There are many ways to route wire. It is buried in the ground, walled up in a wall, attached to supporting structures, and suspended in the air. We will look at the simplest technology from an installation point of view: open wiring.
The definition is as follows: this is a method of laying cables in which it is not located in supporting structures and is not hidden under finishing materials. In this case, the external wiring is properly secured, that is, it does not swing under the influence of atmospheric conditions.
Therefore, laying overhead networks between pillars does not apply to this method. The technology is called "air suspension".
Rules for the construction of electrical networks (PUZ) provide for the following types of laying open (external) electrical wiring:
- On the surface of vertical walls or ceilings. The method involves directly attaching the wire to the surface using special devices. The cable is tightly adjacent to the wall (ceiling).
- Laying using point fastenings: insulating rollers, hangers. In this case, the open wiring does not touch the surface, but does not have long, freely sagging sections.
- String spacer. Unlike free suspension, the cable still has no sagging areas. The fundamental difference from previous methods: a cable is mounted on a supporting surface, and the wire is attached to it. The technology is used when there is a risk of mechanical impact on the wiring.
- Installation of open electrical wiring in special sleeves (pipes). It can be a rigid structure or flexible corrugation. The cable is not secured inside and can be easily removed for replacement or repair. Fixation on the wall is organized by the outer shell.
- Exposed electrical wiring can be placed in special trays. Professional electricians call them cable risers. Moreover, the guides can be fixed both along walls (ceilings) and between objects (supports). This method does not apply to free suspension, since the cables do not have the opportunity to mix.
- Installation of external electrical wiring in special boxes. Perhaps the most common way, if necessary, to protect wires from external influences. Boxes, as a rule, have easily removable lids. This allows you to quickly access content.
- Exposed wiring in a house or apartment can be laid in decorative elements: hollow trim, skirting boards made of electrical plastic.
Any of the listed methods does not contradict the requirements of the PUE if safety measures are observed. Given the accessibility and poor protection from mechanical influences, open wiring can cause electric shock.
Therefore, compliance with the Rules is not just a formality, but your life and health.
Safety measures when organizing external wiring
First, let's define the terminology regarding cable products:
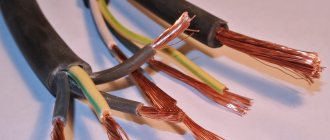
- A cable is an insulated conductor with an additional coating around it, often armored. It must withstand exposure to the external environment without compromising its insulation parameters. As a rule, cables are main cables and are rarely used to connect the end consumer.
- A wire is the same conductor (most often insulated, but non-insulated products are also used: for example, for grounding). An outer sheath may be placed around the main cores if necessary. No special strength required, just extra insulation.
If the installation of external wiring is carried out by wire, the presence of a second sheath is highly desirable (at a voltage of more than 42 volts, it is mandatory). With mechanical impact, there is a chance to damage only the outer insulation, but there will be no contact with the bare conductor.
And now the basic security requirements:
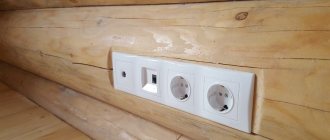
- Installation of open electrical wiring on the surface of walls indoors is allowed only using a cable or wire with an outer sheath. In this case, the walls (or their decoration) cannot be made of flammable material. We are talking about a method of fastening directly to the surface.
- If the walls support combustion, the electrical wiring is attached to the wall using insulating coils, and the wire itself should not touch the surface.
The ideal option is installation in steel pipes or fireproof corrugations. - Laying mutually redundant cables (wires) in one bundle (box, cable rack) is not allowed.
- It is also undesirable to lay power and low-current circuits in the same line.
- It is dangerous to lay the phase and neutral wires of one consumer along different routes.
- All connections of cables (wires) along the laying route are made only by crimping, welding or soldering. Simple twisting is unacceptable. After connection, it is necessary to restore the insulation of all shells.
- At joints, branches, approaches to subscriber devices (end users), external wiring must have a reserve length (slack) in case of repair. In these places, force tension on the cable is not allowed at all.
- Joint and branch points must be accessible for repairs and preventive inspection. It is advisable to hide such wiring points in distribution boxes.
- Junction and branch boxes are selected depending on environmental conditions. For example, an outdoor gasket with the possibility of moisture ingress must have rubber seals.
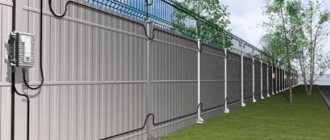
- Inputs from the street side are organized with protection against water ingress into internal highways.
- If load-bearing walls can move under the influence of temperature changes (even by a few millimeters), installation of open wiring is carried out taking into account thermal gaps.
- Protective boxes, cable ladders, corrugations and pipes made of metal must have an anti-corrosion coating. High-quality painting is quite sufficient, although manufacturers of such accessories often use galvanization.
- Wires and cables can be laid in one box on different sides. The main cable and subscriber wires are not laid in one corrugation. It would be more correct to organize a “loop” of wires for different purposes.
It may not always look aesthetically pleasing, but the wiring is safe. - When choosing installation locations, do not allow installation in close proximity to heating sources. In addition, do not place exposed wiring under pipes where moisture may condense.
Requirements for external wiring in the apartment
First of all, it is necessary to draw up an electrical diagram of lines and elements: sockets, switches and boxes. When drawing up a project, you need to consider the following points:
- Wiring lines must be located vertically or horizontally relative to the planes of the room. Other options are prohibited by safety regulations.
- According to standards, they should lie at a distance of 15-20 cm from corners, window and door openings. Distance from floor level: sockets at least 20 cm, and switches - 60 cm.
- Do not lay cables near batteries, heaters and other elements of heat radiation. The insulating layer becomes unusable due to constant temperature and the risk of an emergency increases to a critical state.
- It is also prohibited to install electrical components under pipes where condensate accumulates.
- For rooms with high humidity, electrical wiring elements must have double or triple insulation.
- Connections and wire assemblies should only be located in junction boxes.
- In advance, on the diagram, place the distribution box in an easily accessible place.
If the system is not laid through pipes or protective panels, then special brackets are used, sold in specialized stores. They are necessary to prevent the wires from sagging under their own weight. The distance between horizontal type wiring brackets is every 30-40 cm, and for vertical ones - 60 cm.
Let's look at several options for open wiring using examples
Loft open wiring. This fashion trend allows you not only to be in trend, but also to save on the aesthetic component. That is, you simply lay industrial corrugation without worrying about matching the color and shape (this is the loft style). Fastenings and materials can be the cheapest, the main thing is reliability.
Although rooms decorated to order can look and be priced very expensive. But the technology for installing open electrical wiring has nothing to do with this.
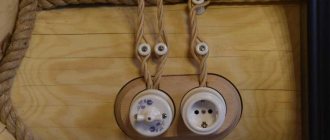
Another trend that takes a lot of money is retro wiring. If you are willing to purchase expensive accessories (fiberglass braided wire costs an order of magnitude more than regular wire), you can complete the electrical installation beautifully and safely.
All fittings are made of ceramics. By the way, it is one of the best dielectrics in terms of fire safety. There is no point in organizing common harnesses and cable ducts. The vintage design just means that the more wires, the more stylish the room looks.
In addition, the retro style involves laying wires in metal pipes. For wooden premises it’s the best: it’s beautiful, it’s fireproof, and the wiring is reliably protected from mechanical stress.
And if these same pipes are also connected to protective grounding, you don’t have to worry that the wiring will pierce a phase to the pipe body.
No less aesthetically, you can organize open wiring in cable ducts. This is absolutely a classic. Initially, professional pipes were used only to optimize harnesses with a large number of wires. And today this is a way to lay single cables.
In addition, the modern design of these accessories allows the box to fit into any interior.
Do you want a contrasting white color? If not, choose a cable box with a wood finish: the choice in stores is huge.
Important! Laying wiring in a box has undeniable advantages:
- By opening the cover, you can always add a new conductor (if this does not contradict the restrictions of the PUE).
- The wires in the box can be used without an outer sheath - again, saving money.
- No ties, fastening clips, beautiful styling. The main thing is that there are no knots or kinks in the wire. The rest will be hidden under the lid.
The situation is a little more complicated with the so-called electrical skirting boards.
Important! When purchasing a similar product, check with the seller: what type of wiring can be installed in the niche of the decorative element. Otherwise, you will buy a baseboard that is not protected from fire, in which you can only install a telephone or Internet line.
With the only drawback: low capacity, a plinth for open wiring can actually replace gating.
Using this technology in conjunction with laying cables behind a suspended ceiling, you can generally leave the walls untouched. In this case, all electrical wiring will be replaced.
Advice! When laying power and signal (telephone, television, Internet) wires together in the baseboard, remember about mutual interference. Ferrite filters at the ends of the wires will not interfere.
Device Rules
In general, you must follow the general rules for laying wiring:
- each branch is made in an installation (junction) box;
- from the box the line descends vertically down;
- the minimum distance of the socket/switch from the door frame or window slope is 10 cm;
- distance from communications (water supply, gas pipeline, heating) - at least 50 cm;
According to modern standards, the installation height of sockets and switches is not standardized, and the wiring from the machine can be under the ceiling or in the floor. Many people do not like the large number of wires that will have to be pulled in plain sight. In each room, at a minimum, there should be two separate routes under the ceiling - for lighting and for electrical outlets. It’s difficult to make such an abundance of wires attractive. That’s why some owners prefer to hide the eyeliner behind a finished ceiling. There, using an ordinary cable of a suitable cross-section, power is supplied from the machine installed on the house panel. The junction box is installed immediately under the ceiling (not a violation, but it’s inconvenient to work with), and a twisted wire is lowered from it down to a switch or socket.
Rules for laying open retro wiring
But these were general rules. Now let’s talk about how to install a twisted electrical cable. First, insulators are installed. The maximum distance between them is 80 cm, the optimal distance is about 50-60 cm, in some cases it is necessary to make it 30 cm. If we talk about a house made of logs, insulators for retro wiring are installed in every second crown. This is the best option.
As shown in the figure above, the socket or switch is placed approximately 50 cm from the last insulator. This distance can be made a little smaller, but it is better not to increase it - the wire may sag. Of course, you can cut it off and reconnect it, but you don’t always want to tinker.
Standards for placing insulators from an old book
The photo above shows at what distance from each other to install the insulators when turning the wiring. These are rules from an old textbook, but they are most likely still relevant today.
And finally, let's talk about the advantages and disadvantages of this method.
What we have in advantage:
- Easy to install. No heavy and dirty work associated with chiseling walls, burying sockets and switches, and subsequent plastering of the room.
- When organizing new wiring, there is no need to undertake renovations to the premises. The impact on the interior is minimal.
- Inspection access: wiring can be easily inspected at any time.
- Possibility of replacement, modernization, adding new lines. And all this at any time, without the use of complex equipment.
- If you change your mind, you can always hide the wire in the wall. But the reverse process is difficult.
- The organization of open wiring is suitable for any premises. But hidden in the walls, it has limitations. For example, it cannot be laid in wooden houses.
There are also disadvantages:
- The main one is that it is not 100% compatible with the design of the room. If you are not a fan of the “vintage” or “loft” style, the only place left to experiment with open wiring is the garage.
- No matter how strong the shell is (cable duct, corrugation, etc.), the probability of damage is still higher than that of a cable in the wall.
- The possibility of grabbing the wire with your hands and getting electrocuted is negligible. But it is there.
Rules for installing open-type electrical wiring
Let's consider the basic requirements for open electrical wiring, which should be strictly followed. If they are neglected, then there is a high probability of an emergency situation, for example, a short circuit and fire.
The first thing to keep in mind is the prohibition on laying the line under pipelines that are prone to condensation. It is worth remembering that heat sources should not be located near the cables.
The location of the wiring determines the type of wire itself; it can be rigid, flexible or shielded. The connection of cable cores can only be carried out through special distribution boxes. The covers of the latter must be in an accessible area.
At high humidity levels, rubber gaskets installed in the cover of the junction box will improve the seal. It is imperative to check the integrity of the protective braiding of the wire along its entire length. If defects are found, it is better to replace the wire.
Some photos of exposed electrical wiring show that it is secured using special plastic brackets. Experts recommend using plastic fasteners of the appropriate size. The distance between the brackets is made in such a way that there is no sagging of the wiring during operation of the line.
It is necessary to install clamps near the connection points of wires with switches, sockets and other elements. When laying an unarmored cable horizontally, the distance between the fasteners should be no more than 40 cm; for armored, the distance increases to 75 cm.
When placed vertically, the interval between fastenings does not exceed a meter. There should be no more than 10 cm between the clamp and the electrical element. Only under the specified conditions is it possible to securely fasten the entire power line.
When it becomes necessary to bend the wire (when avoiding obstacles), the minimum bending radius should be 8 cm. In the case of crossing a non-electrical pipeline, the required interval should be 3 cm. When passing the cable through a wall, it is recommended to provide additional protection in the form of a piece of tube, the length of which is equal to width of the wall.
What materials are needed for installing open wiring?
Cable ducts are fastened with ordinary hardware, or even simply with adhesive tape. Vintage and other “loft” sets are already equipped with no less “vintage” ceramic rollers and clips. For other methods, you will have to select fastener kits.
Corrugated pipes and cable pipes can be conveniently mounted on special clamps.
They have a standard configuration and allow you to neatly organize “paths” from any number of wires.
Fastening of wires and cables directly to the wall is also carried out using quick-installation clips.
For any size and shape. We simply drill a hole in the wall and drive the fastener there.
Ready-made cable ladders are also easy to install.
Although at home you rarely see such a picture.
Installation features
If the ceilings in a house or apartment belong to the suspended class, then the wiring must be routed along the wall. When the number of wires is impressive, it is recommended to use special throughput channels. When installing distribution boxes, remember that access to them must be unobstructed, otherwise maintenance will be difficult.
In general, there are several main methods for installing electrical wiring: the already mentioned option with brackets, installation in corrugated pipes, the use of special elements (cable ducts, baseboards and electrical boxes).
Fastening with staples and corrugated pipes has some disadvantages. Firstly, the hardware option is not considered safe. Secondly, both methods do not give an aesthetic result. A cable channel in this regard will be a more attractive option.
Where is such wiring prohibited?
It is prohibited to use the open wiring method in areas of high humidity, such as bathrooms, baths, saunas and kitchens. Also in large warehouses and near explosive substances.
If external wiring is the only possible method of electrical supply, then several layers of insulation (in the case of warehouses) and fire-resistant materials (for example, for gas stations) should be added.
Thus, the open type of wiring in apartments, houses and other premises is not inferior to the internal one, and in some ways even superior.
The issue of equipping a house, apartment or any room with electrical wiring has long been concerned not only with safety, but also with shaping the design of the room. Modern discoveries in the field of interior design make it possible to transform familiar things into aesthetically pleasing elements of the overall idea.
Source
Pros and cons of external wiring
The installation of external electrical wiring, like any method of creating electrical communications in the house, has its advantages and disadvantages. Among the advantages are:
Undoubtedly, there are presentable options for arranging external wiring. The vintage style of a small piece of electrical wiring in a room can perfectly complement the interior and become its highlight, adding the effect of antiquity.
However, additional elements for high-quality and aesthetic design can significantly hit the wallet. The combination of styles is also important.
Installation of exposed electrical wiring requires careful preparation. If you are not sure, then it is better to entrust all calculation and installation work to professionals. However, keeping all of the above in mind, you can try to do everything yourself.
Source
Installation of cables in electrical plinths
Externally, this element is a standard plinth for decorative finishing, installed in the corner between the wall and the floor. But in order to increase practicality, most manufacturers offer electrical skirting boards, thanks to which you can lay open wiring to household appliances, sockets, lighting fixtures, and heated floors. Following the PUE, you can lay a cable for electrification, a cable for low-current circuits in the baseboard, that is, connect in a hidden way not only an outlet on the other side of the room, but also conduct Internet and cable TV!
Installation of PVC skirting boards with cable laying:
- Installation begins with markings, thanks to which the direction of the cable, entry and exit points are determined, and the required sections of the plinth are cut;
- Fastening is carried out on the DBM. This is a quick installation dowel that almost every craftsman works with. The fastening step is every 200 mm to ensure a uniform fit of the PVC plank to the wall;
- Installation of the plinth on the DBM through ready-made holes or specially drilled ones with a drill and screwdriver. The dowel is inserted into the hole in the baseboard and recessed into the wall, after which a self-tapping screw is screwed into it;
- The cables are placed in the compartments of the electrical baseboard, a special decorative cover is closed with one or two locks, depending on the system!
In the case of using MDF plinth, more precise marking of direct cable fastenings is required. MDF plinth is a decorative element with a technological opening inside, but without an additional part that can be closed. Therefore, a standard clip for fastening the plinth is installed, the cable is placed in it, and the plinth is put on top of the clip or snapped onto its base!
Briefly about the main thing
When laying electrical wiring in a residential building, you first need to decide on the method. Hidden wiring looks more aesthetically pleasing. Because it is not visible at all, and it does not disturb the interior of the room.
But its implementation is very labor-intensive and without a special tool it will be extremely difficult to make channels in a concrete wall. Therefore, when aesthetics can be neglected, many choose open-type wiring. And when decorating a room in a retro style, it will become an indispensable attribute.