Today it is difficult to imagine a bathroom without lamps, sockets, automatic ventilation systems and other equipment that consumes electricity (boilers, washing machines, etc.). And just a few decades ago, the overall load on electrical wiring in such rooms was minimal.
However, the installation of electrical wiring in the bathroom is specific for a number of other reasons. For example, conditions of high humidity prevail in the room. Therefore, in this case, safety precautions, norms and rules must be followed verbatim and carefully.
Bathroom wiring requirements
To ensure safe wiring in the bathroom, follow a few rules:
- the wire should be laid perpendicular to the walls, floor and ceiling - vertically or horizontally (this will simplify the search for the desired area in the event of a break);
- the cable should be hidden in high-quality corrugation;
- the socket and switch must be located at a height of 900 mm from the floor (above a bathtub, sink or water supply - at a height of no less than 700 mm);
- the presence of separate wiring for each device or power supply point;
- protection class of the equipment used is not lower than IP44;
- no twists or connections of multiple wires (only one-piece cable for each wiring);
- The installation of distribution boxes is strictly prohibited;
- functional grounding required.
Basic requirements for electrical wiring in the bathroom
Line distribution
Electrical wiring lines laid in wet rooms must be protected either by an RCD or a differential circuit breaker. At the same time, it is necessary to install a “personal” circuit breaker on almost every socket in the bathroom - only such a circuit guarantees protection against accidental electric shock. The difficulty is that there can be quite a lot of such lines:
- socket for washing machine;
- socket for electric water heater;
- connection point for an electric dryer;
- socket for hair dryer and electric razor;
- socket for connecting the hydromassage bath pump;
- socket for connecting electrical equipment of the shower cabin;
- lighting and exhaust fan line;
- power line for electric underfloor heating.
Such a number of machines requires a lot of space in the distribution board, which is not always acceptable, especially in small apartments. In addition, the location of circuit breakers is usually located at a fairly large distance from the bathroom, which leads to certain difficulties with the simultaneous installation of a large bundle of wires and cables.
And this is not the limit...
But not everything is so scary - the task can be made easier in one of two ways.
- Sockets are combined into groups: one of the power lines of a powerful consumer is taken as the base one - most often it is a washing machine. And from this line, sockets intended for low-power loads - hair dryers, chargers, electric shavers - are powered. In this case, one not so obvious nuance should be taken into account - the vast majority of socket models are structurally designed for a current of 16 A, that is, the power consumption of a device plugged into the socket at a supply voltage of 220 Volts should not exceed 3.3 kW.
- If there are a small number of “points” in a bathroom or toilet and the power consumed by electrical equipment is small, it is permissible to proceed even simpler - all sockets and lamps are powered from one, but always separate line (purely “bathroom line”). If necessary, it is permissible to include a pump and an electric dryer built into the bathtub into such a power supply scheme; in the most extreme case, it is possible (but still undesirable!) to “hang” a washing machine. Electric heated floors and water heaters, as the most energy-intensive consumers of electricity, are in any case each powered by a separate line.
To protect lines from overload, circuit breakers with an operating current of no more than 10 (lighting) and 16 (sockets) amperes are installed. This is due to the need to take into account a not very obvious factor - conventional sockets used to connect household electrical equipment are not designed to carry a current of more than 16 A (or the power consumed by the device included in it is 3.3 kW). Even laying lines with wires of a higher cross-section will not save the situation - the socket will still remain a weak point.
The distribution of lines, like all electrics in the bathroom, should be designed taking into account the minimum number of distribution (junction) boxes required. Ideally, it is better to do without them altogether, making all the necessary wire connections in sockets and switches. When distribution boxes are unavoidable, they are placed either outside the bathroom or at a height of at least 2.25 cm from the floor level, and always after the outer boundaries of zone 2.
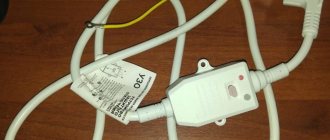
Junction box in the switch socket.
If you need to place an outlet under the bathtub, you should choose a place for it as far as possible from sewer and water pipes. The exhaust fan is usually powered from the lighting line and is activated simultaneously with the lamps being turned on and off, but it is much more convenient (albeit a little technically more difficult) to start it with a separate switch.
Drawing up a plan and electrical circuit diagram
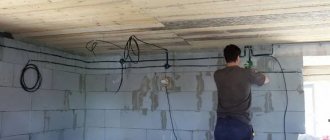
Before you begin installing electrical wiring in the bathroom, you need to draw up and outline a work plan. Decide where the main objects will be located - a bathtub or shower stall, a sink, and so on. Having done this, you can decide at which points large household appliances will fit (if they are in the bathroom): a washing machine and/or a boiler.
Then you need to figure out the lighting of the room. The main lighting fixture can be installed on the ceiling or wall. Additional lamps are usually placed above the sink. The next step is to calculate the required number of sockets and switches. You cannot go overboard with such electrical elements: there should be a minimum of them, but enough to power the main devices. In addition, remember to protect against dust and moisture.
Wiring diagram for electrical equipment in the bathroom
Once you have a detailed plan for the location of large objects, household appliances and electrical points, you can begin to draw up a wiring diagram in the room. You need to calculate the total power consumed by all electrical appliances in the bathroom. If possible, move one or two outlets and switches outside the bathroom. You can install them near the entrance. The distribution box should be organized exclusively outside the premises. For each household appliance, a separate automatic switch should be allocated.
Methods of laying wires
As mentioned above, wiring in any bathroom (and in general in rooms with high humidity) should be laid in a hidden way. In rooms with stone walls or sheathed with sheet material (gypsum plasterboard, plastic or waterproof MDF panels) walls, this is implemented relatively simply - the wires are laid in a groove or pulled into a corrugated pipe, followed by laying the resulting “tails” behind the panels.
At the same time, the rather popular recommendation to lay the wires in the grooves not “naked”, but pre-tightened into corrugation, is frankly meaningless. Such bad advice is usually motivated by the fact that:
- the insulation of wires from contact with putty or plaster, which is used to cover the groove, is quickly destroyed;
- the corrugation, playing the role of a kind of pipe, makes it possible “if something happens” to retighten the wire in it that has become unusable, replacing it with a new one;
- simply because “it’s safer this way,” and also “our grandfathers did it this way and bequeathed it to us.”
The first motivation is valid, but only when using low-quality wires of the notorious brands PUGNP and PUNP, as well as their countless analogues. Their insulation, made of PVC and not of the best quality, quickly deteriorates under any conditions other than “greenhouse”.
Wire PUGNP.
However, this problem is easily solved by using VVGng type wires, which cost a little more, but have an immeasurably higher quality of their insulating sheaths. It is even better to use wires and cables from the NYM group - however, they are very expensive.
Wire VVGng.
In order to realize the possibility of pulling a wire through a corrugated wall immured in a wall, it is necessary to ensure that several conditions are met:
- the wire should occupy no more than ¼ of the internal space of the corrugated pipe - in practice, for this you need to use corrugation with a diameter of at least 25 (and more often 32) mm;
- the corrugation should not have sharp bends - the bending radius should be at least 10 diameters of the corrugated pipe;
- The plastic corrugated “pipe” must have easily accessible wire entry and exit points - in practice this is usually extremely difficult to implement.
The situation is somewhat more complicated in wooden timber or log houses and cottages, since it is impossible to implement hidden wiring with your own hands, even with skillful ones.
There are only two exits - either route the wiring in plastic pipes (as an option - in electrical boxes "cable ducts"), but at the same time ALL sockets and electrical appliances should be placed only in the second zone, or route the wiring along the outer wall of the bathroom, running them directly into sockets and switches through a through hole.
Tools and necessary materials
To install electrical wiring in the bathroom, you will need:
- wall chaser or drill (as a last resort - hammer drill);
- Screwdriver Set;
- screwdriver with indicator;
- tape measure from 5 m;
- building level;
- pliers;
- hammer and chisel;
- insulating tape;
- stationery knife.
A hammer and chisel are used in rare cases when, due to cramped conditions, it is not possible to make grooves using specialized equipment or a hammer drill.
Wiring Tools
Pay attention to the selection of materials. You need to choose high-quality products from trusted manufacturers that meet a given level of protection: waterproof sockets, triple-insulated copper cable with a certain cross-section depending on the power consumption. Carefully inspect the wiring before and after installation to ensure there are no severe bends or cracks in the insulation.
What you need to know when connecting and operating electrical equipment in sanitary facilities
There is an international standard that determines the degree of protection of electrical installations: International Protection - IP. After the letter IP there are two numbers characterizing the degree of protection. Types of markings are shown in the illustration:
We apply this marking to danger zones in the bathroom. The higher the number, the less danger.
- Zone No. 0 - directly in the bathtub or shower tray. Area of maximum risk.
- Zone No. 1 - virtual walls around the perimeter of the bathtub or tray. The danger is almost the same.
- Zone No. 2 - the territory from the border of zone No. 1, to the perimeter at a distance of 60 cm from it.
- Zone No. 3 is the same, only at a distance within 240 cm from the perimeter of zone No. 2. An almost safe place.
Accordingly, requirements for the protection of electrical appliances apply in each perimeter.
- Zone No. 0 - the highest degree of protection IP×7 (only the second digit is considered, there is no need to be afraid of dust in the bathroom). It is highly desirable to use electrical equipment with a supply voltage of 12 volts. In this case, the 220 volt power source is located outside, and there should be no galvanic connection with the device. Dedicated to fans of lighting in the bathroom or shower stall.
- Zone No. 1 - Softer requirements - IP×5. Water heaters may be installed in this area. If the protection class meets the standard, it is safe to use.
- Zone No. 2 - IP×4 is not much different from the previous protection.
- Zone No. 3 - From the point of view of incoming water - the protection is weak: IP×1. It is allowed to install sockets according to a special list of rules for the bathroom.
Installation instructions
Below is a step-by-step installation of electrical wiring in the bathroom.
Removing old wiring
New electrical wiring may be required in two cases: the apartment was put into operation without communications or the old wiring in the residential premises no longer satisfies electrical and fire safety. Every year the load capacity of household appliances increases. What was relevant 10 years ago today seems absolutely unsafe and inappropriate, and can lead to overheating and fires.
Replacing electrical wiring in the bathroom
The advisability of replacing the wiring can be judged by how often the machines are knocked out. Also, new electrical wiring is necessary when combining a bathroom and toilet. At a minimum, you need to study the old lines.
Dividing space into zones
The list below is the zonal division of the bathroom (WC) into areas according to the criterion of “electrical danger” (from most to least dangerous):
- Zone 0. Bathroom and shower - the area of maximum risk.
- Zone No. 1. Imaginary walls located along the edges of the bathtub or shower tray. The threat level is slightly less than in the zero zone.
- Zone No. 2. A buffer area 60 cm wide from the edges of zone No. 1.
- Zone No. 3. The rest of the area is from zone No. 2, up to 240 cm wide. The place is considered the safest.
An example of zoning space in a bathroom
Mark the bathroom in accordance with the zonal division above. Each individual zone has its own electrical safety requirements:
- In the “zero” zone, devices and materials with the highest degree of protection from moisture are required (IP*7, the first digit is protection from dust). It is strongly recommended to use devices (for example, an additional light may be needed) with voltages up to 12 V. The 220 V power source should be located outside the area. Make sure there is no galvanic connection.
- In the first zone, it is enough to install devices with IP*5 moisture protection. In this area you can place equipment for heating water. It is enough to ensure that the protection class complies with the specified standard. In this case, the operation of the devices will be safe.
- In the second zone, IP*4 class products will be required. In terms of protection, they are practically no different from the previous ones.
- In the third zone, a minimum protection of IP*1 is acceptable, since the likelihood of splashes and drops is minimal. Sockets can be installed in these areas.
Degree of protection of luminaires depending on the zone
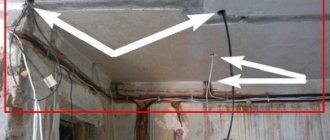
Laying cables and sockets
When drawing up a plan, you must decide where the sockets, switches and lamps will be located, and only then draw up a wiring diagram. Cable installation may be affected by certain conditions where there is or is no void in the wall and ceiling, or where walls without panels are used.
If there is a void, then you can hide corrugated pipes with cable inside it. It is attached along the profile using pre-drilled holes. It is located strictly vertically. If there is no void, you will have to make grooves. The corrugation with the cable is laid in them, and grooves are used for fastening. In the third case, when using walls without panels, large grooves will be needed to accommodate corrugated pipes. After placing the electrical wiring, the grooves are covered with alabaster, and after leveling the walls, they are hidden under the tiles.
In the bathroom, the cable is laid in corrugated grooves
When the wiring is ready, the socket boxes are installed. Alabaster is used to fix these devices. Sockets with grounding protection should be installed. You need to run a three-core cable to them.
Wire cross-section
Manufacturers of electrical appliances for the bathroom try to produce equipment with minimal power consumption, so small cross-section wires can be used.
Rosette lines
Each point or device must have separate wiring. A total load of up to 3.5 kW is allowed per outlet. This value corresponds to copper wires with a cross-section of 2.5 square meters. mm. It is not advisable to use a cable with a larger cross-section in the bathroom. It costs more, but does not carry any semantic meaning (you still do not have the right to connect several household appliances to the outlet through a tee).
The only option is when the wire cross-section can be increased to 4 square meters. mm - electrical wiring using cable type PUGNP or analogues of the ShVVP version. This wire is produced not according to GOST, but according to technical specifications. Therefore, often the cross-section declared by manufacturers may not correspond to the real one, which means you have to take a reserve. A similar situation is observed with the VVGng wire. Ideally, you need to buy products manufactured in accordance with GOST.
Electrical wire PUGNP 3*1.5
Lighting lines
The lighting line can be powered using a wire with a cross-section of 0.75-1.5 square meters. mm. In this case, each line segment must have the same characteristics. It is impossible to draw the main line from the junction box using a cable of one section, and then feed wires of a different section to the lighting fixtures. This will lead to incorrect functioning of the circuit breaker: a device designed for large-section wires simply will not work with a cable of a smaller diameter. Lack of protection will lead to overheating.
The purpose of the circuit breaker is to protect electrical wiring from overloads and fire. It does not affect the operation of household appliances. Thus, the power of the machine is selected depending on the cross-section of the cable being laid. For a wire of 1.5 sq. mm, a machine with a nominal value of 10 A, 2.5 sq. mm is suitable. mm - 16 A.
A similar method is used when connecting electrical equipment in the bathroom from a common line. Focus on the highest consumers, which include sockets. If the sockets are connected with a 2.5 sq.m. cable. mm, then all other wires on the line (including those connected to lighting devices) must have an identical cross-section.
Wiring in the bathroom on the ceiling for lamps
If a hopeless situation arises and you need to switch from a larger cross-section to a smaller one, then an additional machine of the required rating (corresponding to a cable of a smaller cross-section) must be installed at the transition point. For lighting, a machine with a nominal value of 6 A is usually used, and sockets - 10 A. But in a bathroom this is difficult to implement: installing an additional machine is a labor-intensive process, so it is recommended to avoid it.
Ceiling lights
A bathroom with a suspended ceiling should be equipped with ceiling lighting devices. They will be much easier to connect to a common network cable, and this type of lighting is generally considered more efficient and attractive.
In the bathroom it is preferable to use ceiling lamps
A modern ceiling lamp is a multifunctional device that, among other things, can have an adjustable lighting angle. But even with this layout, the cable should be hidden in a corrugated sleeve, and terminals should be used to fix it to the ceiling.
Safety sockets
For sockets, an additional RCD with a rated current corresponding to the machine (or slightly higher) is required. If the difference in rated voltage is excessive, the equipment will not operate correctly. For modern washing machines, 16 A sockets are suitable, which are equipped with a ceramic surface to protect them from splashes.
Waterproof sockets for wet areas
RCD, difavtomat and grounding
The bathroom must meet the highest electrical safety requirements. The likelihood of death from electric shock is high, so lines with sockets should be protected by an RCD. To ensure correct operation of this device, you must use a grounding loop connected to the corresponding cell of the distribution panel.
There are no problems with this in modern residential buildings. In high-rise buildings, wiring with N and PE conductors is pre-installed, which makes it easy to connect to the ground loop. But the bathroom requires a potential equalization bar. The design of this element is a simple metal plate to which several contacts are attached. Such a bar can be created manually. The most primitive option is to weld M6 bolts onto a piece of plate and screw nuts on them. The grounding conductors of every metal object installed in the bathroom, including the bathroom itself, must be connected to it. One exception would be an electric dryer, where the outside of the dryer is automatically connected to ground via the power cord.
Grounding appliances in the bathroom
The situation is much worse with grounding loops in old apartment buildings (for example, Khrushchev buildings). Instead of grounding according to former electrical safety standards, grounding was used. The neutral and grounding circuits were combined into one. There is simply no grounding in the distribution panels at the entrance to the house. Without carrying out major repairs to the entrance, it will not be possible to do such work with your own hands. This will be especially difficult if the apartment is on the third floor or higher.
In such situations, if you do not want to spend a lot of money on grounding the entrance, you will have to replace the RCD with a difavtomat. It is triggered instantly as soon as it detects the appearance of a leakage current. But unlike an RCD, it does not require a ground loop to operate. The disadvantage of the difavtomat is that it is a less sensitive and more “rough” device for protecting the electrical line. But in most cases, such a replacement is completely justified, and often it is the only alternative option.
Connecting a washing machine
It is difficult to select the rating of the RCD. To carry out correct calculations, you need knowledge of the basics of electrical engineering and a clear understanding of the principles of operation of modular machines.
It is important to remember the following:
- There are several types of RCDs. The main classification is the rated value of the leakage current for the device to operate.
- Household electrical appliances and exposed wiring in the house are protected by AB (more expensive) and AC circuit breakers (available, but may not operate correctly if a device with switching power is connected to the line).
- RCDs are triggered by a certain amount of differential current. For the bathroom, devices rated at 10 mA are suitable.
A residual current device, unlike a circuit breaker, cannot de-energize the entire line. However, each device can operate at a certain amount of current, providing the line with the electrical parameters of the desired value. In this mode, the RCD can function for a long time. The maximum current value for the RCD must be identical or greater than the sum of the ratings for all machines on a given line.
To determine the rated current of the RCD, the following sequence is used:
- If the total power of all electrical devices connected to the same line does not exceed 3.5 kW, then a device with a rating of 10 mA is suitable.
- If the power is higher than 3.5 kW, then you should connect equipment at 30 mA (the fact is that there are no RCDs designed for any currents between 10 and 30 mA).
But this is a “double-edged sword”: an RCD rated at 30 mA itself is a risk of electric shock, so try to get by with the minimum value. The same principle should be used when replacing RCDs with difavtomats and choosing their nominal value.
Marking the degree of protection of electrical appliances
There is an international standard, International Protection, which is used to indicate the degree of protection of electrical appliances.
Table: IP marking types
| The first number is protection against contact and particulate matter. | The second number is moisture protection | ||
| IP | Level | IP | Level |
| absent | absent | ||
| 1 | from hand touch and particles larger than 50 mm | 1 | from vertically falling drops |
| 2 | from finger contact and particles greater than 12 mm | 2 | from drops falling on the device at an angle of 15° |
| 3 | from touching with a tool and particles larger than 2.5 mm | 3 | from splashes falling at an angle of 60° |
| 4 | from contact with wire and particles greater than 1 mm | 4 | from drops from any direction |
| 5 | from dust | 5 | from a stream of water, regardless of its direction |
| 6 | absolute dust protection | 6 | from pulsating splashes and jets |
| — | — | 7 | from short-term immersion in water to a depth of 0.15-1 m |
| — | — | 8 | from prolonged immersion under water to a depth of more than 1 m |
Precautionary measures
When installing, operating and maintaining electrical wiring in the bathroom, the same precautions apply:
- The room should be completely de-energized.
- Only use tools that are in good working order and are protected against electric shock.
- Use protective equipment, including construction gloves and goggles.
Protective equipment for electrical installation work
Any work related to changing electrical wiring must be carried out by qualified personnel. It is highly undesirable to get involved in this process on your own without the necessary knowledge and work experience. Especially in the bathroom, where even the slightest mistake can lead to tragic consequences.
Safety sockets
For sockets, an additional RCD with a rated current corresponding to the machine (or slightly higher) is required. If the difference in rated voltage is excessive, the equipment will not operate correctly. For modern washing machines, 16 A sockets are suitable, which are equipped with a ceramic surface to protect them from splashes.
Waterproof sockets for wet areas.
Bottom line
Wiring in the bathroom can be done by yourself. No supervisory authorities will come to check your premises for compliance with the Electrical Installation Rules. At the same time, it is necessary to understand the degree of responsibility for electrical safety. The bathroom is used by members of your family who are far from understanding the PUE. Electric shock can occur from the most harmless actions.
To prevent this from happening, follow the recommendations contained in the material.
Circuit breakers
Automatic machines are installed together with the RCD. Do not confuse the RCD with a separate circuit breaker, which stops conducting current during short circuits and overloads. A different number of circuit breakers are installed in electrical panels depending on the number of electrical appliances: for lighting in some rooms - one, for sockets - another, etc.
For lighting, the recommended power of switches is 10 A with a load of at least 2200 W per hour. For example, one light bulb consumes no more than 60 W, washing machines - from 2000 W per hour or more, so for more powerful devices you will have to install a 25 A machine with a load of at least 5500 W.
How to make grounding
An important element of safety is grounding, which is especially important in the bathroom due to the high humidity of the room. Currently, a 3-core cable is used, where in addition to the phase and neutral wires, a third wire is for grounding.
In older houses with two-core cable wiring, grounding was done by running the ground cable to a distribution panel that has a ground connection.
It also happens that in older houses the distribution panel does not have its own grounding; in such cases, the ground wire is connected directly to the housing. With this method, it is necessary to do the wiring through the RCD device, otherwise the device will burn out.