Comfort in the home is inextricably linked to electricity. Therefore, uninterrupted and safe operation of the electrical network is very important. Since buildings made of timber or logs are the most complex objects in this regard, you must definitely figure out which cable to use for wiring in a wooden house in order to ensure the safety of your home.
We will tell you how to choose a cable in order to fully protect a building that is easily flammable. We'll show you how to eliminate risky situations associated with improperly installed wiring. The article we have proposed describes the brands of products acceptable for installation, and provides recommendations on the choice of cable cross-section.
General wiring requirements
Electrical wiring in wooden houses must be done in accordance with certain requirements and standards of the PUE.
Consider these requirements:
- To avoid overheating of the wires, voids are left in the cable channels, and the cross-section of the wire is increased by 20-30%. It is best to choose an open wiring method in a wooden house, thanks to which you can monitor the condition of the cable and repair damage in a timely manner;
- the electrical panel must be reliably isolated from wooden materials;
- It is better to take three-core copper wires. They are high quality and will last a long time;
- The circuit breakers in the switchboard must match the current load and be easy to operate in the event of a short circuit.
Initial data
Let's take a fairly simple route - take a ready-made and approved project for constructing an electrical panel, filling it with the necessary equipment and laying electrical wires to consumers. Let’s immediately make a reservation that according to the project, 3-phase power is supplied to the house, but there are no 3-phase consumers yet, so the wiring in the house occurs according to a single-phase circuit. This project was compiled individually for a wooden house in the village. Representatives of the network company and energy sales approved the project and checked the final result. Taking the basics and nuances from the presented project, you will be able to apply the knowledge to your home, correctly lay and complete electrical networks.
What we have? A wooden one-story house with an attic and a basement – 7.13 x 8.90 m, which we have to electrify in accordance with generally accepted rules and regulations. Kitchen and room in one room, L-shaped veranda, bathroom adjacent to the building and cellar with entrance from the kitchen.
Wiring diagram. The need to compile
Before installing electrical wiring, you should draw up a diagram of the room, where you should note the location of switches, sockets, lighting fixtures, and their number.
The drawing identifies the installation points of electrical appliances, wiring routes, and locations of junction boxes. The electrical circuit of the room also includes the power of each energy consumer and the total power of the devices. This is necessary to determine the load level on the circuit breakers.
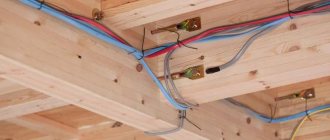
In addition to the diagram, you should draw up a wiring plan. The cable is routed in a straight line to avoid kinks. The wiring is placed at a distance of 15cm from the floor or ceiling. The wires converge in junction boxes made of metal. Distributing the cable correctly, distributing the load between consumers, providing protection against short circuits is the task of a person who decides to independently cope with the installation of electrical wiring in a wooden house.
Features of wire marking
Unfortunately, not all sellers, especially among young people, can clearly answer the buyer’s question about what kind of cable it is, what it is characterized by and what the specific application is. Knowing the definition of the abbreviation, you can independently understand whether the wire you like is suitable for a wooden house or not.
*By position, from left to right.
- 1st - the letter in this place shows what metal the vein is made of. If the letter A is in the first position, then it is aluminum. Copper is not indicated, so it is impossible to confuse it. “A” is not in the abbreviation, which means this wire is presumably suitable.
- 2nd – type (feature) of the wire. Mounting - M (if flexible stranded - MG), flat - P, installation - Sh or Pu.
- 3rd – insulation material. It makes no sense to list all the options. If we take into account the cost of products, then the optimal products for wiring are those whose third position in the abbreviation contains the letters B (or BP) - polyvinyl chloride, P - rubber or NR (the same, but non-flammable rubber goods).
Additional designations
- N – does not support the combustion process. Placed behind the letter indicating the material, in the form of a small letter. For example, VVGn.
- G – the same, but indicates that the insulation does not spread smoke. As a rule, wires are selected in which the braid meets both criteria. Designated VVGng.
- K – protective layer (armor) made of steel braid.
In principle, the information provided is quite enough to select a wire for laying intra-house lines in a wooden building. Those who want to study the issue of categorizing cable products in more depth can be recommended to refer to GOST No. 31947 of 2012 and PUE (7th edition). We described in this article what types of cable channels there are for electrical wiring.
Choosing a laying method
There are 2 ways to install electrical wiring:
- interior. The cable is located in special metal corrugated pipes in a false plasterboard wall, behind a suspended ceiling. Internal wiring for a wooden house benefits from the fact that the usable area of the building and its aesthetic appearance are preserved; there is no need to look for material to mask the wires and protect them from mechanical damage. But this method (hidden wiring) also has its drawbacks: it is difficult to diagnose breakdowns inside the walls, dismantling individual sections is impossible;
- outer. It consists of laying wiring along baseboards, in cable ducts, and boxes. This method is simple and requires less time. You can monitor the wiring and troubleshoot problems in a timely manner. The wires are cooled, eliminating the possibility of overheating and fire. External electrical wiring also has disadvantages. The disadvantages of this method are that cable channels take up useful space and do not always fit into the interior of the house.
Open electrical wiring in a wooden house
For open wiring in the house, metal cable ducts are used.
The cable channel is used to protect electrical wiring from various damages and to disguise it.
Cable channel is a box of different sizes through which wires are laid. It has a rectangular shape. The lid is secured with clamps to prevent dust from entering. The cable channel is necessary in order to veil the locations of the wires.
The design not only gives a beautiful appearance to the room, but also performs a number of functions. It protects against exposure to chemicals, shock, touch, and water. The mounting box is safe for others because it does not conduct electricity. The cable channel for a wooden house must not support combustion and be marked “NG.”
In a log house, the cable can be secured using insulators. First, the dielectric rollers are fixed and the cable is attached to them. In cases where it is impossible to use cable ducts and insulators, the wiring is laid using staples.
You can disguise the cable in your home using retro wiring.
Hidden wiring
Installation of hidden wiring begins with drawing up a diagram of the location of the grooves.
Next, the route is marked. Draw straight lines of grooves using a building level, level, or plumb line. When installing hidden electrical wiring, the wall is drilled so as to hide it inside. Hidden electrical wiring does not spoil the appearance of the house and protects against electric shock.
Drilling is carried out in a straight line vertically or horizontally. Hidden wiring can be hidden in non-combustible floor insulation and in recesses between logs. The locations of sockets, switches, and sprayers are outlined. The tool that will be used to carry out the work is selected.
Metal pipes are being laid. The space for the cable inside the pipes should be less than half of the free space. You can lay the cable inside the pipes using pulling cables.
Entering the power line into the house
In Europe, power lines are hidden underground. In Russia, power lines are stretched above the ground between support poles. And the electrical cable is also supplied to the house by air. A cable is stretched from the pole to the dwelling and a wire is attached to it. This protects the cable from breaking under its own weight and is used when the distance to the house is more than 20 m. And if necessary, additional support is installed between the pole and the house.
If the length to the supporting pole is not long, then you can use a self-supporting insulated wire (SIP), without a cable.
But a reliable method of laying wiring underground is also used. An armored cable is used for this. The wire is protected with a corrugated metal pipe.
A trench is dug to a depth of 70 cm and covered with a 20 cm layer of sand. A corrugated cable is laid on it and again covered with a 15-centimeter layer of sand. The rest of the space is filled with earth.
Ideally, the cable inlet should be located in close proximity to the distribution board. And a metal sleeve is installed in the wall for cable wiring.
Step-by-step installation instructions
Electrical wiring is carried out in a certain order:
- during the preparatory work, a wiring diagram is drawn up, the amount of materials that should be purchased for its installation is calculated;
- cable entry into the building is installed;
- an electrical panel is installed;
- a ground loop is installed;
- cable is laid;
- junction boxes are installed;
- the wall is drilled with a crown for switches and sockets, the top surface is sanded. Electrical points are installed;
- lighting devices are installed;
- Using a tester, the serviceability of electrical points and the working condition of the cable are checked.
Preparation of materials and tools
To properly carry out installation work in a timber or frame house, you will need a variety of tools:
- an electric drill with a crown is necessary for drilling holes for distribution boxes, switches, sockets;
- screwdriver with attachments;
- staples;
- self-tapping screws;
- indicator screwdriver or tester;
- rubber gloves to avoid electric shock.
The correct choice of cable and electrical devices will help prevent accidents and fires in a private home.
It is important to buy a cable with non-flammable insulation.
The wall of the overhead socket must also be made of non-combustible material. If the socket is built-in, then it is better to take a metal cup holder.
Electrical supply to the building
Electricity should be routed to a building in two ways: underground and using a self-supporting insulating wire from an overhead power line. The support for the panel room should be located at a distance of no more than 25 m from the house. The wire is inserted into a log house through a through hole in the wall, located at a slope towards the street. The cable is inserted in a steel sleeve to avoid ignition. In order not to spoil the insulation of the house, the gap between the sleeve and the wall is sealed with glass wool. After this, the outer cladding of the house is restored.
Option for entering the building
Arrangement and installation of an electrical panel
Before installing an electrical panel, it is important to know the basic rules for distributing electricity among consumer groups.
Household appliances with a power of more than 2 kW must have a 16 A circuit breaker in the switchboard. A whole cable with a diameter of 2.5 mm is laid from the line, without branches. Some ovens have high power, so the cable to them has a diameter of 4 mm, and the machine is 20 A. Electric stoves are protected by 32 A circuit breakers. The cable laid to them has a diameter of 6 mm.
One outlet line is allocated for each room in the distribution board. In the room there is a distribution box in which the branches from the sockets are hidden. The socket line cable has a diameter of 2.5 mm. Each room of the house is assigned its own lighting line with a 1.5 mm cable. The circuit breakers for them have a current of 10 A.
A description of the components of the shield will help you understand what devices should be located in it:
- circuit breakers. Circuit breakers are designed for different groups of consumers and have different current strengths depending on the power of household appliances;
- residual current devices - RCD. They serve to protect people from electric shock and fire. They are triggered in the event of a current leak, cutting off the voltage;
- electricity metering devices. Electricity meters help determine the amount of electricity consumed;
- voltage cut-off relay. This device saves you from power surges and prevents failure of electronic devices;
- contact bars.
There are several stages of installing an electrical panel:
- preparatory. At this stage, a niche for the shield is prepared and the wires are brought out. The workplace is prepared and the necessary lighting is provided. The power input cable is de-energized. The plugs are removed from the panel, contact bars and mounting brackets are installed. The electrical panel door is removed. The shield is hung on the wall. After checking that the niche has been prepared correctly, the shield is removed;
- drawing up a diagram of the distribution panel;
- The electrical panel should be assembled on a table. The devices are installed on a DiN rail - a metal strip 35 mm wide;
- connecting wires. They are connected to the corresponding wires and buses;
- The final stage. Checking the operation of the shield. Securing the door. Marking of machines.
Grounding
Designing networks for a wooden house includes a grounding device. In suburban areas, a modular-pin grounding method is used. It is installed around the perimeter of the house or mounted in a line. The good thing about the linear method is that it can be increased at any time. Grounding is arranged in the form of some kind of figure: polyhedron, triangle, rectangle. The circuit consists of vertically located pins. A hole up to 2 m is drilled with a hand drill. Then the first pin is driven into it. The second pin is inserted even deeper. But the ground electrode should not go deeper than 3 m, otherwise it may get stuck.
Then the grounding conductors are cut 20 cm below ground level, and a groove is dug to lay a horizontal steel strip. The steel strip is connected to the grounding conductors by welding. It is best to make not one grounding loop, but several, depending on the number of electrical appliances in the house. The grounding circuit is connected to the distribution board by a steel conductor with a diameter of 16 mm.
Cabling
To lay the cable, you need to cut it into separate sections. The number of segments depends on the number of sockets and switches. One segment is equal to the distance between the socket and the switch plus 15-20 cm. Then the cable channels are installed strictly according to the level. Electrical wiring is hidden inside them. If in the future it is planned to install a porch, then the cable is laid with a reserve so as not to build it up later when installing outdoor lighting.
Connecting wires and contacts
The rules for installing electrical wiring require connecting cables by welding, crimping, squeezing and soldering. The grips include PPE caps. They consist of two parts: a cap and a spring. There is a spring inside the polymer non-flammable material. It is treated with a special compound for better conductivity. On its inside you can see the notches that hold the wires. The wires are stripped to 2 cm, placed parallel to each other and inserted into the cap, twisting it clockwise.
Connection options
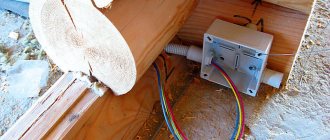
Installation of distribution boxes
A junction box is necessary for separating power lines and branching cables for connecting sockets and switches. Wires leading to electrical points are collected in a distribution box, which is tightly closed to prevent touching them. The lid is closed with locking clips.
The box contains terminal blocks. They are made of fireproof and moisture-proof metal. The metal is coated with an anti-corrosion agent.
The boxes are screwed to the wall with self-tapping screws and secured with support feet. Wires are inserted into spring terminals.
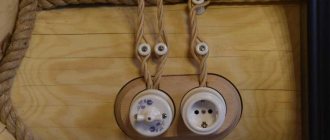
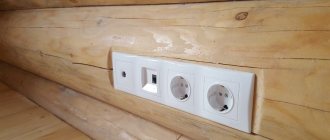
Installation of sockets and switches
Sockets are:
- invoices. They can be applied to any wall surface. The outlet has another name. It is called external;
- built-in They settle into landing nests inside the wall.
It is better to take the landing sockets from metal. They will protect your home from fire.
Outlets and switches must have a metal mounting plate that is attached to the wall. At the beginning of installation, the external socket is aligned and fixed to the wall. Then the mechanism and outer panel are mounted. It is possible to use a plastic plate, but it must be non-flammable and have a Fire Safety Certificate. A grounding wire is installed in the socket and switch.
You need to start installing a built-in socket with markings. After this, a hole is drilled with a crown. Then they make insulation from asbestos or aluminum and only then install it. Strip the wires of insulation and determine their length. It should not be more than 15-20 cm. The wires are connected to the working part. The socket box is inserted and secured with screws. The outer frame is installed. It is screwed on with self-tapping screws.
Electrical sockets are located at a distance of 30 cm-1 m from the floor covering. For every 6-10 m you need an outlet.
There are several ways to connect them:
- sequential connection of sockets one after another. It is intended mainly for low-power electrical appliances;
- for powerful household appliances, it is better to choose a parallel connection method, when each of them has its own wire from the junction box;
- mixed. It combines both connection methods.
The most common light switches are single-key and two-key push-button products. The principle of operation of the switches is to close and open the electrical circuit when the button is switched.
- First, they disassemble the new switch: remove the keys and decorative frame.
- Insert the stripped wires into the switch terminals and tighten with bolts.
- Pack the housing inside a metal cup, level it, and secure the housing with bolts.
- Place a decorative frame and keys.
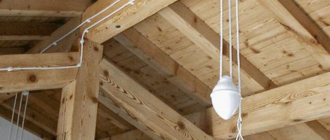
Installation of lighting fixtures
In a wooden house, overhead, built-in and street lighting devices are used. It is important that the installation of lamps takes place on metal platforms to ensure the fire safety of a wooden house. Street lighting devices must be grounded. Ceiling lamps are located at a distance of 70 cm from the ceiling. LED strips and lanterns and spotlights are used as street lighting. Neon porch lighting is an excellent option for highlighting the features of your home and its aesthetic qualities.
Decor element
What do you need to know about cable cross-section?
This parameter is determined based on the current strength. If the cross-section and loads do not match each other, short circuits will occur, resulting in a fire. So, if the plans include closed wiring, and the estimated current is 16 A, a cable with a minimum cross-section of 2 mm² is required. With a rated current of 25 A - 4 mm².
Select cables according to distribution groups and depending on the expected load. In order to connect the sockets, you will need a cable with copper conductors with a cross-section of 2.5 mm². The maximum total power is 4.6 kW.
Lighting devices are powered by a cable with a cross section of 1.5 mm². The power of this group is up to 3.3 kW. Therefore, the number and location of light sources must be planned before installation begins - when drawing up an electrical circuit
High-power home equipment is connected with a cable having a cross-section of 4 mm². Such devices must be connected to an individual outlet and cannot be connected to another group.
Carrying out electrical wiring tests
Do-it-yourself electrics require testing.
After laying the wiring, installing sockets and switches, it is important to carry out a control check with a tester for the absence of a short circuit. When the device shows no errors, the line is connected to the panel. Household and lighting fixtures are turned off. One by one, they begin to supply power to the lines, then turn on the lamps. If the circuit breakers have not tripped, then everything is fine. The phases of the sockets are checked with an indicator or multimeter. Electricity is supplied to the devices, they are working at full capacity, which means you have completed the task.
If you want to be 100% sure of the correct installation of electrical wiring in your home, invite electrical laboratory specialists to conduct tests using special instruments.
- First a visual inspection is carried out;
- grounding is checked;
- sections of the phase-zero circuit;
- wire insulation;
- circuit breakers;
- resistance of protective devices.
Network stress tests are carried out, subjecting them to high loads. Such tests are needed in order to identify problem areas of the circuit. At the end, a test report is issued. It helps identify problems and prevent accidents.
Installation errors
It is important to install electrical wiring in a wooden house with your own hands correctly, without violating safety regulations. If they are not followed and errors are made during the design and installation of wiring, a fire may occur. Let's look at what errors are possible when installing electrical wiring:
- When installing under the ceiling, additional insulation is not always provided. If the cable cross-section is insufficient, then in contact with wooden floors, the cable may overheat and ignite;
- When installing electrical wiring under the baseboard, the distance to create a safe air barrier is not maintained. As a result, the wire comes into contact with the baseboard and can catch fire if it overheats. The gap between the wire and the baseboard should be at least 1-1.5 cm;
- placement of the cable in PVC corrugation. The use of plastic pipes for electrical wiring in a wooden house is extremely unacceptable. This error leads to dangerous situations. If you nevertheless laid the wiring in plastic corrugated pipes, then replace them with metal ones;
- If you decide to use a hidden wiring method, then it is important to place the cable inside the groove in a metal corrugation or steel tube. A bare cable in a conduit can lead to a fire in the wiring;
- plastic sockets and switches do not meet fire safety requirements. It is important to use installation boxes for sockets and switches made of metal.
Wiring in a wooden house with your own hands and with the help of specialists is carried out in accordance with the regulatory documents of the PUE. Only by following safety rules and electrical installations will you protect yourself and your home from accidents and electric shocks.
Automatic machines, RCDs and spark protection devices
What you need to pay special attention to in American protective devices are arc protection and spark protection devices.
These devices are installed in a panel to detect sparks in an electrical circuit. If any appear, they automatically disable the entire group.
That is, if you don’t have a short circuit yet, but the socket has just started sparking, this device will disconnect the power cable.
Such devices have been used there since 1999. In our country, such protection appeared quite recently and is not yet in great demand. The UZM-51MD brand is mainly used.
However, things are about to change dramatically in the near future. Already from 01.07.18 in the Russian Federation the GOST IEC 62606-2016 standard “Protection devices for household and similar significance in case of arc breakdown” has been introduced into force. You can download it from here.
According to this document, installation of AFCI=Arc Fault Circuit Interrupters devices (detection of arc discharges and sparks in wiring) will be mandatory in certain types of premises.
Arc protection devices in the USA also include a 30mA RCD. They are installed on all groups in living quarters, kitchens, bathrooms, etc.
In Russia, fire protection RCDs have a rating from 100mA to 300mA. But even its installation is not yet mandatory.
However, in North America, even 30mA is not considered sufficient differential protection. Therefore, in all rooms such as kitchens, laundries, bathrooms, garages, basements, additional 5mA RCDs are installed!
In such premises we are regulated by the mandatory installation of devices with protection against leakage currents of 30 mA. Of course, 10mA is recommended, but it is required at I=30mA.
As for simple circuit breakers, there are no special differences. The time and current characteristics of American machines practically correspond to our characteristic C.
As well as the ratio between rated current and cable cross-section.