Additional lighting is used for both decorative and practical purposes. The most convenient and easy to install modification of the light source in this case is LED backlighting.
Let's consider what an ice strip is, what characteristics and varieties it has, where it is most often used, how to build a lighting system based on it with your own hands, what are the general and specific rules for connecting it in various variations of circuits, and what needs to be taken into account during its implementation installation
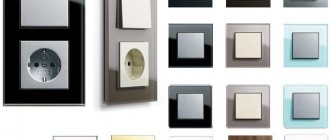
What is LED strip
An LED strip is a flexible polymer tape 2-3 mm thick, 8-10 mm wide and several meters long with diodes, conductors and resistors placed on it.
The LED strip is divided into sections with a cut line marked, along which it can be divided into fragments during installation. Among its main characteristics are:
- Power of individual led elements.
- Number of LEDs per unit length. As a rule, their size varies widely - from 30 to 240 per meter. As the number increases, the power of each element decreases.
- LED chip size (3528, 2835, 5050, etc.).
- Degree of moisture protection. To install LED lighting outdoors or indoors with high humidity (for example, in a sauna or swimming pool), use models with a water resistance level of IP65. Unlike standard specimens, their surface is covered with a layer of silicone or a plastic shell.
Ice tape can be either mono- or polychrome RGB. In the latter case, to control switching between colors, you also need to include a controller in the circuit. The RGB LED strip has four contacts - one for ground and one each for a specific color line (red, green and blue).
Important! The more uniform the illumination of the backlight is required, the greater the density of the ice elements on the LED strip should be. Moreover, the brightness depends on the type of crystals - monochrome ones create a denser flow of light than universal ones. For example, for 5050 in one color the illumination reaches 8 Lm, and in the RGB modification it is no more than 2.5 Lm.
Which connection scheme is preferable?
LEDs have this feature: as the length of the strip increases, the brightness of the light decreases, so you should not choose a sequential connection scheme. Here it is important to remember a simple recommendation - if the elements are long, they are connected to the power supply in series, and the length of one piece should not exceed 5 meters . For clarity, correct and incorrect options are presented.
The same sequence should be used when using three or more pieces.
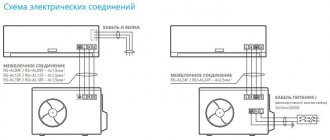
In some cases, it is necessary to connect two blocks; below is a diagram for this option. It is important to do everything correctly to ensure a stable power supply.
This option reduces the load on the system.
It is better to connect the tape on both sides, this will reduce the load on the current-carrying tracks.
Directions for use
Diode strips as backlight are widely used in the following areas:
- As decorative lighting when decorating the interior and exterior of apartments, houses, trees, courtyards, squares.
- As an additional lamp to improve the visibility of individual work areas - kitchen apron, sink, dining area, office table, bar counter.
- The main lighting in places where it is difficult or impossible to install a chandelier. For example, a dressing room, closet, pantry.
- To create optical effects at the interface between different media - in an aquarium, a swimming pool.
- In auto tuning for LED interior lighting and dashboard lighting.
- For interior and exterior decoration during any event.
Backlighting based on LED strips can be widely used in any other cases - the main thing is to follow the connection and installation rules.
Kinds
Ribbons vary in color. There are monochrome products, and there are multi-color ones. They also differ in the type of LEDs used – RGB or SMD.
Single color
Designated as SMD. Such products produce a luminous flux of a certain color. No additional controllers or remotes are required for operation. Single-color devices are cheaper.
Multicolor
RGB tape differs from monochrome tape in the ability to change its color. It operates in conjunction with controllers and a remote control. When a signal is sent from the remote control, the parameters change - color, lighting mode, brightness.
How to make LED lighting with your own hands
To install LED lighting based on an ice strip with your own hands, you need to:
- Calculate the LED strip by length, power, select colors and other lighting characteristics.
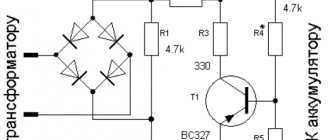
- Based on the calculated data, purchase a power supply/transformer (as a rule, you need to buy a separate cord with a plug for plugging into a household outlet) and a controller with a remote control (for RGB models) or a dimmer (for monochrome).
- In accordance with the structure and type of LED strip, select terminal blocks (connectors) to connect them to each other and the equipment.
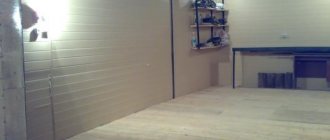
- Prepare the mounting base - with or without a radiator.
- Connect the assembled circuit elements according to the diagram and layout plan.
- Plug in and check functionality.
The main difficulties when installing LED backlights yourself are related to the connection rules, depending on the chosen circuit and the features of installing the LED strip. Let's look at them in more detail.
Recommendation! In order for LED lighting to work flawlessly and last for a long time, you need to choose the right transformer for it. First of all, it must match the total power, voltage rating and current. The first parameter is the most important. You can calculate it in the following way. For example, the total length of the ice strip is 4 meters, and each meter consumes 30 W (30 series-connected diodes of 1 W each). The result is 4x30 = 120 W. However, for safety, it is better to take a power supply that is 30% more powerful than necessary. Therefore, 120x0.3 + 120 = 156 W or slightly more than this value.
PWM controller and remote control
Photo of the regulator
The brain of the system can regulate the brightness and temperature of the tape. Controlled using a remote control or Wi-Fi bridge. Power supply within 12-24 volts, maximum input current (or total output) 12 amperes. There are no complaints about the regulator, it came in a neat box wrapped in bubble polyethylene. The connection is very simple, you need to tighten 5 terminals: - Power supply +24V - Power supply 0V - +24 output to the tape - Cold light output - Warm light output
Photo of the remote control
The remote control came without batteries, but was packaged in the same way, no complaints either. The overall impression of MiLight devices is absolutely positive, everything is stylish, simple and of high quality.
Installation features
Most manufacturers make LED strips for lighting with a self-adhesive backing. This double-sided tape will allow you to quickly and easily install the ice strip on drywall, wood, plaster, and metal.
However, when installing it, you need to take into account that LED crystals emit heat when they glow, and the brighter they are, the more heat there is - so much so that it can damage the diodes themselves. Therefore, we will consider how to install an LED system with and without a radiator, and what to use as a material for heat removal.
This needs to be remembered
Every idea is good. But at the same time, you need to remember about the safety of using such homemade lighting. Cables must be properly insulated to avoid electric shock.
When using glue or paints, you must pay attention to whether the lamp emits toxic fumes when the lamp heats up.
The cost of a DIY lamp is really small, and the effect with little effort can be impressive. Let's start with simple projects that will become more and more complex over time.
A homemade lamp is a great way to add a new touch to your interior. There's no point in spending a fortune on designer items that we can happily make ourselves, adding a little of our own creativity to every idea. In order to select a lamp and make it, we recommend viewing photos of house lighting.
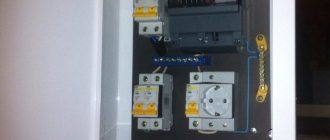
Installation of switches
One of the basic rules in installing any type of switch, lighting or automatic, is that it is always placed on a phase wire. It would seem that what a difference it makes - after all, if you install a switch on the neutral conductor, the circuit will still be open and the light will go out.
There is a difference. Let's say the switch is installed on the neutral conductor. The light bulb in the lamp burned out and needed to be replaced. Your first step is to flip the switch, disconnecting the circuit, and calmly unscrew the faulty light bulb in full confidence that there is no current in the circuit (the light bulb is not lit). However, if the circuit is broken at zero, the voltage in the phase wire does not go away. Having accidentally touched the phase contact in the cartridge, a person instantly becomes a freshly baked zero, that is, he gets an electric shock. If the TPG contacts the lamp body as a result of a breakdown, then touching such a device may be the last.
For an analogy, we can give an example with a water pipe: having turned off the tap, the would-be plumber begins to drill the pipe before the tap, and not after. As a result, a fountain of water will come out of the pipe, although not a drop will flow out of the tap.
Connecting wires inside a distribution box, when the power for sockets and lighting comes from one common cable
There is always one wire going to the switch, which opens and closes inside the switch. From the outside it looks like there are two wires. This is easy to explain - the phase conductor forms a loop that goes down or up to the switch. At the top, the loop is cut and the ends of the disconnected wire are connected to the switch contacts. Now, by clicking a key, you can connect and disconnect the circuit. The wire becomes 3 if the switch is two-key. Current flows in through one conductor, and out through two. One key breaks one line, while the second one works. Accordingly, a three-key switch will have 4 wires - 1 for input and 3 for output.
As an example, you can show how the wires are installed in a chandelier with several light bulbs . Let's say there are 5 light bulbs in a lamp. It is required to install a two-key switch so that when you press one key, 3 light bulbs light up, and when you press the second, 2. Almost every chandelier has a block in the bowl through which the wires are connected. A phase wire is inserted into this block on one side, and a cable on the other end, which branches into 3 - according to the number of connected cartridges. The second phase conductor is connected in the same way, only it branches into 2 wires. Neutral wire 1, and it, joining the second contact of the cartridge, is combined into an outgoing conductor. In order not to remove individual wires from the outer shell, a regular two-core wire is used to supply and drain current to the switch, a three-core wire to the two-button switch, etc.
Wiring diagram for a chandelier with 5 bulbs and a two-key switch: 0 - zero; ph—phase; 1 - chandelier; 2 — connection box; 3 - two-key switch; 4 - connecting terminals
If you install a dimmer as a switch, then the first thing you should pay attention to is what power it is designed for. If the dimmer says 300 W, it means it is designed for a chandelier of 5 bulbs of 60 W each. There are devices for home use with a power of 1000 W. With the help of such a dimmer, you can change the lighting level in several rooms at once. The dimmer is installed in the same way as a regular switch. The only difference is that on the contacts of the dimmer there is a designation indicating which wire to connect to which contact. The correctness of its operation depends on this. The contact for the incoming wire is designated by the Latin letter “L”.
Example of using pass-through switches (switches)
Ideas
Looking at the photos of beautiful homemade lamps, you can’t help but be surprised at how developed the imagination of the designers is. To create lamps, different materials are used, from plastic to glass and fabric.
We invite you to consider the most creative ideas and figure out how to bring them to life by reading the instructions for decorating and designing lamps.
Lighting method
Thanks to the flexibility of the LED strip, you can create unique lighting. With its help, you can zone a room, add volume, and highlight important details. There are 4 ways to create lighting - contour, directional, spot, figured.
Contour
All light sources in this type are located on the same line (for example, along the edge of a multi-level ceiling or on shelves). The light should be directed upward. The illumination is obtained in the form of a continuous strip of light.
Spot
Using spotlights, you can create the effect of a starry sky on the ceiling. LEDs are fixed to the ceiling according to a pre-designed pattern and directed downward.
An additional effect can be created by photo printing on PVC fabric.
Directional lighting
For directional lighting, LEDs are installed on a slope. The light should be directed along the ceiling.
Figured arrangement
In case of figured placement, diodes are installed in ceiling lamps, which are specially designed for this purpose. Such ideas are carried out by designers; ordinary technical knowledge is not enough for implementation.
Lamp made of threads
To create a “case” for a lampshade or lamp made of threads, you will need a piece of solid wire, threads of your choice, glue and scissors.
To make the frame, take two rings connected by strong pieces of metal. Or make your own fastenings using wire.
At the bottom of the ring, fasten the thread and pull it through the opposite ring. It is important that the threads do not get tangled. As soon as the thread runs out, start winding the next one until you achieve the desired result.
Thread the remaining threads inside and trim. Glue on the inside.