The kitchen is a special territory. It simultaneously performs purely utilitarian, practical functions, such as a bathroom or pantry, and is a place of comfortable, spiritual relaxation for the whole family. It’s not for nothing that the kitchen is called the soul, the heart of any home. Even earlier, the hearth, located in the kitchen, was associated with family and the blessing of ancestors. And today we have special feelings for the kitchen. Where are we rushing to share what is sore? Where can you grab a piece of something appetizing and delicious before dinner? What room in the house exudes special comfort and warmth? Of course, all this is the kitchen!
To harmoniously combine different functional areas, to make the kitchen both cozy and convenient for work, a careful approach to artificial lighting is required. It plays a leading role in ensuring comfort in the room. After all, the advantages of the most sophisticated household appliances and magnificent, expensive kitchen units come to naught in dim, insufficient lighting. Moreover, with a lack of light, the safety of people working and in the kitchen suffers, and traumatic situations are created.
How to properly arrange lighting fixtures in the kitchen? Which lamps are suitable? What do you need to know before starting installation? What mistakes are made during the work process? Our specialists will tell you about all this.
General kitchen lighting: how not to mess it up
We have already explained above that 150 lux (lux) is the minimum illumination threshold recommended by the state standard. Accordingly, when organizing general lighting, it is important not to fall below this value, otherwise the kitchen will turn out to be uncomfortable for use.
The central chandelier is still considered the main element in many interiors. However, it is not always convenient: while cooking, you can easily block the light coming from it with your head. Therefore, it is optimal to support it (or replace it) with a couple of additional lamps located exactly in the cooking area and dining area.
Designer tips
Irina Polyakova
founder of the interior studio, architect and interior designer. The main area of work is kitchen design
When drawing up a project, you need to remember that the center of the main chandelier does not coincide with the center of the room at all. For a simple reason - a set located near the wall takes up a certain part of the ceiling. Consider this point if you are prone to perfectionism and any asymmetry irritates you furiously.
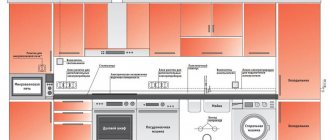
Sketch out your room lighting plan on paper. You must clearly know the layout of your kitchen: where the zones are located, how best to organize the network connection. It is at this stage that conflicts can be prevented. For example, when it is not possible to organize the correct outlet for lighting or insert the switch in a convenient place.
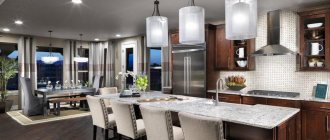
If there is little space, then you can refuse large lamps: spots will cope with their function perfectly. In spacious rooms, you can build general lighting according to the classical scheme:
- central chandelier;
- pendant lights above the dining table and countertop;
- spot - around the perimeter.
The most common errors in organization are related to the distribution of light flux between zones. It is necessary to maintain a balance so that the final script does not irritate with its low optimization and does not interfere with cooking and eating.
Principles and requirements
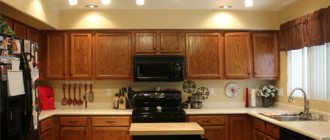
A kitchen is a room in which there are at least two zones with different purposes - a work area for cooking and a dining area. Different purposes also lead to different requirements for kitchen lighting: the work area should have bright lighting, allowing you to see everything clearly, and the dining area should have softer lighting.
It is better to make lighting in the kitchen zoned
But zoned kitchen lighting does not exclude the presence of a chandelier. Its functional significance is small, since the light spot is obtained in the center of the room, which remains mostly empty. But from the point of view of leveling out uneven illumination, this method is very good. As an option, you can use several spotlights, as in the photo above, or install built-in ceiling lights if the ceiling is suspended or suspended from plasterboard.
You need to think about kitchen lighting at the renovation stage, when the electrical panel is being assembled, the wiring is being installed, and the installation locations of sockets and switches are marked. Later, after the repair is completed, this is very problematic - you have to lay the wiring on top or in cable channels.
Illumination standards
When you are just planning lighting in the kitchen, the question arises of how many lamps are needed and what power. It's simple: there are lighting standards for each room for the kitchen - 150 Lux per square meter of area. Calculating illumination in Watts is no longer relevant, since a 7 W LED lamp can produce light like a 50 W incandescent lamp or 650 lm.
For example, let’s calculate how much light is required for a kitchen with an area of 12 m2. To do this, we multiply its area by the norm: 12 m2 * 150 Lx = 1800 Lx. And since 1 Lux is equal to 1 Lumen, it is necessary to install light bulbs that in total give at least 1800 Lm.
With zoned lighting, the amount of light required is calculated separately for each zone
If you decide to do zoned lighting, that is, the work surface will be illuminated separately, there will be a light source above the table, it makes sense to count everything separately. To do this, the kitchen plan must be divided into zones, the area must be calculated, and based on these figures, the number of lamps and lamps for them must be selected. Just keep in mind that two 50 W lamps in total will not give as much light as one 100 W lamp, but about 1/3 less.
Lamp type, color and light
Another important point. When selecting lighting, it is best to choose lamps of the same type: halogen, LED, daylight. As a last resort, you can combine two types, but it is better not to use all three. They provide different lighting and it is almost impossible to get a sane result. We are not talking about incandescent lamps, since they are used very rarely: they require too much electricity, producing a small amount of light.
When choosing lamps, it is necessary to take into account their color temperature
In addition to the type of lamps, you need to choose lamps that produce light of the same color, which is also called the color temperature of the lamps. They can produce light with blue, yellow, and white tints. Basically, it’s up to you to choose, but the best option is natural or neutral. It is better for the eyes and for color perception.
Location of spotlights
One of the most popular ways to optimize the light flow in the kitchen space. The image below shows almost all options for their location on the ceiling. Note that each spot illuminates approximately 1-1.5 meters around (depending on how many lumens the LED built into it produces).
If you install them around the perimeter, then step back from the wall at least 50 cm. The light from them will evenly pour from the ceiling, despite the upper cabinets of the kitchen unit located below.
Spots can be arranged either according to the laws of symmetry or arbitrarily. The main thing is not to overdo it with the quantity. Otherwise, it will dazzle the eyes - and the level of comfort in the room will noticeably decrease.
If spots in a room serve as accent lighting, it is logical to place them around the light source that bears the overall load.
Spots combine quite harmoniously with track systems. Although, it would seem, with such a neighborhood they might seem superfluous.
You will learn how to choose the right track system and which lamps to go with it in our separate article >>> go.
Organization of spot lighting
Spotlights
Most often, this type of lighting is implemented with spot LEDs, pendant units or spotlights. They are located above a specific location where you want to make an accent or highlight any decorative elements. The points can be used either individually or en masse; their number is limited only by the kitchen space and your personal wishes.
This lighting method is characterized by a convenient location, since spotlights do not take up much space, they fit well into any interior style. And in some situations they can be hidden in structural parts (stretch ceilings, in elements of kitchen cabinets). It is most advisable to use them for local lighting of functional areas.
Work area lighting
This is done using accent lighting: the light is purposefully focused on the countertop and stove to make it convenient to cook.
For this purpose, special halogen or LED lamps are mounted on the base of hanging cabinets. They give a beautiful and harmonious glow, quite sufficient to highlight all the key points of the working area.
Or an RGB strip is stretched along the tabletop, neatly packaged in a plastic profile. Inside it are again LEDs. You can also use the monochrome option. It doesn't brighten up the decor as much, but it does a better job with accent lighting.
The tape can also be mounted at the bottom of the cabinets. It is especially impressive if it is “packed” in a glass panel. The glow is flowing and immediately creates a special atmosphere in the room.
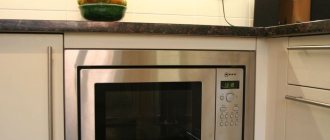
If you want to save money, buy a hood with built-in lighting. Yes, the brightness will not be enough for the entire area, but overall you will get accent lighting of a decent level.
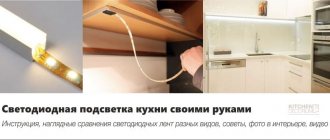
How to do it yourself?
Attaching the LED backlight is not difficult, the main thing is to have all the necessary tools and follow the instructions.
Tools and materials
The main thing that installation cannot do without is the LED strip itself. When choosing, pay attention to the following parameters:
- Color. LED strips glow in the RGB model. Diodes are white, red, blue, green. The remaining shades are obtained by including several basic shades at once. There are RGB strips - they are colored, or WRGB - with colored and white diodes. However, the most suitable for the kitchen are ordinary white ones, which in turn are divided into warm and cold.
- Flow. Brightness is measured in lumens - the more there are, the brighter it will be when the tape is turned on. This parameter depends on the type of LEDs and their number, as well as the density of the arrangement. There are 2 main types: SMD3528 (without RGB) and SMD5060 (5050). The first ones are smaller and are placed more often, the second ones are larger and placed less frequently. For backlighting, a standard double-density SMD5060 or SMD3528 tape is suitable.
- Protection. Let us remind you once again that for a long service life in the kitchen, models marked IP65, 67, 68 are required.
In addition to the tape with diodes, you will need a power supply (adapter), a switch, a wire for connecting with a reserve (section ~2.5 mm), a plug into a socket (or a cable pulled out of the wall), electrical tape, double-sided tape or other fastening. Tools you will need are scissors, a screwdriver, pliers, and a soldering iron.
Important! LEDs operate at a voltage of 12 watts, not 220, so you will need to install a transformer.
Step-by-step instruction
6 steps for successful LED strip installation:
- Cut to the required length. This should be done exclusively in the place indicated on the tape itself. Typically, orange marks are located through 3-4 LEDs, often scissors are drawn on them.
- Connect the cable and power supply. The safest way is to expose the contacts on the tape and solder the wire, but you can also use connectors.
- Isolate. A mandatory step for the kitchen to protect the connection from excess moisture. Use electrical tape or special tubes.
- Attach it in place according to the level. The method depends on the specific model; some aluminum profiles have an adhesive side. If not, use double-sided tape.
- Connect electricity. Insert the plug into the socket or connect the tape to the wire coming out of the wall, and turn it on.
- Complete installation. At this stage, you should attach the switch, secure and hide the adapter, and put a transparent or matte diffuser on the profile.
Important! Do not forget about safety precautions: carry out installation with the power off, observe polarity, insulate all exposed wires immediately.
Video
To understand the LED strip connection diagram in more detail, watch the video using a socket for an exhaust hood:
Light over the dining area
The space of options depends primarily on where the dining complex is located - and what parts make up it. Most often this is:
- table;
- chairs;
- sofa;
- bar counter.
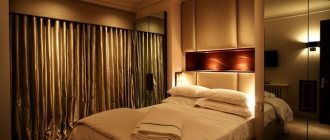
If the kitchen configuration allows, it is better to place the table close to the window: so that during the day natural light can easily enter the area as a whole. The lack of lighting in the evening can be compensated for by ceiling chandeliers. They should hang directly above the table to create even accent lighting.
Lamps should not hang too low from the ceiling so as not to cause discomfort while eating. In addition, it is important to choose the correct brightness of the lamp: the lower the lighting fixture hangs, the less lumens it should produce. This way you will avoid situations in which annoying light endlessly blinds your eyes.
In small kitchens, it is best to place a round or square dining table against the wall. The lighting function will be taken over by a sconce suspended at a height of approximately 1.5 meters. Usually they use two symmetrically located copies at once: it looks prettier and both sides of the table are illuminated better.
The role of natural light
Since the cost of energy resources is quite high, no one neglects the opportunity to reduce their consumption. And using natural light coming from the window is the best opportunity.
The role of natural light
The main thing to consider is the size of the windows and their position relative to the cardinal points:
- with access to the north side - in this case, natural light will flow rather weakly, so it is very important not to interfere with it. It is advisable to use transparent curtains or blinds with the function of fully opening the window.
- with a southern location - here you will have an excess of lighting during the daytime, so you can use blinds, Roman blinds or roller blinds to control it.
- The eastern side is identical to the southern side, with the difference that the peak brightness will occur in the early morning, and during the day the light will be moderate.
- Windows facing west also require good sun protection, but only for the evening hours.
Note that if there is a tree in front of the window that blocks the horizon in summer, then the density of the curtains can be significantly reduced. Since in the summer, when solar radiation is most intense, the crown of the tree neutralizes most of the direct rays.
Interior lighting in cabinets
Incredibly helpful if you need to quickly get something out of the cabinets. And at the same time it serves as decorative lighting, making the atmosphere in the kitchen warmer and more homely.
Formatted in different ways. The simplest one is to cover it with LED strip. There will be little light, but you can adjust the color temperature and create a unique pattern in the room.
Simple, but requiring financial investment - magnetic lamps with a motion sensor. They are attached with double-sided tape and turn on only when you open the door. They are also not very powerful, but they will help you find glasses or cutlery that have gone missing somewhere.
The most difficult, but accessible to everyone, is the installation of spots. They cut directly into the cabinet and connect to the network through a pre-laid channel. You'll have to be smart, but your cabinets will always be light.
Photos in the interior
If there are no partitions in the kitchen-living room or studio apartment, zone lighting will help separate the room or dining room from the kitchen.
Some light sources help to work on the chosen style: for example, high-tech cannot exist without decorative lighting. In addition, an unusual lighting fixture can become the highlight of the interior, its main decoration.
The photo shows an example of zone lighting, where the kitchen is visually separated by ceiling lights.
In addition to the listed electrical equipment, designers also use other light sources - not always practical, but original. In the classic kitchen interior you can see wall sconces with lampshades that perfectly support the traditional style.
Loft-style furnishings are suitable for creative people. In such interiors, table lamps, floor lamps and unusual lighting designs are welcome guests.
Decorative lighting
Unlike accent lighting, it is not a mandatory element of the kitchen lighting scenario. However, when used skillfully, it emphasizes the advantages of the interior and makes it original and memorable.
If you have a mosaic on your apron, add a three-color or monochrome LED strip to the bottom of the headset. It is flexible, so it can be pulled out easily even with corners. The emitted light will delicately highlight the glass or stone texture, creating a bizarre play of light and penumbra. Stunning intimate setting!
See also: Kitchen apron - 106 fashionable design ideas in real photos
If you stretch an LED strip along the perimeter between the ceiling and the set, you can achieve a useful optical effect of expanding the space. This is a good life hack for owners of modest-sized Khrushchev apartment buildings with very low ceilings.
The lower perimeter is used similarly. Below, the glow creates additional volume: the floor seems to float in space. In addition, this is a very beautiful and original design touch.
Use tape not only on the outside of the cabinets, but also on the inside. We have already written about the usefulness of this step, but here we propose once again to be convinced of the power of the aesthetics it generates.
Types of chandeliers for modern kitchens
Manufacturers offer a huge selection of chandeliers of various designs, so choosing the right model that will fit perfectly into the interior of the kitchen will not be difficult.
Hanging chandeliers
They are a structure that consists of one or more lampshades attached to a chain, cord or string.
Most often, a model in the form of a lamp with a lampshade is chosen for kitchens.
They hang it in the middle of the room, above the dining table.
The materials used to make the shades of pendant chandeliers can be different - manufacturers often use plastic, fabric, glass and even plain paper.
The stylistic solutions and shapes of such lamps are also striking in their diversity.
Hanging chandeliers can be called a universal option.
Ceiling chandeliers
This is an excellent solution if the kitchen is too small and has a low ceiling.
The lamp is attached directly to the ceiling, the cord is either very short or absent altogether. Lampshades are made of transparent or translucent glass, they can be colored or white.
Most often, such chandeliers have a strict geometric shape in the form of a square or circle, but there are also original models made in the form of a flower, crown, tree, and so on.
Classic chandeliers
This is a separate category of chandeliers.
Such lamps look expensive and solid, their shapes are distinguished by elegance and grace combined with a certain pretentiousness.
Expensive materials are used for production: copper, bronze, glass, crystal, and gilding may also be present.
Which lamps to choose for the kitchen
We reflected all the available options in the form of a table, where the advantages and disadvantages of each are described in detail.
| Types of lamps | Ratio of power to luminous flux (W - Lm) | Advantages | Flaws |
| Incandescent lamps | 100 — 1200 | cheap | overheat and quickly fail; consume a lot of energy; dim. |
| Luminescent | 30 — 1200 | moderately economical; produce decent brightness; | are more expensive; react to fluctuations in electricity in the network. |
| Halogen | 100 — 1300 | give very beautiful light; increased light output; make up for the lack of sunlight in the room | warming themselves; the spectrum shifts towards cool shades. |
| LED | 15 — 1200 | consume 10 times less electricity; may have different color temperatures; serve for a long time and do not go out during power surges; easily integrated into dimmer systems | expensive |
| Energy saving | 10/12 — 1200 | allow you to save on electricity; long service life. | contains mercury vapor |
Selecting lamps by type, light, color
For the kitchen, experts recommend lamps that imitate neutral white or warm light. The flow temperature is measured in Kelvin. Cold bluish, lifeless white lighting is permissible here only if you have a mini-working office - it can cause anxiety, especially in unbalanced people, and greatly distort the natural color of food, visually making it unappetizing. A warm white option will help you relax, relax with a cup of tea or with your family.
The configuration of the bulb itself can also be different: pear-shaped, candle-shaped, pipe-shaped, spiral-shaped, mushroom-shaped, spot-shaped, etc. LED lamps have the best efficiency, durability, and environmental friendliness, but their prices are relatively high. The cheapest option is ordinary incandescent light bulbs; the price of such a device is minimal, but the electricity consumption to power them is very significant.
Whatever type of lamp is chosen, the light should not be blinding.
LED
LED light bulbs can significantly save your budget, especially if the lamp has a motion sensor built into it, which turns on if someone enters the kitchen, and turns off a few minutes after any activity recorded by the mechanism is stopped. Installing a touch switch system will allow you to adjust the light level.
Incandescent lamps
This type of lamp is used in lamps directed at the ceiling, wall, piece of furniture, and only reflected light is captured by the human eye. Such light bulbs get very hot, so in rooms decorated in black-brown-violet tones that almost completely absorb light, their use is ineffective. In case of close contact with textile, plastic, paper lampshades, there is a high risk of fire. Conventional 40-100 Watt incandescent lamps have a light temperature of 2600-2900 K.
Halogen
This type of design is also an incandescent lamp, but in its manufacture a thin tungsten wire of a certain brand is used, and the flask itself is filled with an oxygen mixture, supplemented with volatile compounds of iodine and bromine. Halogen lamps have a color temperature of 3000-3200 K and last much longer than incandescent lamps, although their sizes are slightly smaller. It is believed that the device produces a luminous flux that is as close as possible to the natural spectrum, reducing visual fatigue. This type of device is divided into four types:
- linear;
- fingered;
- with external flask;
- with reflector.
When installing halogen lamps, specialized transformers are used; it is recommended to wear gloves when replacing a burnt-out device with a new one.
Halogen IRC lamps
The name of the device refers to a lamp with an infrared coating, which is applied to the surface of the bulb during production so that visible light penetrates outward and most of the heat is reflected back. The service life of the light bulb is twice as long, and the energy consumed is much less, which allows for significant financial savings.
Any halogen elements should be kept perfectly clean - in places of minimal contamination, the device quickly burns out and fails.
Luminescent
Such lighting devices are distinguished by smooth warm white light if their color temperature is 2700-3300 K, neutral white at 3400-4500 K, cold daylight at 4600-6500 K. They do not need a special power supply, but only plug into the outlet after fastening in the right place. Fluorescent lamps are divided into two types:
- having the form of long straight, semicircular, U-shaped tubes equipped with an internal ballast;
- energy-saving devices of a conventional form, often equipped with a light sensor.
Both configurations are durable, economical, expensive options shine as brightly as possible from the moment they are turned on, close to natural light, while cheap ones distort the spectrum. The variety of design solutions allows you to choose suitable appliances for the interior of any kitchen.
Lighting Features
The choice of light bulbs based on light temperature directly affects vision and color perception of the interior. Warm colors help you relax, while cold colors are great for toning. A device that completely imitates sunlight has not yet been created, although work in this direction has been going on for a long time.
Correctly organizing kitchen lighting, both primary and additional, can be done using lamps that provide different shades of light output. Experts distinguish three main options:
- warm white – 2500-3500 K;
- white neutral, close to natural – 3600-5000 K;
- cold white – 5100-5600 K.
Various options are acceptable for the dining area of the kitchen: if long gatherings with friends, daily family dinners are held here, warm lighting is recommended, but when the place is intended for quick meals two to three times a day, then it is better to use cool white light bulbs.
The kitchen, the space of which is combined with the living room, is usually illuminated with warm light, which allows you to create the most relaxed atmosphere, especially in combination with a chandelier that gently diffuses the light flux. Warm options are also recommended for interiors designed in “soft” pastel colors - the cold shades of objects here will be blurred, blue, purple, green, gray colors will be slightly distorted.
Natural white leaves all colors practically unchanged, so such devices are mounted above the kitchen work area, and if there are mirrors in the room, around them too, but so that the reflected light does not blind those present.
The cool white hue is similar to the pale winter sun, but is perceived by the human eye as having the highest intensity. It is most convenient to use in combination with natural lighting, if it is insufficient. Cold accent lighting is used to highlight some decorative elements, divide the space into zones, and create a light border between the kitchen and the room adjacent to it.
Options for the kitchen-living room
The kitchen-living room, due to its size, requires maximum elaboration of this issue: it is necessary to organize the light flux in such a way that it is safely sufficient in all areas of the room.
To do this, a scenario of 3 lighting levels is created. The central chandelier takes on the overall role. If the configuration does not allow it to be correctly integrated into the project, it is quite logical to create an ensemble of several chandeliers and place them in the center of the ceiling. The glow should not be too bright and intrusive; it is better to prefer warmer or neutral options to avoid the effect of a hospital environment.
You will find the most beautiful interiors of a kitchen-living room of 20 sq m here.
An alternative, and more modern option is to simply divide the kitchen into 2 parts, placing a chandelier in each. Should we make them the same? Optionally, decide strictly on the interior design in different areas of the room.
Accent lighting is provided by linear spots surrounding the perimeter of the kitchen unit. Such zone lighting will help you prepare food comfortably and easily find all the necessary items in the cabinets.
You can also select a recreation area. For example, a cool multi-level ceiling with built-in lighting on tires. This way you can adjust the lighting angle, and if the lamps are dimmer, then you can completely adjust the color temperature to suit you.
Features of lighting of combined rooms
In the kitchen-studio space there are two or three or more logical zones, each of which is individually illuminated, not forgetting to maintain the same interior style chosen initially. When there is no clear dividing strip (piece of furniture, screen, podium, highlighting with color, etc.) on the border between the kitchen and living room, it is also created with the help of light or the absence of it.
Lamps and chandeliers in any kitchen area are placed in such a way that the risk of touching them with your hand or head is minimal.
Kitchen-living room
With a few exceptions, it is advisable to think through and organize the original lighting design of a kitchen combined with a living room in advance - even before the “finish” coating is applied to the room and the furniture is placed. The wiring for the main devices is completely hidden - only some interior styles welcome the presence of a large number of wires in the most visible places.
The kitchen-living space assumes that the room will accommodate a place for relaxation and sleep. Such an area is illuminated using a floor lamp, wall sconce, or lamp on a clothespin. In the areas belonging to the kitchen and those belonging to the living room, the base light is done separately.
Kitchen-dining room
A combined dining room-kitchen is a less broad concept than a living room-kitchen, since there are only spacious places for preparing food and eating it. Less often, the dining area, among other functions, is intended for receiving guests and sleeping, if there are no other suitable areas in the apartment. Therefore, the light here is adjustable in brightness, the kitchen area also stands out for its level of illumination.
A table is placed in the dining room space, and the height of the lamp above it can be easily changed with a slight movement of the hand - up and down or switched using the remote control. As an option, a tall floor lamp with a curved leg is placed on the side of a small table, or “floating” lighting is mounted on special tires.
If you install devices whose brightness can be changed within wide limits, it is easy to create in the room both a bright atmosphere for a festive dinner, and twilight for an intimate dinner for two.
Small kitchen lighting
Tight spaces, especially those placed in a bay window (which is especially important for miniature studio apartments), do not require a large number of powerful lamps - such lighting will be excessively bright. Volumetric lamps, often located on a multi-level ceiling, are also inappropriate - they clutter up an already small area. An ideal option for a small room is LED lamps built into the ceiling, miniature sconces on the walls, and fixtures on spots. To maximize the expansion of space, diffused light is used, illumination of each corner and cabinet to “raise” the low ceiling, some of the lamps are directed upward. When the ceiling is too high, a large, textured chandelier is hung on a long cord.
Light in a small kitchen
It is the luminous flux, adjusted to the smallest detail, that can become the lifesaver that will save your tiny kitchen from despondency and forever make it friends with harmony and comfort.
You can always display a powerful chandelier with one large shade. It will provide decent illumination in the center - this is a plus. At the same time, the corners can be darkened - and this is a serious disadvantage. Point light sources or track systems will help correct the balance. They should be used for zone lighting: the work area, the sink, the set as a whole.
110 best small kitchen design ideas + a complete design guide can be found here.
Often, if there is a lack of usable space, it is possible to build general lighting solely on the basis of spots. Select them at the rate of 1 piece. by 1.5 sq. meters. But how to arrange it gives you complete freedom for your design inspiration.
Designer tips
Irina Polyakova
founder of the interior studio, architect and interior designer. The main area of work is kitchen design
There is an unspoken rule - to outline the contours of the kitchen set installed in the kitchen with spots. Most often in small kitchens they are either straight or angular, so a symmetrical linear construction will be required.
When developing a kitchen design project, give preference to light colors when decorating walls and selecting furniture. Still, they reflect light better, and this will greatly facilitate your task of creating a cozy atmosphere in the room.
Lamps should not hang very low from the ceiling. This visually reduces the height of an already small room. And too bright light in the immediate vicinity of the head blinds the eyes and does not add comfort.
Basic mistakes when installing lighting
Our experts warn against making mistakes that will later result in discomfort and the need for drastic alterations. Which ones are the most common?
- Planning lighting first. Yes, you can roughly estimate where and what will be located. But these will be rough calculations to which adjustments will have to be made. Correctly install the wiring after the complete project of the kitchen set is ready, all the other furniture has been taken care of, including a seating area, TV and dining area. Only then will the owners know absolutely exactly where lamps will be needed, and in which places they can be dispensed with.
- Standard lighting brightness. The kitchen is the most multifunctional room in the house. And you can’t do without adjusting the brightness of the lighting. In the process of preparing your favorite dishes, bright illumination is necessary. If you want a romantic atmosphere, you need the ability to dim the blinding light to a comfortable twilight. Therefore, experts recommend installing switches with a dimmer.
- One lamp in the center of the ceiling. As already mentioned, the kitchen performs many different tasks. And dark corners in it are unacceptable. This is especially true for the work area - the countertops on which food is prepared, the hob, and the sink. In addition, the central part of the room, as a rule, remains free of furniture. And the only central lamp, in fact, illuminates nothing, wasting electricity. And the owners experience noticeable discomfort when trying to see the right thing in the dark or cut vegetables evenly.
When arranging your kitchen, don’t forget about natural light. To give free access to daylight into the room, the owners are remodeling, demolishing partitions and expanding window openings. Instead of thick curtains, which have no place in the kitchen, light curtains made of cotton, linen or silk fabrics are hung on the windows. Roman blinds and blinds are also in fashion. Walls decorated in light colors effectively enhance the flow of light, creating a mood of lightness and airiness in the kitchen.
Photo gallery
What methods of attaching chandeliers are there?
Hook mounting is the most popular method and one of the most reliable.
It is done quite simply: a hole of suitable width is made in the ceiling covering, then a metal hook is screwed into it, on which the lamp itself is suspended. This method is good because replacing the chandelier with another model is not difficult. The distance between the ceiling and the lamp is hidden in a special “glass”. Mounting strip - to hang a chandelier, a special thin strip is used, which is tightly screwed to the ceiling. The installation process of this mount is more complicated, but with its help you can hide the wiring well, since the lamp is attached very close to the ceiling itself. The cross strip is a very strong and reliable mount that can support the most massive and bulky chandeliers. Thanks to the width and thickness of the cross, the reliability of this design is significantly enhanced. Wall mounting using screws or nails - this method is used when installing wall lamps and sconces. For this purpose, special holes are provided in the product bodies, and the fastening materials themselves are often sold as a set.
How to adjust the height?
If your chandelier is on a chain, adjusting the height is very simple by reducing the number of links. If the lamp hangs on a cord, this cord can also be easily shortened to the desired size.
But if the lamp has a rigid mount, the so-called rod, it is not always possible to change its height.
Therefore, carefully study the information in the manufacturer’s catalog, make calculations, taking into account the height of your kitchen, and only then buy the right model.
The place of the meal - well-deserved honor
Why is it important for the dining area to be well lit? Of course, even in general light we won’t be able to carry a spoon past our mouths, but nevertheless:
- Illumination of the dining table has an important aesthetic function and creates the right atmosphere.
- Draws attention to the scene, no matter what you are doing: eating, talking or playing board games.
- It will create the necessary light accent and dilute the uniformity of general lighting.
Lighting affects appetite and mood. It helps create an atmosphere for both formal meals and intimate gatherings. To do this, it is enough just to provide the ability to adjust the brightness.
Advantages of using diode lamps
Modern types of lighting are superior in their parameters to outdated incandescent lamps, energy-saving lamps and other lighting devices.
Kitchen lighting using LED strips
A popular solution for kitchen lighting, which is often chosen by both super-fashionable interior designers and home craftsmen who successfully manage without their services, is illumination of the work surface and other areas of the kitchen with LED strip. This effective and practical method of lighting is universal, but it is simply optimal for rooms with high levels of humidity and frequent temperature fluctuations of different amplitudes - for kitchens. In addition, such lighting is durable, consumes a minimum of electricity, and withstands power surges in the network. You can buy LED strip everywhere and at an affordable price.
The brightness level of LED strips can vary greatly. The glow power can be easily adjusted using a remote control or touch panel. In addition, manufacturers, in addition to strips with white LEDs, offer LED strips in other colors: red and yellow, blue and green. This opens up new possibilities for kitchen interior design.
LED luminaire LED NAVIGATOR 5W IP20 4000K
LED strips can be mounted anywhere: on the wall, on the ceiling, on the bottom of wall kitchen cabinets. Staples, double-sided tape, and reliable glue are used as fasteners. To install LED kitchen lighting, you can use special removable panels made of material of varying degrees of transparency. Their design provides an internal shelf on which the tape is conveniently and easily attached. Among the options offered by manufacturers of similar products, it is recommended to give preference to models with a high degree of protection - IP44 or more. The panels must be coated with a protective varnish or other composition of similar effect. For the kitchen, models are often used whose crystal size is 50x50 or 50x75; they can be arranged in two rows. You should not buy LED strips that are sealed in a tube to make your own backlight. Their service life is short, they quickly overheat, lose brightness and eventually burn out. To connect LED backlight strips to the power supply, you need to purchase special adapters that provide the required voltage values.
Varieties of the latest lighting
Flexible designs and ready-made modular frames of lighting fixtures are conveniently built into any interior and have a directed beam of light, which greatly facilitates the work process. Among them are ready-made and locally assembled structures used indoors and outdoors.
Recommendations for stretch ceilings
You need to decide on a chandelier for such designs even before stretching the fabric. The need is caused by the finishing features. When installing the frame, special embedded parts are attached to the base floor, to which, after installing the stretch ceiling, a chandelier is mounted.
It should also be taken into account that PVC fabric is afraid of high temperatures. It is better to use suspended models with it or with a metal diffuser to dissipate heat so that the case does not heat up.
The recommended distance from the lamps to the suspended ceiling is at least 20 cm.
Another nuance concerns texture. The glossy canvas reflects everything underneath. Therefore, for such a ceiling it is better to choose a chandelier with arms facing down or with closed shades. Otherwise, glare from the light bulbs will be reflected in the mirror surface and blind your eyes.
Purpose and advantages of LED lighting
When cooking in the kitchen, bright, but not irritating to the eyes, lighting is the best option. Only uniform illumination of the working area without shaded areas and glare will allow you to create culinary masterpieces in a mode that is comfortable for the housewife. It is most convenient if the light sources are located under wall cabinets. This position of the lamps will be comfortable for the eyes, the light will not dazzle during kitchen work.
Furniture lamps not only play the role of additional lighting. When placed on the upper tier of cabinets, the main lighting will be replaced in the evenings. They also perform a decorative function - they visually raise the ceiling, visually increasing the kitchen area. Even during the daytime in cloudy weather, directed streams of light will contribute to more comfortable cooking. There are different options for additional kitchen lighting:
- on the kitchen apron under glass;
- under the cabinets with an offset towards the doors;
- on the front of the cabinets;
- at the walls and on the facade of furniture at the same time.
Most often, LED lamps, or light-emitting diodes, are used to create kitchen lighting. They have great advantages over other types of lamps:
- long service life - up to 15 years, even taking into account regular work;
- a large assortment of appearance, color, shape, models;
- instant heating, unsurpassed brightness;
- no heating of the body, safety for furniture;
- profitability due to long-term operation and low power consumption;
- lack of toxicity - diodes do not contain or emit harmful substances;
- the presence of models that are reliably protected from moisture, grease, and mechanical damage (such diodes are coated with epoxy resin, silicone);
- ease of installation, the ability to do the work yourself.
There is also an LED strip on sale - it not only gives a high-quality glow, but can also follow all the curves of the furniture and be positioned at any angle.
Where is the best place to place a chandelier?
The main light source is always located in the middle of the ceiling. But this rule only applies to a small kitchen. Spacious rooms are usually divided into dining and working areas, and one chandelier is not enough here.
A rectangular and oval table is illuminated with two or three small companion chandeliers at once. They do not have to be absolutely identical, and may differ, for example, in the color of the lampshade. With this lighting, all diners will feel equally comfortable.
Paired devices are also used in another way: one is hung above the table, the second above the bar counter. A fashionable element of a modern kitchen is an island or peninsula. The chandelier can be placed directly above them. Chandelier fans will also come in handy here.
In the dining room, the lighting fixture should be placed no closer than 70 cm to the surface of the tabletop, otherwise the light bulbs will blind the eyes. For the second part, local lighting is used - built-in or overhead spotlights.
How to move a lamp above a table?
Very often we see a situation where builders make an electrical connection for a lamp above the table approximately, give or take. And then it turns out that the chandelier hangs not where it is supposed to - ideally in the center of the table, but where it is necessary.
The case when the chandelier hangs in the center of the kitchen (unfortunate option)
This looks very sad, but there is a solution for this too! Choose a lamp with a long cord. Place the extra hook over the table and pull it through.