Compared to other rooms in the apartment, the kitchen is the most energy-intensive due to the presence of a huge number of powerful household electrical appliances. In addition to the power of electrical appliances, the kitchen area is characterized by a number of factors that make up a rather dangerous combination with electricity. Of course, using the principle of laying wiring in the kitchen, as in other rooms, will not work here, as this can lead to overheating, short circuits and electric shock. That is why do-it-yourself wiring in the kitchen should be done in accordance with the individual characteristics of the room, based on a previously thought-out plan.
Where to begin?
The ideal situation is for electrical installation.
wiring in a new building. Clean walls without plaster, competent calculation of utility networks, and no need for dismantling significantly simplify the upcoming work. In the case of old housing stock, a complete replacement of the wiring is recommended. It is important to understand that no additional lines, installation of new sockets, circuit breakers, wiring boxes, distribution boards with “higher” characteristics can guarantee the safety and reliability of the completed electrical network.
Initially, you need to understand the existing type of wiring. Traditionally, for apartments with gas supply, designers install a single-phase network. Recently it has been used for small-sized housing with electric stoves. The option is actually not the best, since the simultaneous inclusion of several powerful consumers provokes the appearance of a large load on one wire.
The situation is much simpler and better with a three-phase connection, where, for example, a separate “phase” can be allocated for the kitchen. Globally, this will allow the project to be completed with a “reserve” both in terms of capacity and the number of consumers.
Next you need to move on to calculations. Ideally, you should provide for all possible electrical appliances that will be used in the apartment, including the kitchen.
Having decided on the consumers, you can proceed to calculating the total power consumption. This can be done quite simply by summing up the relevant parameters for each device, for which it is enough to take standard values from the tables.
Regarding the kitchen, electrical wiring on average can carry a load of 5 to 12 kW. It is necessary to take note and take into account one important point in the calculations that the devices will not work at the same time. Therefore, it makes no sense to take the maximum possible load as a basis and “build” redundant wiring.
Wire selection
Based on the number of consumers and their power, it is necessary to calculate the wire cross-section and determine the number of supply lines.
If aluminum wires are often used in older housing stock, it is now recommended that all wiring be made of copper with appropriate insulation.
This is due to a number of reasons. Copper has lower resistance than aluminum, better ability to resist oxidation, greater reliability and durability. Regardless of the type of housing, be it a brick or panel house, the insulation must be non-flammable, and it is recommended that the wire itself be laid in appropriate corrugation.
It is important to say that under the same conditions and identical cross-sections, the aluminum cable will heat up more than the copper conductor. Of course, this will not bring anything good to the insulation, since it will dry out faster and crack. Ultimately, such a situation will cause a short circuit.
This is why it is so important to replace wires in the kitchen if they are aluminum. The disadvantage of “copper” is its higher price, greater weight, but the risk of fire and unplanned repairs, after correct calculations and high-quality electrical installation work, is virtually absent.
Types of postings
Electrical wiring is a network of insulated wires in a room designed to carry electricity from the meter to the point where it is supplied to devices.
Depending on the material, the wiring can be:
- Aluminum. Cheap but short-lived material. Has low electrical conductivity.
- Copper. Service life up to 40 years. It has good electrical conductivity, but has a high price.
An important point is the choice of installation method for electrical wiring.
Open
It involves laying wires on top of building structures. There are special devices (cable duct, electrical baseboard) designed to fix and maintain the integrity of the network.
Advantages:
- ease of installation;
- accessibility in terms of diagnostics and repairs;
- does not require large financial costs.
However, in the kitchen area you have to deal with high humidity, fire or hot surfaces.
Flaws:
- not protected from moisture;
- sensitive to mechanical damage;
- fire and electrical hazard.
Hidden
It is installed under the surface of building structures, including suspended ceilings and heated floors.
Advantages:
- meets fire safety standards;
- protected from moisture;
- hidden from mechanical influence;
- electrically safe;
- does not interfere with interior design.
However, this is a rather labor-intensive and expensive method.
Backlight device in the headset
Soft directional light will make any cooking process, especially in the evening, more convenient, enjoyable and comfortable. Typically, LED elements placed in a special aluminum housing are chosen as the main source. They are usually attached directly to the apron, to the bottom of the drawers, or built into their bottom.
Many people do not know how to make the right switch for such light. The answer is very simple - it is advisable to place it also on the apron, along with the socket block of the work area. Accordingly, wiring for the lighting must be provided and laid in advance.
Preparatory work
Before you begin installing the wiring in the kitchen, you should decide on the intended location of the furniture, stove, sink, etc. Next, a set of preparatory work is carried out, consisting of several stages. Next, we will consider each of them in detail.
Determining the status of live wiring
At the initial stage, you will need to determine the condition of the old wiring in the kitchen. In apartments (houses) a single-phase or three-phase network can be used; this point should be clarified. Next, the presence of a ground loop in the electrical wiring is checked. If a three-core cable is laid, then it is available. As a rule, residential buildings built after 1997 require the use of a grounding loop.
Checking the condition of the electrical wiring.
You will also need to establish the cross-section of the cable cores in order to understand how much power the old electrical wiring can withstand.
Calculation of required power
After this, the power of the sum of all devices is calculated. To do this, the rated power is found in the technical passport of each piece of equipment. All these values are summed up. This method involves turning on all electrical appliances at the same time. Although this will happen extremely rarely, a power reserve is necessary. A separate cable is always pulled from the electrical panel to the kitchen, because in this place the same number of appliances is concentrated as in the rest of the apartment.
To calculate power there is a formula: P = P total. × K
- R total – the total power you calculated.
- K – demand coefficient ≈ 0.7 (70%)
K is the demand coefficient, which takes into account the number of electrical receivers and the duration of their use. Due to the lack of accurate data, it is recommended to accept it using the request of the same name from the reference information.
Let's say that by adding you get a total load value of 20 kW. For a single-phase power supply system with a voltage of 220 V, this is a lot. But after multiplying by the demand factor of 0.7 (70%) you get 14 kW. This figure is decisive in determining the cross-section of the wiring cables that you will purchase.
Regulatory restrictions
Utility companies that provide electricity to the population have the right to impose restrictions on the maximum total power of appliances in an apartment. This can be achieved by installing electricity meters with a certain capacity.
The device is equipped with automatic disposable or reusable fuses, which operate when the threshold current value is exceeded.
Soviet-style electricity meters are being massively replaced with electronic ones. They are even more sensitive to overloads, due to which they quickly fail
If you remove the plugs from the meter and connect it directly to the apartment wiring, then it is guaranteed to burn out if the operating mode is disrupted for a long time. Most Soviet meters installed in apartments can withstand a peak load of 25 A for up to 1 minute.
After this, they are burned, which can lead to payment for the installation of a new device and a fine for violating operating rules.
The wiring in the entrance is also unable to withstand high loads; if it burns out, it can cut off power to several apartments at once. Therefore, when connecting an apartment to the intra-house network with a 2.5 mm cable, you should not expect that a thicker intra-apartment wire will be able to withstand high loads.
It is especially important to take into account the factor of regulatory restrictions at the stage of planning the installation of electric heating, heated floors, infrared saunas and other energy-intensive equipment. You must first consult with the relevant utility services about the possibilities of electrical equipment installed in front of the apartment.
You must first consult with the relevant utility services about the possibilities of electrical equipment installed in front of the apartment.
If you decide to calculate the electrical wiring parameters yourself, then it will be useful for you to understand such concepts as: current, power and voltage. Read more in the article - How to calculate power, current and voltage: principles and examples of calculations for domestic conditions
Electrical calculation of electrical wiring for kitchens
The electrical calculation of kitchen outlets is based on several provisions.
- All kitchen appliances cannot be powered from one outlet or, what is the same, they cannot be powered from one power line.
- It is advisable to make sockets in the kitchen with a grounding contact to protect people from electric shock, and it is imperative to ground all household appliances connected to running water (washing machine, dishwasher, waste disposer).
- A separate supply line is made for the electric stove. The line runs directly from the apartment's electrical panel. If the electric stove is assembled from a hob and an oven, then a separate power supply is supplied to them.
- All household appliances connected to running water and metal bodies that can be touched (washing machine, dishwasher) are powered separately with the installation of a residual current device (RCD) or a differential circuit breaker (difavtomat) on the supply lines.
A residual current device (RCD) is an electromechanical device designed to protect a person from electric shock associated with the leakage of electric current onto the housing of electrical appliances. An RCD combined with a circuit breaker is called a differential circuit breaker.
We will proceed from these provisions in further calculations. Let's start with uniform distribution of the power of household appliances or, in other words, dividing the kitchen electrical wiring into groups.
Dividing kitchen wiring into groups
An electrical wiring group or group circuit is several sockets and (or) lamps connected in series and protected by one common circuit breaker.
A circuit breaker is an electrical device that protects an electrical circuit from short circuits (breaker) and serves as a general switch for this circuit.
- First of all. To connect a washing machine, dishwasher, oven, separate power lines are made, which correspond to separate groups of electrical wiring.
- The hob also requires a separate supply line.
- We make a separate supply line for the remaining sockets connected in parallel: mid-level sockets, refrigerator, microwave oven, lighting and waste disposer.
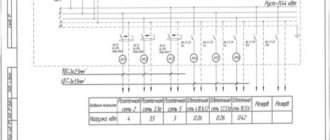
So. We have six electrical groups for kitchen wiring. Let's calculate the ratings of circuit breakers and the cross-section of electrical cables needed for each group circuit.
Calculation of circuit breaker ratings and cable cross-sections for kitchen electrical wiring
In principle, you can not delve into the physics of the process and accept the following postulates for execution.
- All electrical cables must have copper conductors. Electrical cables of the VVG and NYM brands are perfect.
- The electrical cable for electrical wiring must be three-core. Each core must be single-wire.
- For a hob, the cable cross-section should be 3×4 mm² or 3×6 mm². Which means three conductors with a cross section of each conductor of 4 (6) mm².
- For a washing machine, dishwasher, waste shredder, you need a 3 × 2.5 mm² cable.
- The same cable (3 × 2.5 mm²) needs to be used to power the middle level socket blocks.
Or use a table compiled, believe me, by very professional people. But, you can independently calculate the ratings of circuit breakers and cable cross-sections of groups.
Scheme selection
Once the cable has been selected, for which it is advisable to use the appropriate tables, you can proceed to constructing a wiring diagram.
The ideal option is when a separate cable goes to each powerful consumer or group of devices.
It will be possible to get by with just one line, but you should prepare for the fact that if several devices are turned on simultaneously for a long time, the circuit breaker may trip. Of course, this is very inconvenient and unacceptable.
For safety reasons, each line must be “hung” on a residual current device (RCD), which is designed to protect a person from the harmful consequences of breakdown of the wire insulation on the device body and electric shock.
For the kitchen, it is best to opt for 30mA “automation”. Below we list the main recommendations (for a single-phase network) that will help determine the number of lines, wire cross-section and determine the correct “protection”:
- hob - three-core wire 6 squares with a 32A switch, RCD 40A/30mA;
- oven - three-core wire 2.5 squares with a 16A switch, RCD 25A/30mA;
- dishwasher - three-core wire 2.5 squares with a 16A switch, RCD 25A/30mA;
- all light - three-core wire 2.5 squares with a 10A switch, RCD 16A/30mA (often, RCDs are not used in wiring diagrams for the light line);
- washing machine - three-wire wire 2.5 squares with a 16A switch, 25A/30mA RCD;
- all sockets (including the apron), hood - three-core wire 2.5 squares with a 16A switch, 25A/30mA RCD;
- refrigerator - three-core wire 2.5 squares with a 1.6A switch, 25A/30mA RCD (usually it is “hung” on a separate “breaker” of a line that cannot be switched off).
The recommendations given will allow you to create an ideal wiring distribution scheme. If one line will carry the load from several devices (sockets located in different places in the room), you will need to use distribution boxes. They allow you to rationally use the cable and, if necessary, promptly inspect the wiring. Increasingly, in modern “electrics” deep mounting boxes are used, which are invisible and practical to use.
Important! According to the requirements of the PUE, it is prohibited to connect the neutral wire and “grounding”, as well as neutral wires from different lines that have their own RCD.
The nuances of installation using the open and closed method
Experts strongly recommend a hidden method of conducting electrical wiring in the kitchen as it is safer for this room.
Installation of hidden wiring in a residential area involves gating walls to create channels for the electrical network, followed by putty and plaster. In a new building, the wires are attached to the wall with special fasteners. Boxes and socket boxes are installed in the recesses. For light sources, the cable is routed through voids in the ceiling slab. After complete installation of the network, plastering and cosmetic repairs are carried out. So the wiring is completely hidden.
Exposed wiring is attached to the walls using porcelain rollers located at a distance of 50 cm from each other. The wires are subject to the same requirements as with the hidden method. They are located parallel or at right angles to the walls of the room at a distance of 10-20 cm from the cornice. Near a door or window, the net is placed 10 cm from the opening. Sockets and switches are overhead. They are installed on a special external socket box.
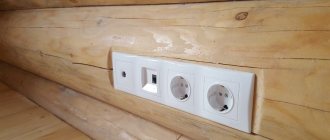
How to properly place sockets and switches
Before you start drawing up a diagram, you need to find out how appliances and furniture will be arranged in the kitchen. Convenience and safety of operation depends on this. For the kitchen, sockets with ceramic inserts rated at 16 A are suitable.
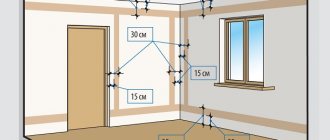
When choosing their location, the following points are taken into account:
- To connect low-power devices, power points are placed at a distance of 10 cm from the tabletop.
- For large equipment they are installed 30-60 cm from the floor. No more than a meter from an electrical appliance.
- For the hood and TV, maintain a height of 190-200 cm from the floor.
- It is better to plan one outlet outside the kitchen area for unexpected connections (phone, laptop, etc.).
Switches are designed for smaller loads, but are used more often. You should pay attention to the surface of the case. The rough coating quickly collects dust. It is better to opt for a smooth body, which is easier to clean. There are no strict requirements for installing the switch. Most often, a place is chosen on the right side at a distance of 10 cm from the doorway and 150 cm from the floor.
Basic rules for the selection and location of sockets and switches
The main rules for placing sockets and switches when creating electrical wiring with your own hands are as follows:
- The installation of sockets in the kitchen must be done evenly and so that the wiring directly approaches the equipment locations;
- It is not advisable to leave long wires hanging;
- The location of the sockets is chosen so that they are not located near the sink or stove - this will protect them from deformation due to overheating or high humidity;
- Built-in (hidden sockets) are perfect for a home where small children live. In addition, such elements will never spoil the design of the room. By the way, sockets are often located in the countertop, which is very convenient for connecting desktop equipment;
- The height of the sockets must be observed - low-lying elements are not always safe (especially in homes with small children);
- Several powerful devices cannot be connected to the same power point;
- Wiring is created throughout the room - you should not group sockets in one place, and especially - bring them closer together vertically.
How to choose the right sockets? Both when installing sockets in a countertop and when mounting them on a wall, preference should be given to products designed for a current of more than 16 amperes. The most durable products are those equipped with ceramic plates and nickel-plated slats. As for the switches, they should be smooth, this will make cleaning much easier.
Preparing to lay wires
1 As soon as the detailed wiring diagram is ready, you can move on to the stage of “drilling” the walls.
The completed work will allow you to hide the wires and properly prepare the surface for painting or wallpapering. It should be noted that the corresponding moment requires the presence of a special tool - a hammer drill, wall chaser or grinder, especially when we are talking about reinforced concrete panels or monolithic structures. The preferred options are when the wires will be hidden under the suspended ceiling, but it will not be possible to do without gating completely.
2 It is necessary to arm yourself with a wiring diagram, and then transfer the cable laying locations to real walls. It is advisable to choose the best options with the minimum length of the grooves. Ideally, the routing of wires should be strictly vertical (if it concerns walls), as well as horizontal (if the wiring will be on the ceiling). All cable rotation angles must be 90 degrees.
It would be good if the laid wiring was additionally photographed or schematically sketched in detail. The minimal effort expended will allow you, subsequently, after finishing, to safely hang a picture, shelf, etc., without damaging the wires.
3 After marking, you should proceed to making grooves.
The depth of the groove should be from 10 to 20 mm, width - 10–30 mm, depending on the type and number of cables being laid. Recesses for mounting boxes must be made with special attachments, crowns (usually with a diameter of 68–70 mm). Brick walls are easily processed with tools with pobedit tips, reinforced concrete with diamond tools. When laying a block of sockets or switches, it is necessary to maintain the correct center-to-center distance of 71 mm, otherwise it will definitely not be possible to install the electrical fittings properly.
Important! When processing concrete surfaces, it is recommended to use a tool capable of removing dust (with a vacuum cleaner). Additionally, it is necessary to protect the respiratory system with a respirator.
It is best to mark wiring boxes and wires using a laser level.
Cabling
If we live in an apartment, then in most cases the electrical panel is located on the staircase. In this case, two or more cables will be introduced into the apartment. For wiring to the kitchen we lay three lines:
- Cable for electric stove 3x4 mm²,
- Cable for sockets 3x2.5 mm²,
- Cable for lighting and exhaust 2x1.5 mm².
Public method
External electrical wiring. It is used in wooden houses where there is a risk of fire and the owners need to constantly monitor the wiring.
Hidden method
Hidden electrical wiring. In this case, the wiring goes inside the building structures. This method does not spoil the aesthetic appearance of the kitchen and allows you to safely hide all the wires. Before starting work, you should turn off the power to the apartment, because when tapping walls, you may accidentally find an unplugged wire in the wall. When choosing any wiring placement option, you must adhere to strict rules:
- The wiring must be placed in non-flammable insulation or, with an open installation method, in a box or pipe made of non-smoking material.
- Cables must pass through the enclosing structures in pipes using a solution. At the same time, they should be easy to get.
- Switches should be 90 cm from the floor.
- Each cable is located at least 15 cm from the ceiling.
- The wiring is not placed closer than 10 cm from the corner or slope.
- Junction boxes are located above the switches at the wiring level.
- You cannot power more than four other outlets directly from an outlet.
- Under no circumstances should you tamper with the load-bearing structures of the building.
- The wiring is attached every 40 cm.
With the open wiring method, all places where the cable can be mechanically damaged are protected with a pipe.
After gating the walls and securing the wiring, it is necessary to write down or even photograph the resulting result of the work, indicating the distances to noticeable structural elements. Thanks to this, the electrical wiring in the kitchen will not be forgotten and the owners will easily repair the electrical network if necessary.
Laying wires
Having selected the cross-section of the wire for the hood, stove, dishwasher and decided on the electrical circuit, you need to understand the issue of proper cable installation in the walls.
If you plan to use corrugation (which is recommended), the width of the groove must be at least 20 mm. Open wiring can be placed in special plastic cable channels (usually not used in modern apartment renovations). In all other cases, it is recommended to adhere to the following recommendations:
- In the grooves, a puncher makes 6 mm holes in increments of 30-40 cm to secure the wire with special plastic clamps or dowel brackets.
- Before installation, the cable is “stretched” in the corrugation.
- After fixing the wire, the entire electrical system is checked to ensure there is no break.
- At the end, the grooves are sealed with gypsum or plaster mixture.
Important! The use of corrugation will allow, if necessary, to replace the wire without disturbing the finish of the walls.
Installation of sockets
Installing sockets without grounding does not cause difficulties. You just need to secure the zero and phase on different screws of the socket. After this, place the resulting structure inside the wall. If there is a grounding, inside the cable insulation, which is now securely hidden in the wall, there are three wires:
- Phase. This is usually a white or black wire.
- Zero. Blue wire.
- Grounding. Indicated in yellow or green.
Grounding is attached to the central terminal, and neutral and phase are attached to the two side terminals. To connect the wires, either use a clamp or wrap the stripped wires around the screws. When installing double sockets, you should carefully ensure that the supply wires are secured to different plates. Otherwise, a short circuit may occur.
Depending on the design, the sockets are located inside the wall or outside. There are options for hidden sockets; they are hidden inside furniture and in this case their appearance does not spoil the interior of the kitchen and does not allow children to reach dangerous electricity.
Switches
There are three cables going to the junction box. They lead to the switch, lamp and panel. Each cable should have two wires of different colors. To make the connection, you need to twist the neutral wires of the lamp and the electrical panel, the phase wires of the electrical panel and the switch, and the phase wire of the lamp with the neutral wire of the switch. All connections are insulated and the structure remains inside the wall. You can connect an outlet to the same junction box. To do this, you need to insert the appropriate cable into the box and connect the neutral wire to the electrical panel and lamp, and the phase to the switch and electrical panel. After connection, all distribution boxes and sockets are placed inside pre-created holes. After this, you can continue the repairs and only after applying the coating to the walls can you finally install the external decorative elements of the sockets. After this, the repairs and wiring in the house are considered complete.
Additional equipment and safety
In the kitchen you can make an additional backup lighting system. It is very simple to carry out, just install a 12-volt power source with a built-in battery and connect diode lamps to it. There is also the option of using rechargeable table lamps.
Installing sensors that indicate water or gas leaks will help increase safety and fire protection in the kitchen. They are quite cheap and do not have high power. The optimal set is an alarm for explosive gas concentrations (propane/butane) and a water leakage sensor. The total cost of these devices will not exceed 2 thousand rubles.
Composition of kitchen appliances
The plan should include a list of equipment located in the kitchen. Usually, in addition to lighting fixtures, it includes a number of standard appliances of different power, but it can be expanded during the use of the kitchen:
- Plate. Apartments have electric stoves if the building is very high. But for such equipment, designers provide a separate power supply circuit.
- Microwave.
- Kitchen hood.
- Dishwasher.
- Fridge.
- Sometimes there is a washing machine or TV.
- Electric kettle
- Toaster
The list of equipment can be continued endlessly. However, all these devices will require a separate outlet and some supply in case the number of devices increases.
Common Mistakes
It is necessary to install or replace wiring in the apartment taking into account the requirements of the PUE. Novice electricians often make the following mistakes:
- Incorrect calculation of the expected load. A downward deviation in power from the electrical network leads to frequent operation of the circuit breakers.
- Formation of a large number of connections. It is desirable that the network in the room be complete, without distribution boxes.
- Use of low quality materials and parts. Such products cannot withstand the load, as a result they overheat and melt, which leads to a fire.
- Laying low-current and power lines in one channel. This may cause interference with your TV, phone, or Internet. It is recommended to lay low-current and power lines in different grooves.