New buildings are built in compliance with special requirements for electrical wiring. It must have grounding loops in its design. This is due to the fact that household appliances are high-power electrical installations enclosed in a metal casing, so there is always a risk of a short circuit, which can pose a serious threat to humans. In this regard, a plug socket with a grounding contact is part of any new home.
Socket design
Socket design from Schnaider Elektric
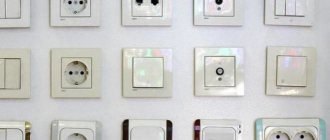
The main difference between the design of a plug socket and a regular one is that it has three or five contacts, depending on whether it is part of a single-phase or three-phase network, respectively. Otherwise, there are no significant differences. A two-pole socket with a protective contact can be:
- overhead;
- hidden;
- single;
- double;
- triple.
Contact blocks in a socket
A standard socket consists of three components:
- contact;
- frame;
- block.
The housing is used as decoration and to protect the connectors from external influences - it blocks access to conductive elements. If the house requires the installation of three or more paired electrical points, separate ones equipped with a plastic core are installed in the frame.
The lid is always made of special plastic that is resistant to high temperatures and mechanical damage. If desired, you can choose a case that will match the interior of the room. Certain models are also equipped with other components: backlight, button for squeezing out the plug and others.
The main device is a carbolite or ceramic block that secures the contacts and the cover. Carbolite ones are characterized by increased strength, but most often they are found only in old sockets. Ceramics itself is quite fragile, and therefore you should be extremely careful during installation, since if even minor damage occurs on the block, the component can no longer be repaired.
How to connect sockets
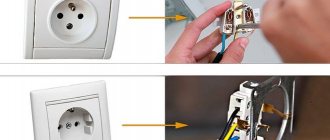
Fastening the wire using clamp terminals
Two-pole plug sockets with a grounding contact can be of several types. Only three key designs can be found on the Russian market, the names of which differ according to the country of origin, where they are often manufactured and are most common.
- French. In this design, the ground pin is a simple pin that fits into the plug when connected to an outlet. For such a connection, a special plug must be used, the hole in which will correspond to the pin.
- German. The main difference of this design is the presence of special clamps located on the sides and serving as a grounding contact. This approach ensures not only the ability to quickly connect the ground loop, but also convenient fixation of the plug in the socket.
- American. It differs in the location of the grounding contacts in special holes in the main connectors of the structure.
Hidden
Hidden socket with protective contact
Most often, this version of plug sockets is used when wiring indoors. The main part is located inside the wall, the protective housing is placed in the installation box and almost does not extend beyond the plane of the wall. The node through which the wires are connected is installed in such a way as to completely eliminate the possibility of squeezing out the cables. The tightness of the fork is ensured by the use of a spring washer.
Outdoor
Outdoor Receptacle with Safety Shutter
Basically it is part of exposed wiring and is fixed to the wall. The base is located in a plastic case, fixed to the wall using a special socket. The design includes a backlight, a switch-off timer, and a child-resistant lid.
Waterproof
A special category of sockets intended for use in rooms with a high degree of humidity: bathrooms, swimming pools or baths. The main difference from the conventional version is the presence of a special membrane, which is used as a reliable barrier protecting the working contacts. Plastic curtains and covers are equipped with an internal flange, through which water and accumulated condensate are drained.
Double socket installation sequence
When the connection diagram for a double socket is correctly determined, the location is selected, and the materials are prepared, you can begin installation.
When the product is a solid block, it can even be placed in the former place of a single device, slightly expanding the size of the niche in the wall. This will not cause the need for repairs, but will require careful gluing of the wallpaper.
Removing the old socket
Having once again made sure that the machines in the apartment are turned off, you can begin to remove the old outlet.
The procedure is as follows:
- Unscrew all the screws that secure the product.
- Remove the outer cover of the old device.
- Unfasten the wires, unscrew the fixing tabs.
The new product that needs to be built in should also be disassembled. The front panel must be carefully unscrewed from the working part.
New socket box for double socket
You should pay close attention to the quality of the new socket - it should be high enough, and in this case you can be sure of clear fixation and normal operation of the socket.
The socket box is secured to the wall with side holders, which are sold separately or come in one set. Cheaper socket boxes are attached not with special claws, but with screws.
The procedure for mounting a socket box is simple. The screws on it need to be tightened clockwise, the holders will move apart to the right and left, securing the product itself. But as you work, the glass always weakens, so the best option is to additionally secure it with alabaster.
Instructions for action:
- Dilute dry alabaster powder (you can replace it with cement) to the consistency of sour cream. You need to take a small portion of the powder, since the composition instantly hardens.
- Place the mixture in the place of the future socket box, slightly wetting the niche with water.
- After 20 minutes, you can attach the socket box to the hole in the wall.
- Level the position of the glass using a hammer and level so that it is perfectly level.
- Next, fill the gaps between the product and the wall with a new portion of alabaster.
- Remove excess mass with a knife.
- Secure the glass with screws, making sure not to tighten them too much - this could cause the plastic to crack.
Preparing to connect
To ensure the correct two-pole connection of the wires, you need to open the cable. A sharp knife will help you quickly remove the outer insulation from the desired cable. You should not leave the supply of wires too long, otherwise it will create inconvenience when connecting the outlet.
It is considered optimal to expose the wires from insulation by 1 cm. The total supply of wires usually does not exceed 12 cm. Shorter wires can be extended. Next, you are allowed to proceed to the most important stage - connecting a double socket with grounding.
How to connect wires
At this stage, you need to clearly identify the wires present in the working part of the product, identifying the zero, phase and ground wire in them by color.
The procedure is as follows:
- Loosen the bolts on the terminals intended for connecting wires.
- Insert the socket wires into the contacts.
- Carefully tighten the bolts with a screwdriver.
The main point is to connect the grounding cable to the corresponding wire in the product (there is always a “ground” symbol at its location). It is important not to connect the phase and neutral to the same contact - a short circuit will occur.
Product Installation
Careful laying of the wires in the glass is very important: if this is not done, sooner or later the cable insulation will be damaged and the operation of electrical appliances may be impaired. The wires must be folded without sharp bends. They should not be located in the socket directly under the mounting bolts.
At the end of the work, the socket must be deepened inward and secured with fastening paws or screwed with self-tapping screws. Then you need to give it a level position using a level and connect the caliper to the installation box block.
The last thing to put on is the decorative trim - the new socket with two sockets is ready!
Installation Rules
Standards for the location of sockets and switches
In order for the socket to work for a long time, reliably and safely after installation, you need to follow simple rules:
- The electric point should be installed at a height of 30 to 80 cm from the floor level, with the exception of above-plinth models.
- Models equipped with a grounding contact should be installed no closer than 50 cm from appliances or a gas pipe.
- If there are children in the house, sockets should be installed higher.
- Single or double plug sockets for hidden installation should be encased in an iron or plastic case, and the wire reserve in them should be 5-6 cm.
- When laying a new power supply line, you should immediately take care of installing power points.
- If you need to place several sockets in a row at once, you can use boxes designed to install two sockets at once. When installing a larger number, you should prepare a group of socket boxes that are secured to each other.
- You can use a “loop” connection scheme, when the contacts of the previous outlet are combined with the power of the next one, or you can use the option of connecting to a separate line.
Before proceeding with the installation of the plug socket, it is imperative to turn off the power supply and also use the indicator to check the voltage.
Standards for socket outlets
Recommended installation height of sockets in the kitchen
When installing and adjusting electrical devices, you need to ensure that every GOST and standard regulating the type of sockets and their total number in the apartment, depending on the characteristics of the room, is observed. Care should be taken to comply with the following requirements:
- At least one socket must be installed for every 6 m2 of room.
- In the corridor this standard is 10 m2.
- In the kitchen, a minimum of three plug sockets are installed, rated for a current of 6 A, as well as one with a grounding contact and rated for a current of 10 A, if the room area is less than 8 m2. Otherwise, according to the standard, there should be four power points of the first type in the kitchen.
- If a stationary electric stove is used in the room, it must be connected to an outlet rated for a current of 25A, which must be grounded.
The body of an electric point must always have appropriate markings, which determine the degree of its protection.
Selecting and installing plug sockets is one of the most critical stages of electrical wiring. If you approach this issue responsibly, you can ensure a long service life of the device and all appliances in the house.
Electrical equipment, light, lighting
0 votes
+
Vote for!
—
Vote against!
In order to improve the appearance of the room, hidden-mounted sockets are installed. They are safer and easier to use. We’ll talk about the types, features and advantages of hidden sockets below.
Table of contents:
- Concealed socket - characteristics
- Hidden ip44 sockets - their features
- Switches and sockets for hidden installation: types and properties
- Recommendations for installing a hidden socket
- Installation instructions for flush-mounted socket outlets
- General requirements for installing sockets
Concealed socket - characteristics
Concealed sockets are more popular among consumers than open-mounted devices. This is primarily due to the increased security they provide.
Flush-mount sockets are common when installing hidden wiring. They also require cutting out a specific space in the wall where the outlet will be installed.
There are no problems in the process of cutting a plasterboard wall, but in the case of installing a socket on a brick or concrete surface, great efforts must be made to achieve the desired result.
Among the main advantages of hidden installation sockets is their aesthetic appearance, which is explained by the fact that the socket is hidden in the wall, and only its outer part is visible on the surface.
In some houses, it is not recommended to install such sockets because the installation work is too labor-intensive. This applies to wooden houses.
In relation to the number of sockets, hidden sockets are divided into devices:
- single type;
- double type;
- block.
The best option is to install a single outlet. When installing such an outlet on a surface made of plasterboard or foam plastic, you should adhere to special installation rules, which imply a more gentle approach to the work.
For example, a casing for installing wires and other electrical wiring elements is made of metal or special plastic substances. All elements must be securely fixed with screws.
There are sockets with and without grounding. The first option is safer and more common, since these types of outlets withstand power surges much better. In addition, to install such an outlet, you need to build a niche, the depth of which is 1-2 cm greater than for an outlet without grounding.
There are sockets of two- or three-pin type for single purpose. Their main difference from single-pin sockets in appearance, which are round or flat in shape. The location of the sockets can be either symmetrical or asymmetrical; this factor depends on the type of device connected to the outlet.
If you need to connect two or more devices to one outlet, then it is better to take care of installing a double or triple hidden outlet. Its main difference from a single room is the number and size of the opening that is made in the wall for the installation of an outlet.
There are two options for installing double sockets:
- vertical to the wall;
- horizontally.
Hidden ip44 sockets - their features
Marking on sockets in the form of IP indicates the degree of its protection from external irritants, depending on a certain type of European standards. The first number, in this case four, indicates resistance to dust and foreign objects larger than one millimeter.
The second number, also four, indicates the level of protection of the outlet from high humidity; such outlets can easily withstand moderate splashes of water.
Concealed sockets IP 44 are the most common, as they are characterized by optimal operating parameters in any kind of residential premises.
These types of sockets will be appropriate for installation in the bedroom or children's room, as well as in the bathroom or kitchen. There are a large number of manufacturers engaged in the manufacture of sockets, but it is still better to give preference to the trademarks of Hungary “Prodaks”, France “LeGrand”, Germany “Gira”. Although their cost is an order of magnitude higher, the quality fully justifies itself. Hidden installation socket price depends on the manufacturer and the quality of the materials used in the process of its manufacture.
These types of sockets have an additional plastic protective casing, and on the outer panel there is a rubber lining and an additional cover.
But keep in mind that installing such sockets would not be appropriate in a garage, at a car wash, on the street and in other places where there is a risk of moisture.
Switches and sockets for hidden installation: types and properties
All sockets, in relation to their design features, are divided into:
- open;
- hidden.
The first option is installed if the electrical wiring in the room is open. The main part of the socket is placed in a plastic case, which is installed on the wall with a socket box. Such sockets are complemented by the function of illuminating the frame, a protective cover, a self-shut-off timer and child protection.
A hidden plug socket allows you to install internal electrical wiring. The main part of the socket is placed in the wall, and only the screen is attached to the outside. The fork is pressed by a spring part and a special thrust mechanism.
In relation to a specific electrical circuit, sockets are:
- with grounding;
- without grounding.
A flush-mount socket with a grounding contact has a special part that is connected to a wire that provides grounding. This type of electrical outlets is appropriate if there is a grounding type wire in the room. The socket is characterized by the presence of sockets for pins, which are responsible for carrying out grounding before the supply of electricity. This type of socket is suitable for connecting a stove, refrigerator, air conditioner or freezer.
Flush-mounted sockets in which there is no grounding are two-pin models, and are installed if there is two-wire electrical wiring in the room, and there is no possibility of grounding.
In relation to the type of protection of the surface of the outlet from moisture, they are divided into:
- standard sockets;
- devices with increased moisture protection.
The first option is perfect for a room with normal moisture; this outlet does not have a moisture protection function.
A waterproof hidden socket is installed if there is high humidity in the room, for example, in the bathroom, sauna or kitchen. A socket of this type is equipped with a special rubber membrane and dense rubber rings, which act as reliable protection against moisture.
The presence of plastic curtains and outlet covers allows you to remove the accumulation of condensation or water from its surface. Some sockets of this type have an additional cover that prevents moisture from entering their surface.
In relation to the number of blocks, hidden sockets are:
- single;
- double;
- triple.
A single hidden socket has only one socket for turning on an electrical device.
A double hidden socket assumes the presence of two sockets that can provide electricity to two electrical appliances. These electrical sockets are common in the kitchen, since this room requires connecting a large number of devices.
A hidden triple socket is a less common option that can connect three electrical appliances to the mains at once.
Recommendations for installing a hidden socket
A correctly installed hidden socket is the key to safe, long-term and convenient operation of electrical appliances that are connected to it. Therefore, before installing a flush-mounted socket, you should be sure to familiarize yourself with the general rules for carrying out the work:
1. The optimal height for installing a socket in a standard living room is considered to be a distance of 300-800 mm from the floor. Although there are also above-plinth types of sockets installed directly below the wall.
2. If the socket has a grounding function, then they are installed at a distance of at least 500 mm from the gas pipeline or electrical heating appliance.
3. If there are children in the house, it is better to increase the installation height of the socket by a few centimeters.
4. Installation of a double or single plug socket is carried out in a specially designated box made of plastic or metal. Please note that it is better to ensure that you have a cable reserve of 50-60 mm.
5. If you plan to install a new outlet to which the cable is laid, then all work is carried out simultaneously.
6. If you plan to install several sockets at once, located close to each other, then it is better to use double-frame boxes or socket boxes, which are connected to each other after installation.
7. Installation of this type of sockets is done using a cable. That is, the contacts of the previous socket are connected to the next one.
8. Please note that before starting any installation work related to connecting the socket, you should first turn off the power to the room and check the absence of voltage using an indicator screwdriver.
Installation instructions for flush-mounted socket outlets
1. Make sure to disconnect the power from the electrical network. Determine the location for installing the outlet and mark it with a pencil.
2. Using a drill, electric drill or hammer, make a hole for installing an outlet in the wall. The type of equipment directly depends on the material from which the wall is constructed.
3. Try to equip the hole with as smooth edges as possible. Next, a special box is installed, which will contain the housing part of the socket and all the wires.
4. The bottom of the installation box has two holes in which the conductors from the electrical cable are located.
5. To fix the socket box to the wall, use plaster, gypsum-based glue or building plaster. The work procedure consists of lubricating all the cracks with a solution and fixing the box. The material should have the consistency of soft plasticine.
6. Wait for the material to completely harden, about 15 minutes, and then proceed to the next stage of installation work.
7. If there are gypsum residues, take care to remove it, and then level the wall surface.
8. To facilitate further connection of the socket, secure the wire in the installation box using a clamp.
9. Strip two or three cable cores by two centimeters and connect the contacts of the block with the cable from the mains. First, the neutral wires are connected, then the phase wires and grounding, if available. The contacts are at the bottom, and the wires are at the top.
10. The wires are fixed using a spring or screws. The excess areas are installed on the bottom of the socket box.
11. Next, the block is secured to the surface of the socket box. There are two ways to perform this operation:
- using sliding tabs, which tighten the screws on the surface of the socket;
- the second method involves the use of screws that pass through the surface of the socket itself and the socket box.
12. After fixing the socket box, the plastic case is installed and the functionality of the device is checked.
General requirements for installing sockets
There are certain documents that declare the rules for installing sockets in rooms for various purposes.
1. If the area of the room is 18 square meters, then only three sockets can be installed in it. Since only one socket should be installed per six square meters of area.
2. If the room serves as a corridor, then the number of outlets is reduced, two outlets per twenty square meters.
3. The kitchen has its own peculiarities in the installation of sockets, since a large number of electrical appliances are installed in this room, the operation of which requires constant electricity. If the kitchen area does not exceed eight square meters, then it is allowed to install at least three sockets with a capacity of six amperes and one with grounding of ten amperes. Using the second outlet, you can connect an electrical appliance with a power of more than two kilowatts, for example, a refrigerator.
4. If the kitchen area is more than eight square meters, then it is allowed to install four sockets of six amperes, and to ensure uninterrupted operation of the electric stove, you should install an outlet that passes a voltage of 25 amperes. This outlet must have a ground connection.
Each outlet must have a marking that indicates the degree of its protection from moisture or dust. It is better to give preference to sockets marked IP22, IP44.
When choosing an electrical outlet for your home, you should focus on the following indicators:
1. Type of electrical wiring: external or open type. In the first case, you will need to install hidden sockets, and in the second - open ones.
2. In addition, you should pay attention to such indicators as the operating nominal value of the outlet, the amount of current, its type and the voltage of the electrical network.
3. Absence or presence of a circuit providing grounding.
4. The place in which the outlet is installed determines its type, in relation to moisture and dirt protection.
Please note that to select a high-quality socket, you should take into account the fact that the materials from which it is made must be non-flammable, which can ensure a reliable connection of contacts.
