- November 29, 2020
- Electricity
- Daria Gaiduk
The article contains information about regulations and standards for the placement of electrical outlets and switches. The electrical supply requirements for various types of rooms in residential premises are indicated. A comparison is made of the height at which sockets are placed from the floor in America, and how sockets and switches are mounted according to GOST and European standards.
The Importance of Electrical Design
Attempts to make repairs yourself sometimes lead to funny or even disastrous consequences. Home craftsmen demolish walls, install soundproofing, but do not take into account the rules at what height they install switches and sockets. Designing electrical wiring includes taking into account the type of room, planned lighting, and the number of household appliances used. Dividing each room into several functional areas also affects the location of electrical outlets.
Choosing a diameter for installation in concrete and brick walls
The easiest way to install a single socket box, the dimensions of which are standard. The markings of the box coincide with the location of the outlet itself, and all adjustments can be made during the installation process. To speed up the work, it is recommended to use a hammer drill and a special bit or drill for hard materials. With their help, a hole is drilled in a concrete wall in a few minutes. If you don’t have a crown, a drill with a carbide tip is quite suitable for a one-time event.
The correct choice of the diameter of the socket box is important. It is selected in such a way that there is a small gap between the body and the wall. That is, the box should fit freely into its seat. When marking on the wall, vertical and horizontal lines should extend slightly beyond the diameter of the circle. This will make it possible to level the socket box, including the double one, during the process of fixing it with the solution.
The diameter of the crown for the socket when drilling should provide a gap of 5-10 mm into which the solution is placed. After hardening, it securely holds the box in its nest. During operation, the tool, including the drill, heats up and expands, so it is recommended to use water-cooled bits. Once the desired depth is reached, the drill or bit is removed and the hole itself is leveled with a chisel.
A brick wall can be drilled in the same way as concrete, and the diameter of the hole is selected in the same way. The depth is calculated differently, taking into account the applied plaster, so that the box is flush with the surface. Installation of wiring in brick walls is carried out even before applying plaster. After the solution has dried, the socket box is installed. Below the line along the brick, you need to carefully drill a hole, then punch a groove and lead the wire inside the box.
Standards for sockets and switches
Comfort is determined not only by the quality of the repair, but also by the height at which the sockets are placed from the floor. During the process of apartment renovations, electricians take into account issues related to the placement of sockets and switches.
According to the standards, the number of power supply installation points is unlimited. Requirements are specified for the installation of entrances in certain parts of the living space, for example, in the bathroom. And the construction of industrial and public premises is strictly regulated.
The location of sockets in the apartment is a recommendation. Taking into account the tips for installing sockets in walls, a person ensures a comfortable stay. You also need to remember about the arrangement of furniture in your own living space, the placement of electrical appliances, as well as the personal wishes of the home owners.
Previously, the following standards were acceptable:
- socket installation height – 0.9 m;
- the distance from the floor to the switches is 1.6 m.
These standards are still in use. The advantage is that the switch is at the level of an outstretched hand, and connecting electrical appliances to sockets does not cause inconvenience.
Installation rules
All installation socket boxes have functional elements to facilitate installation.
The design depends on the material of the vertical fences:
- into hollow plasterboard partitions using a special fixation system of spacer tabs.
- In porous wall materials, casings of a simplified structure are used for installation in prepared niches during gating.
- For concrete surfaces , smooth boxes are used; they are securely fixed with quick-setting gypsum and alabaster-based mortars and dowels.
The socket box is made in the form of a plastic cylinder with holes for tightening screws. On the inner walls there is a mark for holes for the wires. If necessary, perforated areas are cut out with a knife from a convenient side, and cables are inserted into them.
Into drywall
Spacer tabs or ears are the main difference between boxes for sockets for fixing in drywall. With this type of fastening, if everything is marked correctly, alabaster will not be required.
Rules for installing socket boxes in plasterboard:
- Using a saw-edged bit, a hole is drilled in the panels so that the diameter exactly matches the size of the box.
- The self-tapping screw is fixed with a screwdriver, while the legs diverge to the sides and press the socket box against the wall.
- The standard distance between the lugs is 83 mm.
Valera
The voice of the construction guru
Ask a Question
For work, you should not purchase Chinese-made plasterboard crowns. The product loses its operating parameters after several drilled recesses (solderings disappear). Wiring installers always leave a supply of wire so that in the future they can replace a socket or switch, without adding the missing few centimeters.
Into concrete
Concrete walls are drilled with a hammer drill. If you use an impact drill, it will take one and a half times longer. A regular drill is not suitable for working with concrete.
First, markings are made on the wall for the main drill. Further processes:
- The tip is inserted into the mark and drilling begins.
- After reaching the limiting depth, the crown is removed.
- They knock out the central area within the cut line, use a hammer drill or use a chisel and hammer.
Crowns for concrete are a cylindrical attachment with diamond-coated teeth. The segments cut concrete using diamond chips that appear during operation. There are varieties M, S, T (for ordinary, reinforced and high-quality concrete, respectively). These diamond bits can only be used to drill concrete walls; they are not intended for impact and combined modes. For impact use pobedite drills.
Under plaster and tiles
Wiring in the house is most often done before plastering work or before tiling the walls. This point is taken into account when drilling recesses for socket boxes. The edges of the boxes must be flush with the plaster layer or tile covering so that the rosette cover adheres to the surface without gaps.
Options for installing boxes in such cases:
- The edge of the socket is placed 7 - 10 mm above the wall surface (mortar 2 - 5 mm + tile thickness 5 mm).
- A hole is formed for the casing, wires are inserted into it, but the socket itself is not secured, but mounted exactly along the edges after cladding or plastering.
Carbide drill bits (10% cobalt, 90% tungsten) are used for work. This tool does not work for too long; it is an excellent option if you need to create niches for sockets in one residential building. It is better to avoid reinforced areas so as not to damage the soldering. Tungsten carbide bits are durable and can withstand drilling directly into ceramic tiles.
Standards for installing sockets and switches
Usually the person who started the repair decides at what height to make the sockets, but there are still some recommendations that should be followed. “Rules for the construction of electrical installations” (PUE) were developed taking into account the repair of electrical installations and electrical equipment.
The basic standards for the placement of sockets and switches are regulated:
- Installation of sockets and switches must be carried out at a distance of at least 60 cm from the doorway of the shower or bathtub.
- The location of various elements of electrical installations, switches and sockets is determined at a distance of more than 50 cm from gas pipelines.
- Switches are placed at a height of no more than 1 meter next to the door handle. Can be mounted under the ceiling. In this case, a cord is needed that will be used to turn on the light.
- The socket in the bathroom must be connected together with a residual current device (RCD).
More detailed recommendations regarding the installation of electrical wiring in each zone of the living space are given in the following sections of the article.
Bathroom
The principle of placing sockets in the bathroom and toilet is basically no different from how they will be placed throughout the apartment. The main criterion here is still safety. Therefore, more attention should be paid to how ready the installation is for operation in conditions of high humidity. And the very pattern of arrangement of devices must be chosen taking into account functionality, convenience and personal preferences. As a rule, the standard 60 cm is considered the optimal height, but for a washing machine it may make sense to place a separate socket lower.
Please note that the 60 cm allowance in rooms with high humidity applies not only to the height from the floor, but also to the distance from water services. If you have a water heater installed in the bathroom, it, like a washing machine, can be given a separate power outlet located nearby. Electricians today typically use a height of 1.5 meters from the floor for boilers and hoods, 1 meter for an electric razor, hair dryer or curling iron, and below 1 meter for a washing machine.
There is no talk about light switches in the bathroom or toilet. According to the rules of the PUE, it is taken outside the room. For example, in the corridor or hallway.
Height of sockets from the floor according to GOST
Detailed information on the design of internal electrical networks is contained in the Code of Rules 31-110-2003, which includes an extended list of recommendations not only for the installation location, but also for their number.
The power supply device (installation of switches and sockets) is carried out taking into account the presented rules:
- GOST R 50571.11-96 also includes a requirement for outlets to be located at a distance of at least 0.6 m from the shower stall.
- For standardization purposes, the distance from air conditioners and stationary kitchen electric stoves to an electrical outlet is not considered.
- Installation of sockets in living rooms occurs at a distance of 4 m around the perimeter; in corridors, sockets should be provided for every 10 m2 of area, and in kitchen areas - at least four.
- The customer determines the quantity only when installation is carried out in private and single-family houses.
Device and types
A typical electrical connector consists of 3 elements:
- Contact block.
- Decorative frame.
- Socket box.
According to the type of installation, sockets are:
- Built-in.
- Invoices.
There are portable ones, but they do not need to be mounted. These are just extension cord elements.
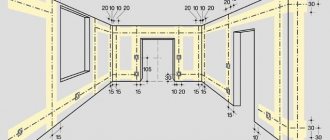
Installation height of sockets from the floor according to European standards
This type of standard is included in the concept of “European-quality renovation”. It appeared after the renovation of residential premises in a style new to the Russian market. The adoption of standards occurred rapidly, as many consumers noted the comfort of such a height of the socket from the floor. Standards are also mostly regulated, but not mandatory:
- A more acceptable installation height for switches is 0.9 m from the floor. The advantage lies in the rational arrangement of the devices, that is, at arm's length for a person of average height.
- Embedding sockets 30 cm from the floor level allows you to hide the wires coming from them behind connected household appliances.
Ergonomic recommendations for the arrangement of electrical appliances
For each room, before carrying out electrical work, it is necessary to draw up a sketch, a scale plan with the location of furniture and electrical appliances, mark on it the places of connection to the electrical network, including low-current circuits: telephone, television, alarm and other devices.
It is important to provide a small reserve of these places for future equipment. Practice shows that this is justified.
Location of sockets
For stationary appliances, such as a TV, computer, washing machine, freezer... they must be located with easy access to them, but it is advisable to hide them behind the appliances themselves. For design purposes, periodically used sockets are usually placed at the same height from the floor; usually this distance is about 30 cm. In this case, they are less noticeable.
It is recommended to choose such a quantity that it is convenient to use a vacuum cleaner and portable electrical appliances in all rooms. Electrical sockets above the desk and bedside tables are placed above the surface of the furniture at a height of 10÷20 cm.
Switch locations
It is recommended to mount them on the wall near the front door on the handle side at a distance of more than 10 cm from the opening and a height of about 90-100 cm. This location is convenient for adults: no need to raise your hand high. And children aged four years and older can already use the lighting themselves. Ceiling-mounted switch designs with a lowered cord for control are still used in room designs.
The type of room and its purpose must also be taken into account when installing switches. In a long corridor, two pass-through switches can be installed at its ends to control one lamp. At the entrance to nearby rooms, you can place a block of several switches to control the light in separate rooms from one place.
It is convenient to place switches in the bedroom so that you can turn off the lighting without getting out of bed, simply by raising your hand. The rule used in most cases for installing sockets 30 cm from the floor and switches 90 cm is considered universal. If you are not sure about the future arrangement of furniture or electrical appliances in the room, then feel free to use this method.
American standards
To find out at what height to make sockets in America, you need to refer to the following rules:
- The distance from any surface, from the floor to the kitchen table or sink, should be 30.5-41 cm.
- The space from the doorway between the sockets should be 1.8 m.
It is necessary to remember: when using it, it is important to take into account the diameter of the pins and the distance between them in Euro sockets. This provides a higher current of 10-16 amperes than in domestic copies (up to 10 A). Therefore, the operation of more powerful electrical appliances is possible when installing imported representatives.
Standard sizes of socket boxes and crowns
When considering the classification of mounting boxes, you should dwell in more detail on their sizes. The standard dimensions of the product are 68x45 mm, and are deciphered as the diameter of the socket box - 68, depth - 45 mm. In this regard, when marking holes for a block of mounting boxes, the distances between centers are taken as 71 mm.
Different manufacturers have different product sizes depending on the purpose of each of them. The diameters range from 60-68 mm, the maximum value is 72 mm. The depth of the socket box is selected depending on the number of elements planned for installation in the internal space. Its value starts from 40 mm, the average is 60 mm, the maximum is 75-80 mm, which means a recessed socket box.
In accordance with the size of the socket box, a drill and a bit for drilling holes are selected. You need to carefully select the tool for the diameter of the hole, otherwise the box simply will not fit inside. Reinforced concrete and other materials of increased strength are drilled with diamond core bits, and the distance between the socket boxes of 71 mm is maintained regardless of their size.
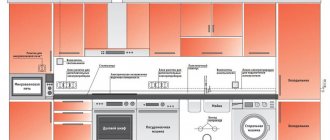
Installation height of switches and sockets in the apartment: standards for the kitchen
At what height should sockets be installed in the kitchen? This is a frequently asked question when building the most technologically advanced part of a living space. He should be given special attention.
Designing electrical wiring is necessary for the installation and convenient operation of numerous kitchen equipment. A modern detailed diagram takes into account the location of furniture, the arrangement of electrical appliances, the entrance group and the entrances themselves for the supply of electricity.
Features of installation with ceramic tiles
Drilling holes in ceramic tiles has its own characteristics. Here you also need to calculate the installation depth of the socket box so that it is located in the same plane with the wall surface. Sometimes a more complicated version is used, when the socket box is initially mounted on the wall, and only then the tiles are installed. In this case, several parameters are taken into account, the adhesive layer, the thickness of the tiles and the dimensions of the socket boxes.
It is somewhat difficult to calculate the location of the hole for the mounting box. It must be marked and cut directly into the tile, and a discrepancy of 3-4 mm will already be critical and will not allow the socket box to be installed in its place. In such cases, a new tile is cut or a hole is drilled again in the wall itself. It is also necessary to take into account the distance between the centers of the socket boxes.
Key Tips
- When connecting a refrigerator, as well as a dishwasher and washing machine, the socket is connected 0.1–0.2 m from the floor. It is calculated that this is the most suitable height, taking into account the length of the technical electrical cord. It is known that there are models with a 50 cm wire.
- To connect a multicooker or microwave, that is, small-sized appliances, install an outlet at a distance of 1.1 m from the floor or 0.2 m (20 cm) from the countertop.
- Regarding the hood, there are recommendations for mounting a separate outlet at a height of two meters from the floor. For the ventilation duct to move freely, the distance from the middle of the hood to the electrical inlet must be at least 0.2 m.
- The sockets are located behind the cabinet walls, which will have to be cut out if we are talking about built-in appliances. In this case, the recommended height is 0.3–0.6 m from the floor. The outlet must not be located directly behind the above-mentioned electrical appliances.
- It is convenient to place power points for lighting fixtures and wall cabinets above the furniture at a height of about 5-10 cm.
Attention! The total power of electricity must have a reserve in order to be able to keep all household appliances turned on in the kitchen.
- A current of 32-40 A is supplied using sockets for the oven and hob.
- If there is a heater with a power higher than 3.5 W, then an additional power line is built in.
- For all other equipment, 16 A sockets are generally suitable.
Rules for selecting power supply devices
First of all, you need to figure out what and where the furniture will be located, as well as electrical household appliances in the room; for clarity, it is optimal to draw a plan diagram in the correct proportions, on which to indicate all the pieces of furniture and electrical equipment that need to be connected to the electrical network.
Then indicate all the sockets (electrical, television, telephone and computer), it is advisable to make a small reserve. It is preferable to install sockets for devices that do not change their location (TV, system unit, etc.) so that they have constant access, but at the same time, it is better if they are hidden behind this equipment.
Sockets for non-permanent use, installed in open areas of wall structures, should be optimally placed at the same height - thirty centimeters from the floor surface; their number must be selected taking into account that a household vacuum cleaner can reach any room.
Sockets located above a computer desk, chest of drawers, bedside table, etc. are optimally installed at a height of 10-18 cm from the furniture surface. In order to correctly select the installation height of the switch, you first need to determine in which direction the door leaf will open in this room and install the switch on the edge of the door frame where the handle is located. At a height from the floor of approximately 75-95 cm, depending on your height, that is, this distance is determined in practice.
The position of the switches is strongly tied to the type of room, for example, in a narrow corridor or on a flight of stairs, they are usually installed at the start and finish, in the bedroom or living room; it is optimal to install switches near the entrance to the room, as well as at the bedroom places to control lighting while lying down.
Select the height of the switches according to the same rules, taking into account from what position they will be used more often, in other words, if it is at the exit from the room, then we take a height of 75-95 cm, taking into account your height, and if near the bed, then a switch is needed Place it at such a height that it can be easily reached with an outstretched arm.
In those areas where you do not yet know how furniture or electrical devices will be arranged, we recommend installing sockets at a height of thirty centimeters, and switches ninety centimeters from the floor surface; most often this is the most optimal height for switches and sockets.
By putting into practice these simple recommendations, common sense and not forgetting about basic safety, you can find the best location and height of sockets and switches in your apartment. Don’t forget a simple rule: it’s better to calculate and determine everything well in advance than to redo everything all over again later.
Standards for bedroom and living room
Modern needs and preferences of the owners dictate at what height to install sockets in the recreation area of the living space.
The number of sockets near the bed is usually two on both sides of the bed. The standard location assumes a height of 0.7 m. This ensures that the lamp is connected and installed on a nearby cabinet with the ability to adjust the lighting. It also participates in recharging existing gadgets. In a classic interior, the switch is installed at the entrance to the room.
The desk also needs additional sockets. The first block of sockets is installed for the computer behind the desktop at a level of 0.3 m from the floor. The second block is intended for a table lamp and is located 0.15 m from the workplace.
There are sockets behind the TV at a height of 1.3 m from the floor in the living room. There must be not only regular sockets, but also power points for the Internet. Other sockets are also provided for lighting, connecting musical instruments and other electrical appliances, taking into account the furniture and the functional division of the room into zones.
There are so-called backup sockets used to connect a vacuum cleaner or air conditioner.
The switch is traditionally installed at the front door. But the presence of multi-level ceilings with the use of special lighting requires the equipment of switches with several keys.
Location of lighting points
Lighting control points in the house are divided into three main groups:
- This includes classic switches - these are devices of different types, often with one or two keys. But thanks to three-key switches, you can simultaneously use three different groups of lighting installations.
- This group includes switches, which, when activated, control several lighting sources from different places at once.
- This group includes devices in which lighting control mechanisms are already built into the lighting tools. These include a table lamp and a floor lamp/
In the apartment, almost all rooms are equipped with one- or two-key switches, which is considered justified and, most importantly, comfortable.
The category of general lighting often includes lamps placed under the ceiling, providing uniform diffused light
For example, for a bathroom, an additional light source can be a lamp above the mirror. But regulation for such a device is carried out using a built-in switch
The bedroom has its own unique switch system. It allows you to adjust the light source simultaneously from different places. Let's look at convenience using an example.
Each sleeping place must be equipped with a lamp in the form of a night light on a table, bedside table, wall sconce or floor lamp
Every time you need to turn the light on or off, you have to get out of bed, since the switches are located quite far from the bed. The solution is obvious. Three switches are installed in the room at once. One is at the exit from the room, and the other two are on both sides of the bed. As a result, it has become very easy to regulate the lighting in the bedroom, and access to switches will be at hand.
Placement of power points and switches in the bathroom
Periodic high humidity is a feature of this room. In this case, protection and a special connection through an RCD are required. All sockets have a protection degree of at least IP44 with a waterproof cover. It is prohibited to place sockets at a distance of less than 0.6 m from a washbasin, shower or bathtub.
The recommended distance for mounting plug sockets by type of electrical appliance is:
- for a water heater – 1.8 m;
- for a washing machine – 1 m;
- for a hairdryer, razor or toothbrush near the sink – 1.1 m.
Attention! There is a risk of floods in this room due to faulty household appliances or the mistake of the apartment owners. To prevent a threat to life, there is a restriction on installing products above the floor, which is no lower than 15 cm. In turn, the switches are located outside the bathroom in front of the entrance.
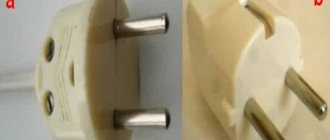
Are we replacing old ones with new ones?
There is such a principle - “as long as it works, don’t touch it.” Russian models from the 90s and Soviet ones from the distant 80s continue to serve regularly in dachas. Their obsolete type is C5 . Everything seems to be fine. But there are two negative factors:
- Small diameter of contact holes - only 4 mm.
- There is no ground connection.
A modern plug may simply not fit into a Soviet socket. And the lack of ground contact can cause a fire.
Therefore, replacing sockets with updated C6 , developed according to German quality standards, is not a bad idea. The diameter of the holes in them is 4.8 mm. If you choose a model with contacts on springs, then even thin Soviet plugs will not fall out.
Air conditioner
A microclimate control system, as a rule, should be connected directly from a separately laid cable, which in turn is connected from a separate circuit breaker in the electrical panel. If this condition is met, then the air conditioner is connected directly without installing an outlet. In such cases, sockets are not installed.
However, not all air conditioners operate directly, so you will have to install the outlet in close proximity to the device. Considering the location of the device, which is usually under the ceiling, the socket must be installed thirty centimeters from the top, so that the air conditioner wire reaches the socket and is not strained.
Socket placement errors
Before you begin installing sockets in the kitchen, you should mark the points at which power points will be installed; the selection of the location should be carried out in accordance with safety conditions.
1. Installation of wiring in the kitchen is carried out without a plan for the placement of kitchen furniture.
Before installing electrical wiring, be sure to draw up a plan for the location of all furniture and kitchen appliances.
2. Free access to connection
The main requirement for placing sockets in the kitchen is that they must have easy access, and if necessary, it is possible to easily turn off household appliances.
It is not advisable to install sockets in places that are below the work surface or countertop. Installed power points below the required level require cutting of surfaces for easy access. Of course, such changes to the headset are not entirely acceptable, so before installing, you need to think through everything in detail.
Sockets installed above the work surface can make their own adjustments to the overall appearance of the kitchen. A well-thought-out plan will allow you to choose the optimal installation solution.
You should not install sockets behind cabinet furniture and built-in appliances, as this will add more work to the technician. To put it simply, placing sockets in the kitchen for built-in appliances can lead to unpleasant situations that are best avoided. In such situations, you will have to cut a hole in the back wall.
It is prohibited to install an outlet behind the structure itself without access to it, because if necessary, it will be impossible to reach and turn off the electrical device. As an option, you can install a socket at the level of furniture legs, but provided that the distance to the floor is at least 20 centimeters. It is better to install sockets in a kitchen with built-in appliances and furniture on the side, where there is easy access.
3. Connecting sockets for “wet equipment” without using an RCD.
If “wet appliances” such as a dishwasher, water heaters, or washing machine are used in the kitchen, their outlet lines must be connected through an RCD.
It is also forbidden to make an outlet in the immediate vicinity of the sink, since water and electricity should be far from each other, only in this case maximum electrical safety is achieved.
4. Connecting a hob or electric stove
It is strictly forbidden to install an outlet opposite the hob or stove. As a result of cooking, warm air will constantly heat the cable, which over time will cause the insulation to dry out and it will crumble. Also, the heat may melt the body of the outlet, which can negatively affect the appearance and performance of the power point.
5. Installation of sockets near gas pipes and communications.
| According to the rules of the PUE, it is prohibited to install sockets in close proximity to gas pipes and communications (water pipes, sinks, radiators). The minimum distance to the sockets in this case should be at least 50 cm. |
Forbidden places
Any place where sockets are located must be accessible so that in the event of an emergency it is possible to immediately disconnect devices from the network. You should not install sockets behind built-in appliances or inside the lower tier.
It is unacceptable to place them behind cabinets with drawers or with closers.
Installing electrical sockets above the stove or hob is also unacceptable - due to warm air, the cable insulation may simply crumble. There must be a safe distance from appliances to sockets. Also, they cannot be installed above or below the sink.
By following our recommendations and safety precautions, you will carry out quality repairs and avoid many mistakes.