When operating household networks, switching switches and sockets are used to connect electrical appliances and room lighting. Due to natural aging, emergency conditions and excessive load, switches can fail. Therefore, the question may often arise about how to disassemble a light switch with your own hands.
Why disassemble the switch?
The most common reasons are:
- Transforming the aesthetic appearance by replacing outdated models with more modern ones;
- The appearance of an unpleasant burning smell from the switch or its excessive heating;
- The lighting device powered by the switch does not turn on or malfunctions;
Therefore, disassembling the light switch is caused either by some kind of emergency situation or by its obsolescence. Let's consider the procedure for disassembling the switch.
#1. Turn off the voltage
Rice. 1: disable double machine
The main step, before disassembling the switch, is to remove the voltage from all current-carrying elements that are involved in the power supply. As with disassembling sockets, the best option for de-energizing is to turn off the input circuit breakers. If your machine breaks two wires at once - both phase and zero, then after turning it off, you can immediately disassemble the switch.
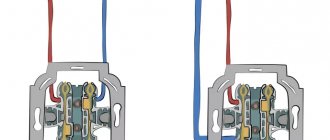
Rice. 2: disable single machine
If there is one machine at the input and you do not know whether it disconnects the phase wire or not, then after switching it you need to use an indicator screwdriver. Which will allow you to determine the presence or absence of potential in the network. If the potential is still present on the electrical wire, then you need to turn off the phase at the distribution board or use dielectric gloves and safety glasses when disassembling the switch.
If the apartment has its own distribution panel, in which the circuit breakers are not labeled and you do not know the connection diagram, then turn off each circuit breaker one by one and observe the state of the light bulb when the switch is on. If the switch is broken and you are unable to supply voltage to the light bulb, use an indicator to check the voltage in nearby outlets, and if there are none, turn off the voltage in the apartment completely. Or use dielectric gloves.
Rice. 3: Use dielectric gloves if you cannot turn off the power to the switch.
#2 Remove the keys
In most cases, to disassemble modern switches, it is necessary to remove the keys. Since they act as a decorative panel that hides the place where the switch itself is attached to the wall or box. In some older models, dismantling the key is not required, since their attachment points are located directly on the body, and the key performs only its direct function.
Rice. 4: modern two-gang switch
Look at the picture, here is an example of a two-key switch. In a model with large keys that occupy a significant area of the device, you need to lightly press on one side of the key, lock it in the extreme position, and pull it towards you.
Rice. 5: Pull the key towards you
Some switch designs even provide a small recess for this purpose, into which it is convenient to place your fingers and then remove the keys from there.
Rice. 6: the key came off easily
If you cannot pull the key with your fingers or the force applied is not enough, you can use a flat tool. To remove the key, pry it from the side with a regular screwdriver.
Rice. 7: pry up the key with a screwdriver
Be careful when doing this as you can easily damage the key. Of course, you don’t have to regret the device being prepared for disposal, but in other situations you need to be extremely careful. If necessary, you can pry the key alternately from different sides to ensure its forward movement. You should end up removing all the keys.
Rice. 8: switch without keys
#3 Remove the cover
In various models, the cover can be fixed using:
- Fastening screws screwed into the panel;
Rice. 9. Fastening the cover with bolts - Plastic fastening elements that are inserted into the corresponding grooves;
- A special frame that secures the lid. The frame fastening is easily pryed off with a screwdriver.
Rice.
10: fastening using a frame Look, the frame is fixed using small latches, there are four of them in this model. In order to remove the frame, it is enough to pry off two adjacent ones, and the rest can be easily pulled out from their mounting points.
After the decorative cover and key are removed, you can proceed to removing the mechanism body itself.
If there are bolts on the outside of the old cover, disassembly should begin by removing these bolts.
Rice. 11: Unscrew the bolts on the cover
Then proceed to unscrew the housing.
#4 Remove the housing
The most common option on new rocker switches is a bolt-on design located at the edges of the housing that secures the entire mechanism into the box. To remove from the body, the bolts at the attachment points are unscrewed one by one.
Rice. 12: Unscrew the housing bolts
The second fixation option is spring spacers, which, in addition to mounting in the box, also allow you to adjust the angle of rotation of the main block of the automatic switch. In such a situation, use a screwdriver to loosen the spacers until the switch freely comes out of the socket. This is done by unscrewing the bolts.
Rice. 13: loosen the spacers
In models with a bolt-on housing, you can also see these spacers that allow you to adjust the angle of rotation. But you don’t need to unscrew them to disassemble the device.
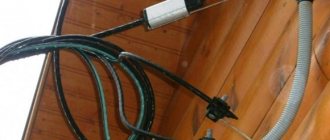
It should be noted that in the event of a breakdown, it is possible that the wires are burnt away from the fastening or they become loose at the crimp points. Then the core may fall out of the box. Such a fall with the voltage turned off, although safe from the point of view of electric shock, nevertheless, the main part of the switch may be damaged if dropped. Therefore, before removing the mechanism, it is better to support it with your fingers during dismantling.
#5 Unplug the wires
Once the switch core is pulled out of the box, it should remain hanging by the wires alone.
Rice. 14: core on wires
Therefore, to disassemble it further, disconnect the wiring fastener from the slats. The supply wires may have different methods of attachment to the lamellas, which is why their disconnection will be different. The most common options are:
- Fixation with screws - in this case they are simply unscrewed with a screwdriver;
- Fixation using clamps - in order to disassemble the fastening of the wires, you just need to press on the corresponding levers.
- Using crimping is a fairly old method; it is not used in modern models, since unclamping the sleeve is a rather labor-intensive task and its reuse is not always possible.
- By twisting - the rules prohibit the use of twists, but in practice you can easily encounter such a connection. Which often becomes the cause of malfunction or failure of the electrical switch.
Rice.
15: Disconnect the wires It should be noted that this procedure should be done carefully so that small parts do not fall apart. If your goal was to install a new double switch, you can simply throw away the old one. And if you disassembled the device to eliminate any malfunction, then after disconnecting the wire it must be inspected.
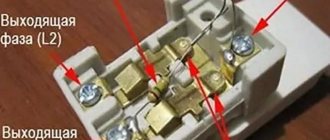
#6 Inspect the switch
If your goal was to identify any faults, carefully inspect the mounting locations of the phase leads. It is possible that traces of melting or oxidation will be clearly visible on them. If there is thermal destruction of the plastic, you can immediately replace the entire switch. Oxidation areas can cause poor contact, so they need to be cleaned.
Due to the fact that its cost is relatively low, it is simply impractical to make any replacements of parts and places where the housing is attached to damaged parts.
There is also a possibility that the switch remained intact, but the electrical wiring suffered from excessive overheating. In such situations, you may observe annealing of live parts, melting of insulation and other damage. These factors will indicate that it may be necessary to replace the wiring or some section of it.
If all parts do not contain any signs of burning, then there may be no contact in the on position. To check for such a malfunction, use a multimeter and check for the presence or absence of contact. In some models, it is enough to simply get to the mechanism and restore its normal operation. Therefore, it is quite possible to fix such a malfunction yourself.
Nuances when disassembling various types of switches
- To power a large number of spotlights, ceiling lighting and other lighting fixtures, three-key switches are often used. The design of such models is distinguished by fairly thin keys. But, as for two-key switches, dismantling a three-key switch begins with removing each of them one by one. To simplify this procedure, many models are equipped with a small rectangular hole at the bottom of the keys, into which a screwdriver can easily fit.
- If you want to disassemble the dimmer (adjustable switch with rotary knob). Its dismantling is fundamentally no different from the classic model. The only difference is that instead of keys, you first have to remove the regulator knob.
- The touch switch is disassembled by removing the outer panel. For this purpose, you can use either a regular screwdriver or a special holder, which you can make yourself from wire if it is not included in the kit. In this case, special care must be taken so that the glass does not crack.
- If the switch is paired with a socket, then to dismantle the first one you will need to remove the socket along with it. In this case, the socket cover will have to be removed, since one of the fastening bolts is often hidden under it.
- Pass-through switches have the same design as conventional ones, and, accordingly, the same disassembly procedure. The only difference is the number of wires, since the phase connection is made in several positions at the same time.
How to remove a switch from the wall?
Light switches, as a rule, have a significant operating reserve, so they do not have to be disassembled regularly.
However, if such a need does arise, then this should be done extremely carefully, and strictly following the sequence, so as not to damage the inside of the device, which is almost 90% plastic.
Removing the key
Disassembling the switch first involves removing the key. Removing the key from the switch is quite simple. If you do not remove the key, then you will not be able to complete the disassembly process.
Before removal, you will need to examine the mechanism of your switch. It may be different and therefore the removal process is also different. The easiest way to remove the button is to pull it towards you. In most cases, this method works great.
But there are also switches on which you will not be able to perform this process correctly. That is why you will need to find special connectors on its sides. Once you find them, you need to pry them off with a screwdriver.
When you remove a key using a screwdriver, be sure to calculate your efforts. If you don't do this, then you may damage it.
Removing the frame
Disassembling the switch also involves removing the frame. The frames may also be different. Here are the main types of frames you can find:
- Screw. They are usually attached to small screws that simply need to be unscrewed with a screwdriver.
- Clamping. This type of switch may have special clamps in its design. To remove the frame, you simply need to bend these clips. For greater convenience, it is better to remove one side and then the other.
Removing the switch mechanism from the socket box
After removing the frame, the stage of disconnecting the mechanism from the socket follows. To do this, you need to unscrew with a screwdriver the screws located on the sides that hold the mechanism in the socket.
Some mechanisms are mounted on “spacers”. They have legs installed on the sides, which move apart when the screw is tightened, thereby securing the mechanism in the socket box.
Also, some mechanisms can be mounted in a mounting box, then you need to loosen the screws on the box and remove it.
Disconnecting wires
On many switches, most wire connections are made using bolts. To turn them off, you simply need to loosen these fasteners and pull the switch towards you.
Now the entire disassembly process is complete. As you can see, you can disassemble the light switch with your own hands quite simply. You don't need a lot of knowledge to complete this process. You just need to study our article, which describes this process in detail. Do not turn on the electricity immediately, as the wires will immediately be energized. If the switch is not replaced immediately, then the wires simply need to be insulated.
Today, disassembling a switch involves removing its three main parts. When reassembling the switch, you will need to reverse this process.
Switch assembly process
When assembling or replacing a mechanism with a new one, the process is carried out in the opposite direction. First, you need to secure the wires. Then secure the mounting box in the socket box, then carefully put on the frame and insert the keys. If you are disassembling the switch during repairs and are not going to install a new one, you need to remember that after turning on the electricity, the exposed wires will be live, so they need to be insulated.
Be sure to watch how to disassemble the switch video
Preparatory work: let's not forget about safety
The easiest way to apply wallpaper around switches and sockets is after partial dismantling of electrical appliances. Before starting this work, turn off the power to the room, and then:
- Unscrew the screws and remove the protective cover of the socket. The contact group in the mounting socket is left in place
- Carefully pry the switch keys with a screwdriver or a small chisel and remove the decorative panel-frame from it
- insulate open screw terminals with wires with masking tape or securely cover them with thick polyethylene, tucking the ends into the technical hole.
It is strictly forbidden to begin work on wallpapering without insulating the contact group in order to avoid electrical injury from electric shock.
How to remove a socket with a switch
Universal designs that include a socket and switch, made in a single housing, are very popular. Such devices are quite convenient during operation, since it becomes possible to connect lighting fixtures and power the outlet from one incoming line. The disadvantage is obvious - if one of the elements breaks down, you will need to remove the socket from the wall along with the switch, regardless of the source of the problem. There is no need to worry, because this operation is performed very quickly.
general information
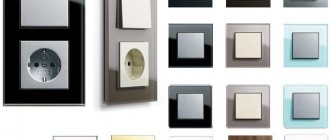
Keyboard models are the most popular and affordable today, designed for a voltage of 220-250 V and a rated current of 10-15 A. One-, two-, three-keyboards are used, there are even 5-6 keyboards.
They are installed indoors in an open or hidden way, with all the keys usually connected by one frame.
Key switches must be distinguished from switches. They are very similar, but perform different functions.
There are also “passing switch” - this is a combined version of a switch and a switch.
The use of multi-key devices is very convenient in large rooms with several lamps. A significant “plus” of the presented switches is the shorter length of the wire for connecting the switch and the output to one point for controlling the lighting in the room.
Rheostats or dimmers are considered more modern, with the help of which you can conveniently regulate the intensity of the light flux. But such devices only work with incandescent and halogen lamps.
Electrical switches are usually wall mounted, depending on the wiring method (concealed or exposed).
When electrical wires are hidden inside walls, the switch will be located in the wall socket. In the case of an open installation, a socket box is used, where the switch will be installed.
The first option is the most common, the second is easier to maintain.
How to disassemble a light switch?
So, in the initial position you have a key switch securely fastened inside the groove. First, prepare a tool to quickly disassemble the case - an indicator screwdriver, which will be quite sufficient.
Instructions for disassembling a light switch in an apartment are as follows:
Disconnect the circuit breaker that protects the electrical wiring from network overloads and short circuits.
Make sure there is no electricity in the room using an indicator screwdriver.
Remove the key(s). It doesn’t matter what type of switch you use: single-key, double or three-key. To remove the key, you need to squeeze it with your fingers on the sides (in the middle) and carefully remove it from the case (as shown in the photo). Sometimes the part “sits” firmly inside the case and in order to get it out you need to pry off one of the edges with a screwdriver.
Remove the decorative frame. In some cases, the frame is secured with two bolts from the inside; less often, the part is held in place by grooves that need to be lightly pressed with a screwdriver to disassemble the electrical accessories. Another option for fixing the frame is with the help of an additional element that is attached to the grooves of the caliper.
Remove the “core” from the socket. There are two screws on the sides of the case that secure the mechanism to the wall. All you need to do is unscrew them with a screwdriver. There is another option for holding the case in the socket box - with spreading legs. They need to be loosened by unscrewing the bolts on the sides that adjust the thrust angle.
Disconnect the lead wires. Phase, ground and neutral can be secured with self-clamping terminals or a screw clamp. In the first case, you just need to press the locking levers and pull the wires out of the connectors. The screw terminals must be unscrewed with a screwdriver and the wires carefully removed.
That's all the instructions for disassembling the light switch. As you can see, there is nothing complicated in such an event.
Visual video lessons will allow you to see in more detail all the stages of unwinding:
As for repairs (for which it was necessary to disassemble the light switch), it all comes down to the following steps:
- If the effects of the mechanism melting are visible inside the case (the plastic has turned yellow, some areas are charred), you can throw away the product without hesitation and go to the store to buy a new one. Today, the cost of a key switch is not too high, but safety is much more important!/li>
- If there is no visible damage, try reinserting the wires and tightening them carefully, as Perhaps the contact simply loosened, as a result of which the switch stopped working. If it doesn’t help, most likely the reason is in the electrical wiring, try testing it with a multimeter, based on which you can draw conclusions.
After finding the cause of the breakdown, and most likely it is a weak contact, assembly is carried out in the reverse order. We hope that now you understand how to disassemble a light switch with your own hands!
Step-by-step instructions for analysis
And now in detail about how to remove the switch:
- The first step is to remove the key. In theory, it should come off if you press the key from below with your thumb and pull it towards you from above with your other fingers. In some models, the keys fit quite tightly, then you will have to slightly pry them off from the side with a flat-head screwdriver. Do this carefully so as not to scratch the protective frame and the key itself. If you have a switch with two or three keys, remove and put them away one by one.
- Now remove the protective frame. In some models it is secured with two screws; unscrew them with a Phillips screwdriver. Sometimes the frame is secured using plastic latches, in this case it’s even easier, just squeeze them out.
- Having removed all the protective plastic elements, we approached the operating mechanism of the switch. There are two spacer screws on the sides; unscrew them and remove the working part from the socket box. There is another option when, to fix the working mechanism in the socket box, not spacer screws are used, but expansion tabs. They need to be loosened a little by reducing the thrust angle.
- Carefully inspect the disassembled switch, especially the wire connection points, for weak contact, burning, or melting. Disconnect the wire strands from the contact holes. In order not to confuse anything later, immediately use insulating tape to mark the wire that was phase and connected to the incoming contact of the switch. If you find that the wire strands are oxidized, clean them with sandpaper and reconnect. If it is discovered that a wire core has burnt out as a result of poor contact, it is necessary to re-terminate it, use a knife to remove 1 cm of insulation and secure it in the contact hole.
This video shows how a single-key one is disassembled:
and two-key switch:
When disassembling the switch, remember the sequence of actions. If everything is in order with the switching device itself (it has not melted and is ready for further use), it will need to be assembled in the reverse order. If damage to the switch itself is discovered (for example, the contact part is melted), and do not try to restore anything, immediately go to the store for a new device.
What to do with the rotary switch
Key switches are the most common and simplest models. With other options for such devices, some difficulties may arise. Sometimes you have to troubleshoot problems with so-called rotary switches, also called dimmers.
Disassembling the rotary switch begins with removing the round handle. You just need to pull it forward while holding the device body
Such devices are also sensitive to power surges and short circuits, just like their “brothers” with keys. Very often the triac in dimmers breaks. This element cannot be repaired, but it can be replaced. You need to start disassembling the rotary switch by removing the adjustment knob.
It is mounted on semicircular male-female elements or with special slots. You need to hold the switch body with one hand, and with the other, gently but forcefully pull the handle towards you. There is no need to twist it.
There is a fastening locknut under the handle; it also needs to be unscrewed. Sometimes fastening is done using a screw.
After the dimmer locknut or mounting screw has been unscrewed, you can remove the device body and gain access to its interior
Any of these elements should be unscrewed counterclockwise. Now you need to remove the plastic cover, as well as the frame, if necessary. Then you should loosen the elements that hold the dimmer mechanism inside and you can remove it from the socket.
First you need to check all contacts, connections and wires, clean off any deposits and oxidation that have appeared, restore damaged insulation, replace broken wires, etc.
If the rotary switch triac is broken, it must be replaced with another serviceable element with exactly the same dimensions and characteristics
The damaged triac must be removed and taken to an electrical store to find a new one, exactly the same. Reassembling the repaired device is performed in the reverse order.
As in the case of a key switch, before disassembling you need to de-energize the line, check the contacts with a tester and record the process in the form of a photo so as not to confuse anything during assembly.
FAQ
Question No. 1: Does it make sense to repair an old-style switch, still made in the Soviet Union? Or is it better to buy a new, more modern model?
If an outdated model light switch breaks down, you can, of course, try to repair it. But this makes no sense, since each part has its own service life. In electrical engineering, using parts of sockets and switches for a long time can be dangerous.
Question No. 2: Does the power of light bulbs installed in lighting fixtures affect the service life of the switch?
One of the reasons why key switches quickly break down is that the light bulb in the chandelier or floor lamp is too powerful. It is better to replace incandescent lamps with energy-efficient and safe, but at the same time, less powerful types of lamps. It is best to use modern LED light sources, which have a relatively low cost and good energy-saving performance.
Question No. 3: Is it possible to try to repair or at least check the switch without disassembling it?
You can try to check whether the wires are securely fastened with the internal screws of the device. This reason occurs quite often. To solve the problem, you just need to tighten the screws using a screwdriver.
Question No. 4: If there is neither a felt-tip pen nor a marker in the house, how can you mark certain wires and not confuse the order of assembly?
To do this, it is recommended to use a camera or mobile phone camera. You can photograph each stage of the work of dismantling the switch, so that after repair it can be easily and quickly reassembled.
Fault diagnosis
Has the light gone out in your house, garage or shed? Before you take a screwdriver, you need to find out the possible cause. There may be several of them, identifying them is not difficult:
- Burnt out incandescent lamp. Sometimes in such cases, when turned on, it may flash, blink or burst, and only then go out. If this happens, then there should be no doubt - the lamp requires replacement. You should turn the switch to the “off” position, carefully unscrew and replace the burnt out bulb with a working one. If the lamp simply does not turn on, then to diagnose it you will also have to unscrew it from the socket, see if the tungsten filament is intact, or simply try to insert a new lamp in its place. If after the manipulations the light turns on, then everything is in order and nothing else needs to be done.
- If replacing the lamp did nothing and the light still does not want to turn on, the socket may have failed. To check this assumption, you need to unscrew it and put another one in its place.
- If there is no response, there are no options left - the switch itself is faulty.
If you have spare electrical accessories and several screwdrivers at home, you can immediately begin repair work. The only difficulty is to correctly locate the mounting points and not damage the appearance of the switch when removing it from the wall.
The fact is that the reason for the inactivity of the on/off mechanism can be easily eliminated using home methods, and replacement will not be required, then it will be possible to put the repaired switch back in place. And given that manufacturers now pay great attention to the design of their products, all screws, clamps and other fasteners are usually hidden under the frame. Therefore, when dismantling, without knowing the detailed structure of the fittings, you can easily damage the keys or frame, and this will significantly worsen the external data.
Recommendations for repairs
Problems with contacts are easily resolved. They need to be inspected first. If there is a layer of oxidized metal on them, you should remove it and then install the contacts in place.
If the contacts are not just oxidized, but have pronounced traces of melting, they usually cannot be repaired and the device will have to be completely replaced. Removing carbon deposits from the contacts is very simple; you can use a knife or the end of a flat-head screwdriver to do this.
A visual inspection of the wires both in the electrical outlet and in the junction box will help identify and eliminate the cause of the breakdown. It is necessary to restore damaged elements or replace them completely
When working with wires, you need to pay attention not only to the condition of the bare ends, but also to the quality of the wires themselves. For example, fragile wires can easily break, break, etc. In this case, part of the wiring will have to be replaced.
Required Tools
As before starting any work, you first need to prepare all the tools. To disassemble the switch, one small flat-head screwdriver is usually enough. Some designs provide for mounting with Phillips screws, so you will also need a Phillips screwdriver.
You should also have an indicator screwdriver with you to check the voltage. To repair the switch, you may need electrical tape, sandpaper, or a knife.
The voltage must be checked with an indicator screwdriver.
How to remove a switch or socket before wallpapering walls
If you want the wallpaper to look beautiful on the wall, then before pasting the surface, remove all sockets and switches from it. No amount of precision will help you get around the fixtures without removing them - the wallpaper around the perimeter will be uneven, and after the repair there will be a bitter aftertaste.
Below is a brief instruction with a photo; after spending 5 minutes on it, you will not receive an electric shock, and the wallpaper will look beautiful in the interior of your apartment.
Step one - preparation
Sockets/switches are removed immediately before wallpapering; there is no need to do this in advance, as you can get an electric shock when turning on the lights or, as an alternative, sit in the dark with electrical appliances turned off.
We recommend removing old wallpaper without removing switches, except if the walls need to be heavily wetted and water may get on live wires. Typically the algorithm looks like this:
- Removing old wallpaper
- Prepare the wall (if necessary),
- Prepare glue and cut new wallpaper,
- Turn off the light on the meter,
- Removing sockets
- Wallpaper is being glued.
This way you can avoid some inconveniences and the use of swear words when becoming closely acquainted with the discovery of Alexander Volta.
The tools you will need are a flathead and a Phillips screwdriver.
Step two - removing the switch
Let us remind you that we remove, not dismantle, sockets and switches, so it is important to keep them intact unless replacement is planned. Using the example of a one-button model of a Legrand Etika switch, the essence remains the same for other mechanisms.
First, remove the button, for which we use a flat screwdriver or a sharp knife. We insert the screwdriver into the gap between the button and the switch frame, pressing the pressure panel until the fastening tendril comes out of the side hole. Do not overdo it - you need to press the button until the tendril comes out - no more, no less.
Now we remove the protective panel, which provides access to the wires and the main fasteners of the switch. To do this, unscrew 1-2 screws at the top and bottom and hook the protection with a screwdriver. The protective panel presses the switch frame to the wall; after removing the first one, the second one is automatically released and removed.
If the switch or socket has been standing for a long time and has begun to wobble, then at this stage the mechanism is secured. To do this, after removing the protective panel and frame, tighten the two main fastening screws. They are located on the sides of the push mechanism in the switch or to the right and left of the plug input in the socket. Tighten the screws sparing no effort – it is difficult to remove them.
There is no need to completely remove the light switching mechanism - just remove the button, protective panel and front frame!
Now all that remains is to glue the wallpaper, cutting the wallpaper sheets on the switch so that they extend 1 cm inside the perimeter of the switch, and install the mechanism back in the reverse order - the outer frame, fastening the protective panel with two screws and installing the button until it clicks.
Removing the key
To remove the key, you need to pull it towards you.
You need to start disassembling the switch from the keys, since it is not possible to dismantle the structure with them.
The easiest way to implement this is to press the key with your thumb towards the wall, grab the formed protrusion on the sides with your other fingers and, with a little effort, pull the key towards you. If a person is afraid of not calculating the force and breaking the part, you can use any flat and hard object, for example, a knife or a flat-head screwdriver. However, it is preferable to do everything manually, since the likelihood of scratching or damaging the part is minimized.
Modern modifications of switches are equipped with special holes on the sides of the keys. This design can be removed without much effort and without the risk of damaging its integrity.
In a two-key or three-key switch, after removing the first one, the others are removed in a similar way.
Common mistakes and their consequences
The main thing is to act carefully so that the plastic structure does not crack. The switches cannot be repaired; if the integrity of the housing is damaged, you will need to purchase a new device. This mistake is the most common when removing switches from walls.
The second mistake is the most dangerous; its meaning lies in neglecting the rules of personal safety, which poses a threat to human health and life. Before starting work, you need to turn off the power supply to the apartment and check the voltage at the output in the work area. If it is missing, you can safely get to work.
If you have no skills in such matters and the master is not sure that he can cope with the task, you can turn to a qualified electrician for help.
Mandatory step - disconnecting the power supply
Any work carried out on electricity must be carried out after it has been switched off . In a house, wiring usually diverges into several parts. Each of the branches is responsible for its own area and functions on it.
The distribution machine is usually located in the corridor or basement; the required lever on it is turned off, after which the voltage at the output is checked. If you are not sure which petal to turn off, it is better to turn off the machine completely.
Automatic power cut-off.
As for apartment owners, their distribution panel is located on the floor in the entrance. The main thing is not to get confused and not turn off the lights for your neighbors.
Design errors can affect the process. Sometimes it is not the phase wire that is connected to the machine, but the neutral wire. Such a system will work, but there is always voltage left in it, so it is rechecked. To solve this problem, you will have to change the connection diagram.