Convenience in the kitchen for the housewife is not just a thoughtful arrangement of furniture, but also the presence of various household appliances that greatly facilitate the cooking process. All modern devices are electric, that is, they require connection to a current source.
Adjustments to the existing premises can only be made during a major renovation. Therefore, when planning it, you should draw up a design project with an exact list and placement of household appliances and think about how to place sockets in the kitchen correctly and in the right quantity. This will not be difficult if you have an idea of the safety standards and rules that will be discussed in the article.
Sockets in the kitchen for the hob and oven
The oven and hob are connected separately, and therefore two independent sockets are required. There are several installation models:
- When the oven is positioned below the hob, both sockets should be positioned 180mm above the floor. At this distance there will be a retractable drawer.
- Both socket boxes are mounted vertically behind the nearest cabinet. A distance of 200 mm is maintained from the side wall. The floor is required to maintain a height of 200 to 750 mm.
- When the oven is located separately from the hob, the appliances should be placed at the appropriate level - ideally 200 - 750 mm under the oven, or immediately behind the cabinet next door (1000 - 1300 mm above the floor).
- When installing a separate stove, the socket is located on the side behind the adjacent cabinet.
Electrical network load calculation
After drawing up the layout of the sockets, you need to calculate the load. This must be done so that at the right time, when the kitchen will be used to the maximum, there is no power outage.
Depending on the type of electrical network, the installation of machines differs. If you are on the list of lucky owners of a single-phase network, then you will need more machines. Consumers such as an induction cooker, washing machine and oven require their own line with a separate machine.
The panel should contain a common circuit breaker with maximum load. Depending on the network and consumers, its amperage may vary. No more than 5 sockets are allowed to be connected to a loop. Such a loop must be protected by a 25A circuit breaker. Typically, 32A+40A connectors are used for hobs and electric stoves. In all other cases, these are ordinary closed or open grounding sockets from 16A.
Wrong location of sockets
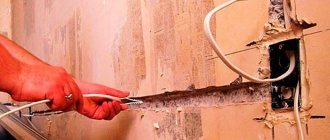
Which cable to choose for the kitchen
The next step is to calculate the cross-section of the common supply wire of the electrical panel and the outgoing wires to each pantograph in the kitchen. To buy a good cable, follow the rules below:
- if the load of devices does not exceed 3500 W - copper cables VVGng LS 3*2.25m2;
- if the load of the devices does not exceed 5500 W - copper cable VVGng LS 3*4m2;
- if the total load of all electrical appliances is up to 10,000 W - copper cable VVGng LS 3*6m2;
- if the total load of all electrical appliances is up to 15000 W - copper cable VVGng LS 3*10m.
If your home has an old grounding system (that is, there is no third protective conductor), then installing a three-conductor cable is still a suitable option. This is done to save you from replacing or reconstructing the wiring in the future.
In any case, another wire will not be superfluous. It can be useful in case of a broken cord or any other damage.
Recommendations for wiring and circuit breakers
- for a group of sockets into which devices up to 3.5 kW are connected, a 16A circuit breaker is installed
- for devices up to 5.5 kW automatic 25A. Moreover, it is better to extend a separate group to this pantograph
You can also navigate using the following table for selecting machines and cables when connecting a hob:
- since the kitchen is a wet room, plus a huge number of objects with a metal case, it is mandatory to install an incoming RCD with a current of 30 mA in the panel in front of all machines
- all sockets must have a grounding contact, for a rated current of up to 16A, for hidden wiring
- A separate socket is installed for each pantograph
- do not use carriers or extension cords in the kitchen
This is not only an additional load on the wiring, but also a potential short circuit (due to spilled tea or other liquid).
Advantages
If the installation of wall panels is compared with laying tiles, the following advantages can be identified:
- There are many colors and textures of such products. This allows, for example, to perfectly match the color of the wall panels with the color of the countertop. As a result, it looks harmonious.
- Installing the panels is easy, especially when compared to laying tiles. After all, installing tiles requires certain skills, experience and more time. This is especially difficult to do if the walls are uneven. But wall panels do not require all this, you only need some tools and a little time.
- It is no secret that tiles may fall off over time, especially if they were not installed professionally. There may be several reasons for this. But this will not happen with wall panels. After all, even if shrinkage occurs, it will not affect the structure in any way.
Kinds
There are several types of panels:
- Leafy. They are similar to plywood, but have an image on the surface. The joints between the products are filled with slats or sealant. The thickness of such panels ranges from 3 to 6 mm, and their size is 1.22x2.44 meters.
- Square. Sizes from 30x30 to 98x98 cm. Thanks to the use of tiles of different textures, you can combine panels to create a mosaic.
- Rack and pinion. Such products resemble the well-known lining. Such panels can be fastened in two ways: “groove-groove” or “groove-tenon”.
Often the panels are made to look like wood.
Materials
In addition to the mentioned MDF, products can be made from chipboard, PVC or specially treated wood.
As for chipboard and MDF, they are made using a hot press method, combining wood chips with synthetic additives.
The disadvantage of chipboard is its low strength and resistance to moisture, so it is not recommended for use in the kitchen.
In any case, all materials must be certified. It is advisable to have proof of fire safety. This is not a requirement, but recommended.
Lathing
Bars are used that are installed perpendicularly. They are secured with screws at a distance of up to 50 cm from each other.
Mounting profile
Well used if the walls are uneven. Also, the profile is not hampered by high humidity, unlike wooden sheathing, for example. First you need to install the metal slats, then the profile to which the panels are attached. The method eliminates warping.
Glue
Glue is a popular method of attaching wall panels in the kitchen with your own hands. If the surface is smooth and clean, nothing prevents you from fixing the panels with glue without using profiles and sheathing. It is applied with a roller or spatula.
Do not forget to use a level to ensure the quality of installation is at a high level. After completing the process, it is recommended to double-check the horizontalness of the structure, as well as the uniformity of the seams. This is especially true in corners. After completing the installation of the panels, it is recommended to wipe them with a damp sponge so that no dirt or glue residue remains on the surface (if the installation was carried out using glue).
Conclusion
Wall panels are a simple and effective way to arrange a kitchen workspace. Any housewife will appreciate the practicality of such a solution. The panels are easy to clean and do not absorb dirt and moisture. At the same time, they perfectly ennoble the space, creating comfort and coziness, which are also important in this room. And if something else is not clear, you can additionally watch the video instructions, and then the installation will be easy and quick.
Probably, you need to start with the fact that the wall panel in the kitchen can be made from different materials, each of which has its own advantages and disadvantages. And since the kitchen is the place where a lot of grease and other drops fall on the walls near the work surfaces, you need to approach the choice of material very carefully.
Preparing for installation
Before installing sockets, it is recommended to make markings on the wall.
The beginning of the kitchen electrification process is drawing up a project, carrying out calculations and purchasing everything necessary.
For work you will need the following tools and materials:
- hammer drill, grinder, soldering iron;
- pliers, wire cutters, knife;
- screwdrivers;
- roulette, level;
- copper cable VVGng-Ls 3×4mm²;
- spatula, putty;
- corrugated plastic tube.
Drilling tiles for a socket.
Preparation of the base is carried out in the following sequence:
- Markings are applied to the walls. Lines are made only in the vertical and horizontal directions. The places where sockets and mounting boxes will be located are marked.
- Using a grinder and a hammer drill, grooves and holes are made for the glasses.
- Plastic tubes with a cable pre-stretched inside are placed in the grooves. After this, the grooves are sealed with putty.
You can continue working after the solution has completely set. To avoid subsequent stripping, the solution must be laid so that it does not form a convex layer after hardening.
Calculation of power of electrical appliances
Before starting repair work, at the time of design, you should decide on the number of electrical appliances to be used, and also take into account options for installing additional elements in the future. This will allow you to calculate the cross-section of the cable to be laid, the number of electrical points, and wiring methods. For each individual device, power indicators will be individual, depending on its type, class, and manufacturer. However, as an example, you can use average values, on the basis of which you can make the necessary calculations and make a reserve for the maximum load by increasing the diameter of the core.
Table of average energy consumption for kitchen electrical appliances:
| Name | power, kWt | Operating time minutes per day |
| Electric oven | 2 | 60 |
| Electric stove | 10 | 120 |
| Washing machine | 2 | 90 |
| Dishwasher | 2 | 72 |
| Water heater | 2 | 120 |
| Fridge | 0,3 | 420 |
| Freezer | 0,3 | 420 |
| Electric kettle | 2 | 10 |
| Microwave | 1 | 15 |
| Blender | 0,2 | 10 |
| Hood | 0,3 | 30 |
| Food processor | 0,5 | 20 |
| Coffee maker | 0,8 | 12 |
| Toaster | 0,8 | 10 |
The main load comes from large equipment, for which a separate cable should be provided
When making calculations, it is necessary to take into account the possibility of connecting all elements at the same time, including taking into account the use of additional items, for example, a laptop, TV
Preparatory work
The glass itself has a number of positive aspects, but during installation it is necessary to take into account all the subtleties, including holes for installing sockets. If you do not cut them out in advance, then installation will be impossible in the future.
The installation process itself is almost the same for any apron material. First you need to prepare the tool and the surface itself:
- to attach the sockets you will have to work with a hammer drill, crowns and chisel;
- To conduct lines, it is recommended to use a three-core cable with double insulation, 2.5 mm in diameter, socket boxes, a distribution box, sockets themselves of 16A or more, dowels and screws.
Having decided on the amount of equipment, sockets and drawing a diagram, you need to transfer the data for electrical points directly to the wall using a pencil
It is very important to understand what a kitchen apron is made of
For installation, you need to carefully cut a hole in the tile or plywood base. The most difficult thing is with a glass work area. In this case, the apron manufacturer must be given the parameters in advance according to the diagram and location of the devices.
Drawing up a diagram of the location of sockets
When planning a major kitchen renovation, you need to take care of drawing up a diagram of the location of sockets in order to avoid unnecessary hanging wires, as well as inconvenience when connecting electrical appliances.
Determining the required number of sockets
To determine the number of sockets in the kitchen, you need to add up all the household appliances that you plan to use and add another 20% as a reserve. The most common kitchen users are:
- hoods;
- slabs;
- fridge;
- built-in appliances;
- kettle, mixer, etc.
To the resulting list it is also worth adding devices that may be used in the future. All calculations should be performed at the wiring stage, i.e. before finishing work begins, since it will not be easy to install additional sockets later.
The number of sockets at each connection point in the kitchen directly depends on the number of electrical appliances that will be used in its immediate vicinity
Location of sockets for each type of household appliance
Depending on the consumer, the outlet should be located at a certain level from the floor:
- Plate. The basic rule is that sockets cannot be placed above the burners or behind the oven. The optimal distance from the floor is 15 cm with some indentation to the side so that the plug can be accessed, but the socket is not visible.
- Fridge. The recommendations are generally identical. Plus, it’s worth considering that some refrigerator models have a short power cord, which will not allow the outlet to be located far away.
- Washing machine and dishwasher. This type of equipment has holes on the back for water supply and drainage, so the socket should be located at some distance. It is better to place it on the opposite side of the hoses at a height of 15–20 cm from the floor.
- Hood. Since this device is installed quite high, the socket should be located closer to the ceiling, usually 2 m from the floor.
- On the apron. Typically, this location is a working area for cooking, so connecting kitchen electrical appliances may be required quite often. So that the plug can be turned on and off without difficulty, the socket is placed 10–15 cm from the edge of the tabletop or 110–115 cm from the floor. You shouldn’t place it too high, since the apron is a noticeable place in the kitchen and wires that are in plain sight will only spoil the interior.
In the kitchen area where the sofa, table and chairs are installed, the presence of an outlet is also extremely important, for example, to connect a vacuum cleaner, charge a phone or laptop. In this case, it is better to place a pair of double sockets at a height of 20–30 cm from the floor
With a higher location, the wires will be visible.
Wiring rules
Connecting sockets in the kitchen is carried out by adhering to the following rules:
- The total power of consumers that are connected to the outlet should not exceed the maximum permissible.
- When operating equipment with high power, it is necessary to connect a dedicated line to it and install a separate machine.
- If there are electrical appliances with a metal body, they must be grounded.
- It is not recommended to install sockets behind electrical equipment that generates heat (ovens, refrigerators, etc.).
- Before you begin installation, you should make a plan.
Table: power and wire cross-section for connecting kitchen appliances
| Types of equipment | Maximum power consumption | Socket | Cable cross-section | Machine in the dashboard | |
| Single-phase connection | Three-phase connection | ||||
| Dependent set: electrical panel plus oven | about 11 kW | Calculated for the power consumption of the kit | Up to 8.3 kW/4 mm² (PVA 3*4) 8.3–11 kW/6 mm² (PVA 3*6) | Up to 9 kW/2.5 mm² (PVA 3*2.5)9–15/4 mm² (PVA 3*4) | separate, at least 25 A (380 V only) plus RCD |
| Electrical panel (independent) | 6–11 kW | Calculated for panel power consumption | Up to 8.3 kW/4 mm² (PVA 3*4)8.3–11 kW/6 mm² (PVA 3*6) | Up to 9 kW/2.5 mm² (PVA 3*2.5)9–15/4 mm² (PVA 3*4) | separate, at least 25 A plus RCD |
| Electric oven (independent) | 3.5–6 kW | euro socket | Up to 4 kW/2.5 mm² (PVA 3*2.5) from 4 to 6 kW/4 mm² (PVA 3*4) | 16 A 25 A | |
| Gas panel | euro socket | 1.5 mm² (PVA 3*1.5) | 16A | ||
| Gas oven | euro socket | 1.5 mm² (PVA 3*1.5) | 16A | ||
| Washing machine | 2.5 kW7 kW with drying | euro socket | 2.5 mm² (PVA 3*2.5) 7 kW/4 mm² (PVA 3*4) | separate, 16 A separate, 32 A | |
| Dishwasher | 2–2.5 kW | euro socket | 2.5 mm² (PVA 3*2.5) | separate, 16 A | |
| Refrigerator, freezer | less than 1 kW | euro socket | 1.5 mm² (PVA 3*1.5) | 16 A | |
| Hood | less than 1 kW | euro socket | 1.5 mm² (PVA 3*1.5) | 16 A | |
| Coffee machine, steamer, microwave oven | up to 2 kW | euro socket | 1.5 mm² (PVA 3*1.5) | 16 A |
Distances and locations
When you have decided on the quantity, it’s time to move on to calculating the required sizes and indentations.
To do this, draw something like a scan of the walls where the furniture will stand. Here you will need the exact dimensions of the kitchen - length, height of the room. Gradually, in the form of rectangles, you draw the equipment and all the cabinets.
If the kitchen is corner, do the same with the adjacent wall.
Next, take your plan with the number of sockets and transfer them to the wall layouts. For each technique, follow its own rules.
Refrigerator socket
For built-in refrigerator
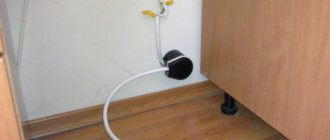
It is better to place the socket in the kitchen plinth - this way it will be accessible, and if necessary, the device can be turned off. The socket should not be placed behind the appliance - it may interfere with the installation of the frame and the refrigerator itself. If the kitchen configuration allows, you can place the outlet in an adjacent cabinet. In this case, the height of the outlet varies from 20 to 70 cm from the level of the finished floor and no further than 10–20 cm from the refrigerator itself.
For free standing refrigerator
It is allowed to place an outlet directly behind it. But the best option is 5–10 cm from the refrigerator: the socket will be in constant access, and if necessary, you will not have to move the refrigerator.
Sockets in the work area and above the tabletop
The height of the tabletop is usually 85cm, maximum 90cm. Then there is a partition with a height of 550-600mm and then cabinets.
Place sockets in this area 105cm from the floor.
In this case, they will not end up in the middle of the wall, and it will be convenient to cover them with the same microwave.
The minimum distance from the countertop should be at least 5cm so that the kitchen plinth does not touch them. Location: one set in any corner, plus between the hob and sink.
As mentioned above, at least two pieces. If you don't like the look of sockets above the kitchen splashback, consider the option of a pull-out unit from the countertop.
You definitely need to consider whether there will be built-in appliances in the upper cabinets. For example, a microwave.
You will also have to make a separate outlet for it. It is not feng shui to pull the cords from above to the tabletop area.
Hood
Also at the top, at a height of 1.9m-2.0m, there is an outlet for the hood. However, a lot can depend on the brand. If this is a cheap option, then you can get by with the cable outlet and then connect it directly inside the equipment.
But if this is an expensive model, then it comes with its own fork. And cutting off the factory plug will void the warranty.
Sockets for hob and oven
If this is not a single appliance, the electric stove, hob and oven are connected to different sockets. When the oven is located in the classic way under the hob, the sockets are placed at a height of 10 cm from the level of the finished floor in the kitchen basement in the center of the frame or in an adjacent cabinet.
Location of sockets
When developing a layout of sockets, you should be guided by regulatory documents.
It can be:
- SNiP 3.05.06-85 for installation of electrical devices.
- GOST 7396.1-89, for the development of electrical circuits for connecting electrical appliances.
When installing kitchen sockets, the following standards must be observed:
- They should be placed at a height of at least 20 mm from the baseboard.
- To connect to the network, a household appliance must be located at a distance of up to one meter from the outlet.
- With this installation, the product will not be exposed to moisture vapor or splashes of water.
How many sockets do you need in the kitchen?
The number of sockets is calculated taking into account the number of electrical appliances present in the kitchen, and 20-25% of spare ones are added.
In this case, the devices are mounted:
- For hob with induction surface, electric ignition or electric oven.
- Under the hood (see Socket for the hood: how to choose and install it yourself).
- For connecting large household appliances: refrigerator, washing machine, TV.
- For built-in appliances, microwave ovens, electric kettles, and other appliances.
By counting the number of devices to connect and adding the reserve, you get the total number of sockets that will be needed for installation in the kitchen. If there are not enough of them, it will be quite difficult, and sometimes impossible, to remake the system, and you will have to use extension cords, which is not very convenient.
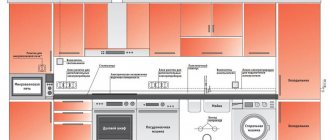
Approximate list of electrical appliances in the kitchen and their connection to the electrical networkPower distribution
When arranging a kitchen, all its equipment should be divided according to the intensity of use and power consumption. To connect small household appliances, it is enough to install 4 connection points: two from one outlet - in the kitchen, large appliances usually work constantly.
Placing household appliances in the kitchen
To install a mandatory group, you need individual sockets that are designed for the appropriate power. If this rule is ignored, when connecting two high-power units to one power source, excessive heating and melting of the outlet may occur.
It is unacceptable for other devices to simultaneously connect devices with a total power exceeding the capacity of the outlet. The instructions for choosing the right sockets offer the following simple formula: the power of the unit is divided by 220. The result is the current strength calculated for one socket.
Approximate power values for large equipment:
- Oven – from 2500 W.
- Stove - 1000-1500 W.
- Dishwasher – from 1000 W.
- Washing machine – from 1500 W.
- Water heating tank – from 1500 W.
- Refrigerator – 200-1000 W.
- Freezer compartment – 300 W.
For small kitchen appliances:
- Microwave – from 800 W.
- Electric kettle – from 500 W.
- Blender – up to 300 W.
- Kitchen processor – 1200-1500 W.
- Coffee maker – from 900 W.
The kitchen may have:
- TV consuming – 200-330 W.
- Laptop – 50-75 W.
To avoid unpleasant consequences, you must follow several rules:
- The total power of devices connected to the outlet must not exceed the permissible load. You cannot connect a kettle and a microwave oven to the same outlet at the same time. The power of the devices is specified in the technical data sheets for the devices.
- There should be so many lines in the kitchen that will power the sockets so that there is enough of them for all units with a double reserve.
- For large household appliances and electric stoves, it is better to arrange separate lines with the required cross-section, copper lines with the installation of protective automatic equipment.
- Devices with a metal body require grounding. Sockets for them must be connected through a differential circuit breaker or a residual current device (RCD).
- It is prohibited to install sockets directly behind built-in ovens, hoods, refrigerators; they should be located on the side at a distance of 20 cm.
- Sockets above the countertop are installed 15 cm above it. It is prohibited to mount them above the stove and sink.
- When installing sockets near pipes, they must have covers and rubber seals, which will protect them from moisture in the event of a breakthrough.
On the packaging for sockets, manufacturers indicate the power for which they are designed. Products are available in 10A, 2.2 kW; 16A – at 3.5 kW.
Before installing the sockets, a diagram of their location is first drawn up, as in the photo. The ease of use of household appliances in the kitchen, their safety and the aesthetics of the room depend on its accuracy.
How to best arrange sockets in the kitchen
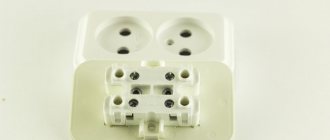
Types of sockets for the kitchen: 4 common variations
Corner sockets for the kitchen. They are popular due to their ease of use, because they can be installed at the junction of walls, or at the junction of a wall and a wall cabinet. Another advantage of using this product is the fact that it occupies space that is usually not used and is simply empty. Installation is not particularly difficult and can be compared to installing a surface-mounted socket. They can be either single or modular.
Pull-out socket blocks. Quite an interesting option from a practical point of view. Can be an excellent alternative to an electrical extension cord. Allows you to connect several electrical appliances at the same time, which is very convenient, especially in the kitchen. In most cases, these sockets are placed in cabinets to prevent moisture and dust from entering.
Overhead sockets. The simplest and most uncomplicated. Installing them will not be difficult, since the installation is quite simple. But this type is not so often used in the kitchen, since it brings much more benefit to open wiring.
Built-in sockets (hidden). Represent a block consisting of several devices. Very popular among buyers, because they are installed in a countertop or wall cabinet. Thanks to this, the block becomes invisible until the moment of immediate use. They are loved by aesthetes because they are not an eyesore. To access the outlets, you must open the unit. To do this, press the housing cover.
The question arises: which sockets are best to install? Remember that each of the variations has its positive and negative sides. Therefore, choose the option that best suits your needs.
At what height should they be made?
Experts recommend adhering to a three-level scheme, considering it the most successful model:
- The lower level is occupied by large household appliances. Such sockets are located at a height from the floor of approximately 10-30 cm.
- The next level—intermediate—occupies the bulk of the equipment. Most often they use sockets that are located above the working surface of tables, this is convenient. According to the rules, they should be at a height of 10-20 cm above the tabletop.
- And at the very top level there are sockets for the kitchen hood, as well as lighting devices connected via an electric plug. Here the height is at least 2 m from the floor level.
How to install?
All that remains is to proceed with installation according to the prepared diagram:
- First, the sockets are distributed along the walls and on the kitchen apron, marks are made, and they are correlated with the output voltage cables.
- Then, in the marked places, holes are made in the wall, necessary for proper installation using a hammer drill and a round nozzle.
- A socket box is installed, which is securely fixed in the wall.
- Power lines are connected to the socket, fixed in accordance with installation rules, and covers are installed.
- It remains to check the functionality.
Retractable options are installed in a hole that is drilled in the work surface. You can connect them to a socket hidden behind the kitchen unit or located in the apron.
If you do not have experience, it is better not to take risks and turn to specialists.
Self-installation
If you have a certain desire, after a detailed study of video materials on the Internet, as well as current norms and regulations, it will be quite possible to install the sockets yourself. It is recommended to carry out the work taking into account the following algorithm of actions:
- A detailed diagram is drawn up.
- The points and lines specified in the project are transferred to the walls of the room.
- Holes are drilled for installing electrical boxes and grooves are made for laying wires (a grinder, a hammer drill, or a milling cutter may be required).
- Using plaster and plastic fasteners, socket boxes and cables are fixed to the wall.
- The laid line is checked and communications are connected to the apartment switchboard.
This technology is standard and may vary depending on various factors.
The grooves are usually sealed with a plaster mixture and are made strictly vertically so that, for example, when placing cabinets, their location can be predicted. The length of the protruding end of the cable must be at least 10 cm, which is necessary for normal connection of the fittings. Installing the outlet couldn't be easier. The main thing is to adhere to polarity and remember about grounding.
When planning the placement of a block of sockets, do not forget about choosing the correct center distance between adjacent mounting boxes. It must be strictly 71 cm, since, otherwise, it will not be possible to install fittings with a standard common frame. Ideally, it is recommended to install a residual current device on each line (group of lines), which will protect you and your household from electric shock in the event of emergency situations.
In this case, all equipment is de-energized, with the exception of the refrigerator (possibly also the router, emergency light and other consumers connected to a separate, non-disconnected line).
How to place sockets in the kitchen
Electrician in the kitchen
DIY kitchen wiring: step-by-step instructions
How to choose sockets for the kitchen
Retractable tabletop sockets
Installing exhaust ventilation in the kitchen
What additional materials will be needed?
To protect power supplies from splashes and soot, it is necessary to choose socket models with special plastic covers or a deep casing with protective curtains.
Today's range of power supplies for the kitchen offers 2 options:
- Internal sockets. The safest option is to cut the hole for the socket and the groove for the wire directly into the wall.
- External sockets. Relevant for houses where the wire is laid over the walls. Most often this applies to suburban wooden buildings.
“Apron design for classic kitchens”
The kitchen socket can be of various modifications:
- Have protective curtains.
- Be waterproof.
- To be supplemented with a residual current device.
- Have an ejector design, which greatly facilitates the process of pulling out the plug without displacing the mechanism of the socket itself.
- Have a built-in timer or indicator of the presence of current in the network.
For installation you will need:
- A hammer drill for forming a socket box.
- Crowns and groove chisel for laying wiring.
- Insulated electrical cable.
- Socket boxes.
- Self-tapping screws.
Also, in modern kitchens, pull-out sockets are often preferred. They are located inside an MDF apron. This design can hardly be called practical, but it certainly adds aesthetics.
“What types of aprons are there for the kitchen: a guide to design options”
When installing a retractable socket, the following 3 conditions must be observed:
- The cable must have an uninterrupted connection to the network.
- Access to the fittings should not be difficult, so that if it breaks, it can be easily replaced with a new one.
- There should be plenty of space below the surface.
Straight kitchen ideas in different styles
| Style | Traits |
| Classic | direct kitchen with patina, solid wood furniture, built-in appliances, noble shades of burgundy interspersed with gold, curtains made of light fabrics, a large chandelier, which is located directly above the dining table. |
| Provence | artificially aged surfaces, shades similar to those faded in the sun, bright elements that stand out against the general background, floor design in dark colors. |
| Country | warm colors, the use of brick, wood, ceramics, stone, wickerwork, lace, open shelves for dishes on which you can place homemade accessories and other cute trinkets, ceramic/clay dishes, brass pans, wooden spoons, curtains, tablecloths, napkins from lace, linen fabrics, stylized galleries, stained glass windows, folk decorations, decorative cornices. |
| High tech | light, functional furniture without excessive decoration, metallic design notes, cool tones, glass, metal. |
| Minimalism | Only the essentials are used, a minimum amount of decor, a lightweight set using plastic, metal, glass; instead of a dining table, you can use a tabletop attached to the wall. |
| Loft | a straight loft kitchen is: industrial, rough materials, strict palette, communications remain visible, industrial footage, huge windows. |
Don’t know where to start when choosing a kitchen for your apartment? It’s okay, we’ll help you! A detailed list of questions to answer before going to the store. Click on the button.
Additional recommendations
During operation, sockets can overheat, which leads to oxidation of contacts and terminals, and burning of wires. In order not to turn off the entire apartment during the renovation period, it is advisable to equip the line with its own 16-25A package switch. This device will prevent the possibility of a short circuit.
A good solution is to install switches with hidden wiring to control low-power appliances - a hood, lamp, toaster, multicooker.
When installing sockets, you need to choose places that are most convenient for use and comply with safety rules. It is advisable to choose a device installation height that ensures maximum comfort of use in a wide variety of situations. If the kitchen has a large area, energy sources should be installed at intervals of no more than 100 cm. This will provide the housewife with complete freedom of action.
Switch locations
It is no secret that it is recommended to install switches at the level of the lowered hand, taking into account the side of the door opening. There are other points:
- put each type of lighting (central, spot, perimeter, main area lighting, dining room) on a separate switch. This way you will vary the amount of light and save energy;
- Place the second control unit near the dining area. Otherwise, you will have to get up from the table every time to turn off the extra light;
- use the principle of walking distance - all switches should be close to your work triangle;
- add another separate switch to the unit to illuminate the work area, because turning on small lamp buttons every time, and even with wet hands, will be extremely inconvenient.
Drilling ceramics with a tile drill bit
The special feature of this drill is its spear-shaped tip made of hard alloy, which makes the drilling process more precise. Similar drills are used when drilling holes in glass, which is known to be quite fragile.
How to make a hole in a tile? The production process consists of several nuances. To prevent the sharp edge of the drill from moving to the side, it is recommended to stick masking tape on the tile, and then mark the future hole on it with a pencil. Thanks to the tape, the drill will remain in the place where you put it, and there will be fewer chips on the tile.
Rules and layout of sockets
Determine how many household appliances will be there or may appear in the near future. Then check and write down the power of each and the connection features, if any. Approximate power figures:
- Large appliances: electric oven – from 2500 W;
- hob – 1000-1500 W;
- dishwasher – from 1000 W;
- washing machine – from 1500 W;
- water heater – from 1500 W;
- refrigerator – 200-1000 W;
- freezer – 300 W.
- microwave oven – from 800 W;
- TV – 200-330 W;
The placement of sockets is subject to certain rules to prevent situations that could lead to unpleasant consequences:
Pay special attention to the fact that the total power of the devices plugged into the outlet should not exceed the permissible value. For example, you cannot connect a kettle and a microwave oven to the same outlet at the same time.
The power of devices can be clarified in their technical data sheets. It is necessary to install so many lines in the kitchen that power the sockets so that there is enough supply for all appliances with a double supply. This means that the kitchen needs to be roughly divided into parts with the location of the appliances, then the resulting power should be divided into socket groups in these parts and multiplied by two in each resulting group. For electrical appliances with high power (large household appliances, electric stoves, etc.), it is better to install separate lines with a suitable cross-section, copper and through protective automation. For convenience, it is better to sign each machine in the electrical panel. Devices with a metal body require grounding. Therefore, sockets for them must be connected through a differential circuit breaker or RCD (residual current device). It is prohibited to install sockets directly behind built-in electric ovens, refrigerators, and hoods; they should be located on the side at a distance of approximately 20 cm. Above the countertop, sockets are installed at a distance of 10-15 cm upwards. Conditions must be strictly observed to prevent moisture and splashes of grease from getting on them . Installation above a sink and stove is prohibited. When installing sockets near pipes, make sure that they have covers and rubber seals that will protect them from moisture in the event of a breakthrough.
Manufacturers indicate on the packaging for sockets what power they are designed for; these figures should be taken into account when purchasing. They produce options of 10 amperes, which corresponds to 2.2 kW, and 16 amperes – 3.5 kW.
Preliminarily draw up a diagram of the location of the sockets. This point should receive most of your attention.
The importance of this stage lies in the fact that the ease of use of household appliances in the kitchen, the safety and aesthetics of the room will depend on how accurately and successfully the diagram is drawn up
The placement of sockets should be strictly drawn on the kitchen plan and it should be noted how the electrical lines will be laid to them.
Do not forget about the design of the room; they should not spoil the overall appearance. If sockets for large household appliances, as a rule, are not visible behind the kitchen apron, then located above the countertop they can add an interesting look or ruin it.
In modern kitchens, the choice is often made in favor of pull-out options; they are hidden in the work surface without changing its aesthetics, and appear when needed. Another advantage to note is that they are easy to install; you can often order installation when making a kitchen set.
How to determine the required number of electrical devices
To do everything right, you should start by drawing up a plan for arranging equipment and furniture. If the future design has not yet been determined, this event will have to be postponed. Otherwise, it may turn out that the electrical sockets “stand up” in the wrong place. Considering that their location is connected with the wiring, the transfer will be quite difficult. It’s easier to first decide on the design of the room.
- Apartment
6 electrical planning mistakes that are ruining your interior
We are building a diagram for arranging furniture and household appliances. We determine the approximate number of required blocks. There should be one for each piece of stationary equipment, plus at least two blocks on each edge of the tabletop and one near the dining table. Provided that the latter is not located at a distance from the wall. We consider the following to be stationary equipment:
- hood;
- oven;
- hob;
- fridge;
- freezer;
- washing machine;
- dishwasher;
- microwave;
- garbage shredder.
It is good to install an electrical outlet near the kitchen switch. Typically this area is relatively free of furniture, so a network access point will be very useful here. It is especially useful for connecting a vacuum cleaner. After this, we think about the location of the connectors for other household appliances. As we know, there should be at least two of them on each side of the tabletop.
Instagram geosideal
We make calculations with a margin so that when purchasing new devices you do not have to use an extension cord or network splitter, it is also called a tee. This is unsafe and therefore highly undesirable.
Washing machine and dishwasher
These household items require a constant supply of water in addition to electricity, so they are often located in close proximity to the sink. Here you need to be careful, since access to moisture can make adjustments to the work.
For security, these connections are hidden in a cabinet, creating an additional barrier. The height from the floor is 40 cm. The device is not moved far, 20 cm will be enough.
One of the most common mistakes we can safely note is the installation of the element behind the equipment; during installation, the device simply does not fit into the space allocated for it. You need to be careful with built-in elements; any error or miscalculation in size will lead to additional work aimed at eliminating defects.
A microwave oven or coffee maker are not important attributes of every kitchen, but you shouldn’t forget about them either; the simplest socket options are suitable for this type of equipment.
To avoid mistakes when connecting devices and locating places for supplying electricity, you need to remember the basic rules. Experts have been thinking through all the points for many years and making adjustments to the schemes. It’s quite easy to make repairs yourself; you just need to be careful and not neglect the instructions.
Some sizes can be changed at personal discretion, but safety must not be forgotten. A room with high humidity is a particularly dangerous place if the wiring issues were handled by an inexperienced and poor technician.
TOP 5 common mistakes
When performing electrical installation work with your own hands, serious mistakes are often made. Which can lead to additional costs for their elimination or expose household members to the danger of electric shock. To avoid this, let's look at the most common mistakes:
- The cross-section of the wires supplying the kitchen does not correspond to the connected load. In this case, the wiring will overheat and may fail, or even cause a fire.
- Installation of sockets before drawing up a plan for the arrangement of furniture in the kitchen. In this case, there is a high probability that some outlets will be closed and you will have to be content with fewer resources. Or install new ones after finishing the finishing work.
- The locations of the sockets are not consistent with the water pipe laying plan. Then when gating walls, drilling, etc. you can damage the pipeline and flood the room.
- The permissible socket rating does not match the equipment being connected. As a result, the device will overheat and may melt or burn out.
- The dimensions of the socket do not allow installation of the desired device or interior element.
Sockets at the kitchen table where the family gathers
For many, the kitchen table is an additional workspace where, if necessary, you can sit in silence, watch a TV series or work on a laptop, which is especially important now, when many have switched to remote work.
The kitchen table should have 2-3 sockets for connecting a lamp, laptop or charging a phone.
Don't forget about heated floors and thermostats
Many people choose ceramic or porcelain tiles as kitchen flooring, laying a heating cable or heated floor mats underneath. The heated floor is controlled using a thermostat.
In many series of electrical installation products, thermostats are produced in the same design as the entire series of sockets and switches. Such thermostats are installed in the same framework as electrical installation products.
We hope you found our article useful, good luck planning and completing your renovation! Let your kitchen be as safe, ergonomic and cozy as possible!
Common Mistakes
You should not install sockets near a heat source.
During the design and installation process, inexperienced craftsmen make the following mistakes:
- Design errors. After installing the furniture, the sockets are located behind cabinets and large household appliances.
- Saving on cable, which leads to overheating and melting of the insulation.
- Connecting washing and flow-through devices through simple machines.
- Incorrect placement of sockets (above the sink and stove, close to gas pipes).
- Placing the cable in grooves without using plastic tubes.
By following the work technology and using high-quality materials, you can easily make reliable and durable wiring on the apron.
Sockets in the work area above the countertop
The part of the wall located between the wall cabinets and the countertop is called the kitchen apron. This is where most food preparation operations using small electrical appliances take place. Here you need to provide a number of sockets that will allow you not to turn off one kitchen tool in order to turn on another.
The installation height is 10-15 cm from the desktop surface. If you lower them lower, it will become inconvenient to use, and if you raise them higher, they will stand out strongly against the general background of the wall, which is ugly. Two separate blocks with three points each, located on different sides, look good. Such socket blocks can be supplemented with switches to control hoods and lamps. Or provide a separate block for them, installed to the side.