Author of the article
Yuri Sanaev
System Administrator. Sales manager of computers and wi-fi equipment. Work experience – 10 years. Knows everything and even more about hardware and software.
If a user wants to create a local network at home in order to have shared access to files from all devices, he may have problems crimping a twisted pair cable into 8 cores or 4 cores.
To cope with the task, let’s figure out what types there are, what wires, plugs and tools are needed. We will provide crimping diagrams and tell you which one is suitable in a particular situation.
Kinds
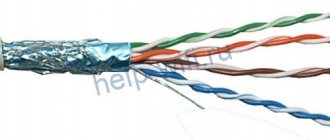
Twisted pair is a cable made of twisted copper or brass wires in a braid. It is designed to transmit signals between equipment and is connected via Ethernet connectors. Maybe with protection. The latter is made of foil or wire braiding and can be shared or paired. The first covers the cable completely, the second covers separate pairs.
Twisted pair cables are divided into several types:
| Name according to ISO/IEC 11801 | General shielding | Paired screen protection |
| U/UTP(UTP) | No | No |
| U/FTP | No | Foil |
| F/UTP (FTP) | Foil | No |
| S/UTP (STP) | Braid | No |
| SF/UTP (S/FTP) | Braid, foil | No |
| F/FTP | Foil | Foil |
| S/FTP | Braid | Foil |
| SF/FTP | Braid, foil | Foil |
An unshielded cable (UTP) is not inferior to others in terms of signal transmission quality, but under the influence of electromagnetic interference, the connection deteriorates significantly. It should not be placed near electrical wiring.
In individually shielded (FTP) cable, the individual pairs are protected by foil, making the signal impervious to external interference or crosstalk between pairs. May be located near electrical wiring.
STP (S/UTP) – shielding occurs due to copper braiding over all pairs.
Explanation:
- U – no screen;
- F – foil is used;
- S – metal braid of the outer screen.
A cable with a common shield (F/UTP, S/UTP, SF/UTP) provides good protection from external electromagnetic influences.
An Internet cable with both types of screens protects both from external influences and from cross influences between pairs. These are the types of cable F/FTP, S/FTP, SF/FTP.
Number of cores
The cable includes one core (single-core) or a series of wires (multi-core). The first type bends poorly, but has better properties responsible for the signal transmission range. It is easier to press it, fix it, it practically does not bend. Optimal for connecting internet outlets.
A wire with many cords bends better, but has high attenuation when transmitting a signal. It does not crimp well because there is a risk of breaking the insulation. It is difficult to fit into the connector and is used where flexibility is required, for example, when connecting a router and a PC or two computers.
What is twisted pair crimping and how to do it
Twisted pair pinout
The connection of cable cores with a connector is called crimping - the contact group of the connector, after distributing the wire cores in it, is pressed inward, piercing their insulation and fixing the cable. This creates a reliable and high-quality connection. The most popular connectors are the rj45 model.
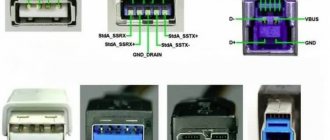
The rj45 socket through which the pinout is performed is often referred to by experts as the 8P8C connector. This marking indicates that both the plug and the socket itself have 8 contacts. All these contacts can be connected in different schematic variations according to the type of cable connection.
Pinout of the rj-45 socket: the marking for the T568A standard is circled in red, T568B is circled in blue
Rg 45 pinout of 8 wires comes in two standards: T568A and T568B. The latter is more popular and is used much more often, as it is designed to connect a PC to a router or modem. The first standard was created to connect two PCs to each other.
Before considering the crimping process, it is logical to indicate variations in connector connection diagrams. There are only two of them: straight and cross.
All twisted pair wires are marked with a specific color, which allows for quick pinout and further crimping of the rj45 socket. The veins of a single pair are similar in color, for example, blue and blue-white.
The differences between straight and cross crimp configurations are obvious. Direct variation is a circuit solution when the colors of the cores on two opposite edges of the cable coincide.
Cross variation involves a scheme where, on opposite edges of the cable, the color matching of the cores is slightly changed. Most often, conductors numbered 1, 2, 3 and 6 are swapped.
Each of these schemes provides for the placement of conductors on opposite edges in such a way that conductor No. 1 is located opposite conductor No. 8 and vice versa - conductor No. 8 is located opposite conductor No. 1.
In addition to the above 2 configurations, there is also an intermediate one - console. It involves placing conductors on the edges of the cable in an inverted order. Core No. 1 from the first connector corresponds to core No. 1 from the second connector. Conductors No. 8 also correspond to each other.
Category and containment
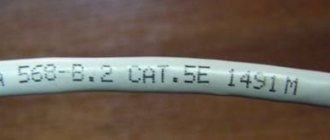
The cable category is important when crimping a cable for an Internet connection or setting up a local network. You need to use a category of at least CAT 5. You can see the number on the shell. There are 7 categories in total:
| Category | Number of pairs | Bandwidth, MHz | Data transfer rate, Mbit/s |
| CAT 1 | 1 | 0.1, used in telephone communications | – |
| CAT 2 | 2 | 1 | 4 |
| CAT 3 | 4 | 16 | 10 and 100 |
| CAT 4 | 4 | 20 | 20 |
| CAT 5 | 4 | 100 | 100 |
| CAT 5E | 4 | 125 | 100 (2 pairs), 1 Gbit/s (4 pairs) |
| CAT 6 | 4 | 250 | From 1 to 10 Gbit/s |
| CAT 7 | 4 | 600 | Up to 10 Gbps |
The shape, braid and color of the twisted pair matter. The classic cable has a gray color. It is made of PVC, designated by the letters PVC. It is used indoors, is cheap, but is afraid of fire and is susceptible to heat or cold.
Cables are made from polyethylene (designation PE) for laying outdoors. It is not afraid of temperature changes and moisture, and is often equipped with a support cable for tensioning the cable between supports, without fear of compromising the integrity of the cores.
Orange or bright red indicates that the cable is not lit. It is made of a low-smoke, halogen-free compound (marked LSZH). Used in premises where fire safety requirements are high. This cable is more expensive than standard PVC, but more durable and safe.
The shape of the wire can be round or flat. This does not affect the technical characteristics.
Twisted pair consists of 2 or 4 pairs (4 or 8 wires, respectively). If the Internet speed is up to 100 Mbit/s, 2 pairs are enough. If the speed is from 100 Mbit/s to 1 Gbit/s, then all 8 contacts are used.
Wire, connector and crimper
A reliable connection is essential for safety. This will eliminate the possibility of electrical damage and will not disrupt communications. The connectors are fixed with crimpers. Each connector is designed for its own wire cross-section.
Before starting work, you need to calculate how much wire is needed. The distance between equipment should not be more than 100 meters.
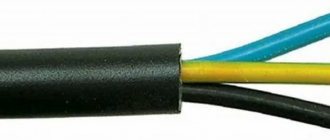
Twisted pair cables have become one of the most common cables. It is qualified by different degrees of protection: grounded copper or aluminum. The number of cores in such a cable can be 8, it is called 4 pairs, or four-core - 2 pairs.
Catalog of twisted pair LAN-ART
The frequency of data transmission depends on the quality of the cable. This indicator is called CAT. The higher it is, the better the transfer speed.
To work with the cable, a special RG-45 connector is required. During operation, you need to connect the conductors correctly so that the connection is established.
A crimper is a special tool for crimping a network cable. It helps connect two parts of the wire without soldering.
Where is twisted pair cable used and why is crimping needed?
The process involves installing a special connector at the end of the network cable. It is necessary to connect the cable and any device, for example, a computer, telephone, modem. The contacts on the network must be correctly connected to ensure good operating conditions for the devices.
Wire selection
When choosing twisted pair cable for your home network or Internet connection, it is recommended to use CAT5E cable. CAT6 and CAT7 are suitable, but you don't need to pay for them unless you really need them.
When planning a local network, it is recommended to immediately lay a cable with four pairs of cores. Two pairs are enough for speeds up to 100 Mbit/s, but if the speed is increased in the future, you will need to re-stretch the wire.
A single-core cable is suitable for Internet outlets; a multi-core cable is suitable for connecting PCs, routers and PCs.
If the cable is located away from the electrical wire, then the UTP type is suitable. Otherwise, you need to look at types of twisted pair cables with a shield that protects against external interference.
Let's sum it up
In this collection, we have collected all the necessary information, thanks to which it will not be difficult to crimp a twisted pair cable for one or another connection scheme with your own hands, using the necessary tools. The main thing is to adhere to the basic rules; it wouldn’t hurt to repeat them again:
- The crimping must be done in accordance with the color scheme.
- It is important to follow the cable cutting rules. Let us remind you that the wires must rest against the stop of the channels. The clamp must secure the cable without removing the insulation (see Fig. 8).
- The crimping procedure allows for direct and reverse methods, but it is unacceptable to connect a four-wire and two-wire connection circuit.
- Although smart hubs allow you to combine direct and cross-connection methods, it is recommended to stick to one type of standard.
- Checking the cable with a tester allows you to quickly detect the problem.
- A high-quality tool guarantees an appropriate result. You can also purchase Chinese crimpers, but in this case the quality of crimping and the service life of the tool will be up to the manufacturer.
Read related articles on the website:
Tools
To crimp an Internet cable at home, you need not only wire and connectors, but also a specific tool.
Cable
The stability of signal transmission depends on the correct choice of cable. You need to select a twisted pair cable of category CAT 5E and higher, preferably with four pairs. A wire with a fireproof braid will be more durable and reliable. Flat or round, it doesn't matter.
You need to consider where the wire will be located. If it is not put away in cable channels and is simply stretched around the room, the UTP type is suitable, otherwise you need to consider more expensive types of wire with a common shield or pair protection.
If you need to connect two PCs or a router and a PC with a cable, then a stranded wire is selected, but for ease of crimping it is better to use a single-core wire. For sockets - with one core.
Connector
In addition to the wire, you need to prepare a switching element, also known as a connector or Ethernet plug. Often referred to as RJ-45.
Many connectors have a similar design. Their body is made of transparent plastic for visual control of the crimping process. There is a latch on top that allows you to secure the plug after installation in the port. At the back there is a connector for cable entry, a little higher, on the case there is a fixing bar that ensures a reliable connection.
Inside, the connector consists of eight channels, the diameter of the cores. They go to the end wall of the plug, where there are 8 separate contacts. Initially, they are raised up and do not prevent the cable from entering through the channels until it comes into contact with the end wall. Each has pointed protrusions on the bottom.
When crimping, the contacts move down, pierce the insulation and establish a connection with the conductors. They are recessed flush with the surface of the connector and form contact pads for connecting to the port of a router, PC or other device.
Some connectors have auxiliary inserts that make it easier to correctly insert the cores into their positions under the contacts.
When purchasing connectors, you should also buy a protective cap. It is cheap, but it will protect the LAN cable from being bent, the latch from breaking, and the port and plug from dust.
Crimping tool
The following tool is used to crimp twisted pair cables:
- Crimper. These are crimping pliers. To crimp a connector, place the edge of the wires into them, then install the connector into the socket on the tool and squeeze the handles until they click. You need large pliers (light pliers break quickly), but comfortable and light so that your hand does not get tired. The crimper halves must be even in relation to each other, otherwise the plug will break during the crimping process of the wire.
- Stripper. A tool for cutting cables, stripping insulation, or otherwise working with it. Much more convenient than a simple stationery knife.
- Tester or multimeter for crimp diagnostics.
It is not necessary to use a professional tool for crimping, especially if laying the wire will be done once. But with it it will be easier to complete the task, and the result will be higher.
Direct Connect Cable Crimping
How to connect a printer to a computer on Windows 10 and Mac OS
So, let's take a closer look at how to properly crimp an Internet cable.
First you need to clean the wires from their external protection.
In almost all wires in which the wires are in the form of a twisted pair. There is also a special thread with which you can easily get rid of the first layer.
Twisted pair image
Next you need to unwind and straighten the small wires.
Measure the required length for cutting (attach an adapter), taking into account that a small part of the external protection should extend into the connector by a few millimeters.
Cut off the excess by measuring the desired length
Inside the connector there are divisions, for each dart there is a separate one.
The wiring should be carefully arranged in them.
You need to insert it so that the outer shell also fits under the clamp of the adapter.
How to fix the wire correctly
Using a screwdriver, you need to fix the connector where it comes into contact with the insulated part of the wire.
It is very important to keep track of the wiring; they should each be in their place. The next step is to fix them in the contacts of the adapter. The next step is to fix them in the contacts of the adapter
The next step is to fix them in the contacts of the adapter.
For this action you will need a crimper.
With its use, the work will be done once and efficiently.
You can also crimp the cable without crimping tools, using a screwdriver to help you.
1You need to insert it so that the outer shell also fits under the clamp of the adapter.
2Conveniently place it on a table or other convenient place that will ensure reliable contact of the object with a smooth surface.
In this case, the clamp must be in a free position so as not to crush it during processing.
3The pressure must be such that each wire will sit correctly in its place and cut through the insulation.
4Use a flat-sided screwdriver and gently press the connector until no gaps or protrusions are visible.
It is important to correctly position the wiring in the adapter
At the end of processing, it is necessary to check the functionality of the product using a special device.
Before testing, the tester must be configured as follows: set the switch to diagnosing resistance or set the sound signal to sound when the resistance force changes.
It is necessary to conduct a test for each wire separately.
If difficulties arise somewhere and the indicator does not respond, you need to tighten the broken wire and check again.
Next you need to put the protection on the place between the cord and the creeper.
Of course, you can save money and not buy such a tip.
But the savings will be minimal, and if the wire is damaged, you will need to do the work done again, or even buy other components if something becomes unusable.
Protects the wire from kinking
The job is done.
The important thing is that the better the adapter is made and the cord is crimped, the better the Internet connection to your PC will be. If the Internet supply is intermittent, you should check the connector again
Indeed, in this case, over time, it may generally fail.
If the Internet supply is intermittent, you should check the connector again. Indeed, in this case, over time, it may generally fail.
Crimping schemes and choosing the right one
There are two known twisted pair connection schemes (pinouts): straight (568B) and crossover (568A).
Straight (Straigt) twisted pair cable pinouts connect various devices. This is a “router-computer”, “router-TV”, etc. scheme. A feature of direct crimping is the identical arrangement of cores in the contacts of both connectors.
Cross connection or crossover (Cross - Over) is required when you need to connect the same type of equipment. This is a “router - router” scheme, a “computer – computer” scheme, etc. The peculiarity is that at the first end of the cable the straight type is used, and at the second the wires intersect.
The second twisted pair crimping scheme for 8 and 4 cores has practically gone out of use. Most modern technology automatically recognizes the connection option and selects the appropriate switching method. Soon it will be possible to crimp an Internet cable only using the first method.
8 cores
The order of wires when directly crimping a network cable looks like this:
- white-orange;
- orange;
- white-green;
- blue;
- white-blue;
- green;
- white-brown;
- brown.
To cross-crimp a wire, use the following diagram:
- white-orange – white-green;
- orange – green;
- white-green – white-orange;
- blue – blue;
- white-blue – white-blue;
- green – orange;
- white-brown – white-brown;
- brown - brown.
The difference is that some of the couples here are crossed.
4 cores
A four-wire connection is typical for a direct crimping circuit of a twisted pair cable into 4 cores. It allows you to transfer information at speeds of up to 100 Mbit/sec. The connector remains the same, with eight channels, but to reduce network costs, a four-pin wire is used.
Color order for direct crimp:
- white-orange;
- orange;
- white-green;
- empty;
- empty;
- green;
- empty;
- empty.
Crossover Ethernet cable pinout or crossover with four-wire wire:
- white-orange – white-green;
- orange – green;
- white-green – white-orange;
- empty;
- empty;
- green – orange;
- empty;
- empty..
A little theory
The name of the RJ-45 connector, which is familiar to many, is actually erroneous, since the connector itself is called 8P8C (8 positions, 8 pins) and is actually universal, and “RJ-45” is the name of the standard for both parts of the connector (plug and socket) and their connection diagrams. The most important thing about this is that not all contacts can be used when connecting, and the order of individual wires may change depending on the purpose of the resulting cable.
The cable itself is also called twisted pair. It comes in two types, depending on the number of cores - individual wires located inside the overall insulation:
- 4 cores - cheaper, designed for a throughput of no more than 100 Mbit/s. Due to its low cost, it is used by most Internet providers.
- 8 cores - expensive, provides connection speeds of up to 1000 Mbit/s and is usually used for installing high-speed networks.
Twisted pair initially does not have connectors (unless, of course, we are talking about a ready-made patch cord), and their installation (crimping) may be required in different cases:
- when independently producing a patch cord of the required length,
- when replacing an old connector that has become unusable, for example, due to damage to one of the wires on the Internet cable entering the apartment.
Considering all of the above, it is worth considering how to crimp a connector for the Internet of both types - with 4 and 8 cores. Accordingly, for work you will need a piece of twisted pair cable of suitable length and several new RJ-45s.
Crimping procedure
The procedure for crimping a twisted pair onto 8 RJ-45 wires:
- Measure the required wire length.
- Make the cable even by biting off a few millimeters from each edge.
- Carefully cut, retreating 1.5 - 2 cm from each edge, to remove the insulation.
- Bend the cable several times in different directions from the cut.
- Separate the insulation that has separated during bending from the cable.
- Remove the shielding, straighten the wires, bite the wires to the same length.
- Lay out the wires using one of the crimp types.
- Connect the twisted pair to the connector, arranging the wires in the correct order into the channels close to the side of the connector.
- Insert the plug into the connector on the crimper.
- Holding the wire, squeeze the handles of the tool to crimp the network cable until it clicks.
After installation, you need to check whether the crimping is done well.
When is RJ-45 crimping useful?
Technology is constantly being improved, new devices connected to the Internet are appearing. If you have a large piece of network cable and a crimping tool at home, you don’t have to purchase expensive patch cords or call a specialist every time.
The proven cable manufacturing procedure takes no more than 5 minutes.
Here are a few situations where crimping skills will come in handy:
If you urgently need to prepare a project or complete a thesis, and the cable has become unusable, sometimes only your own skills can help out. Especially if the trouble happened late in the evening, when all the shops are closed, or you are far from the city.
It is impossible to foresee all situations related to twisted pair, so it is better to know in advance how the LAN cable is constructed and how it is crimped.
Tool-free crimping
If there is no crimper, you will have to use existing tools, for example, a screwdriver. The braid is removed with a simple sharp knife. You need to act carefully so as not to spoil the integrity of the core insulation. The contacts are cut to the appropriate length using side cutters.
To properly crimp a twisted pair, the wire is placed in the connector and clamped with a strip so as not to be pulled out by negligence. Next, you need to lay the connector on a flat surface and use a slotted screwdriver to press the contacts one by one so that they push through the insulation and cut into the cores. Now you should make sure that all contacts are pressed in completely and are at the same level.
Using special self-crimping connectors
There are self-crimping connectors that do not require tools other than those used to remove braiding and insulation to crimp a twisted pair of 8 cores.
The principle of crimping using such structures is simple. You need to open the connector and insert the wires into the grooves from above (the connectors are painted in different colors, so it is impossible to make a mistake with the correct location). Then close the halves. The wires will be pushed onto the contact blades. Now the connector can be used.
How to choose a network cable
We will tell you what you need to pay attention to when choosing a twisted pair cable.
- A very important point, you need to understand whether you will be laying the network cable indoors or outdoors. Because the simplest and cheapest twisted pair cable is suitable for internal installation. But for external use (outdoors), you need to take it with additional protection (double braiding that protects from natural phenomena, such as sun, rain, snow, frost).
- If the cable length is long, then take a twisted pair cable with additional wire. It will reliably keep the wire from breaking.
- Pay attention to the composition of the wire; it can be made of bimetal or copper. Of course, copper is better, but its price is several times higher. So, here you need to look at the budget allocated for the purchase and decide.
- The thickness of each core should be about 0.50 mm, ideally. But, alas, many manufacturers underestimate these figures to 0.40 mm.
- Look at the markings on the cable; a self-respecting manufacturer makes it clear and understandable. And an unscrupulous manufacturer applies such markings that when touched, they are erased, or they are not even on the cable at all.
- You can buy a network cable that has additional protection against various interference (thunderstorm, static). This cable has a foil-shaped shield.
- Availability of a quality certificate.
Examination
After connecting the device to other devices or connecting to the local network, you need to check how the created line works. The simplest way is to connect the Ethernet connector to the PC and make sure everything is functioning.
Professionals use cable testers or LAN testers. They include two blocks and allow you to diagnose cables distributed in different rooms. Both blocks have ports for installing connectors. After connection, the device starts up and checks each wire, as indicated by LEDs with serial numbers. If there is a break, then you can see where the damage is or where the crimping was done poorly.
At home, a multimeter is used instead of a tester. It is set to ringing or low resistance (200 Ohms). After this, each wire of the same color is diagnosed on two connectors placed next to each other. Thin probes are needed to accurately touch the contacts. To do this, you need to sharpen them or install wire tips.
It is also easy to check the cable with plugs in different rooms with a multimeter. In the ports of the connected devices there is an induction coil connecting the wires of one pair, so there is conductivity between them. You need to insert a connector into the port of one of the switched off devices, and check the conductivity on the second connector. For private lines (up to 100 Mbit/s), only two pairs need to be dialed.
Couples tend to have similar resistance. If the difference is large or the value is very high, if the line cannot be dialed, this indicates that the wires were crimped incorrectly.
Making a patch cord
Step 1. Purchase and prepare a piece of twisted pair cable of the length you need.
We prepare a piece of twisted pair of the required length
Step 2: Remove a small portion of the outer braid, about two to three centimeters. Try not to touch the inner braid (braid of an individual core). If you use a crimper as a tool, use the appropriate connector for the knife.
Remove a small part of the outer braid
Do not forget about the breaking thread, when working without a special tool - this is the best way to remove the braid without risk to the cable.
Breaking thread
Sometimes, when purchasing a category 5 cable, there may be no breaking thread inside; in this situation, use side cutters, wire cutters, or an ordinary knife.
We use side cutters
Step 3. Place the conductors into the desired pins of the plug. Remember that to work on the network you should use switching equipment with normal/uplink technology (currently any switch or computer network adapter for a 100 Mb/s network), in this case you will only need direct cable routing (identical conductors in identical contacts ).
When using old equipment, you will have to do crossover (crossover, cross-link) wiring (one end of the patch cord is crimped in a straight wiring, the other in a crossover), as shown in the figure below.
Cross Wiring
Make sure the conductors are in the correct contacts
Step 4. Bite off the ends of the cores so that they are the same length, then insert them into the 8p8c sleeve to the extreme position (the cores should rest against the edge of the connector).
We insert the cores of the 8p8c sleeve to the extreme position
Step 5. Using a special connector of the pliers, “bite through” the copper conductors with the contacts of the sleeve.
We fix the copper conductors of the contact sleeves
Types of crimping pliers
You can do without using crimping pliers - with a thin flat screwdriver or a knife. You need to press the tip of the plug on the contacts until they bite through the copper conductors.
You can crimp the wires using a thin flat-head screwdriver
After securing the conductors, press down on the braid lock.
After securing the conductors, you must press down on the braid lock
Method – “vampire tooth”
Step 6. Upon completion of work, do not forget to check the quality of the created patch cord. The easiest way is to use a switch - connect the crimped connectors into the device sockets, and make sure that the LEDs indicate the fact of the physical connection.
Upon completion of work, it is necessary to check the quality of the created patch cord
Secrets from installation practice
A few tips for laying out cables for the Internet and crimping twisted pair cables:
- It is most convenient to straighten the veins and place them with a pencil or pen. The wires are smoothed out and placed close to each other, which is what is required for their installation inside the connector.
- The cable insulation must fit into the connector and be clamped. This will avoid possible breakage of the connector.
- After crimping the connector, you need to make sure that the wires are seated tightly in the connector until it stops. This will avoid bad contact.
If possible, it is better to buy a crimper or ask someone for it. It is more convenient to use than a regular knife, and it will not damage the insulation of the cores.
You can do twisted pair crimping yourself if you know the procedure and understand what is required. It is important to do everything efficiently, otherwise a poor-quality connection will cause a poor signal and regular connection interruptions.
How to remove the connector?
RJ-45 connectors are disposable, that is, specialists do not dismantle them, but simply cut off and re-crimp the end of the twisted pair. In everyday life, a situation may arise when a cable needs to be crimped “here and now”, but there is no new connector in stock. In this case, the contacts can be carefully removed with a needle, prying them on one side and gradually rocking them. This task in itself is quite complicated and takes a lot of time, besides, the small contacts themselves fall out of the connector, but if there are no other solutions to the problem, this solution can be used as a temporary measure.
How to crimp a cable with a screwdriver?
There is not always a crimper in the house. To quickly crimp pairs, you can use a regular screwdriver and knife. Installation procedure:
- Choose a flat-tip screwdriver with a thickness of 3-4mm. Since there is no insulation, you can use a regular knife. You need to be very careful in all actions; when working with these tools there is a risk of damaging the integrity of the cable.
The screwdriver must be flat - The procedure for straightening, routing, and folding wires remains unchanged. Cut the pairs along a straight line using side cutters. We expose the wires We cut the wires along a straight line The wires must be the same
- Insert the pairs into the connector.
We insert the wire into the connector - Crimping begins by fixing the strip at the tail of the connector. After fixing, you should not think about the fact that the cable will accidentally fly out and the whole procedure will have to be repeated again.
Location of the clamping bar - Place the connector on a hard surface and press the tip of the screwdriver against the retaining bar. As a result of these actions, the lower plastic latch often breaks. To avoid this, choose a surface with a small groove or hole for the latch. For example, a cutting board.
- Due to the application of force, the bar moves downwards. As a result, the clamp rests against the cable so that the wires do not fall out randomly.
The cable is clamped with a bar - To crimp contacts, place the connector on a solid base. Push the contacts downwards with force. As a result, the metal legs will break through the insulation. Before applying force to the contacts, make sure the tip of the screwdriver is resting on them and not between them. The pressure must be strong, and if the connector slips, you can hurt your fingers.
- Continue until each pin has pierced the insulation, making an electrical connection to the pair. We push through the contacts one by one
- To check you will need a magnifying glass. Inspect the front of the connector. It is impossible for any contact to stick out upward - when identified, press it down.
- Crimp the other part of the cable in the same way.
I can assemble and disassemble computers, laptops, tablets, phones. Sometimes successfully. I have mastered the skills of diagnosing breakdowns using Google and Yandex. It may not work out the first time, so I recommend having a few additional connectors in stock for practice. I always have a bag in my pantry just in case.
Sources
- https://help-wifi.com/poleznoe-i-interesnoe/kak-obzhat-setevoj-kabel-bez-instrumenta-otvertkoj/
- https://WiFiGid.ru/poleznoe-i-interesnoe/obzhim-vitoj-pary
- https://2hpc.ru/%D0%B2%D0%B8%D1%82%D0%B0%D1%8F-%D0%BF%D0%B0%D1%80%D0%B0-%D0%BF %D1%80%D1%8F%D0%BC%D0%BE%D0%B9-%D0%B8-%D0%BF%D0%B5%D1%80%D0%B5%D0%BA%D1%80 %D0%B5%D1%81%D1%82%D0%BD%D1%8B%D0%B9-%D0%BE%D0%B1%D0%B6%D0%B8/
- https://help-wifi.ru/tekh-podderzhka/obzhim-vitoj-pary/
- https://principraboty.ru/raspinovka-vitoy-pary-rj45-i-internet-kabelya/
- https://HouseChief.ru/kak-vypolnit-obzhim-vitoj-pary-v-domashnih-usloviyah.html
- https://lanportal.ru/lan/poryadok-obzhima-vitoj-pary.html
- https://zulkinoks.ru/sdelay-sam/vitaya-para-obzhim-shema.html