01/16/201701/16/2017 master
Sometimes certain difficulties arise in a house or apartment that are associated with electrical wiring or electrical appliances. It will be inconvenient and expensive to call an electrician every time. At the same time, calling it will not always make sense, since very often existing problems can be fixed with your own hands, because they are associated with minor problems in the electrical circuit, switch or socket. But to find and fix the problem you will need a special tool - an indicator screwdriver.
Indicator screwdrivers
Such a screwdriver may seem unfamiliar to many and not a completely necessary purchase. But if you understand its capabilities, it will become an indispensable item in your home toolbox. Our article will help you understand the features of indicator screwdrivers.
What is it like?
In order to use any tool for its intended purpose, it is necessary to understand its structure and operating principle. The same applies to indicator (signal) screwdrivers. They look like regular models. But at the same time there is an indicator on it that reflects the presence of current in the circuit. It was he who gave the name to this device. An indicator screwdriver can replace a multimeter. Moreover, it will cost several times less than a measuring device. In simple words, this product is a voltage indicator made in the form of a regular screwdriver. Today, such products are produced in a wide variety. At the same time, they all share a common operating principle.
Note! Despite the same operating principle, such products may differ in design and design. Let's look at the structure of the standard and simplest indicator screwdriver.
Structure of an indicator screwdriver
There is a fairly simple structure here:
- a sting that acts as a conductor;
- thyristor. The sting is connected to it. This element is designed to reduce the current to a level that is safe;
- Light-emitting diode. It is located after the thyristor. The LED is connected to the contact fields that are located at the end of the screwdriver.
All elements of the indicator screwdriver are contained in a transparent plastic case. Thanks to its transparency, a person can easily see the glow of the LED, also hidden under the plastic housing. This structure is typical for the simplest and cheapest voltage indicator. Using it you can determine the working phase. In this case, zero in this situation is sought by elimination. Now let's look in more detail at how to work with such a screwdriver.
Main types of verification
Using an indicator screwdriver, you can check both the presence of voltage and the conductivity of a particular section of the circuit, the serviceability of incandescent lamps, heating elements, and determine the correct installation of key switches.
Contact method
When testing sockets and electrical circuits using the contact method, the tip of the tester is applied to a bare conductive surface (socket contact, uninsulated wire, track on a printed circuit board). The presence of current is determined by the lighting of the LED or neon lamp and the sound of the speaker.
Contactless method
With this method, the tip or tip of the non-contact tester is located near the contact of a socket, insulated wire, or electrical appliance, without touching their surfaces. If there is an electric current in them, the tester emits a sound or light signal.
Checking the serviceability of incandescent lamps
In order to check the serviceability of an incandescent lamp, use a battery tester. The tip of the screwdriver is applied to the central contact of the bottom of the light bulb base, and with the fingers of the other hand - to the body of the base. If the diode inside the indicator lights up, it means the light bulb is working; if not, it will not work even if the filament is visually intact.
Checking the heating element
In order to check the heating element, for example, of a boiler, the tip of the battery-powered indicator is applied to one of the contacts of its plug, and the second is grasped by hand. As in the case of an incandescent lamp, a lit diode will indicate the health of the element.
Determining the correct switch position
Checking the correct installation of the switch is carried out as follows:
- The switch key is pressed to the “On” position (pointer “I” on the body);
- The tip of the battery-powered tester is touched to the top terminal of the switch;
- Use a paper clip or other thin metal pin to touch the terminal on the opposite side: if the indicator LED lights up, then the switch is installed correctly. If the LED does not light, the switch must be turned over.
The installed switch is checked when the electricity is turned off.
Checking the voltage on an insulated wire
In order to determine whether or not there is voltage on an insulated wire, it is best to use a non-contact indicator: if an electric current passes through the conductor, an indicator brought to it will signal this with a sound signal and blinking of the LED in the tip.
Finding a broken wire
In order to find a broken wire, a non-contact indicator is slowly moved along a live insulated conductor. In the place where the integrity of the wire strands is broken, the LED burning inside the indicator will immediately go out.
Algorithm for working with a simple voltage indicator
After we have examined the structure of the simplest signal screwdriver, we need to determine the correct operating algorithm for it. Finding a phase in the wires, in this situation, looks like this:
- with the tip of the product it is necessary to sequentially touch all the wires being examined;
Screwdriver in working mode
- When touching the wires, you must touch the contact field. It is specially displayed on a plastic case;
- the moment the tip touches the phase, the indicator on the screwdriver begins to glow.
Note! When you touch zero, the indicator LED will not light up.
As you can see, using such a tool, finding phase and zero will be quite simple, and most importantly, safe.
Product selection criteria
Knowing how to determine phase and zero with an indicator screwdriver, you can always quickly fix problems with the power supply of your home with your own hands. When choosing a voltage indicator, it is recommended to consider a number of characteristics. Their list includes:
- body size and shape;
- color shade and ergonomics of the handle;
- functionality;
- availability of a power source for autonomous operation of the screwdriver;
- type of indicator light: neon or LED;
- presence of display and sound signal;
- manufacturer company;
- cost of the product.
The optimal choice of voltage indicator determines the successful use of the products and the absolute safety of repair work.
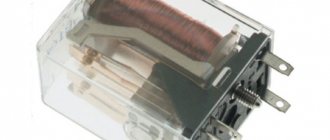
Screwdriver with neon lamp
Another type, in addition to a simple indicator screwdriver, is a voltage tester equipped with a neon lamp.
Voltage tester with neon lamp
This device functions as follows:
- the electric current that exists on the surface being measured is transferred to the tip of the meter;
- then the current through a resistor (limiting the current) having 0.5 mOhm (ultimate minimum) reaches the contact of a neon lamp mounted in the body of the product;
- the second contact of the circuit, necessary to turn on this type of light source, closes on the person, on the handle of the screwdriver.
Note! This type of voltage indicator is characterized by the inclusion of the capacitance and resistance parameters of the human body in the light bulb circuit.
As a result, when using such a tool, the glow will only occur if voltage is present. At the same time, in the absence of contact with the human body, its glow will not be observed. The disadvantage of such a voltage indicator is the fairly high threshold used to indicate voltage (from 60V). Models with a neon bulb have proven themselves well in the situation of searching for a phase or determining the presence of voltage. It cannot be used to determine an open circuit.
Using Voltage Indicators
The use of indicator screwdrivers makes it possible to find the phase wire, neutral and ground in sockets, switches, lighting fixtures, verify the presence of voltage in the electrical network, identify voltage breakdowns on the body of household appliances, and also detect wiring in the walls under tiles or a layer of plaster with a finishing finish coating. Work with testers begins after their verification. The test is performed on a stressed area. Its presence on the network will be indicated by a light signal from a neon or LED indicator lamp. After checking the suitability of the device, breakdowns and malfunctions of electrical networks, household appliances, and lighting devices are eliminated. The main types of work using voltage testers include:
- Searching for phase and zero is necessary if electrical wires are not marked. The work begins by turning off the circuit breaker on the input panel, from which the electrical network is supplied at the test site. After stripping the wires being tested and then separating them from each other to a safe distance, eliminating the possibility of a short circuit or electric shock to a person, they begin to identify the phase cable. If, after turning on the electric current and touching the voltage indicator to the stripped end of the wire, the lamp lights up, then this conductor is phase. The second wire is zero. If the indicator lamp does not light up, then the first conductor is without voltage. The second wire can be considered a phase, which must be verified using an indicator.
- Determining voltage leakage on the body of an electrical device involves simply touching the tip of an indicator screwdriver to its metal (unpainted) part. The appearance of a glowing lamp on the indicator after connecting the household appliance to the network indicates the presence of a phase on the device body, as well as the need to urgently eliminate this problem. The bright glow of the indicator screwdriver indicates direct contact of the phase conductor of the cable with the body of the electrical appliance, touching which can cause electric shock.
- Checking the quality of the conductivity of the circuit is carried out by touching the ends of the wire, stripped of insulation, to the tip and finger contact of the indicator. An audible signal or a glowing lamp indicates that there are no problems with the integrity of the conductor.
- Detection of hidden wiring in walls is based on the appearance of a light or sound signal from a voltage indicator in the area of the electromagnetic field created by a cable connected to the network power supply. Its boundaries will be determined by slowly moving an indicator screwdriver along the wall in different directions. The activation of a sound or light signal indicates the location of conductive wiring under a layer of plaster or finishing coating.
- Finding broken wires is based on the cessation of functioning of the indicator screwdrivers. In places of damage, the voltage probe will not light up or emit sound signals. His work will be stopped. The use of indicator screwdrivers is a prerequisite when carrying out voltage-related repair work. Their correct use is a guarantee of safety, eliminating the risk of electric shock.
Voltage indicator with LED light
The more popular and in demand type of indicator screwdriver today are models equipped with an LED light.
Indicator screwdriver with LED
The principle of operation of this tool will be similar to how an indicator-type screwdriver with a neon light bulb works. The main difference between the models is that the LED varieties have a significantly lower threshold for voltage indication. Here, the LED glow will be observed in the presence of a voltage less than 60V.
Checking the indicator for functionality
Before you start working, you need to check the probe for functionality. To do this, simply touch the metal contact on the handle and the steel slotted shaft of the screwdriver at the same time.
At the same time, the indicator light should light up - this means that the device is working properly, if it does not light up, then it is not. If you check with a regular indicator screwdriver like this, nothing will happen.
Battery voltage indicator
In addition to the models described above, there are indicator-type screwdrivers that are equipped with an LED light source and operate on batteries (autonomous power sources).
Battery-powered indicator screwdriver
These types of products are multifunctional, which allows them to be used in a wide variety of situations. An additional element in the design of such instruments - a bipolar transistor - allows maintaining multifunctionality. The list of functions of indicator autonomous screwdrivers with an LED built into the housing includes:
- finding an open circuit;
- phase determination;
- locating the place where the conductor was damaged;
- determining the location of the wiring. This function is made possible due to the presence of voltage in this non-contact method;
Note! The ability to non-contactly search for a conductive electrical system is based on inducing the magnitude of the magnetic field.
- determination of the polarity of different current sources.
In addition, it should be noted that instruments of this kind are capable of detecting microwave radiation. Therefore they can also be used with microwave ovens.
Types of screwdrivers
This principle is the basis of the operation of all tester screwdrivers. However, their options and the number of technical executions today are very large:
- Simple probes are screwdrivers with a standard composition of working elements, which were described earlier, and a hollow plastic body. For indication, as a rule, neon lamps are used, and the zero phase is the person directly touching the contact plate. The scope of use and functionality of the screwdriver is slightly limited by the fact that the product does not work at a network voltage of less than 60 V. It is possible to identify the contact core and check the phase with a screwdriver, but it is unlikely to be able to find an open circuit.
- Testers with LEDs . These devices are slightly different from those described above in their design and, of course, functionality. The use of an LED as an indication element makes it possible to check the operation of circuits with voltages less than 60 V. Accordingly, using this device you can check the internal circuits of electrical equipment, determine the integrity of fuses, wires, and breaks. Probes of this type often use a bipolar transistor and a self-contained power supply, making it possible to perform non-contact testing.
- Universal screwdriver testers have the widest capabilities: “ringing” networks for a short circuit, non-contact and contact testing, sound and light indication, and detection of open circuits. In addition, they have a fairly low response threshold, due to which these screwdrivers can be used in setting up and repairing AC and DC circuits in transport, domestic conditions, electronic devices, etc. The main disadvantage is the presence of their own power source. If the battery runs out, the tester will be completely useless.
The choice of a specific device is directly related to the totality of work that must be performed with its help. Directly in categories, the difference between the devices is small - screwdrivers are simple to use, so budget products are not much inferior in quality to more expensive ones.
How to use a simple tester
In this section we will talk about simple indicator screwdrivers, inside of which there is a neon light bulb. Naturally, they are suitable for the most basic tasks - determining the load on an outlet or finding a phase conductor in a cable. To do this, you need to take the socket in your hand in such a way that one finger fits tightly at the end of the handle to the contact pad, and the other fingers do not contact the tip of the socket (220V current passes through it).
Then the probe is inserted one by one into each hole of the socket, which is presumably energized. During contact with one of them, the indicator begins to light. If this does not happen, then no current is reaching the outlet.
Due to their high response threshold, these devices are not suitable for more accurate ringing. It is necessary to pay attention that the indicator probe must be applied only to one of the core wires of the cable or contacts, since a short circuit between phase and zero is unacceptable.
Using an indicator with LED
As described above, LED screwdrivers can support non-contact testing mode. This means that the person performing the test does not need to close the electrical circuit inside the device with his finger. This highly sensitive mode makes it possible to very conveniently and quickly find hidden wiring in frame structures and walls, and determine the presence of voltage on electrical components or cables.
To do this, you only need to bring the “heel” to the object being tested - the part of the structure where the finger is applied during contact testing. Moreover, often it is enough not to apply the contact to the wire, but only to bring it close to it - the sensitivity of the device is enough for the LED to light up . When searching for a phase in sockets, you must act in the same way as described in the example with a simple tester.
The non-contact testing option has a slight drawback - the screwdriver can react to interference and indicate voltage even during an open circuit. LED indicators have significant advantages over simpler models - a brighter glow, and you can also work with a voltage of less than 60 V. The emission of a neon lamp can be simply invisible if it is used outdoors or in a well-lit room - it is necessary to darken the handle to determine whether it burns or not.
The principle of operation of universal testers
Universal testers are not much different in principle of application and operation from the devices described above. However, they are less reminiscent of a classic screwdriver and more like an electronic thermometer . The most advanced devices are equipped with a digital display that shows the voltage value. This function is quite useful, but it raises the cost of the product to such an extent that a full-fledged multimeter would be an excellent alternative for the money.
In addition to the display, all universal testers have a contact pad for zeroing the circuit with a finger and a toggle switch for switching operating modes. The toggle switch contains the following modes:
- H - non-contact highly sensitive mode. Required to search for hidden electrical wiring routes.
- L—non-contact mode. In this case, the indicator emits a sound or light signal when it reacts to an electric field (the contact part is brought close to the object being tested).
- O—contact mode. It works the same as with simple devices: finger on the contact pad, probe on the conductive element.
It is almost impossible to say exactly which model of universal tester is better - everything will depend on the scope of application and requirements.
Electronic type voltage indicator
Another type of indicator type screwdriver is the electronic model. This screwdriver can be presented in two types:
- with liquid crystal screen;
- without him.
Electronic screwdriver with LCD screen
This type of tool is equipped with an audible alarm, the activation of which indicates the presence of voltage. At its core, this device resembles a simplified and quite easy-to-use multimeter. Using the built-in LCD display, you can not only determine, but also find out the voltage value. Typically this parameter is in the range from 12V to 220V. The operating principle of electronic voltage indicators is similar to all other models.
Types of indicator screwdrivers and their design
This not too complicated device has many names. Some are more common, others less. Here are the names you can find:
- screwdriver tester;
- voltage indicator;
- phase meter or phase meter;
How to operate an indicator screwdriver depends on its type
- electrician's screwdriver;
- probe screwdriver;
- screwdriver for checking electricity (phases);
- electric probe.
Perhaps there are other names - although this device is simple and costs little, it is useful for both professionals and amateurs. With its help, you can identify the most common damage, check the integrity of wires and the functionality of radio elements.
Rules for using voltage indicators
When working with this kind of tool, there are a number of rules that you need to know in order to do everything correctly. Here you need to adhere to the following recommendations:
- compliance with the rules of safe work with electrical networks. This means that all manipulations with the indicator screwdriver should be carried out with the package switches turned off;
Switched off switches in electrical panel
- remember that electric current always flows through a conductor along the path of least resistance (from plus to minus);
Note! Any electrical appliance will function only if its phase/plus goes through the circuit to the neutral/negative wire of the network.
- Such an indicator meter of any type is not suitable for assessing complex electrical appliances. With its help, you can check the serviceability of electrical circuits of devices;
- in houses and apartments there is a standard network with a purity of 50Hz and a voltage of 220V;
- When working with such a screwdriver, you need to know that the (+) phase always receives voltage, the zero leads to the transformer (-), and the third wire is grounding (for example, in a socket).
When using a signal screwdriver in various works, be sure to adhere to the above rules. Otherwise, you may get the completely opposite result.
How to use an indicator screwdriver
When working with indicator screwdrivers, especially contact models, you must first of all follow the technology of their use and electrical safety rules. It is forbidden to touch the bare probe with your hand; the device must be held by the body covered with insulation.
When a regular and not a universal indicator screwdriver is used, its probe touches live parts, and at the same time the contact button is clamped on the handle. If there is current and the screwdriver comes into contact with the phase, the neon light bulb will begin to glow. The absence of a light signal indicates a neutral or ground conductor.
It's a little more difficult to work with a battery-powered LED indicator. Before using the indicator screwdriver, you need to check its functionality. To do this, you simultaneously touch the probe and the contact button with your hands. The LED lights up, which means the tool is ready for use.
A special feature of this device is that there is no need to touch the button while checking the phase. Simply insert the probe into the socket and touch the contacts. The light comes on - that means it's a phase. If the LED does not light up, you can press the contact button. The light signal indicates neutral, and its absence indicates the presence of grounding or a broken wire.
All other checks will also require pressing a button. This way you can check the conductor for integrity, the fuse or heating element for functionality, and identify other faults. When searching for hidden wiring with a tester, you need to take the screwdriver by the tip and move the button to the locations of the expected lines. In this case, the LED will light up, but the wire itself must be energized at this time.
How the tool is checked
Like any device with measuring qualities, our alarm screwdriver sometimes needs to be checked for its functionality.
Note! Working with voltage always requires constant monitoring of the serviceability of the measuring tool.
Working indicator screwdriver
To ensure that our signal instrument is always ready to measure voltage, pay attention to the following nuances:
- The body of the instrument must always remain intact and clean. There should be no cracks on it;
Note! If the case is damaged, the product must be replaced. Otherwise, your safety at work will not be guaranteed by the manufacturer.
- Before starting work, you should always make sure that the tool is working properly. You can check it simply by touching the conductor in which there is voltage;
- If the batteries are low, you need to replace them. To do this, carefully unscrew the fixing cap and replace the old batteries with new ones. The main thing here is not to confuse their polarity. Otherwise the screwdriver will not function.
Do-it-yourself repair of the alarm screw, if damage is detected, will be irrational - it is cheaper to buy a new tool.
Types of indicators
The main function that the voltage indicator should perform is checking the integrity of the electrical circuit - this is what determines whether the device plugged into the outlet will work or not. Different devices cope with this task in different ways - a standard screwdriver voltage indicator uses to check the current that is already in the network (passive), and inside a multifunctional voltage tester-probe there is a whole circuit with a separate power supply (active), which allows you to dial even de-energized electrical circuits.
All these devices work on a similar principle, but have some differences in the rules of use.
Passive screwdriver indicator
This is a single-pole household phase indicator that performs one single task - to show the presence or absence of voltage at a certain point in the electrical circuit. It is not used by professional electricians due to its extremely limited functionality, but at home among a set of tools “just in case” it can come in handy.