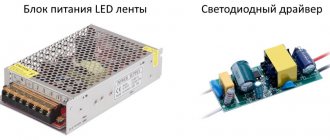
Some people, having heard all sorts of horrors about power supplies, controllers, dimmers and other additional devices, refuse to purchase an LED lamp at all. The reason for this is the “increased” price tag. If only they knew about the 220 V LED strip. This is a special device that does not require a power supply to convert the power to the required level. The device is powered from a full mains voltage of 220 Volts. A controller is also not needed for this device if the owner does not need to adjust the brightness and color program. The colors are switched using a button on the rectifier, which makes using the LED strip much easier.
Types of LED strips for 220 V.
The modern market of LED devices offers 2 types of 220 V LED strip:
- With rectifier;
The rectifier is built into the LED strip itself.
- without rectifier.
It is connected separately.
Both options are divided into lengths that are multiples of 50 centimeters or 1 meter. This rule occurs due to one production feature: there are 60 LEDs on each section of the device. Therefore, it is impossible to cut off 25 centimeters or 2.3 meters, respectively, 30 and about 270 LEDs.
Selecting adapter performance
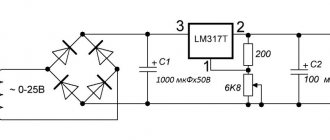
The description of each tape contains technical data. The voltage that must be supplied (12 or 24 V) and the current consumption must be indicated there. But the current is usually indicated per 1 meter of tape. If you connect 5 meters, then you will need to multiply this figure by 5. If you connect 10 meters to this power supply, multiply by 10, etc.
If you are still figuring out how much the backlight will cost you and you don’t have a ribbon yet or haven’t chosen it yet, you can use the average data. The current consumption of the most common type of monochrome tapes is shown in the table. They can be taken as an example.
Current consumed by SMD3528 and SMD5050 LED strips depending on the number of LEDs per meter of length
The resulting figure is the minimum current value that the desired power supply should produce. But constant operation at the limit of capabilities greatly reduces the service life of electrical products. Therefore, we add 20-25% of the reserve to the found figure (multiply by 1.2 or 1.25), round the resulting figure up to the nearest whole number. This will be the current that the adapter should produce.
To make it clearer, let's give an example. Let a meter of tape consume 0.8 A, we will connect 18 meters to the adapter. We are looking for the total current consumption: 0.8 A * 18 = 14.4 A. We add a reserve: 14.4 A * 1.2 = 17.28 A. So, we will look for an adapter that will produce at least 17 Amperes.
In the case of color RGB LED strips, the current required by the controller (dimmer) and amplifiers (if they are powered from this source) is added to the found figure. This data is in the technical description of the devices.
LED strip 220 V differences in the color of the glow.
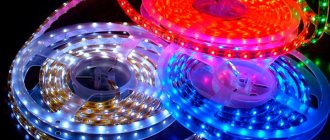
Different ribbons can play different shades. Some devices can reproduce all the colors of the rainbow, while others specialize in only one. So, classification by color:
- single-color (monochrome);
- multicolor (RGB).
Brightness adjustment.
To change the intensity of the glow and set the program for changing shades, you need to get a special controller, which is difficult to buy separately from the tape itself. You can also change the brightness level using a dimmer, but this device will not be able to influence the change in colors and the dynamics of their play.
Recommendations for placement of equipment and installation of LED strip
- Determine for yourself the method of installing the SDL. This is important when choosing it, because Not all SDLs are equipped with self-adhesive tape. In this case, they are attached to brackets and clamps.
- Carefully prepare the surface on which the tape will be applied. For more reliable fixation, additionally cover the entire path with double-sided or aluminum tape and apply instant glue.
- During the gluing process, the protective coating of the self-adhesive layer is removed gradually as it progresses.
- In order to save money, the plastic profile of aluminum channels can be replaced with a plastic corner. It is attached with glue/liquid nails.
- When designing ceiling lighting, remember the degree of light dispersion. For the most effective lighting, the distance from the ceiling to the mounting location of the board should be at least 80 mm.
- To illuminate signs, display cases, and cabinet shelves, choose side-illuminated SDLs. This will help avoid being blinded by crystals and highlight the required interior details.
- Boards longer than 5 meters are connected to the power source in parallel. Otherwise, it will lead to damage to the diodes.
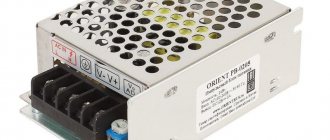
- PSUs equipped with a fan have a specific sound. Therefore, it is worth considering the location of its installation outside recreation areas. The controller, on the contrary, should be located nearby for ease of control from the remote control or manually.
- Choose trusted manufacturing plants. This will help you avoid unnecessary expenses.
Features of 220 V LED strip.
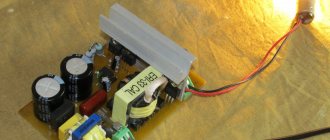
To operate this tape, as already mentioned, you do not need a voltage stabilization unit. But it should be noted that the mains voltage fluctuates between 190 and 240 V, and the device needs exactly 220 V for full and safe operation. The brightness of the lighting directly depends on the number of volts received: the more volts there are, the brighter the device shines, and vice versa. It would seem that what’s wrong with this, it’s shining, and it’s shining. But a line that constantly receives 240 V will last significantly less than its intended life. Otherwise, if there is insufficient voltage, of course, the device will live longer, but the lighting will also be dimmer. If the power supply is unstable, the best solution would be to purchase a power supply. It will normalize the operation of the device and maintain the network voltage at the optimal level: 220 Volts.
The main differences between types of devices:
- features of functioning;
- appearance;
- possible lengths of segments into which the tape can be divided.
Connecting RGB color strip
The connection principle remains the same. A controller (also called a dimmer) is added to the circuit, with which the color of the LEDs changes. Another difference is the number of wires. After the controller there are not two, but four. Otherwise there are no differences.
How to supply 220V to an RGB LED strip
As you can see, both on the controller and on the tape, there are designations 12B / V+ - this is the phase wire, R - for connecting red LEDs, G - green, B - blue. To avoid confusion, it is better to use wires of the same colors. Everything will be easier to follow and there will be less chance of getting confused.
Connecting two RGB strips to one power supply and controller
If you need to connect several color tapes, they are also connected in parallel. The parallels start from the controller outputs (two wires are connected to the output terminals). With this connection, both tapes will change the glow at the same time.
The power of the controller (dimmer) is not always enough to control all the tapes. In this case, an amplifier is used. The diagram becomes more complex, but it indicates the connectors to which the wires must be connected, which greatly simplifies its assembly. Please note that in the figure, the connection of the tapes is indicated by four lines, and the power to the inputs of the amplifiers is indicated by two, and this power is taken from the outputs of the adapters.
Connection diagram for RGB strips with amplifier and separate power supply
As many strips are connected to the dimmer (controller) as it can power. In the figure, this is only one tape 5 meters long, so each subsequent one uses its own amplifier. In fact, two tapes are “hung” on one controller. The main thing is that he can control them (the characteristics of the controller indicate the length of tapes that can be connected to it).
Also note that the controller and one amplifier are powered by one adapter, the other two amplifiers by another. This is also not necessary. If the power of the power supply is sufficient to power all devices (tape, dimmer, amplifiers), then power will be supplied from only one converter. Another thing is that such a power supply costs a lot, and it gets hot and makes a lot of noise. Therefore, it is indeed better to implement separate power supply by two less powerful units.
Application of 220 V LED strip
Businessmen often use LEDs for outdoor advertising: billboards, banners, signs and other ways to attract customers. Successful entrepreneurs are serious people who won't buy a bad product. LED lighting has earned trust in its ease of use, reliability, efficiency and long service life. The relatively low cost also played an important role, which decreased due to operation from a 220 network. The once mandatory power supply was removed from the entire structure, leaving only a diode bridge.
Due to the absence of a stabilizing unit, the tape voltage is pulsed with a frequency of 60 Hz, which contributes to the blinking of the diodes. The human eye does not see the altered glow, but the central nervous system and brain suffer from a similar phenomenon. Therefore, it is not recommended to decorate rooms where people are constantly present. For example, for a residential building, a 12 and 24 V tape is more suitable. There is an option to simply add a power supply for the 220 device, which will normalize all processes and protect the health of people and the device itself.
Thus, if a person wants to save money and not worsen his well-being, he will not be able to do this with an option that runs on 220V. For proper functioning you need to purchase certain parts. Of course, you can do without them, but on the condition that people are not constantly near the tape.
Video
Plotter roll, 610 mm x 50 m x 50.8 mm core, 80 g/m2, CIE whiteness 146%, Brauberg
669 ₽ More details
Plotter roll, 914 mm x 50 m x 50.8 mm core, 80 g/m2, CIE whiteness 146%, Brauberg
799 ₽ More details
Textbooks on technology 2nd grade
Advantages and disadvantages of 220 V LED strips.
So, having familiarized ourselves with all the nuances of popular lighting, we can highlight all the good and bad sides.
Pros:
- no need for a power supply;
- compactness of additional devices;
The straightener fits completely in your pocket.
- low current strength;
By using thin wires instead of thick ones, money is saved and installation time is reduced.
- functionality and practicality;
- strength;
The device is resistant to external influences: rain, frost, strong wind. Therefore, it can be used as street lighting.
- length up to 200 meters in one piece.
Minuses:
- undesirability of use in a crowded place due to flickering;
- impossibility of repair;
If the device is damaged, it cannot be repaired. You will have to buy a new one, which will significantly affect the budget.
- it is possible that harm will occur to a person during installation due to high voltage;
- Certain conditions for dividing the tape are not always comfortable for owners.
Connection via switch
Of course, any lighting device must be connected to the mains via a switch. Moreover, LED strips controlled from a remote control should be no exception. But where in the circuit should the switch be located for the operation of the entire lighting system to be safe? There is only one correct answer to this question: at the very beginning of the circuit, breaking a phase in the AC circuit.
If the switch is installed in a DC circuit, the power supply will always remain energized. This is bad for two reasons. Firstly, radio components have a working life that will be exhausted much earlier. Secondly, the power supply will have to withstand pulsed network interference and voltage surges around the clock, which will only accelerate its wear.
How to connect an LED strip to 220 V.
The connection process is quite simple - you need to connect several wires, taking into account the polarity.
Algorithm of actions:
- We cut the required piece of strip into 50 or 100 centimeters - you need to check the instructions or on the manufacturer’s website.
- When using the sealed version, apply sealant to the end and put on a silicone connector.
- We install the connector and secure it with sealant.
- We connect the strip to the rectifier, observing the polarity.
- We check for tightness and for the absence of moisture inside.
- We mount the tape into the required surface and plug it into a power outlet.
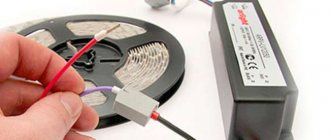
Circuit assembly process
In order to connect an LED strip to 220 V, you will need the LED strips themselves, a power supply, a controller (if needed), wires of the required colors and lengths. The wires are preferably stranded copper (they are softer, but harder to solder) or made from a single wire. Take colored wires, this will make it easier to correctly connect the LED strip to 220 V.
The following tools will also be needed:
- scissors;
- heat-shrink tubing;
- soldering iron with rosin and tin (selection and use of a soldering iron).
Scissors are needed if you need to cut a piece from a reel of LED strip. You can only cut in certain places. On the tape they are indicated by a vertical line, next to which there is usually a schematic image of scissors. Another distinctive feature is the solder pads, which are located on both sides of the cut line.
LED strips need to be cut only in certain places
Next, we take the wires, strip their ends of insulation (2-3 mm), and tin them. and put on the prepared wire a piece of heat-shrinkable tubing of such a size that it would fit onto the tape in its original state. Next, use cotton wool soaked in alcohol to clean the contact pads, tin them (dip a heated soldering iron into rosin, heat the pad for a couple of seconds. It should be covered with a thin layer of tin. Solder the wires to the prepared pads. Be careful and do not take a lot of tin when soldering. The pads are located very close by planting a tin blot, it is easy to connect them (especially in colored ribbons).
After all the wires are soldered, lower the heat-shrink tube so that it covers all the contacts and warm it up. By shrinking, it will close all contacts well. In general, it is better to carry out this operation after checking the functionality of the circuit. If everything lights up and glows, you can isolate it.
Simply press between two plates
Having soldered the wires to the tape, we connect them to the output of the adapter or controller. Everything is simple here. There is a clamping screw and contact plates. We loosen the screw, insert the bare wire (3-4 mm) between the plates, and tighten the screw. We lightly tug the wire a couple of times, checking the contact - if it holds, then everything is fine.
Basic rules and mistakes
- connect tapes longer than 5 meters only in parallel, serial connection is prohibited;
- Install power supplies in a ventilated area with easy access. So that they do not get hot and are accessible for maintenance;
- choose a power supply with a power reserve of 15-20%;
- in one project it is advisable to use a power supply of the same type, since the startup time may vary. Different fragments of the tape will not be turned on at the same time;
- select the correct wire cross-section;
- Before starting installation, assemble the circuit on the floor and check its functionality;
- Make sure that the power source and the tape are of the same voltage (12 or 24 volts);
- cut the tape along the cutting lines marked on it;
- when the printed circuit board is bent at a large angle, damage to the current-carrying tracks may occur;
- Use plug-in connectors only when they cannot be replaced by soldering. In damp rooms, connector contacts oxidize;
- Keep in mind that powerful power supplies are equipped with a cooler that makes noise.
Comparison with low-voltage counterparts
The main difference is in the power plan. The quality of electricity affects the light emitted because... the tape is powered “almost” directly from the network, without a voltage stabilization unit. Reduced voltage in the network reduces the level of luminescence of the strip's LEDs, while increased voltage reduces its service life. This is also a minus. We cannot influence this in any way, because... according to GOST, the voltage in the network can be in the range from 190 to 240 Volts.
If in the network where you use the LED strip the voltage is 240V or more, use a voltage stabilizer. It will significantly extend the service life.
Low light output due to low voltage in the network will not lead to failure of the tape, and even on the contrary, will extend its service life. However, low light output can also be a problem. The problem can be solved by including a stabilizer in the connection diagram.
Let's note the main differences:
- nutritional features,
- appearance and performance,
- multiplicity of length.
Regarding the length, take note. If you are going to install the tape around the perimeter of the room, then you may end up with tails that you can’t get rid of, because... The tape piece is at least 0.5 meters.
Application
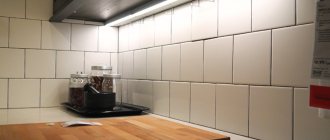
220V LED strip provides bright light. But bright doesn't always mean good. The main disadvantage is the pulsation of the light flux. It occurs due to connection without power supplies with stabilization, through a conventional diode rectifier. This limits the scope of application. The ideal option is street lighting, signs, illumination of the facades of houses, architectural buildings, and personal plots. It can be used in residential premises, but only for decorative purposes, for example, in the kitchen or in a suspended ceiling, placing the LED strip in a niche or profile.
The flickering of light may be invisible to the eye, but when working in such lighting, you will begin to get tired faster, and headaches may appear. The values of pulsation coefficients for lighting are established in regulatory documents - GOSTs and SNIPs.
Options for using tape
Strip lighting devices can be used for various purposes - from creating hidden lighting to full-fledged street lighting. Below we will look at each application option in more detail.
For general lighting
Options for using the strip
LED strip is ideal for creating general room lighting instead of conventional incandescent lamps. The best option would be to use devices of class 5050/5055/5060 with a large number of diodes (50-100 pieces), which will evenly illuminate the room. In public institutions, more powerful devices of the 2835 class should be used, since the light from low-power 5050 diodes will be highly scattered.
Note! When choosing a device, pay attention not only to the level of luminous flux, but also the quality of dust protection, the number of diodes and other technical parameters.
For decorative complex lighting
For decorative complex lighting
For decorative complex lighting, long strips with a low level of luminous flux (3528, 5050, 5055, 5060) are suitable. With their help you can create both open and closed lighting. You can decorate any object - mirror, furniture, home appliances, and so on. You can also decorate public institutions - for example, a bar, cafe or nightclub, but in this case you need to use devices with an average level of luminous flux (the best option is 2835).
To illuminate the work area
For the work area
Various spaces can be used as a work area - for example, a kitchen, a mirror, a bathroom, and so on. To illuminate the work area, devices of the 5050/5055/5060 class with a dense arrangement of LED lamps are suitable. Devices of this type must have a built-in dimmer, with which you can adjust the brightness of the installation. Also pay attention to the level of protection against dust and water - it should be medium or high.
For street lighting
For street lighting
To create full-fledged street lighting, powerful systems of classes 2835 or 5630/5730 are suitable. They will be able to create a bright, stable light that will be visible from afar. When choosing a device, also pay attention to the quality of protection - it should be at the IP 65/68 level, and if you use weakly protected devices, the backlight will quickly deteriorate and become unusable.
How does an LED work?
Before you grab wires and plugs, trying to build a lighting circuit with your own hands, include a motion sensor for the house and other elements in it, you need to understand what its key elements are. What is their principle of operation and how to properly connect the LED strip. Any LED is a semiconductor device (despite its small size), which is actively used in electronics, as one of the elements of microcircuits in various devices.
If an electric current is passed through it in the forward direction (the positive potential is maintained on the anode side), then optical radiation will be observed. If voltage is applied from the reverse side (potential to the cathode), then due to the properties of semiconductors, the resistance will be significantly higher than the current, that is, it can be conditionally assumed to be zero. That is why any instruction for connecting an LED strip insists on observing polarity (otherwise there will be no light).
Network connection
To assemble the circuit, you need to do the following:
- cut the tape to the required length;
- if necessary, connect several sections using feed-through connectors;
- connect the diode bridge;
- connect the cable with the plug;
- connect to the network.
An RGB controller will be added to the above if you have the appropriate model.
Advice! When installing the LED strip, do not bend it sharply to avoid damage. Coat joints and cuts with sealant to protect against moisture. To avoid energy losses and unnecessary heating, a low-power strip (for example, from 3528 LEDs) can be connected in a line no more than 100 m long. If the tape is powerful (5730) - 40 m.
Advantages
What are the advantages of 220V LED strip?
1As mentioned above, it does not require a power supply.
This results in significant savings in overall costs.
2LED strip 220V can be connected in series with a length of up to 100 meters.
You no longer have to solder parallel pieces, connecting them several meters long.
It can immediately be supplied in reels of 50-100 meters in length.
That is, if you need to install lighting over a large extended area, simply unwind it from the reel. At one end you connect a plug with a wire that has a diode bridge, plug it into a socket and that’s it. Enjoy the lighting.
If you need to illuminate an area of 100 meters, take one coil, plus one connector and connect it. True, a tape of this length should be low-power - up to 10 W.
Also keep in mind that at the junctions of individual pieces, there will be small “dips” of lighting due to the inserts and the large distance between the LEDs.
3The LED strip is immediately encased in silicone with a degree of protection IP65 - IP68.
It can be wiped with a damp cloth and cleaned.
This also implies automatic protection from rain, snow, etc. 4 220V tapes do not have strict requirements for the minimum cross-section of power wires.
If in 12 and 24V versions it is recommended to power all lighting from wires with a cross-section of 1.5 mm2 and higher,
then for 220V you can choose smaller sections.
True, the mechanical strength of the cores will play a big role here, and not their electrical resistance and conductivity.
It would seem that the advantages of such a tape are undeniable. Why do many still abandon it in favor of other options connected via power supplies?