Very often, in the sultry heat, there is not enough air flow in the room. To solve this problem, many people buy table fans; they are convenient and compact, some of them work from USB, that is, they can be connected to any charger, power bank or laptop, so that the coolness is always with you. But why buy something that you can make yourself using available materials? For readers of the site, we have prepared two simple instructions that will clearly explain how to make a USB fan at home with your own hands. So, all you need to prepare is a sharp knife, good scissors, electrical tape, an unnecessary USB cord and, in fact, a homemade executive body. As for the latter, it is customary to use one of two options: an old cooler from a computer or a motor from a car or other toy.
Making a fan using a computer cooler
To make a fan at home and not have to strain at all, we found this method on the Internet. The entire manufacturing process will take no more than 20 minutes, you can use old coolers or just buy a new one in the store, the price for them is now a pittance.
We begin preparing the USB wire; to do this, cut off one half at the main cut and remove all the insulation. We will get four wires: two black and two red, we also strip them. If there are other green or white wires on the cooler, cut them off, they only get in the way. Learn how to make a thermoelectric generator with your own hands.
This is how the guys in the video suggest we make a fan from a cooler. The method is actually simple, we don’t promise strong airflow, but working at the computer will be much more pleasant.
How to make a USB fan with your own hands using a motor
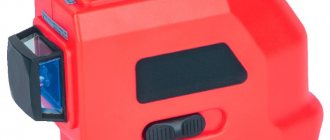
First of all we need to make the blades for our fan, we recommend using a regular CD drive, it looks great and is quite easy to make. Also read an interesting article where we make a laser level.
- We make 8 identical marks on the disk and cut everything along them.
- Then we heat up the disk and bend all the blades in the desired direction. To heat up the disc, just use a regular lighter, bend the blades carefully, if you do something wrong, you will have to buy a new disc.
- Now let's move on to the base of the fan itself, for this it is best to take cardboard and bend it into three parts, or a cardboard base, for example, wrapped in cling film.
- We glue a special mount to the disk.
- We make the base of the case more stable; you can attach a regular disk.
- We hide all the wires and bring one out (to connect to the network).
- We attach the motor to the paper tube and immediately attach it to the base.
- We attach the blade to the engine.
- Now we connect the wires from the motor with a USB cable, as described above.
- This is the final result; if desired, the cardboard base can be painted over or decorated in some way.
Here are the guys with the video showing a really cool method. In a similar way, you can make a fan out of paper, but remember, the paper must be thick; it is optimal to use cardboard.
It will be interesting to know: Do-it-yourself water leakage sensor.
Source: https://dekormyhome.ru/remont-i-oformlenie/delaem-mini-ventiliator-svoimi-rykami.html
Models
On the shelves of specialized stores you will find a wide variety of models from manufacturers. Such abundance can make your eyes run wide. Which one should you choose so that it can serve faithfully for at least one hot summer? There are a number of criteria by which you need to choose USB fans.
- The intensity of the airflow depends on the size of the blades. If you need a fan that will blow on you specifically, and not the whole workplace, choose a device with small diameter blades.
- Amount of noise. Depending on the power, fans can create different noise levels. The maximum, as a rule, does not exceed 30 decibels. Such sounds can distract you from your work and make it difficult to concentrate.
- Security level. We have already discussed the possible consequences above.
And, of course, the price. Choose a fan based on your financial capabilities. We will tell you about the models that, according to customer reviews, have become the best this summer.
Ambielly is an example of a good table fan. Using a meter cord, it can be connected to any device with a USB input. Equipped with a stand and an adjustable head, so you can adjust the air flow yourself. One of the main features of the model is the built-in battery. So the fan can work for some time without being connected. It also makes virtually no noise.
Tacson is a flexible mini fan with an interesting appearance. We can say that it is equipped with a built-in clock, although it is also one. The fact is that the blades have green and red LEDs, which form a dial during rotation. By the way, they are made of soft materials and are not capable of causing harm if accidentally touched.
Prettycare is the quietest fan available. It is ensured by an oil-free axial motor and anti-vibration cushions. Another advantage of the model is the presence of a stainless steel mesh, which guarantees safety during operation. The air flow can be adjusted as desired.
IEGROW is the most highly rated accessory by customers. It can not only cool the air, but also humidify it. Has several operating modes. The model is also equipped with a battery to operate without being connected to power. The fan can work not only while standing in one place. The case has a convenient carrying handle. The model is almost silent.
How to make a fan with your own hands, how to make blades
You are sitting at the computer, it’s summer outside, there is no air conditioning. My hand is already tired of endlessly fanning myself with newspaper, and sweat from my forehead is dripping onto the keyboard.
Common situation? If you don’t have extra money, a homemade fan will help. To make it, you don't need to run to the store for parts. Everything you need for a leaf blower is in the house.
Don't know how to make a free fan at home? Follow the text!
What does an air cooler consist of:
- engine
- fan blades
- stand
- power supply
The last point can be omitted if you make a USB fan with your own hands. The computer has a voltage of 5 volts. You will need a printer cable, an old mouse, or any unnecessary device with a USB cable.
If you are a fan of DIY projects, you probably have some useful junk in your house. Otherwise, you have no need to know how to make a fan yourself.
Can't find an electric motor in a box of unwanted parts? You can make a fan from a motor from an old disk drive or a broken toy. Let's look at a few examples of how to make a mini fan from scrap materials.
Glue, cardboard, toy motor
To make a small propeller you will need a piece of corrugated cardboard 30x30 cm.
We glue the support in 2-3 layers, the area is at least two palms. We make the rack for the engine in the form of a prism 10–15 cm high. For cutting, we use a stationery knife. We bend the structure along a ruler.
How to make a mini fan durable and stable? Let's use a glue gun. No other glue will allow the connection to be made as reliably.
Next comes the most difficult part: the propeller. The center sleeve does not have to be made of wood or plastic. We cut it out of the same cardboard.
We connect with hot glue, and as thickly as possible: the structure should turn out to be monolithic. The blades can be made from thinner cardboard. The packaging for a mobile phone accessory is suitable.
This is the most critical element: the blades must be absolutely identical in shape and weight. Otherwise, your propeller will vibrate during operation and will quickly fall apart.
We glue the blades (carefully) onto a cardboard sleeve, observing aerodynamics. The planes should be rotated 30–45 degrees in opposite directions. To simplify the design, we assemble a USB fan with two blades with our own hands. They are easier to balance, and such a propeller can cope with cooling no worse than a three-bladed one.
Test run and balancing
We make a hole in the very center of the bushing (using an awl), place it on the motor axis, and carry out a test run. Of course, before assembly it is necessary to coordinate the angle of attack of the blades with the direction of rotation of the motor.
Otherwise, the fan will blow in the opposite direction. If there is vibration, the propeller can be easily balanced by simply lifting the blades. After making sure that the propeller rotates smoothly and blows where required, we glue the motor onto the stand.
Don't spare glue!
We connect the USB cable to the power wires of the engine. Of course, it is better to do this with a soldering iron, but given the scanty power, you can get by with simple twisting. The main thing is not to forget to insulate the connection using electrical tape or tape.
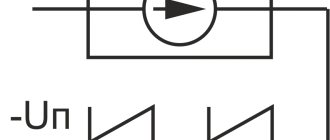
How to determine the power pins of a USB cable
Any USB connector consists of 4 pins. We are not interested in averages, these are information wires. The 5 volt power supply is on the outermost contacts. Wiring in the illustration:
If you reverse the polarity, nothing bad will happen. The motor will just spin in the wrong direction. How to determine the motor supply voltage? There is no need to look for markings. If the toy (where it was installed) is powered by three batteries (1.5 volts each), then the motor is 5 volts. If it runs on two batteries, it will not be suitable for USB power.
CD
Don't know how to make an efficient CD fan? It's easier than it seems. We divide the disk into 8 sectors. An even number of blades is easier to balance if axial runout occurs.
We cut out the blades with ordinary scissors. You can do this work with a construction knife, or melt the sectors with a soldering iron - there is not much difference. If you accidentally break a CD, get a new one.
The extra segments are broken out, the rest are given the aerodynamic shape of a propeller. To do this, just heat the workpiece over a candle or using a hair dryer. If you make a mistake with the geometry, you can always correct the situation by reheating. This is the advantage of crafts made from a CD.
In the center of the structure we glue a thickening: any piece of plastic 5–10 mm. We drill a hole in it for mounting on the electric motor shaft.
Where to get an electric motor
This design uses a drive from a floppy drive. Power supply is 5 volts, speed is moderate. Most likely, you do not have a separate disk drive collecting dust on a shelf; it can be found in the system unit. Nobody uses floppy disks anyway, you can safely disassemble it for spare parts.
The convenient flat motor housing allows you to assemble the fan on a flexible leg. To do this, twist a piece of single-core copper wire into a pigtail and attach it to the power cable using electrical tape.
The motor with the propeller is glued to the flexible stand either with hot glue or wrapped with the same electrical tape. Unless you're entering a fan design competition, you don't have to worry about aesthetics.
After spending 2–3 hours, you get a convenient, portable “device” that can be installed anywhere without leaving your computer.
Description
The portable accessory is a device of small dimensions. It is designed to blow air into small spaces and can serve only one or two people at a time. However, different models may differ in size and power.
Their appearance varies. Some are equipped with a protective mesh, and some have a closed housing with holes for air to pass through. Such fans can be completely open. One more parameter is added to the standard set of parameters – security.
By the way, the USB fan can be connected not only to a computer, but also to a Power Bank, so you can take the accessory with you on the road. Due to low energy consumption, the fan can operate continuously for several hours.
At its core, it is a regular small fan. Only instead of a standard plug for connecting to the mains, it has a cord with a special USB connector designed for connecting to modern electronic devices.
The main elements that make up the device:
- stator – stationary part;
- rotor – moving part;
- copper winding - several coils in the stator where power is supplied;
- a round magnet located in the rotor.
The operating principle is quite simple. The winding, under the influence of electricity, creates an electromagnetic field, and the rotor, equipped with blades, begins to rotate.
Of course, USB fans are inferior in power to standard desktop designs. This is due to low energy consumption. The accessory operates at a voltage of 5 V.
How to make a USB fan using improvised materials
Very often, in the sultry heat, there is not enough air flow in the room.
To solve this problem, many people buy table fans; they are convenient and compact, some of them work from USB, that is, they can be connected to any charger, power bank or laptop, so that the coolness is always with you.
But why buy something that you can make yourself using available materials? For readers of the site, we have prepared two simple instructions that will clearly explain how to make a USB fan at home with your own hands.
So, all you need to prepare is a sharp knife, good scissors, electrical tape, an unnecessary USB cord and, in fact, a homemade executive body. As for the latter, it is customary to use one of two options: an old cooler from a computer or a motor from a car or other toy.
Idea No. 1 – Use a cooler
It will take no more than 15 minutes to assemble a USB fan from a cooler. First you need to prepare the cooler. Two wires come out of the device - black and red, and sometimes yellow, even less often - blue. Yellow and blue are of no use to us.
We strip the insulation by 10 mm and put the prepared element aside.
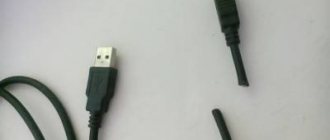
Next you need to prepare the USB cable. We cut off one half of it and clean off the insulation at the cut point with a sharp knife; a stationery knife works perfectly. Under it you will see four wires, of which two are necessary: red and black.
We also clean them, but it is better to cut off the other two (usually green and white) and insulate them.
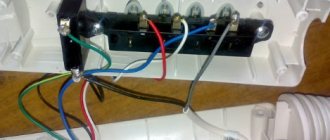
Now, as you understand, you need to connect the prepared contacts in pairs, according to the color marking of the wires: red to red, black to black using twisting.
After this, you need to carefully insulate the cable connections using electrical tape or heat shrink and make a stand. As for the stand, it’s up to your imagination.
Some people successfully use wire, while others cut out a nest in a cardboard box in a very interesting way.
In the end, a homemade mini fan is connected to a computer or charging unit, and you can enjoy the operation of your own electrical appliance.
Idea No. 2 – Use a motor
In order to make a USB fan from a motor and a CD, it will take a little more time, but you can still easily make such an electrical device with your own hands in an hour. A motor for such a homemade product should be chosen with an operating voltage of approximately 5 Volts, maybe a little more.
If you take the motor to a lower voltage, too much current will flow through the circuit and the motor will quickly fail.
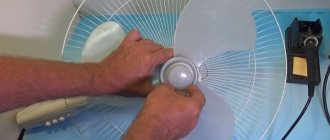
First, we prepare all the elements of the device. In this case, you will need to make an impeller (blades).
To do this, we recommend using an ordinary CD. We draw it into 8 equal parts and carefully cut it with good scissors, almost reaching the center. Next, we heat the disk (it’s convenient to do this with a lighter), and when the plastic becomes more elastic, we bend the blades at an equal angle (as shown in the photo).
If the impeller is not bent enough, then no air flow will be created during the rotation of the disk. However, if you overdo it, the homemade product will also work poorly and unstable.
When the blades are ready, move on to creating the main mechanism. Inside the disk you need to insert an ordinary champagne cork, cut to the required size, which must be placed on the motor shaft. Next, we move on to creating a USB fan stand for a laptop.
Here, as in the previous version, everything depends on your imagination. Of all the available means, the option with wire is the most suitable. When the homemade USB fan is ready, we connect the motor wires to the USB cord wires, as in the previous version, carefully isolate the twist and proceed to testing.
Visual video instructions:
As you can see, in order to make a fan from a cooler or a motor from a machine, it does not require much time and skills in working with electrical appliances. Even a beginner can cope with this task! Be sure to watch the videos we provide, they will help you better understand the principle of operation. If you have any questions, feel free to leave them in x.
Source: https://samelectrik.ru/kak-sdelat-ventilyator-usb-svoimi-rukami.html
Step-by-step instruction
For each material listed previously, there are instructions for creating blades and a cone for a fan.
Made of plastic
Let's consider the algorithm of actions with a plastic bottle:
From the cooler
Next, consider the instructions for using the cooler:
- To turn the cooler into a ventilation device with a propeller, first the wires are prepared, and then the connecting structure. When placing the device near a computer unit, an ordinary USB cable will be useful. The connecting wire is cut and stripped of insulation. A similar operation is carried out with the cooler wiring. During the propeller assembly process, you will need a red and black wire. The first is responsible for the plus, the second for the minus. But if there are other colors in the wires of the cooler and USB cable, they can be cut off and removed. This is done to avoid confusion.
- Let's move on to the procedure for joining materials. First, the wires and cooler are cleaned of dust and other debris. It is better to twist the cords tightly together. Don't mix colors. An incorrect design will lead to difficulties in the process of designing parts for the fan. Twisting requires 1 cm. If necessary, most wires are cleaned and insulated later.
When the minus falls to the plus, a dangerous situation is created. Do not allow the black and red wires to touch while connecting the electrical circuit. In this case, not only the USB cable burns out, but also the components of the computer system.
Typically, a computer is not afraid of such situations if it has special protection against voltage surges built into it. The problem is much more complicated with sockets. During surges, the socket short-circuits and the entire wiring is disrupted. Therefore, care should be taken to insulate the exposed part of the wires in order to avoid complications and unusual situations.
To create a full-fledged fan of significant dimensions, you will need several unnecessary coolers. Otherwise, the device will fall due to oscillations and vibrations. This situation cannot be allowed for the following reasons:
- If dropped, the device may bounce directly into your face. But such a device will not cause deep cuts.
- If the made device falls on a flat surface, the blades will simply break. The fragments will fly to different places. A dangerous part can also bounce into the eye.
- Other dangerous unforeseen circumstances.
From disk
You can't make a cone out of a disk. But this material is useful for creating blades. Let's look at the detailed instructions for creating parts:
Expert opinion
Viktor Pavlovich Strebizh, lighting and electrical expert
Any questions ask me, I will help!
Even a cardboard box will do just fine for the fan housing, but if you spend a little more effort and time, you can even build a real designer object. If there is something you don’t understand, write to me!
How to make a USB fan using improvised materials?
So, all you need to prepare is a sharp knife, electrical tape, an unnecessary USB cord and, in fact, a homemade executive body.
As for the latter, it is customary to use one of two options: an old cooler from a computer or a motor from a typewriter.
Next, we will look at two instructions that will clearly explain how to make a USB fan at home with your own hands!
Idea No. 1 – Use a cooler
As a rule, it will take no more than 15 minutes to assemble a USB fan from a cooler. First you need to prepare the cooler. There are two wires coming out of the device - black and red. Strip the insulation to 10 mm and set the prepared element aside.
Next you need to prepare the USB cable. Cut off one half of it and peel off the insulation at the cut point. Under it you will see four contacts, of which two are necessary: red and black. You also clean them, but it’s better to cut off the other two (usually green and white) so that they don’t get in the way.
Design and types of fan heaters
To preliminarily estimate the amount of work and select the materials necessary for assembly, it is worth familiarizing yourself with the design of a factory-assembled fan heater. The elements present in the design of all models are:
- Protective housing made of plastic or metal.
- Electric motor.
- Impeller with blades.
- A heating element.
- Protective grille.
- Adjustment and control elements.
Depending on the chosen design and purpose of the device, additional components are selected. You can make almost all types of electric heaters with your own hands. For domestic needs, you can make a mini heat gun with your own hands to warm up and dry the room, a do-it-yourself electric fireplace will allow you to realize your own design ideas and give the room a cozy atmosphere, and a ducted air heater is built into the supply ventilation or air conditioning system.
What you will need
1.
The main thing we need is the fan itself. Any fan for a system unit or processor will do, the main thing is that it has a stable design and can be placed on something. As an example, I took a 12 cm fan, without a sensor, for a system unit.
If you have a choice, it is best to take fans with the highest possible rotation speed, since the power supply for such fans requires 12 V, while the USB port only has 5 V power and, accordingly, the rotation speed will be slower. Rotation speed is measured in revolutions per minute (RPM) and can usually be found on the fan packaging or from the retailer, sometimes it is indicated on the fan itself. In my case, a fan with a rotation speed of 1200 RPM, when connected to USB it will be somewhere around 500-550 RPM, which is extremely low and only enough to create a small draft :). It is advisable to take fans with 2500 – 5000 RPM (some can operate up to 8000 RPM).
2.
Next, of course, you will need a USB cable
Any cord with a standard USB plug on one side will do, and it doesn’t matter which connector on the other, we’ll cut it off anyway
This could be a cord from an old printer, mobile phone, mouse or keyboard, in general, from anything. The length of the cord should not exceed 2m.
3.
We will need any insulating tape.
Well, or as a last resort, the great and irreplaceable one is adhesive tape, but I highly do not recommend it.
USB connector cable color coding
Any cable with a USB connector is suitable to supply power to the cooler. Such cables are widely used to connect cell phones, printers and other devices to the charger.
If you look inside the USB connector, you will see four pins, as shown in the photo. A 5 V supply voltage is supplied through the first and fourth contacts, and information data is supplied through the rest, which is not needed to connect the cooler.
| USB 2.0 connector pinout | |||
| Conclusion | Name | Wire color | Description |
| 1 | VCC | red | +5 V |
| 2 | D – | white | Data - |
| 3 | D+ | green | Data + |
| 4 | GND | black | General |
The contacts are connected to wires of different colors according to the standard. The table shows information on the color coding of USB cables. To power the cooler, only red and black wires are needed.
To connect a homemade additional cooling system to the USB connector of a mini-PC, a cord length of 20 cm is sufficient, but I decided to make it 50 cm to be able to use the fan in other cases. If desired, the wire can always be made shorter.
After cutting the cable, you need to remove the insulation from it to a length of about a centimeter, cut the Data wires (white and green wires) and use a soldering iron to tin the ends of the wires. It is necessary to exclude the possibility of data wires touching each other.
Materials for useful crafts
To make this simple device with your own hands, you will need the following materials and tools:
- soldering iron and related accessories (solder, rosin);
- a piece of USB cable of any length;
- knife, wire cutters, electrical tape;
- the computer cooler itself (one or more).
Coolers come in different sizes. Their design includes wires with which you can adjust the number of revolutions depending on the temperature of the central processor. In our case, these wires will not be needed - we will work only with the black (minus) and red (plus) wires, which receive voltage from the computer motherboard. The remaining wires can be cut off using wire cutters so that they do not interfere with assembly. We need to do this carefully so as not to damage the red and black cores we need.
Operating procedure:
- Take any unnecessary USB cable you need to connect the cooler to it. It may not be formally working, but here we need to find wires of the same colors as the cooler. For ease of work, the remaining wires are removed using wire cutters.
- Remove the outer insulation from the USB cable with a sharp utility knife: measure a distance of approximately 3-4 cm from the end of the wire and apply the knife to the wire.
- Then, in a circular motion, without pressing, draw the wire in a circle.
- Now pull the insulation - it should easily come away and expose the bundle of wires.
If you press too hard, cutting the insulation may damage the insulation of the wires underneath the outer layer of plastic you cut. Then you will have to bite off the entire braid and repeat the procedure due to the fact that a slight violation of the integrity of the insulation usually leads to a short circuit. Now that you have prepared the wires yourself, you can proceed to the next step.