Replacing a light bulb is the simplest job at first glance, which is not difficult for anyone to do. But according to statistics, a very large proportion of electric shocks in everyday life occur precisely when unscrewing or screwing in a lamp. Therefore, it is worth considering the process in detail to figure out how to ensure safety and quickly replace the burnt element.
The work is simple, but requires compliance with safety precautions.
Design
The purpose of the fastener is to conduct current from the network to the lamp. Everything necessary for this is provided in its design:
The contacts must pass current. Therefore, the light bulb base is made of metal, that is, a conductor (iron, copper). In LED devices it is also found in aluminum. Insulation, on the contrary, should prevent the passage of current. At the same time, it holds the contacts in the working position. Typically the insulation is made of plastic or heat-resistant resin.
Light bulb base design
Types of lighting bulbs
We will talk about the most common lamps that we usually use at home, in offices and various industrial premises. These include incandescent, energy-saving, halogen, fluorescent and LED lamps. Let's look at each of these types in more detail.
Regular incandescent lamp
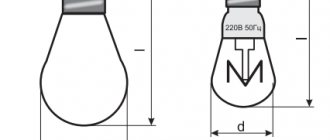
This is probably the most common lamp, despite the fact that it is already more than 150 years old, and over the past 100 years it has undergone virtually no significant changes, we still use it. The thing is that its production is very cheap and its design is simple. It is a flask without air in which a tungsten filament is placed. Under the influence of electric current, it heats up to high temperatures and emits light. Modern incandescent lamps with a tungsten filament have one feature: at room temperature, the resistance in the tungsten filament is very low, approximately 15 times lower than the working one, which increases the risk of its burning out when a higher current passes at the moment of switching on. The first lamps used graphite filaments, the resistance of which, on the contrary, decreased with increasing temperature. This gave the effect of a gradual increase in brightness. At the same time, graphite threads exhausted their service life faster.
Source
Useful tips
- There are a large number of methods that can be used to easily remove a broken light bulb. This can be done with a spool of thread, a piece of ordinary soap, etc. You can also carefully drive a sharp and thin screwdriver into the bottom of the base and use a platypus to unscrew the damaged light bulb.
- If you still can’t get the base out, you can break it into pieces. To do this, the remains of the light bulb are torn off in pieces. This method takes a lot of time, but is reliable.
- If the light bulb burns out not at the moment when it is turned on, but later, it may be hot. In this case, you need to wait until its surface cools down.
- It is forbidden to work with electricity with wet hands. This may result in electric shock.
- Bulbs, tools and lighting fixtures should be purchased from reputable stores. Products must comply with GOST standards.
The essence of the method is to disassemble the cartridge itself. True, this can only be done with carbolite cartridges, which are installed in old lighting fixtures from the USSR era. Ceramic ones, which are mainly used in modern chandeliers, are not intended for such disassembly. Let's return to disassembling the cartridge. It consists of the following parts:
One of the halves contains a metal sleeve into which the base is screwed. To remove the base, you must separate the base. All that remains is to unscrew the base; the already familiar thin-nose pliers will help with this. After removal, the cartridge should be collected and can be used again.
Useful tips Connection diagrams Principles of operation of devices Main concepts Meters from Energomer Precautions Incandescent lamps Video instructions for the master Testing with a multimeter
Adapters for sockets
The type of base, voltage and power of the light bulb are its most important technical characteristics. They are taken into account when buying a lighting fixture. The voltage is usually standard - 220 volts. The user chooses the power at his own discretion. You will have to tinker with the fasteners.
If you are purchasing a light bulb for a chandelier, you should definitely find out the size of the socket. If it cannot be determined visually, then information about the type of base can be found in the technical documentation for the lamp.
Source
Replacement process
With proper preparation, you can quickly and safely change any type of lamp. At the same time, the set of tools and devices may differ, it all depends on the specifics of the work. General recommendations are:
- If possible, wear dielectric gloves. If they are not available, use any rubber option that is at hand, or at least a fabric one.
- When purchasing a screwdriver, pliers or pliers, it is advisable to choose varieties with dielectric handles rated for 220 V. They are always marked, and this is also indicated on the packaging. But even such a tool should be used with caution.
- It is worth wearing safety glasses. They are inexpensive, but useful for a variety of purposes. For example, when working with your head raised, you can prevent glass shards and small debris and dust from getting into your eyes, which often fall when disassembling a lampshade or replacing a light bulb.
- Turn off the power supply to the entire apartment or to the part where repairs need to be carried out. It is best to clarify in advance what each of the machines in the panel is responsible for, so as not to confuse anything and turn off the power to the lighting. Usually there is a separate unit connected to it, so other consumers of electricity will not be left without voltage
- If the house has an old-style panel, then it is enough to unscrew one of the plugs to de-energize the room. But even after turning off, you need to be careful and remember about the residual current that may remain in the network. Even this is enough to seriously defeat a person.
- Set up a chair, table, stepladder or any other device to ensure comfortable work. It is important not only to choose a reliable design, but also to ensure a stable position to prevent tipping over. You need to check this in advance, and not after climbing up.
How you can do it and how you can’t.
Important! If the light bulb is located at a high height, you can only work on a reliable stepladder to ensure safety. There must be a second person below and support the ladder.
In which direction and how to twist it correctly?
This simplest action at first glance causes many difficulties for those who carry out the work for the first time. Therefore, you need to follow a few simple recommendations to change the light bulb correctly and minimize the risk of damage to it:
- If the surface is hot, it is better to wait until it cools down. Do not rush, as the risk of damage is much higher.
- Grasp the flask with all your fingers and distribute the load evenly over the surface. If you press on only one or two sides, then the likelihood that the flask will burst increases significantly. Grasp it in such a way as to hold it from all sides.
- If the lampshade interferes with work, it is better to remove it first. It all depends on the design of the chandelier; you need to act according to the situation. The main thing is not to damage the fastenings and the lamp itself and not to drop it.
- Use gloves, preferably fabric ones with polymer coating. Firstly, they allow you to securely grip a slippery glass surface. Secondly, even if the flask bursts when unscrewing, the glass fragments will not damage your hand and you will be protected from severe cuts.
- Always unscrew counterclockwise or from right to left. All bulbs have the same thread direction, so you need to immediately turn them in the right direction so as not to tighten them even more and complicate your work.
Unscrew counterclockwise. - If the base is burnt from overheating or does not give in, you need to work with extreme caution. First, firmly grasp the flask and gently swing it from side to side, pushing a little inward. Often after such manipulations the lamp breaks. It should be torn off with a sharp, precise movement, without pressing hard on the glass so that it does not break.
- If the socket is dismountable, the easiest way is to unscrew the bottom part along with the light bulb. In this case, the top one can also rotate; in this case, it should be held with your hand or any suitable device.
- To remove the removed lamp from the socket, it is better to pre-treat the thread with a liquid key and leave it for a while. And then try to unscrew the base. If the flask bursts, follow the instructions in the section below.
Advice! To prevent the bulbs from sticking, apply a little lubricant to the base before installation. Lithol or solid oil will do. Then, even after a few years, no problems will arise.
Pliers or needle nose pliers
The first method you should resort to is using pliers or needle-nose pliers. The latter are more convenient due to the fact that they have thin, elongated “sponges” that can reach many hard-to-reach places. They are very convenient for capturing small parts. It will also be easy to separate the base from the socket.
Specialist in repair and maintenance of electrical equipment and industrial electronics.
Important! The handles of thin-nose pliers should be rubber or plastic. If such a tool is not at hand, the last resort is to wrap the handles with several balls of electrical tape.
- Remove any remaining glass, if any.
- Next, grab the base with a tool, twisting it outward. The lamp shade must be held so that it does not come off. It is important not to damage the circumference of the cartridge.
- If the base does not give in, you can carefully bend its sides inward and then unscrew it.
During the process, the base may begin to tear or become deformed, this is not a big deal, it will even be easier to remove it, the main thing is that it does not damage the cartridge.
If you can’t grab the edges, you can try another option - place the needle-nose pliers inside the base and push the ends apart so that they rest against the side walls. You need to twist counterclockwise.
If there are no tools at hand, then you can resort to using improvised means. The procedure is as follows:
- Pull out the remaining glass, they will interfere.
- Take a plastic bottle. The volume does not matter - the necks are all the same.
- Remove the lid and heat the neck until the plastic begins to melt. This can be done with a lighter or candle.
- Insert the neck into the base and wait until the plastic cools down.
- Get the base.
The method is simple, although it does not always help. To do this, you need to have pieces of glass sticking out of the base; in this case, there is no need to remove them. To implement this method you need:
- Cut a fairly large potato (raw) in half and separate its parts. They must be clean and dry.
- Place a potato over the fragments so that they cut firmly into the flesh.
- All that remains is to unscrew the base from the socket.
After use, potatoes should be thrown away. Other fruits and vegetables will not help because their flesh is not as dense.
Expert opinion
Viktor Pavlovich Strebizh, lighting and electrical expert
Any questions ask me, I will help!
Of course, the lamp must be screwed tightly into the socket, but still, during installation, you need to find such a tightening point so that you can then unscrew it. If there is something you don’t understand, write to me!
Subtleties of replacing damaged lamps
If the bulb bursts during operation or when unscrewing, then changing the light bulb is much more difficult. The remaining part in the cartridge must be removed. There are several methods, you need to choose the appropriate one based on the situation:
- If the bulb has completely fallen out, you can try to unscrew the metal element using small pliers or long-nose pliers. You need to carefully grasp the edge of the base; you can bend it a little with a screwdriver to make it easier to work with. While rocking, twist counterclockwise, the main thing is to get it out of place, then the work will go much easier. During operation, you should be careful not to damage the threads in the chuck.
- You can use a small plastic bottle. To use it to unscrew the base from the cartridge, you need to heat the neck with a regular lighter so that the plastic becomes soft. Then insert it into the cartridge, pressing it inward so that it hardens in the base and, after cooling, sticks securely. Next, unscrew counterclockwise, holding the bottle.
Using a bottle you can quickly remove the base remaining in the cartridge. - If you have a champagne cork with a thick top on hand, you can use it. If necessary, the thin side must be trimmed a little with a knife so that it fits into the base. If there is a rod left inside (the leg on which the tungsten filament stands), it must first be removed with pliers. Insert the plug all the way so that it is firmly fixed and unscrew the remaining part.
- When there are small pieces of glass and a leg left in the base, you can try to unscrew the light bulb with a potato. To do this, you can cut the potatoes in half, there should be a piece left that will be comfortable to hold in your hand. Press the half into the light bulb so that it is well fixed on the fragments, then carefully turn out the base.
An example of unscrewing a light bulb with a potato. - If you can unscrew the lower part of the cartridge, it is better to do this; it is more convenient to work on the removed element. Again, you can treat the threads with liquid wrench to make unscrewing easier.
In the most difficult cases, you need to replace part of the cartridge with a new one, and if it is non-separable, cut off the wires and attach a new one. Do not forget that glass must be cleaned thoroughly; it is best to use a vacuum cleaner.
Video: Replacement hazards, common breakdowns
Possible problems
When replacing lamps you may encounter the following problems:
- The tendrils beat on the fingers. If they are too strong, removing the lamp may damage the ceiling. To solve this problem, just hold the springs firmly to prevent damage to your fingers and the ceiling. The light source must not be allowed to hang on the film; it is necessary to ensure that the springs get into the mounting ring behind the film.
- At one time, workers who installed the ceiling could leave exposed parts of the wire behind it. To eliminate this problem, even after a complete blackout of the house (apartment), it is better to wait a few minutes before starting work. Otherwise, there is a risk of getting an electric shock.
The following types of lamps are used to illuminate the ceiling:
Various types of lamps and socket fasteners. They differ in power output, heat, economical energy consumption, cost and service life. Regardless of the type of light bulb used in the design of the lamp based on the established GOST standards, the package includes similar parts, knowledge of the structure of which facilitates the dismantling process:
- The housing, which is located in the inter-ceiling space and is hidden from view, contains wiring and a cartridge;
- Spring-type “tendril” clamps that securely hold the light bulb in one position and fix it flush with the surface of the ceiling;
- A glass or plastic cover, which performs a protective and light-diffusing function, protects the lamp from the penetration of dust and moisture;
- Fixing ring that holds the protective cover on the decorative outer formwork.
When a light bulb burns out, not the entire lamp needs to be replaced, but a part. To do this, you only need to dismantle the fixing ring and the plastic cover. However, during operation, difficulties are caused by the type of lamp to be replaced and the method of attachment to the housing. There are different types of fastenings for lamps to the socket:
- Threads are a standard type of fixation, most often installed on conventional incandescent lamps;
- Pins (2 metal guides) that pass through a special groove in the cartridge and with light pressure, if connected correctly, a characteristic click is heard;
- 90 degree rotating lock.
Lamp disposal
It all depends on the type of light bulb, so you need to look at the main options in order to understand how to properly dispose of them:
- Incandescent lamps can be disposed of with normal household waste. But at the same time, they are dangerous because they can break and cause injury or damage the package. It is best to take them out immediately to eliminate problems.
- Halogen lamps also do not need to be disposed of separately. They are an order of magnitude stronger, so they do not pose any danger.
- LED options are made of plastic, do not contain hazardous substances, and can be disposed of with household waste.
- Energy-saving fluorescent lamps contain mercury vapor, so they should not be thrown away as usual. You need to hand it over to specialized collection points or put it in special containers; they are available in many cities.
Fluorescent lamps must be disposed of in special containers.
Despite its simplicity, replacing a light bulb requires certain knowledge and compliance with basic safety standards. It is important to turn off the electricity before starting work and protect your eyes and hands in case the bulb is damaged. And if the lamp bursts, use one of the described methods for removing it.
How to replace the cartridge in a chandelier yourself: step-by-step instructions
How to change the socket in a chandelier:
- turn off the electricity in the apartment (it is necessary to turn off the current on the panel, since the switch can open not the phase, but the zero contact);
- remove the chandelier if necessary, if there is no other way to replace the failed cartridge;
- unscrew the light bulbs and disassemble the lamp;
- pull out the visible part of the cartridge, disconnect the wires;
- remove the ceramic base;
- replace the cartridge;
- Assemble the chandelier in the reverse order, install it in place and mount all decorative elements.
Each step must be performed observing safety precautions.
Turn off the light on the dashboard
Before replacing the cartridge, be sure to turn off the electricity supply to the room. To do this, you need to put the machines on the dashboard into an inactive state.
It is strictly prohibited to work when the electrical wiring is not de-energized, otherwise there is a risk of electric shock!
Disconnect the wires
The wires necessary to supply voltage are connected to the chandelier. They need to be insulated and separated in different directions, otherwise a short circuit may occur.
Remove the chandelier from the ceiling
To remove, you need an indicator screwdriver and a stepladder.
Dismantling is carried out if it is otherwise impossible to remove the cartridge, according to the following algorithm:
- First you need to make sure that the electricity is turned off.
- Then the decorative and fragile elements, lampshade, and light bulbs are removed from the lamp.
- It is necessary to disconnect the fixing pin and the cap covering the wires.
- If there is a strip, you need to loosen the clamping bolt and remove it.
- Remove the chandelier itself.
As a standard, fastening is done using disposable butterfly-type fasteners. If they need to be removed during the process, then you need to purchase new ones in advance.
Disassemble the lamp
If the chandelier was working immediately before dismantling, you need to wait until it cools down. Then the lampshade is removed; it is usually fixed with a thread or latches. When disassembling the lamp, it is important not to damage the plastic mounting ring.
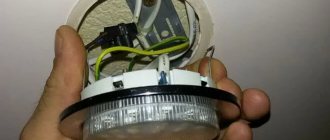
Remove the cartridge
How to remove the cartridge depends on the type of fixation. It is usually secured with bolts. The element must be removed immediately or disassembled by removing the core. Finally, you need to unscrew the nut that secures the housing.
Labeling of factory products
Professional electricians are not content with one size and a quick visual inspection of the product; they carefully read the markings printed in indelible ink or embossed on the visible part of the socket.
Typically, the labeling includes technical characteristics or conditions of use that are of fundamental importance when choosing light sources
The most responsible manufacturers apply the markings and attach short manuals to the products listing important characteristics.
The list of parameters that can be found on the cartridge is not always complete.
Usually any of the following characteristics are reflected:
- type, for example, threaded, pin;
- size;
- temperature;
- load current;
- power;
- voltage;
- manufacturer's trademark;
- level of protection;
- presence of contact for grounding.
Before purchasing cartridges, study the manufacturer’s website, where detailed technical information and a diagram with dimensions are usually posted.
In addition to reviewing the technical characteristics and conditions of use of the product, it is necessary to clarify exactly how the cartridge is attached and what holes/latches are provided for fixing
When choosing, it is also worth considering that ceramics are stronger than plastic and can withstand higher temperatures. If the cost of a product is questionably low, there is a chance that it is a fake.
It’s better to play it safe and buy a more expensive, but high-quality electric cartridge from a reputable brand.
How does a standard lamp socket work?
Depending on the type of product, a distinction is made between screw and pin chucks. Their main difference lies in the way the light bulb is attached.
Any cartridge consists of three mandatory elements - a threaded sleeve, a bottom and a ceramic liner. The sleeve is located in a cylindrical body and the light bulb is screwed into it. The body is made of plastic (the most common), ceramics, metal, carbolite.
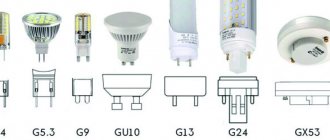
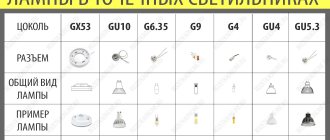
Features of sockets marked e14, e27, g4, g13
The socket is the part of the light bulb necessary for fixing it in the socket and supplying electric current. The base is marked with letters and numbers. The letter designation indicates the type of fixation, the number indicates the diameter of the connection with the conductor.
The letter E indicates that this base is equipped with an Edison thread. G – pin base. There are also devices marked R, P, S, B.
In addition to the fixation method and diameter, the following parameters are indicated on the product:
The following types of bases are used for the home electrical network:
- E14 – “minion”. Threaded base. The diameter of the screwed part is 14 mm. They are used with a current of 2 Amps. Used in chandeliers, for lighting refrigerators, microwave ovens.
- E27. The most common option. Designed for a current of 4 A, but there are also more powerful products for a current of 16 A, they are marked E40. Powerful cartridges are used for street lighting.
- G4. Used in miniature lamps (in built-in lamps and flexible lighting systems), which are used for room decor. They are low-voltage devices; the required supply voltage is 12 or 24 V; 220 V devices are less common.
- G13. Such light bulbs are used for devices such as Armstrong, LVO and others. There are also analogues - T8 tubular lamps with a G13 socket.
- GX53. Widely used in suspended ceilings, offices and other rooms where directional lighting is needed. They operate on 220 V and do not require transformers.
Sockets E14 and E27 G4 Adapter-adapter E27 and G4 G13 GX53
Other types of lamps for home lighting are used less frequently.
What is the name of where a light bulb is screwed in?
Also, the cause of such trouble can be a defect in which the flask itself easily separates from the metal base.
Expert opinion
Viktor Pavlovich Strebizh, lighting and electrical expert
Any questions ask me, I will help!
The only way when it is absolutely safe to use such a spray is to remove the chandelier completely, disconnecting it from the power cables. If there is something you don’t understand, write to me!
When do you need to change the cartridge in a lighting device?
- Newspaper or dry rag. It is most convenient to twist it with newspaper. You need to twist it tightly, insert it inside the cartridge and unscrew the base.
- Special equipment. There is a special tool designed to screw in lamp bases without lamps. It looks like a large clothespin. You can buy one in online stores of Chinese goods.
- Scissors. Turn off the power to the lamp, insert the scissors into the base, and open them so that their sharp edges rest against the stuck element, and unscrew.
- Cut the base, twisting the pieces inside. Having done such manipulations, pulling it out will not be difficult.
Holders for lamps and chandeliers
- Check the condition of the thread and the absence of carbon deposits on it if the base had to be torn off. If there is damage or dents, it is better to replace the outer part of the cartridge; it can be purchased assembled.
- Be sure to bend the contact on the inside so that it presses well against the base. You just need to pull it a little towards yourself, since over time the spring steel loses its elasticity and the contact deteriorates, which often leads to the bulb burning out.
- First, screw the outer part of the cartridge until it stops; it should not dangle. Then carefully screw in the light bulb clockwise. If it does not fit in easily, gently wiggle it or unscrew it a little and screw it in again, do not apply force.