The cable is connected by turning the contact mechanism a quarter turn, as shown in the figure.
After this, crimping is carried out. Thus, the current passed along a closed path.
At the final stage, all that remains is to eliminate the gaps between the socket box and the wall, covering it with gypsum mortar, and also seal the channels with the laid telephone cable. Initially, stationary devices did not require connecting sockets, since the wires were simply connected directly to each other. How to connect a telephone socket
Installation is complete. This has virtually no effect on the quality of communication.
The excess part, if any remains, can be easily hidden under the socket body.
You can view the models using the photos of telephone sockets presented. Further, both types are distinguished by the number of connectors: single-connector and multi-connector models.
All terminals are distinguished by color, each of them is connected to the corresponding color of the cores. Methods for installing telephone sockets Taking into account certain technical issues, telephone sockets are installed using the same methods as ordinary electrical ones. 6 Video tutorial Installing and connecting electrical and telephone sockets
Features of a telephone socket
Telephone socket
To connect a telephone socket you will need a PBX cable coming from an external telephone line. To make calls, an external PBX cable is connected to an outlet. Then an additional connector cable goes from the outlet to the box, and the phone itself is separately connected to the electrical network using a plug. The telephone socket is usually mounted on the wall, and there are two options for installing this device:
- With external mount . With this installation option, the socket and wires are mounted on the wall from above. This option is simpler and faster, since the craftsman does not have to make recess holes to mount the box. However, such a box is easier to damage, so external sockets are more likely to fail.
- With internal fastening. With this installation option, the socket with wires is mounted directly into the wall. This installation allows you to hide the box and wiring, so such devices are less likely to be damaged. True, the master will have to make a notch in the wall, which complicates the work.
Checking the network functionality
Now we can check how successfully we connected. To do this, you need to connect your laptop or PC one by one to all the sockets that we installed and try to access the Internet. If any of the outlets does not work, you need to check:
- correct connection of the outlet itself;
- correct connection of the cable to the router (including the quality of the connector crimp);
- integrity of the wire along the way from the router to the outlet.
There is another way to find out the performance. If your router has LAN connection indicator lights (they are usually located on the front panel), then you can connect PCs or laptops to each outlet (either simultaneously or one by one). If the corresponding LAN indicator lights up, everything is fine, there is contact. If not, you need to check for problems.
Types of telephone sockets
There are several options for telephone sockets depending on the type of connector:
- RJ-11 . The connector is compact in size and consists of a two-core wire. Used to connect one telephone in the house (connected to one line). The RJ-11 connector is most often used in private apartments and small houses.
- RJ-12 . Made in the form of an oversized connector, which consists of a four-core wire. It is usually used in offices and in production to create a large telephone network (connected to several lines at once).
- RJ-14. The connector has increased dimensions, and the device itself consists of a four-core wire. Can be connected to one or several lines. Therefore, RJ-14 is considered a universal device that can create both large and small telephone networks.
Attention! There are also obsolete RTShK-4 models on sale, but they are characterized by complicated installation, so in practice they are almost never used.
Socket design and cable operating principle
Socket design
The socket has the same design regardless of the type of device. It consists of three main elements:
- Frame. Usually made of dielectric material - it can be ceramic or plastic. The case acts as an insulator - it protects the contacts from mechanical deformation and water, as well as from accidental touch.
- Nest . It is made in the form of a recess on the body, which is connected to the electrical contacts inside the device. The socket device may include one or more sockets, depending on the needs of the landline telephone user
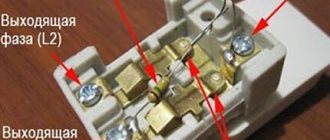
- Contacts . Used to connect external PBX wires to the device. The contacts also connect to a socket inside the case, which allows you to create a subscriber connection via telephone. They come in two types - clamping (screw) and in the form of terminals.
To transmit the signal, two copper wires are used, which are located inside the contacts. The cross-section of these wires is very small, so they are used to transmit low-power electric current. In the absence of a call (when the network is not connected or the pipe is laid), a direct current runs through them with a voltage level of 40-60 volts. During a call, the current becomes alternating and the voltage level increases to 100-120 volts. If the handset is picked up, but there is no call, then the voltage drops to 4-12 volts.
Note! These numbers can be used to check that the telephone jack is assembled correctly using a voltmeter or multimeter.
general characteristics
Before considering how to connect an outlet for the Internet, you should say a few words about the features of its design. The main difference is the presence of a twisted pair of wires. There are 4 of them in total. Accordingly, the socket accepts 8 wires. They twist, interrupting electrical interference.
This allows you to achieve high quality communications, as well as good information transfer speeds (up to 1000 Mbit/s). The connector used by different manufacturers in such sockets is called RJ-45. It is present in the vast majority of the products presented.
This input is suitable for connecting a wire from the Internet or a landline telephone. The connection is made according to specific instructions.
Connection algorithm
Connection algorithm
In Russia, the most popular devices are the RJ-11 category (for home use) or RJ-12 (for creating a network in the office or at work). Their installation will be carried out almost according to the same algorithm, and only the wiring diagram will differ. Below we will first find out what preliminary work needs to be done before connecting RJ-11 and RJ-12, and then we will look at the step-by-step installation algorithm for each device.
Preparatory work
Before installation, you need to decide on the location of the future outlet device. If you are mounting the device inside the wall, then you need to use a hammer drill to make a recess in advance, where you should put the sealing box and cover it with construction mixture so that it adheres well to the wall. You will also need the socket itself, as well as additional tools:
- Rubberized gloves - to prevent you from getting an electric shock while working.
- Screwdriver - for connecting contacts and securing the device to the wall.
- Sharp knife - for removing insulation from telephone wires.
- Wire cutters - for cutting wires in case of improper stripping.
- Electrical tape - to protect contacts in case of damage.
- Tester - to determine the “plus” and “minus” on the wires.
Stripping the ends of the cores
Before installing the outlet device, put on gloves and take the PBX cable. Using a knife, carefully scrape back 3-4cm of the ends to create smooth, clean ends. If you make a mistake while stripping, be sure to cut the wire using wire cutters, and then repeat the stripping. If you cut off a lot of insulation, you can restore it using electrical tape. If you can’t do the cleaning efficiently, you can buy a cross-cutting knife - it will make the work much easier with it.
Note! Stripping the ends should only be done in the case of clamp contacts - if you have terminals, then it is not performed.
Connecting a two-wire socket (RJ-11)
To install RJ-11, follow these steps:
- First you need to disassemble the case. Typically, the housing elements are connected using small bolts or screws - carefully unscrew them using a screwdriver.
- Now look carefully at the contacts. If you have crimp (screw) contacts, then use a tester to determine the polarity, and then connect the red wire to the negative and the green wire to the positive. Finally, tighten the screw terminals.
- If your contacts are made in the form of terminals, then you just need to insert the unstripped wires into connectors 2 and 3. In this case, the green wire is usually attached to the 2nd connector with a plus, and the red wire to the 3rd connector with a minus. Polarity can be checked using a tester. At the end, the terminals are tightened using a screwdriver.
- At the end, you need to check the correct assembly. To do this, use a voltmeter or multimeter - it should show 40-60 volts. If the indicators match, then attach the device to the wall and assemble the case back - the RJ-11 assembly is ready.
Connecting a two-wire socket (RJ-11) video
Connecting a four-wire socket (RJ-12)
The RJ-12 connection will be carried out according to a similar scheme. Only the wiring connection will be different:
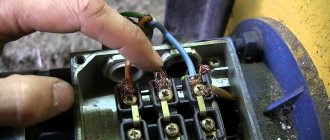
- Remove the housing and decide on the type of contacts. If you work with clamp contacts, then the telephone exchange is connected to the corresponding wires inside the housing. That is, the red wire connects to red, black to black, and so on. Finally, tighten the contacts using screws, and then assemble the box.
- If you have terminals, the work will be even easier. Insert the black one into the first slot, the green one into the second one, the orange one into the third one, and the yellow one into the fourth one. After this, tighten the terminals to ensure good contact and assemble the box.
Useful tips
Following simple advice from experts will help you avoid mistakes in installation:
- It is better to use devices for hidden installation. They fit more harmoniously into the interior than others. But to install them, you will have to break the integrity of the walls and wall coverings.
- In the selection process, it is recommended to pay attention exclusively to proven companies with a good reputation. This is a guarantee of safety and reliability.
- Most outlets have numbered pins. If there are no markings, you should look at the colors. Green, orange or blue contacts in combination with white are positive, contacts of the same colors, but without white, are negative.
- When installing products of the old standard, it will not be superfluous to remember the color design of the contacts: orange, black and green are positive, red, yellow, blue are negative.
The types of sockets for connecting a telephone differ in design, installation method and other parameters. If you follow the instructions, installing these devices will be easy.
Popular mistakes
When assembling, a person can make the following mistakes:
- Installation without using gloves . In the PBX network, the voltage level is 40-60 V, and during work it can increase to 120 V. If you do not wear gloves, there is a high risk of electric shock, which can be fatal.
- Buying a socket without instructions . The arrangement of contacts and wires inside the box may vary depending on the device manufacturer. Therefore, it is recommended to have the instructions with you during assembly in case you get confused.
We also note that if the conductors are incorrectly fastened, a short circuit may occur, which will lead to the de-energization of the telephone line.
However, there is no need to panic - the PBX station operates in clock mode, and the voltage level is updated every few minutes. Therefore, if a short circuit occurs, just wait 5 minutes - after that the line should work again. Connecting a telephone socket video
Checking the network functionality
Now we can check how successfully we connected. To do this, you need to connect your laptop or PC one by one to all the sockets that we installed and try to access the Internet. If any of the outlets does not work, you need to check:
- correct connection of the outlet itself;
- correct connection of the cable to the router (including the quality of the connector crimp);
- integrity of the wire along the way from the router to the outlet.
There is another way to find out the performance. If your router has LAN connection indicator lights (they are usually located on the front panel), then you can connect PCs or laptops to each outlet (either simultaneously or one by one). If the corresponding LAN indicator lights up, everything is fine, there is contact. If not, you need to check for problems.