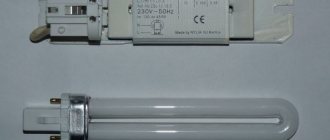
The most important thing is that fluorescent and LED lamps have the same bases - G13. Unlike other types of pin contacts, no modifications to the housing are required.
- G- means pins are used as contacts
- 13 is the distance in millimeters between these pins
Benefits of remodeling
In this case you will receive:
- energy savings (2 times)
- greater illumination
- lower losses (almost half of the useful energy in fluorescent lamps can be lost in the choke)
- absence of vibration and unpleasant rattling sound from the ballast throttle
True, more modern models already use electronic ballast. They have increased efficiency (90% or more), noise has disappeared, but energy consumption and luminous flux have remained at the same level.
For example, new models of such LPO and LVO are often used for Armstrong ceilings. Here is a rough comparison of their effectiveness:
Another advantage of LEDs is that there are models designed for supply voltages from 85V to 265V. For fluorescent you need 220V or close to it.
For such LEDs, even if your network voltage is low or too high, they will start and shine without any complaints.
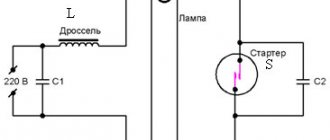
Connection diagrams
There are two main connection diagrams for LED lamps: No. 1 – for AC 220V; No. 2 – on AC 110V.
Scheme No. 1
This option involves powering the lamps from a standard 220 V 50 Hz network. In this case, it is necessary to remove all ballast components from the luminaire.
Procedure:
- network blackout;
- removal of fluorescent lamps;
- removal of the old electronic circuit: removing the ballast, removing the starter and ballast, disconnecting the capacitor;
- installation of LED lamps;
- network connection.
This scheme is the simplest and requires the least amount of time to rework.
Scheme No. 2
This variation implies that electronic ballast will remain in the luminaire. Only the starter needs to be removed. In this case, the power supply for the LED lamps will be 110 V.
The algorithm of actions is as follows:
- network blackout;
- removal of fluorescent lamps;
- starter removal;
- installation of LED lamps;
- Finally, food is served.
This scheme is less popular, since with it the energy consumption of the lamps will be higher than with the first option. Accordingly, the saving effect will not be so noticeable.
Luminaires with electromagnetic ballasts
What should you pay attention to when converting simple fluorescent lamps to LED lamps? First of all, its design.
If you have a simple old Soviet-style lamp with starters and an ordinary (not electronic ballast) choke, then in fact there is no need to modernize anything.
Simply pull out the starter, select a new LED lamp to fit the overall size, insert it into the housing and enjoy brighter and more economical lighting.
If the starter is not removed from the circuit, then when replacing the LB lamp with an LED one, a short circuit can be created.
It is not necessary to dismantle the throttle. For an LED, the current consumption will be in the range of 0.12A-0.16A, and for a ballast, the operating current in such old lamps is 0.37A-0.43A, depending on the power. In fact, it will act as an ordinary jumper.
After all the rework, you still have the same lamp. There is no need to change the fixture on the ceiling, and you no longer have to dispose of burnt lamps and look for special containers for them.
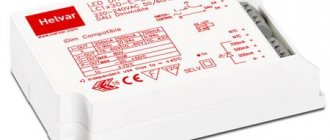
Such lamps do not require separate drivers and power supplies, since they are already built-in inside the housing.
The main thing is to remember the main feature - for LEDs, two pin contacts on the base are rigidly connected to each other.
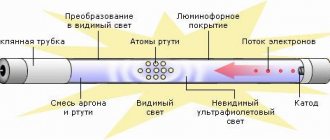
And with fluorescent they are connected by a filament. When it gets hot, mercury vapor ignites.
In models with electronic ballasts, a filament is not used and the gap between the contacts is pierced by a high voltage pulse.
The most common sizes of such tubes are:
- 300mm (used in table lamps)
- 600mm (on the ceiling for Armstrong type lamps)
- 900mm and 1200mm
The longer they are, the brighter the glow.
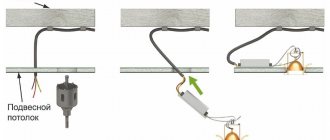
Replacement instructions
The scheme for converting a lamp from fluorescent to LED lamps is quite simple, even an inexperienced electrician can handle it.
Algorithm of actions:
- disconnecting the circuit breaker and checking the absence of voltage;
- removing the luminaire cover to gain access to the circuit components;
- removal of the capacitor, starter and choke from the electrical circuit;
- separation of wires going to the cartridge terminals. They need to be connected directly to the phase/zero wires;
- removing or insulating remaining wiring;
- installation of the LED lamp and test switching on.
To convert fluorescent lamps with an electronic ballast, you need to unsolder or cut the wiring that goes to and from the ballast. Next, the phase/neutral wires are connected to the wires of the lamp sockets, both left and right. The connection itself must be insulated. Finally, you can replace the light source with an LED lamp and apply mains voltage to it.
Conversion of a lamp with electronic ballast
If you have a more modern model, without a starter, with an electronic ballast throttle (electronic ballast), then you will have to tinker a little with changing the circuit.
What is inside the lamp before alteration:
- throttle
- wires
- contact blocks-cartridges on the sides of the case
The throttle is what will need to be thrown out first. Without it, the entire structure will significantly lose weight. Unscrew the mounting screws or drill out the rivets, depending on the fastener.
Then disconnect the power wires. To do this, you may need a screwdriver with a narrow blade.
You can use these wirings and just eat them with pliers.
The connection diagram for the two lamps is different; with the LED lamp everything is much simpler:
The main task that needs to be solved is to supply 220V to different ends of the lamp. That is, the phase is on one terminal (for example, the right one), and the zero is on the other (left).
It was said earlier that an LED lamp has both pin contacts inside the base, connected to each other by a jumper. Therefore, here it is impossible, as in a fluorescent one, to supply 220V between them.
To verify this, use a multimeter. Set it to resistance measurement mode, and touch the two terminals with the measuring probes and take measurements.
The display should display the same values as when the probes are connected to each other, i.e. zero or close to it (taking into account the resistance of the probes themselves).
A fluorescent lamp, between two terminals on each side, has a resistance filament, which, after applying 220V voltage through it, heats up and “starts” the lamp.
Next, all the work can be done in two ways:
- without dismantling cartridges
- with dismantling and installing jumpers through their contacts
Is it worth replacing fluorescent light bulbs with LED lamps?
The lighting market is being massively filled with LED lamps of various formats, with characteristics attractive to those who like to save money. Given the rise in electricity tariffs, many manufacturers are speculating on this problem, promoting their products as eternal, efficient and at the same time economical. In reality, everything is not as rosy as marketers describe and replacing fluorescent lamps with LED lamps will be profitable if you purchase very expensive devices. The properties attributed to LEDs correspond to the products of branded lighting manufacturers. As a rule, the cost of their products goes through the roof, negating all the benefits of refurbishment. This is how, in the understanding of manufacturers of LED elements, the comparative characteristics of their products with fluorescent lamps look like.
By and large, with a certain combination of devices, the presented characteristic corresponds to reality, since there are bad fluorescent lamps and good LED lamps. The key factor determining the effectiveness of a particular lamp is the price. But if we take the average range, then everything looks a little different.
Are there any savings in this?
Using the passport data of specific lamp models from one manufacturer, you can calculate the cost of operating a lamp for a certain period of time. In the case of Navigator and Osram, the calculation table is as follows.
Based on calculations, the most expensive of the presented devices are incandescent and halogen lamps. The cost of operating LEDs is comparable to gas-discharge energy-saving lamps, but fluorescent lamps, even with a power of 36 W versus 8 W for LED lamps, are cheaper. LED lamps begin to pay for themselves only after 4,000 hours, and become more profitable than energy-saving lamps after 25,000 hours of operation, as can be seen in the graph.
To be fair, it is worth noting that the service life of branded LED elements of 50,000 hours allows them to be oriented for the long term, while fluorescent ones will have to be replaced after 20,000-30,000 hours.
Without dismantling
The easiest way is without dismantling, but you will have to buy a couple of Wago clamps. In general, bite out all the wires suitable for the cartridge at a distance of 10-15mm or more. Next, insert them into the same Vago clamp.
Do the same with the other side of the lamp. If the wago terminal block does not have enough contacts, you will have to use 2 pieces.
After this, all that remains is to feed a phase into the clamp on one side and zero on the other.
No Vago, just twist the wires under the PPE cap. With this method, you do not need to deal with the existing circuit, jumpers, get into the cartridge contacts, etc.
T8 LED tube
Technical advantages
The main feature that ensures a long service life of a 220-volt LED lamp is well-thought-out heat removal from the light elements. The main radiator, which provides heat removal, duplicates an additional device in the form of a longitudinal plate along the entire length of the tube. As a result, the equipment does not overheat, which means it does not fail longer.
In addition, there is a third point of heat removal - this is a double-sided printed circuit board made of a special fiberglass laminate with increased density.
LED tube structure
Features of the board
Surprisingly, the contacts on the diode lamp board are not soldered. Installation is carried out using innovative contact connections, which are gold-plated to improve reliability and increase service life.
The driver is made on the basis of microcircuits that minimize dimensions and make it possible to do without parts such as a high-voltage electrolytic capacitor. As a result of these innovations, the operation of the lighting device is improved, voltage surges are reduced to zero, in particular when it is supplied to the lamp, and there is no electrical interference.
The stabilizing device is mounted using PWM (pulse width modulator), which maintains the required voltage on the LEDs when these indicators differ from 175 volts to 275 volts.
The maximum permissible load on the pole width modulator is 35 watts. Therefore, even under heavy load, the temperature of the device does not increase.
LED tube with modular system
With dismantling the cartridges and installing jumpers
The other method is more scrupulous, but does not require any extra costs.
Remove the side covers from the lamp. This must be done carefully, because... in modern products, latches are made of fragile and brittle plastic class=”aligncenter” width=”720″ height=”653″[/img]
After which, you can dismantle the contact cartridges. Inside them there are two contacts that are isolated from each other.
Such cartridges can be of several varieties:
All of them are equally suitable for lamps with G13 socket. There may be springs inside them.
First of all, they are needed not for better contact, but to ensure that the lamp does not fall out of it. Plus, due to the springs, there is some compensation for the length. Since it is not always possible to produce identical lamps with millimeter accuracy.
Each cartridge has two power cables. Most often, they are attached by snapping into special contacts without screws.
You turn them clockwise and counterclockwise, and with some force, pull one of them out.
As mentioned above, the contacts inside the connector are isolated from each other. And by dismantling one of the wiring, you actually leave only one contact socket.
All current will now flow through the other contact. Of course, everything will work on one, but if you are making a lamp for yourself, it makes sense to improve the design a little by installing a jumper.
Thanks to it, you don’t have to make contact by turning the LED lamp from side to side. The double connector ensures a reliable connection.
The jumper can be made from the extra power wires of the lamp itself, which you will definitely have left over as a result of the rework.
Using a tester, you check that after installing the jumper, there is a circuit between the previously isolated connectors. Do the same with the second plug-in contact on the other side of the lamp.
The main thing is to make sure that the remaining power wire is no longer phase, but zero. You bite off the rest.
LED design
The LED is a small transparent tube made of high-quality plastic. A driver and a getinax strip with soldered LED diodes are placed inside. This is due to the lack of need for external control gear. It is enough to connect the lamp to a 220 V network.
LED products have a standard G13 socket, while inside, using the copper wire of the bulb, a connection is made between the lamp pins. Thanks to this, electricity can be supplied to any pin.
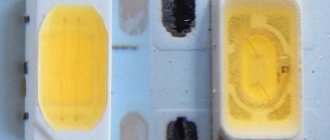
The LED tube can be 600mm or 1500mm long and the power is usually between 9-25W. The light from the source can be warm (yellow) or cool (white). LED lamps come in different forms. The most common are designs with a classic 5 mm case. There is a lens in the upper part, a reflector in the lower part, and a crystal in the body, which is a light emitter (begins to glow when electricity passes through it).
Linear LED lamp design
From an electrical circuit point of view, the LED design is simple. It has two outputs - anode and cathode. The aluminum reflector is placed on the cathode and looks like a cup. The main element of the product is a semiconductor single crystal with a pn junction. When examining this component, you will find a cube whose dimensions are approximately 0.3x0.3x0.25 mm.
The single crystal is connected to the anode through a jumper wire. The body is made of polymer materials, is transparent and, to some extent, represents a focusing lens. Together with the reflector, the housing sets the angle of radiation and the direction of light.