- Domestic designs - base, carbolite E-27. The body consists of carbolite, dismountable, internal elements are porcelain. The cartridges are practical to use. In this case, the damaged individual unit is replaced.
- Chinese ceramic modifications, base E-27. Solid. Attached to the surface with several screws. The contacts are connected with rivets. If any component fails, the cartridge must be completely replaced.
- Domestic ceramic modifications, E-27. The collapsible porcelain case consists of two halves. The cartridges are street (with small lugs for fastening), end-mounted and suspended. Replacing/disassembling the product does not require any special skills.
- Plastic cartridges with end mounting type, E-14 base. The individual halves are secured with plastic latches. The power wires are secured with screw or spring clamps. For such products, the plastic thread running in a small depression has virtually no contact with the base. The aluminum base and brass plate oxidize, the space between them increases and contact disappears. Therefore, it is advisable to install a new cartridge.
Replacing the cartridge in lamps and chandeliers is not difficult. The most important thing is to show patience and attention, since almost all the parts are small.
Change or repair
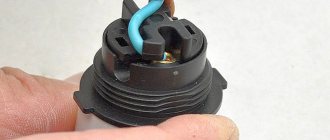
If one or more light bulbs in a lamp do not light after replacement, this is most often caused by a faulty socket. The cause of the problem may be oxidation of the junction of the contacts with the light bulb base. You can check this without disassembling the entire lamp:
- De-energize the network by turning off the packager.
- Unscrew the light bulb.
- Using a flashlight, shine it into the cartridge.
- Inspect the ends of the terminals for the presence of carbon deposits, rust, and oxidation products.
- Clean the ends of the contacts with a fine file or screwdriver.
- The metal terminals may be loose and bent against the walls, so tighten them all the way and bend them back with a screwdriver.
All these procedures can be performed without removing the lampshade and dismantling its parts. If, during a visual inspection, it turns out that the contacts have fallen off, the wires have burned out, the holder body is cracked, partially broken off, or after all the above steps a working light bulb does not light up, you will need to completely replace the old socket in the lamp with a new one.
Design
Electric cartridges have different designs, depending on the series of the device. Most often in everyday life, a model range equipped with Edison thread is used. It has a cylindrical body, inside which the remaining elements are contained.
Core
This is the bottom part of the cartridge, which has a wide base and holes for fastening. It may have various bushings and inserts in its design for removing the wire. Most often it is attached to the body of the chandelier.
Screw clamp
They look like threaded mounting strips. With their help, electric current is supplied to the core.
Pressure contact
Made of brass, most often it is a non-separable part of the device. Also responsible for supplying current to the light bulb.
Thread
The presence of a thread allows the use of various types of lamps - both incandescent and LED. It is most universal in the e14 and e27 cartridge models.
Frame
The cartridges can be equipped with a body made of various materials. Their characteristics and application possibilities depend on this. To figure out how to remove the cartridge from a chandelier, you need to know its design, including the type of housing. The following varieties are available for sale:
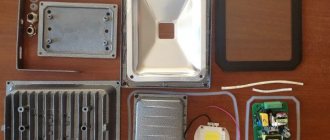
- Ceramic - made of heat-resistant ceramics, thanks to which they are able to withstand heating to high temperatures. As a rule, they are non-separable. Screw terminals are built into the base, with which connections are made. This is done using a regular screwdriver. The disadvantage of such cartridges is low strength.
- Plastic ones are unable to withstand high temperatures, which is why they are much inferior to ceramic ones. Designed for use with light bulbs no more powerful than 60 W. The design is usually collapsible, the contacts are located in the inner part. Connection to the lampshade is made using self-clamping terminals.
- Carbolite - characterized by increased strength and resistance to heat. They have a collapsible design; connection to the network occurs using brass contacts and a screw connection.
How does a standard cartridge work?
A standard cartridge consists of the following main parts:
- Frame.
- Wires (zero wire and phase).
- Threaded sleeve for screwing the light bulb.
- Contacts/terminals.
- Central contact plate.
- Mounting screws.
- Porcelain insert.
In the manufacture of the holder body, various materials are used - metal, ceramics, plastic, carbolite and others. At the same time, plastic models are most widespread. Their designs are divided mainly according to the method of fastening into three categories - suspended (nipple), with straight and inclined flanges.
Attention! If, when replacing a light bulb, it happens that the base is burnt and the bulb is disconnected, you need to take pliers and, firmly hooking the edges of the remaining lamp, unscrew it from the socket.
Reasons for replacing the cartridge
Work should be carried out in the following cases:
- If the element has visible damage or cracks. Another option is that the plastic has become brittle and is showing signs of severe overheating.
- When the light is turned on, the light bulb does not work, despite the fact that everything is in order with it. This is usually due to severe corrosion of the center contact or threaded part. There is no point in cleaning them; it is wiser to immediately install a new part.
- The lamp base is stuck and will not come out of the threaded part. It is better not to apply excessive force, as the light bulb may burst. It's easier to change the cartridge.
- Damage to the terminals, their deformation, which leads to short circuits in the structure.
By the way! Experts advise changing cartridges for preventive purposes at least once every 5 years. This will prevent any problems and ensure the safety of the equipment.
Step-by-step replacement instructions
Let's look at how to quickly and safely replace a failed cartridge in a lamp with a new one with your own hands. To do this, turn off the lights, disconnect the wires, remove and disassemble the chandelier. Then the cartridge is replaced and the reverse steps are carried out.
Turning off the lights
Naturally, all work on household electrical appliances can only be done when the network is de-energized to avoid electric shock. When repairing, replacing and inspecting a chandelier and its parts, it is not enough to simply turn off the switch or unplug the plug from the socket - you must necessarily turn the switch/switch of your apartment or house to the “off” position.
Security measures
To change the design yourself and avoid an emergency, you must follow safety regulations. They include the following:
- It is forbidden to carry out replacement without first de-energizing the network. If you neglect this rule, the risk of an accident is very high.
- If damage to the wires is discovered during dismantling, be sure to replace them (partially or completely).
- If the new cartridge is equipped with lead wires, you need to pay attention to the material they are made of. It is likely that the device has an aluminum conductor, and the lighting device is connected using copper (or vice versa). To connect such wires, it is advisable to use specially designed terminal blocks. As a last resort, it is permissible to carefully twist it and wrap it securely with electrical tape.
- Before removing the chandelier, you need to sketch or photograph its installation diagram. This will avoid incorrect connections and fasteners (which could cause a short circuit).
- Be careful when working with glass and ceramic elements. To avoid cuts, it is recommended to use gloves.
You can replace or repair the socket in an electric chandelier yourself. This does not require any special skills. It is enough just to follow safety precautions when handling wiring and electrical appliances, as well as perform consistent actions. When assembling the structure after completion of the work, you should responsibly approach the process of connecting conductors. If the work is completed without errors, the electrical appliance will emit light again.
A light bulb socket is an intermediate element used for a convenient and reliable connection between electrical wiring and a lamp. Often various decorative elements of modern chandeliers and lamps are attached to it.
How to disassemble and repair a cartridge
Unlike an LED spotlight, a lamp chandelier can be repaired with your own hands. To do this, you will need to disassemble its main part - the cartridge. Reasons why a cartridge stops functioning, but can still be restored:
- The contacts of the wires inside the chandelier were burnt. Restoration requires dismantling the chandelier and disconnecting the wiring, disassembling the socket - according to the algorithm described above. The wires connecting the cartridge to the network wires are changed.
- The screws at the junction of the contacts were unscrewed and loosened. The problem can be fixed by disassembling the unit, disconnecting it from the main wiring and disassembling the chandelier. Having released the socket, you need to use a screwdriver to tighten the screws securing the conductors of the lamp to the contacts.
- The center contact tongue has carbon deposits. To restore function, you need to clean the surface with fine sandpaper or a file. It will be necessary to dismantle the chamber using the above method.
- Recession of the contact tongue. If the bulb is screwed in too tightly and the elasticity of the central contact of the base is poor, it may sink. The base will not reach it and the lamp will not light. To fix it, you need to bend it with a slightly thin screwdriver in the opposite direction.
How to unscrew a light bulb if the bulb has exploded
Situations often occur when the bulb bursts during operation of a lighting device. The causes of this problem are poor quality of the light source, sudden changes in electrical voltage, prolonged use of the device, external influences and other factors.
Plastic bottle
If you don’t have a set of tools at hand, you can use improvised means to solve the problem. One suitable option is a plastic bottle. The instructions for unscrewing the light source are as follows:
- remove all fragments, as they will interfere and can lead to injury;
- take a plastic bottle of any size with a standard neck;
- remove the lid and heat the neck until the material melts;
- the neck is placed in the base and wait for the plastic to cool;
- gently pull the bottle to remove the base along with it.
Pliers
A more convenient way is to use pliers, which can be used to grab small components. To remove the base, pick it up with a tool and twist it outward. To prevent the lampshade from coming off, you need to hold it with your hands. When performing manipulations, it is important not to violate the integrity of the cartridge circumference.
See also
Options for the design and arrangement of a country toilet with your own hands, layout and interior decoration
If the base is firmly in place and cannot be rotated, you can try bending the sides inward and then continue unscrewing. When removing, the base may become deformed, but this will only simplify the work. The main thing is to make sure that the base does not damage the cartridge.
In a situation where it is not possible to conveniently grasp the part by the edges, you should place the pliers inside the base and push the ends as far apart as possible so that they rest against the side walls. Then the pliers are rotated counterclockwise.
Main conclusions
Anyone can repair or replace a socket in a lamp. To do this, it is necessary to comply with all the rules for the safe handling of electrical appliances (disconnect the power supply before starting work), and comply with the requirements for the technology for disassembling, assembling and installing them. Particular attention should be paid to the quality of conductor connections at all stages of work.
Previous
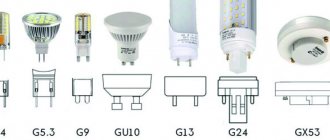
Sockets and sockets Electric lamps with GX53 socket: characteristics, applications, advantages and disadvantages
Next
Sockets and sockets How to properly connect a light bulb socket to the wires on the ceiling
Required tools and materials
The list of materials and tools depends on the design of a particular lamp. The minimum set includes:
- screwdriver;
- pliers;
- stationery knife;
- insulating tape.
For more professional work, a screwdriver with replaceable bits or even a screwdriver, a soldering iron with solder and flux, heat-shrinkable tubes, and terminal blocks will be useful.
To seal the lampshade, you may need sealant or gel adhesive.
Turn off the voltage and check its absence
Before you begin any repair work, you must turn off the power to the chandelier. This can be done in the electrical panel located in the apartment itself or on the landing.
If the machines that we turn off have access to strangers, then we hang a sign on the turned off machine that says “Do not turn it on, people are working!”, or even better, post an observer. We must not forget that we are surrounded by complete “electricians” who do not know the basic rule “you didn’t turn it off, it’s not yours to turn it on.” With such people it’s easy to get electrocuted.
Important! You can turn off the voltage to the chandelier only using a machine, but in no case with an ordinary switch that controls the chandelier!
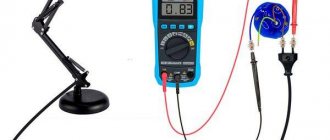
Now we need a voltage indicator or, as it is called in everyday life, an indicator screwdriver. In principle, it should be in every home where they independently repair electrical appliances and electrical equipment.
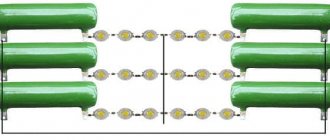
Voltage indicator
We stand on a chair and, using the pointer, check that there is no voltage on both contacts of the cartridges IN ALL HORNES. This check must be done in both switch positions. If the indicator does not light, then to be sure, we check that there is no voltage in the nearest outlet, and we can assume that it is safe to work with the chandelier. Why in all the horns? The fact is that a faulty cartridge can “deceive”, but the voltage remains on the power cable of the chandelier.
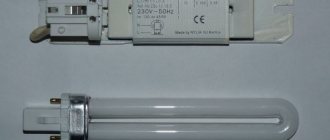
Changing fluorescent housekeepers
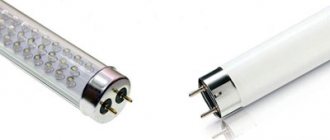
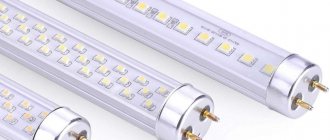
For suspended ceiling structures, fluorescent lamps are used in two modifications, in the form of tubular fluorescent lamps or classic bulbs with an E27 socket.
Tubular housings are installed in contact panels of luminaires equipped with a starter device. To unscrew the housing from the socket, it is enough to remove the protective casing, lightly press it in the longitudinal direction, turn it and pull it out of the socket. Installing a fluorescent tube on a suspended ceiling is performed in the reverse order.
Replacing housekeepers with a screw socket is carried out in the same way as for a conventional incandescent lamp. If the base is “caught” in the plastic socket, then the device can be unscrewed using rotating movements without much effort.
Precautionary measures
Before carrying out any work, the chandelier must be de-energized. In this case, it is not enough to simply change the position of the switch - it is better to protect yourself from all accidents by unscrewing the plugs or turning off the safety toggle switch.
Do not start disassembling the chandelier immediately after turning it off - the lamps must cool completely.
Replacing a socket in a chandelier is a relatively simple procedure that requires attentiveness, accuracy and caution from the performer. If you follow the instructions and follow all safety precautions, there will be no problems.
Expert opinion
Viktor Pavlovich Strebizh, lighting and electrical expert
Any questions ask me, I will help!
This allows you to securely attach any heavy lampshade to the socket or decorate the room with a variety of decorative caps. If there is something you don’t understand, write to me!
How to replace a broken lamp
One of the most unpleasant cases involves replacing a broken or burst light bulb. If a glass flask with cracks looks intact, this does not mean that it cannot break in your hands at the slightest attempt to remove it from the cartridge. Therefore, all manipulations with cracked glass should be carried out with cotton gloves and in a de-energized state.
To unscrew the halogen, cover its bulb with several pieces of tape. The glass of halogen cylinders is quite thick, and the sticker is only needed to avoid gas leakage and the formation of sharp chips along the crack line.
The most difficult case is with fluorescent lamps. Before unscrewing a cracked housekeeper, place a bag over its bulb, and force should be applied only to the plastic base of the light bulb.
And finally, the worst case. If the bulb has shattered into pieces, but the base remains in the socket, then there is nothing left to do but free the ceiling panel and disassemble the plastic socket.
Useful tips Connection diagrams Principles of operation of devices Main concepts Meters from Energomer Precautions Incandescent lamps Video instructions for the master Testing with a multimeter
Making lampshades on a frame
There are enough options for how to make a lampshade cover:
- Sew from fabric.
- To tie. Crochet or knit.
You can knit a lampshade cover with knitting needles or crochet - Braid with threads, twine, ropes.
- Decorate with ribbons.
From tapes
The easiest and fastest way to transform an old lampshade for a floor lamp or table lamp is to use ribbons. You need a frame or lampshade in the form of a cylinder. It can be “naked” or covered with fabric. If you use a “bare” frame, light will shine through the cracks, which will create interesting lighting effects, but the lighting will be uneven. It is uncomfortable to read in this light - this is an interior solution. If you need even lighting, first cover the frame with fabric. It can be the same color as the ribbons, a couple of shades darker or lighter, or it can be contrasting. It all depends on your desire. And remember that the darker the fabric, the less light the lampshade lets in.
We take a ribbon 1-2.5 cm wide. We fix it on the wrong side of the lampshade using PVA glue, additionally securing it with a pin. If you took a wire frame without fabric, attach it to the upper or lower rim (you can sew it on by hand, you can use glue). Then we begin to wrap the entire frame, from top to bottom, placing the turns of tape close to each other, but without overlapping.
How to make a lampshade from ribbons with your own hands
Having completed the circle, turn the tape 90°. We fix it in this position (with a needle and thread or PVA glue, glue from a gun, temporarily fixing it with a pin, pressing it with a clothespin). Then we pass the tape under the first tape, pull it out, lay it on top of the second, then pull it down again, pull it up through one tape. So, gradually, we create an interlacing, filling the entire lampshade.
Alternatively, you can pass two vertical ribbons at a time. But then you need to make sure that each next row moves one crossbar. Then you get a different type of weave. This type of lampshade is ideal for floor lamps, since the light will be directed downwards and the dispersion through the walls will be small.
This technique is very flexible and allows you to get different results.
In this version, the ribbons can be the same, they can be the same color but of different textures, they can differ by a couple of tones or be contrasting. The tapes can be passed in a circle in a continuous stream, or at some distance. If you find a wide tape and apply it with an overlap, then you won’t need horizontal ones at all. And if you use a braided or twisted cord (in the lower photo on the right), we will get a completely different-looking lampshade. So this lampshade finishing technique alone gives you a lot of options.
Interesting options
Let's briefly present the ideas. There are many options for how you can design standard frames for lampshades in a non-standard way. The first method has already been announced: you can knit or crochet a cover for a lampshade. Several options in the photo.
Crochet lampshade for bedside lamp
We knit separately fragments that we attach to the frames
Several types of knitted lampshades
Not everyone knows how to knit. It is easier to work with beads, especially if you glue them. You can decorate old fabric using beads, sequins, beads of different shapes and sizes. You can make this “new-old” lampshade with your own hands in a couple of hours. Select decorations that match the color, coat the fabric with PVA glue, and stick on the decorations. To complete the look, you can assemble pendants from beads and beads that are attached to the lower rim, but this is already painstaking work. The effect is interesting though.
You can update the lampshade using beads, beads, sequins
You can sew a new lampshade from fabric. But it doesn’t have to be an updated copy of the old one. You should use your imagination! If a lamp or floor lamp is in the girls' room, a new cover for the lampshade can be made in the form of a skirt. You choose the style of the skirt yourself. They look interesting when folded. With and without ruffles.
Dress a table lamp in a skirt)))
You can use an old geographical map in the boy's room. They are on thick paper. If the paper is not thick enough, you first need to glue the card onto the cardboard, and then glue the lampshade from such a blank.
You can use geographic maps
Original lampshades are obtained if the finished frame is woven with threads or ropes. Ropes can be natural. In this case they are gray, brown and beige. You can find thin synthetic colored cords. They will make products that are more “cheerful” in color. The situation is even simpler with knitting threads. They are thin, thick, textured, with smoothly changing colors. In general, there are a lot of options.
We take the frame and braid it according to a certain pattern. You can start with the racks. Braid each stand with a braid (the length of the threads should be 3 times the height of the stand). When this work is completed, we begin to stretch the threads/ropes between the posts. They will need to be passed through the braids, so with threads it is more convenient to do this with a needle, but ropes can be inserted this way.
Several ways to braid a frame with threads
The second option is to first entangle the entire frame horizontally, and then braid the racks. The braid won't work here, you just need to secure the turns to the stand using inclined stitches with a certain slope. This option is somewhat simpler in execution, but the “braids” look more decorative.
Replacing a broken stretch ceiling light bulb
Halogen or LED bulbs are most often used in suspended ceilings. When a light element fails, it is enough to remove the protective mechanisms from the lamp (cover and ring) and carefully pull out the lamp.
In a situation where the lamp and luminaire are a single structure, everything will have to be changed together.
Fixtures that hold the bulbs in place with pins open with a gentle push.
- In this case, replacing a broken lamp will not be difficult.
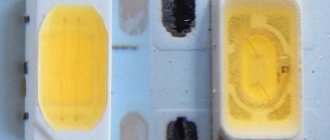
- LED lamps practically do not burn out, although in some elements the capacitor fails, which can explode during power surges in the network.
- However, using the available instructions for changing light bulbs using tools and folk methods, a burst light bulb will not cause any special problems.
Recommendations from experts
- It is recommended to buy only high-quality products from well-known brands to prevent premature failure of the device.
- It is prohibited to replace the cartridge when mains voltage is present. The consequences can be quite serious.
- If a fault is detected in the main electrical wiring, you should definitely replace either the damaged section of the cable or the entire wiring.
- The phase must always be connected to the central contact of the product, but not to the sleeve (when screwing the lamp in, it will produce an electric shock).
- Some cartridge models are equipped with lead wires. In the case of connecting wires of different types (the main one is aluminum, the one from the lamp is copper), it is recommended to use special terminal blocks. If there are none, then after twisting the wires need to be well insulated.
Important! It is not recommended to carry out electrical installation work yourself if you are not completely confident in the correct step-by-step actions; it is better to seek help from an experienced electrician!
Mounting methods
In most cases, the socket is connected to the lighting fixture through the bottom. There is a hole in the bottom for entering an electrical cable. The E27 series is available with M16, M10 or M13 threads, and the E14 - M10.
For current-carrying wires
Direct connection of the cartridge to the wires is unacceptable! First you need to ensure reliable fastening of the product in the lighting fixture (lamp or chandelier), for which a plastic sleeve with a hole in the center necessary for the cable is installed on the bottom. A plastic screw is mounted to the sleeve for further fixation.
Connect the socket, clamp the wires with a plastic screw. The sleeve is intended for mounting decorative parts, and the screw ensures reliable fixation of the lampshade and the device suspension.
On the phone
The socket is attached using a metal tube, which allows you to hang heavy lampshades from the ceiling. The tube is equipped with additional nuts, with the help of which the fittings for the chandelier, including caps, are installed. The entire load falls on the metal tube, and the wires needed to connect the power are pulled directly through it.
Cartridges with threads on the outer surface of the body can be decorated with lampshade rings and other decorative elements.
Bushing
Tubular bushings are used for fastening sockets in table lamps and wall sconces. Products are made from sheet materials. It is enough to make a hole through which the cartridge should be attached using a sleeve.
Due to the heating of the light bulb, plastic bushings can become deformed, causing the socket to begin to wobble. Replace plastic with metal.
The mounting thread varies, as there is no specific standard for E27 socket sockets. To replace a plastic bushing with a metal one, use resistors. Before breaking, disassemble and compare the threads so as not to ruin the product in vain.
With screwless terminals
The body and bottom of the cartridge, using screwless clamp contacts, are connected to each other using two latches. The bottom of the product is screwed to the threaded tube, after which the electrical wires are inserted. The body is made in the shape of a cylinder and is attached to the bottom.
Elements are subject to repair and maintenance. Use a screwdriver and move the latches to the sides so as not to damage the cable when dismantling the product.
Turning off the light on the dashboard
Before you independently carry out work to replace the cartridge in a lighting device, first of all, it is necessary to ensure complete electrical safety. For this purpose, it is necessary to turn off the circuit breakers in the electrical panel that are responsible for powering the ceiling chandelier.
What kind of lighting do you prefer?
Built-in Chandelier
To dismantle the ceiling light fixture, you should prepare an indicator screwdriver, as well as terminal blocks, insulating tape and a stable stepladder, after which you use a switch to check that there is no electrical power.
- removal from the lamp of all fragile parts, represented by glass decorative elements, light bulbs and shades;
- unscrewing the locking screw and the decorative cap covering the connection of wires in the under-ceiling space;
- if there is a hook under the decorative cap, the wires are disconnected and pulled apart, followed by the removal of the chandelier;
- If there is a strip under the decorative cap, the bolted connection on the strip fastening is loosened and the chandelier is removed.
At the final stage, you need to separate all three wires of the electrical wires in different directions and insulate them with insulating tape.
It is important to remember that the installation of a lighting fixture in suspended or suspended ceilings is most often carried out with disposable butterfly-type fasteners, which are best left in place when dismantling the chandelier.
Disassembly procedure
An ordinary incandescent lamp is quite easy to disassemble after it fails. To do this, you will need to perform the following simple operations:
- First, you should grab the sealed contact from the very edge of the base with pliers or duckbills and try to loosen it while simultaneously turning it in different directions;
- This operation should be performed until the conductor connecting this contact to the filament comes off;
- After this, you can remove the solder contact, and then use the same tool to completely crack the insulating base of the base.
Important! This must be done very carefully, taking care not to damage the lamp bulb.
Then the remaining part of the light bulb inside (the so-called “leg”) should also be carefully loosened, and after it is freed, completely removed. How to do this is shown in the photo below.
Together with this part, the filament body itself, which holds its electrodes and hooks, should be removed. Before removal, it is recommended to spread a sheet of clean paper under the work area, on which you can collect pieces of broken glass. At the end of disassembly, the empty flask is cleaned from the inside with a soft cloth or flannel.