How the garland is arranged
All electric garlands are designed the same way.
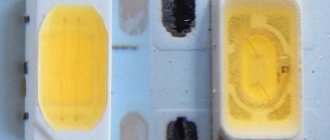
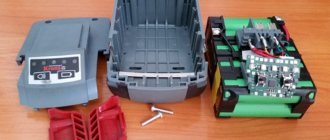
In older models, these are light bulbs connected in one circuit that light up or blink when connected to the network. Modern ones add a controller for lighting in different modes and the light bulbs can be replaced with LEDs. Usually old or decorative garlands have two wires, or to be more precise, one, which is connected in the form of a ring and twisted. Modern models have five wires. There are LEDs on four of them - these are branches. The fifth - general - remains empty. At the far edge they are all connected together, and their other ends go into a small box with a button and a plug. Inside the box there is a controller - a small board on which there is a chip for creating effects and several parts. A diode bridge, a capacitor, a pair of resistors and four (or two) thyristors that control the glow of each branch with lights of the same color. In the photo on the left, the four black parts are thyristors. The blue one next to it is a capacitor, the small light ones at the edges are resistors, behind the scarf with a microcircuit is a diode and a button. In the photo on the right is the back side of the board, two wires at the bottom - power supply, a row of wires at the top - lines of branches of each color and a common one.
The garland does not turn on
If the garland does not turn on, then most likely the power wires are damaged - either at the plug or in the controller (the block box that each garland has). Disassemble the controller and replace the wires going from the plug to the board - if the problem is in them, then this way you will fix it.
If the problem is not in the wires, then the diodes could burn out. Check them with a multimeter and, if necessary, replace them with serviceable ones, choosing the ones that are suitable for the nominal value (refer to the values on the body of the burnt diode).
What to do to fix the garland
The method for eliminating a specific breakdown is dictated by its characteristics, location and maintainability. We will look at some of the most common and illustrative cases.
Finding and replacing a faulty lamp (LED)
The non-working section of the chain is visually divided into two parts; each of them is called
When working with LEDs, it is important to observe polarity. The area with a fault, in turn, is also divided into two parts
Dividing and monitoring continues until faulty parts are found. The faulty light source is unsoldered if it is attached directly to the wires, or removed from the socket. The part is checked to make sure that the breakdown is not due to poor contact in the circuit. A broken lamp or LED is replaced with a similar part. Some circuits also allow wires to be connected directly, but this may adversely affect the durability of other light sources. Check the quality of soldering and the serviceability of the garland. All places from which insulation was removed during the repair process are tightly wrapped with electrical tape (of course, with the power turned off).
Repair and replacement of the controller
- By unscrewing the screws or unfastening the latches, remove the controller cover. Inspect parts and contacts for breaks, blackening and deformations, which usually indicate a malfunction.
- Most often, it is enough to re-solder the contacts of the plug and branches or replace one or two thyristors, but in some cases you will have to replace the entire controller. Typically its cost is 20–50% of the total cost of the garland.
- The repaired or new controller is installed in the case, the contacts are soldered to it in the required sequence, installed in place and the cover is fixed.
If disassembling and diagnosing the controller does not reveal a malfunction, and the garland still does not turn on, the problem is in the plug. Replacing it is very simple - just cut the wires at the base of the old plug and solder them to the new one, insulating this section of the circuit. Both a new part and an old part from any used electrical appliance will be suitable.
Repairing a garland is not that difficult, the main thing is to be patient. Now the garland is ready for use again. We hope she will delight you, your friends and loved ones for many more years to come!
One or more colors do not light up
One of the most time-consuming breakdowns is the case when one or two colors in an electric garland do not work, for example, only red or yellow and blue, as in the photo below. This indicates that, most likely, the light bulbs in the corresponding section have burned out.
To begin with, we still recommend disassembling the switch cover, also known as the control unit, and checking the reliability of all connections - contacts soldered to the board. We immediately suggest watching a video lesson from a young master, which clearly shows what to do if the wire from the board breaks:
How to perform a simple fault repair?
If everything seems to be in order, then it is highly likely that the light bulb has burned out. The fact is that modern garlands are designed in such a way that all single-color lamps are connected in series and if one burns out, the light will go out on the entire electrical branch. To fix a break, it is recommended to proceed as a good old textbook advises: cut the garland in half and ring both sections. Next, proceed in the same way with the non-working section: cut by 2 and check again, and so on until the end, as shown in the diagram.
As a result, you will be able to determine which light bulb is not working and replace it
We draw your attention to the fact that this repair method is advisable to use if the electric garland is non-removable, as a rule, Chinese
To quickly repair a garland with your own hands, you can take a tester and attach needles to its ends instead of probes. Using needles, pierce each section of the circuit sequentially so that the needle passes to the current-carrying core, and look for where the resistance of the section differs significantly. In this way, you can find a breakdown and repair it with less effort.
Old Soviet Christmas tree garlands (without a box) are more convenient in this regard, because... in them, all lamps are screwed into sockets, and you can determine which light bulb does not work without a soldering iron and an ohmmeter by the method of elimination - by taking a working light source and screwing it into all sockets one by one. Another repair method is to use a tester to measure the resistance of each lamp until you find a burnt one.
An example of repairing another complex malfunction:
Why doesn't the Soviet electric garland work and how can I repair it myself?
Another way to fix a broken electric garland is to check the integrity of the common wire. On one side of the board you will see 5 soldered wires: 4 for the glow of each color and one common. Now, if the common wire breaks, you just need to solder it.
In addition to the light bulb, the reason that one or more colors in the garland do not light up may be a break in the wire responsible for a specific color. This problem most often occurs if there are cats or dogs in the house that chew through wiring while playing. In this case, you need to find the location of the damage, re-twist the current-carrying conductors and insulate them. It won't hurt to protect the wires from pets afterwards.
Idea N5. Retro garland
Retro garlands are popular when decorating photo zones, terraces, gazebos, shop windows and other objects. And it is not at all necessary to purchase a finished product, since anyone can assemble it. To do this, you will need: a connecting wire (it’s a good idea to get wires in fabric insulation), sockets (the most convenient models with clamps for wires), the incandescent light bulbs themselves (you can also take LED ones), a plug and a switch. In this example, we will consider a series connection of light bulbs; we will use some sockets with a built-in switch.
- Cut the wires into pieces of the required length - they will determine the distance between the glow points. Rice. 13: cut the wires into pieces
- Strip the insulation of the wires at the ends; in these places they will be connected to the cartridge, so the length of the core must be appropriate. Rice. 14: Strip the ends of the wires
- If you are using a wire with fabric insulation, then its edge must be fixed with electrical tape so that the fabric does not fray further. Rice. 15. Secure the insulation with electrical tape
- Disassemble the cartridge itself and thread the wires into the cartridge cover.
Rice. 16: insert the wires into the socket cover - Connect the ends of the wires to the contacts of the cartridge
Rice. 17: Connect the wires to the socket - Assemble the cartridge body; the excess length of wires from under the cover should be carefully pulled out, avoiding excessive force, so as not to loosen the contact.
Rice. 18: Assemble the chuck body - Repeat the same procedure with the remaining sockets, after which you can fix the light bulbs in them.
- Cut the wire from the last light bulb; you will need one core from it, which you need to connect to the switch gap.
Rice. 19: Connect the switch - Connect the edges of the wire to the plug; to do this, they must be inserted into the groove of each contact and clamped with a screwdriver. Arrange the rest of the wire so that it does not protrude; the plug body should close normally.
Rice. 20: connect the edges of the wire to the plug
The retro garland is ready for use - plug in and enjoy. If you wish, you can complement the garland’s surroundings with a darkened wire or socket - they can be painted in the appropriate color. For greater gloss, the wires are painted with gold or bronze paint.
Ready-made retro-style garland of light bulbs
Making your own lighting
How to make curtain lighting yourself? To complete the work you need:
- choose LED strip;
- select additional equipment necessary for the operation of the tape;
- install LED strip and other electrical equipment.
How to choose a tape for organizing curtain lighting
When choosing an LED strip you need to consider:
- LED color. Manufacturers produce:
- plain white LED strips (photo below). The main advantage is the possibility of achieving not only a decorative effect, but also organizing additional lighting of the window opening;
- plain colored ribbons. Available in red, yellow, blue, green, purple and so on. When choosing a specific color, you need to build on the existing decoration of the room. The ribbon should complement the design of the room, and not stand out as a separate bright spot;
LED strips with diodes of the same color
multicolor ribbons. The main advantage is the ability to independently select a color mode in accordance with your mood, work performed, and so on.
Multi-colored ribbons can be used to additionally decorate a suspended ceiling with a niche for curtains, which will allow you to achieve maximum effectiveness;
LED strip with multi-colored LEDs
- lighting brightness. Parameter depends:
on the size of the installed LEDs. Illumination of cornices for curtains and suspended ceilings is usually done with diodes of size 3.5X2.8 mm, which allows you to achieve a brightness of 5 lumens;
The most popular sizes of LED strips
on the number of diodes per 1 m of tape;
Variety of strips depending on the number of LEDs
- level of protection of electrical equipment from moisture. To illuminate curtains in a room or kitchen, a strip with a minimum level of protection (IP20 marking) is sufficient.
All parameters that are significant when choosing an LED strip are indicated in the labeling.
Standard LED strip marking
Selecting additional equipment
For the LED strip to work correctly you will need:
power supply, which is selected depending on the power of the electrical equipment and operating voltage. To independently determine the power of the equipment, you can use the following formula:
Power supply power = Power of 1 m LED strip * Strip length * 1.25 (minimum stock level)
Tape connection equipment
controller. If you set up the curtain lighting yourself using a multi-color tape, then to control the operating modes, additional equipment is required - a controller, which can have manual or remote control.
When choosing a device, factors such as the control method and the number of available operating modes are taken into account.
Remote Controller
Installation diagram
LED strip installation diagram:
- preparation (assembly) of the lamp. The LED strip is cut in accordance with the specified parameters, connected to each other by soldering (the safest method) or connecting clips, the power supply and controller are connected (if necessary);
Equipment connection sequence
- LED strip mount. If installation is carried out in an aluminum profile or plasterboard box, then the tape can be attached to an adhesive base. If the tape is fixed directly to the cornice, wall or ceiling, then it is more advisable to use special fasteners;
Installation of LED strip on mounting clips
- fixing the power supply and controller.
You can watch the video for more information about the process of organizing the lighting.
» alt=»»>
After complete installation of all lighting elements, a test run and performance check is carried out. If necessary, appropriate adjustments are made.
Doesn't light up at all
If your LED garland does not light up, and you are convinced that the problem is not with the LEDs, then you need to look at the control unit and the power cord. First, check the integrity of the cord; it may have been broken or the contact at the connection to the microcircuit has broken. After this, check how all the contact connections are soldered to the board. For example, in the photo below one of the wires has burned out. If everything is working, then the board has burned out. You can, of course, buy a new garland if this one was a cheap Chinese one, but if you want to repair the product, now we will tell you how to do it.
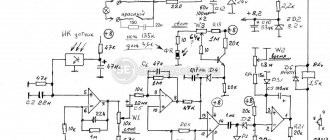
Instead of a standing control unit, you can use a starter from a fluorescent lamp of 127 or 220 Volts (the only difference is the blinking speed of the lamps). First, check how the LEDs are connected. If it turns out that the outer elements of the groups are connected to each other by anodes, you will have to redo the circuit and connect the LEDs with cathodes. This is due to the fact that for normal operation of the starter, voltage must be supplied to the anode through a 5-watt resistor with a resistance of 15-20 kOhm. In addition, diodes will also have to be included in the circuit, as shown in the diagram below. Diodes are needed to pass the reverse current of the network through themselves. This is how you can remake and thereby repair the LED garland with your own hands at home.
As you can see, you will have to work hard to repair the product, so if the electric garland is Chinese, it is better not to waste time and buy a new one. We talked about how to choose a garland for a Christmas tree in a separate article. By the way, it is recommended to convert it into a starter even if the garland does not blink or does not switch modes and the reason for this is the controller.
We draw your attention to the fact that if it is the LED in the Christmas tree diode lamp that has burned out, after which the entire section does not light, you must solder in the working element, strictly observing the polarity!
LED damage
If the wire contacts are fine and you missed one of the diodes, how can you check if it is working? And most importantly, how to find it among the entire series of light bulbs?
First of all, unplug the garland from the outlet. Let's start with the last diode. The power cable comes directly from the control unit.
The outgoing conductor is soldered to the same leg. Let's move on to the next branch of the light channel. It is also necessary to check the diode between its two power wires (input-output).
You will need a multimeter and its probes, somewhat modernized.
Place thin needles tightly onto the tips of the tester probes so that their tip protrudes a maximum of 5-8 mm.
Wrap everything on top with a thick layer of electrical tape.
Since the LEDs are soldered, it is not possible to simply pull them out of the bulb, as in conventional garlands.
Therefore, you will need to pierce the wire insulation to get to the copper wires of the wires. Switch the multimeter to diode continuity test mode.
And you begin to sequentially punch the power wires near each suspicious diode.
If you have a garland not 220V, but 12V or 24V, which is connected with the following power supply:
then the LED of the multimeter's good battery should light up.
If it is a 220V backlight, check the multimeter readings.
On the working elements they will be approximately the same, but the faulty one will show an open circuit.
The method, of course, is barbaric and harmful to isolation, but it works quite well. True, it is better not to use street garlands on the street after such punctures.
Briefly about the main thing
An LED lamp can break even after a short period of use, but in most cases you can fix it yourself.
To properly disassemble an LED lamp, you need to understand its structure.
There are several options for assembling LED lamps; analysis must be done taking this information into account.
One of the reasons for the rapid failure of an LED lamp may be the presence of a switch with a dimmer, a light bulb that glows when the lamp is turned off.
The most common causes of failure of the lamp in question are: incorrect assembly, improper heat removal from the lamp, poor-quality materials, incorrect calculation of the wire cross-section.
To disassemble the lamp for repair, you need to disconnect the diffuser cap and fasteners, materials (screws, clips or sealant), remove the radiator, matrix and disconnect the driver.
When a non-working element is found, it must be replaced and the repaired LED lamp must be checked for functionality.
To remove a non-working LED, you need to use a heating element.
When working with LED lamps and tools, you must follow safety precautions.
Since lamp drivers may have different structures, the reasons for their failure may also differ.
Ratings 0
"Shapes of LED garlands"
The play-light garland is further confirmation that true beauty lies in simplicity. Your house or apartment can be transformed with the help of the simplest form, a kind of curtain or screen that can be used to crown anything.
"Rain"
The “rain” garland is the most typical representative of LED curtains. Its difference from the others lies in the equal length of the luminous cords, making the screen look monolithic. It is these garlands that imitate waterfalls or the murmur of water - after all, this is so easy to achieve by implementing a program in which the flickering lights seem to run from top to bottom, repeating the rhythm of the flow of streams.
The standard length of the main cord is several meters, usually 2-3. But the length of the vertical cords can be different - from 1.5 to 10 meters. Thus, each thread contains on average from 350 to 2500 LEDs - imagine how large an area you can decorate with them!
LED rain lights for outdoor placement typically have black cords that blend in best with their surroundings. Interior play-light options are more varied - black, white, transparent and dark green cords, ideal for decorating a Christmas tree.
In stores you will find garlands for every taste and you can choose those whose shades are most comfortable for you. In addition to the traditional blue, green, yellow, red and pink, you have the pleasant opportunity to choose a suitable white - from the warm or cool spectrum.
"Fringe"
It would seem that the LED fringe garland has such a slight difference from the “rain”, but at the same time it looks completely different. It consists of threads of different lengths - therefore, the output is a pronounced unevenness of the edges and a different number of LEDs on the thread. Please note that all individual threads are permanent.
“Fringe”, like any play light or Christmas tree garlands, has the ability to be connected in series, making it possible to cover any area. Even the simplest light algorithms look great - static burning makes it look like frozen small icicles. Special tips also look great - the lower edge of the LED play light can be crowned with stars or snowflakes.
"Melting Icicles"
It’s not for nothing that LED garlands in the form of melting icicles have gained wide popularity - such objects look very interesting! At the base is not the usual cord with light bulbs, but a transparent rod, inside of which there are LEDs, “droplets” of light in them seem to roll down the rod. The LEDs in these garlands come in two colors - blue and white, like real cones made of frozen water.
The tubes come in different sizes and formats, from very thin to impressive sizes. In one garland, as a rule, there are 5-10 tubes, the distance between the icicles also varies, their length ranges from several tens of centimeters to a meter. They decorate balconies, the outside of window sills, windows and railings on verandas. Within the apartment, icicles look especially interesting on mirrors and curtains; you can also decorate the entrance door to the apartment with LED play light.
Fault detection methods
The process of restoring the functionality of the garland can be accelerated. To do this, you need to take a tester and attach needles to its ends instead of probes. Then, using them, sequentially punch through each section of the chain so that the needle passes to the current core. It is necessary to determine where the section resistance differs significantly. In this way, you can identify a breakdown and repair it much faster, without putting in a lot of effort.
As a rule, old Soviet garlands for the New Year tree are much more convenient in this regard than a Chinese garland. Their circuits are almost similar, but the design is noticeably different. In Soviet ones, light bulbs are screwed into sockets. Therefore, it is possible to determine which of them is in working condition, without a soldering iron and an ohmmeter, only by elimination. This method involves taking a working light source and screwing it into the sockets one by one. Another way to use a tester is to measure the resistance of each individual lamp until you can find the burnt one.
Before trying to repair the garland, it is recommended to check the integrity of the common wire. For accuracy, you can refer to the Chinese garland diagram. On one side of the board you can see 5 soldered wires, 4 of which are intended for glowing colors, and one is common. And if the common wire breaks, it must be soldered.
If a single-color LED strip stops working
The greatest consumer demand is for tapes of the same glow color powered by a 12 V DC source. Malfunctions encountered during their operation can be divided into 4 groups:
- Doesn't turn on.
- There is light, but dimly.
- Flickers.
- One of the above symptoms appears on a separate section of the tape.
1) If the LED strip does not light up immediately after assembling the entire system, then you need to ensure the integrity of the electrical circuit. To do this, first check whether the connection polarity is correct: the red wire from the output of the power supply unit (PSU) should go to “+”, and the black wire to “–” of the tape. If everything is correct, then with the power supply turned on, you need to lightly pull all the connecting wires and once again make sure that the contact is reliable at the soldering points
If there are connectors, they should be given special attention. Lack of reliable contact under the connector latch is a common reason why LEDs do not light up immediately after being turned on. The second step towards troubleshooting should be to check the functionality of the power supply
Using a multimeter (voltmeter), check the presence of a constant voltage of +12 V at its output terminals. If the readings of the measuring device differ by more than 10% from 12 V, then the power supply is most likely faulty. If you don’t have a voltmeter at hand, you can check the voltage at the power supply output using a car light bulb
The second step towards troubleshooting should be to check the functionality of the power supply. Using a multimeter (voltmeter), check the presence of a constant voltage of +12 V at its output terminals. If the readings of the measuring device differ by more than 10% from 12 V, then the power supply is most likely faulty. If you don’t have a voltmeter at hand, you can check the voltage at the output of the power supply using a car light bulb.
It’s rare, but it still happens that when the power supply breaks down, the LED strip also burns out. Therefore, you cannot be sure that it will light up with the new power supply. But you can make a diagnosis: take a 9 or 12 volt battery and briefly connect it to the tape, observing the polarity. The LEDs should light up, although not at full brightness.
2) Dim LED lighting can occur for one of two reasons:
- The voltage at the power supply output is less than 10 V, as a result of which the LED strip does not burn at full power.
- Loss of LED brightness caused by overheating of the emitting crystal. In turn, overheating of the crystal can be caused by violation of operating conditions (lack of a radiator or too high supply voltage), or poor quality of installed LEDs.
3) The reason that the LED strip either lights up or doesn’t light up along its entire length is poor contact in the power circuit.
4) Any strip can be conditionally divided into sections of three LEDs and a resistor, connected in series and operating from +12 V. All sections are connected in parallel to each other, that is, they are electrically independent of each other. It follows that a malfunction in one area (failure of an LED, resistor, broken contact, microcrack on a printed conductor) will not affect the operation of the rest of the LED strip. Only 3 LEDs will stop lighting.
Recently, LED strips and LED lines have appeared on sale, connected directly to a 220 V network. They have a primitive power source sealed at one end. The reliability of such an assembly is low. Therefore, if a 220-volt LED strip does not light up after the next turn on, then its repair is hardly possible.
Why doesn't the lamp light up?
90% of the problems of all failed LED lamps are one burnt out LED.
Often you can determine it even by appearance. A black dot will be clearly visible on the yellow surface.
Sometimes there may be an obvious bulge or swelling instead.
Since all the diodes in the lamp are connected in series, the failure of one automatically interrupts the entire chain.
After you have found such an LED with a dot, pry it from below with a knife and simply cut it out of its place.
You should only have two contacts left on the site, scrape off everything else.
A small contact is a “plus”, a large one is a “minus”.
As a matter of fact, to restore the lamp’s functionality, these two contacts will need to be connected to each other with something.
Problems and their solutions
Below are the most common breakdowns. You can actually repair the garland with your own hands: this will require attentiveness and accuracy.
Poor soldering quality
Poor soldering of supply and output conductors is the most common cause of backlight failure. In some cases, the contact is held solely by hot-melt adhesive, so its functionality is out of the question. It is enough to lightly touch the conductor, and the contact is completely broken.
Low-quality connections are especially common in Chinese-made garlands. Also, manufacturers from China, in order to save money, often use wires that are too thin, which easily break at the junction with the board.
Another way to avoid wire problems is to avoid stripping wires with a knife. It is easy to excessively thin the wire during this operation. It is better to clean the conductor by heat treatment with a lighter.
LED damage
To find the faulty diode, disconnect the garland from the power supply. We start the test with the last LED in the circuit (the conductor from the power supply goes directly to it). An outgoing wire is connected to the same leg, which goes further to the next branch of the light channel.
You will need to test the LED between a pair of power wires (input and output). As a test device we use a multimeter with slightly modified probes. To upgrade the probes, we attach thin needles to their ends using thread. The point of the needles should protrude just a little - 5-7 millimeters. Apply a layer of insulating tape on top.
Since all the diodes are connected to the circuit by soldering, simply removing them from the lamp (as is the case with a regular garland) will not work. We pierce the insulating layer of the cores to find the copper wires.
Switch the device to LED ringing mode. We begin to pierce the supply conductors near each diode over and over again.
Chaotic flickering
Another common problem is light bulbs flickering randomly. The diodes blink for no apparent reason, their brightness changes chaotically.
The cause of this malfunction is the incorrect operation of the electrolytic capacitor. This element is usually subject to deformation - it looks somewhat bloated.
The way out of this situation is to replace the capacitor. Its nominal value is always written on the body.
If after replacing the capacitor the situation does not improve, the problem may be a burnt-out resistor. Such a defect cannot be detected visually, so in this case you cannot do without a tester. We measure the resistance, not forgetting to find out the rating for the component in advance. If the result obtained does not correspond to the nominal value, change the resistor.
No light in one of the areas
If there is no light at all on any of the channels, this could be due to one of two factors:
- Breakdown on the thyristor or diode of this channel. To make sure that the cause of the malfunction is correctly determined, we unsolder the channel wire on the board and connect a new channel instead of the old one (which definitely works).
- If the above method does not bring a positive result, the problem lies not in the garland, but in one of the board elements - a diode or thyristor. Using a multimeter, we check these components and, if necessary, replace them with working ones.
Dim lighting
There are situations when there is lighting, but one of the channels provides too dim light. In this case, the controller circuit functions without problems, and when pressing the buttons, normal mode switching occurs.
Testing the diodes using a multitester also does not give any results. There is only one possible reason left - poor quality wires. If any part of the stranded conductor is torn, the total cross-section decreases, which is reflected in the dimness of the light. This happens due to the fact that the required amount of voltage is not supplied to the LEDs.
To find a break, you will need to manually check the entire wire line. You will have to be patient, since the defect on the line is quite possibly located on the last thread being tested.
When the problem area is found, we disassemble the conductors on the LED, clean them (preferably with a lighter) and solder them again. Next, we apply an insulating layer using heat shrink.
Broken lamps
If one or more lamps are broken and you decide to repair the garland, it is recommended to simply replace one LED with another. It is technically impractical to repair such light bulbs.
If there is no spare light bulb, remove the broken light source and connect the wires without its participation.
Recommended procedure for troubleshooting and repair
Checking the presence and rating of industrial voltage
The author understands that this point will seem meaningless to some, even somewhat naive, and so on. But practice shows that often the fault is not in the lamp itself, but in the lighting fixture (device) in which it is located. Before you start repairing it, you should first make sure that there is voltage on the cartridge contacts and their condition. Carbon deposits, a defect in the “tongue” or, for example, a poor connection in the electrical wiring - all this can be the reason that the lamp does not light up when turned on.
Such a check will only take a couple of minutes, but for some reason not everyone follows one of the fundamental rules for repairing any electrical device. Briefly, it can be formulated as follows: first make sure that there is food (and it is normal), and only then start “gutting”.
Disassembling the lamp
All LED models differ in their housing, internal “filling,” and design features. When disassembling an LED device (as well as any other device or mechanism), you must follow a certain order. It consists in the fact that all disconnected (unscrewed, unsoldered) parts are placed in a row, from left to right. But the lamp is assembled in the reverse order.
This technique is a guarantee that everything will be done correctly, and there will be no “extra parts that came from nowhere.” For those who are accustomed to lumping everything together, the author predicts some difficulties after completing the repair of the LED lamp.
You should start by dismantling the “dome”. When it is removed, the further algorithm of actions will become clear.
You need to remember (write down, sketch) exactly how the parts are attached to each other. Sometimes such carelessness turns into a problem when assembling an LED lamp.
Visual inspection
Any burnt (melted) part, some segment on the board is a clear sign of a malfunction. How to proceed? Those who know how to do spot soldering and have the appropriate tools solve the problem simply - by replacing the part. For example, if the board has darkened in the area of the diode bridge, then “calculating” the faulty semiconductor is a simple task. The second option is to purchase a driver panel and replace it.
Checking radio components for serviceability
This applies to the capacitors and resistors included in the circuit. It is more difficult to determine the leakage current of a capacitance, but a breakdown can be detected with a simple multimeter. Resistances usually burn out, but sometimes a visually imperceptible malfunction occurs, such as an internal break in the conductive layer. The same thing is to “listen” with a measuring device.
Individual LEDs also fail
This is the most negative option. The fact is that for the lamp to work properly, they need to be changed on a one-to-one basis. Where can I get the initial data (according to the parameters of the device)? Plus, given their dense layout and the “delicacy” of the legs, it’s unlikely to be possible to solder several semiconductors without the appropriate experience. As a rule, if a large number of LEDs have failed, it is easier to buy a new LED lamp. A malfunction of 3-5 pieces “doesn’t make any difference.”
How to determine the integrity of an LED? An ordinary Krona battery, but through a resistor with a nominal value of about 150±50 Ohms. The fact is that it is 9 V, and for a semi-automatic product only 1.5 is required. When you touch the terminals of the device, it should (if it is working) light up.
Blinking (flashing) of an LED lamp is often the reason for replacing it with a new one. There is no need to rush - such a nuisance can be easily eliminated. This is covered in detail here.
Actually, that’s all that can be said about repairing LED lamps with your own hands. Considering that there is nothing particularly complicated about this, and only requires attentiveness and accuracy, you should not immediately throw away the device and spend money on a new one.
Recommended for you:
How to transmit electricity meter readings via the Internet, telephone and terminal Why the generator does not charge the car battery - reasons and methods for repair Voltage surges in the electrical network - the main reasons and methods for solving the problem
The garland shines dimly
There are also not entirely obvious accidents, when the LEDs of a separate channel seem to be on, but rather dimly compared to the others.
What does it mean? The controller circuit is working fine. When you press the button, all modes are switched.
Testing the parameters of the diode bridge and resistance with a tester also does not reveal any problems. In this case, the only thing left to blame is the wires. They are already quite frail, and when such a multi-core wire breaks, its cross-section decreases even more.
As a result, the garland is simply not capable of starting the LEDs in the nominal brightness mode, since they simply do not have enough voltage. How to find this torn vein in a long garland?
To do this, you will have to walk along the entire line with your hands. Turn on the garland and start moving the wires near each LED until all the backlight lights up at full strength.
Why is the Christmas tree garland shining dimly?
Why is the Christmas tree garland shining dimly?
According to Murphy's Law, this may be the very last piece of garland, so be patient.
As soon as you find this area, pick up a soldering iron and disassemble the wires on the LED. Clean them with a lighter and solder everything again.
Then insulate the soldering area with heat shrink.
Light bulbs broke
If the light bulbs are broken and there is a desire to repair the device, then it is advisable to simply replace the damaged light source. It should be noted that replacement is carried out only with the power turned off to avoid electric shock. In such situations, you should pay tribute to unbreakable light bulbs, since you do not always have to deal with malfunctions.
So, if you find that the garland does not work, then you should try visually and using a tester to identify the problem area and cut it out. After which the working sections must be connected using special connectors. At this point the repair can be considered complete.
Soviet style garlands
Garlands produced in Soviet times are reliable. Another feature is that they can be repaired, while not all Chinese-made products can be repaired. Modern devices and tools make it possible to identify faults and carry out repair work.
Required set of tools and materials:
- soldering iron;
- indicator screwdriver;
- insulating material;
- pliers.
The garland uses a serial connection circuit. In other words, if one light bulb burns out, the entire system stops functioning.
We check the lamps for integrity. If the light sources are not damaged, check how they are screwed into the sockets. If necessary, screw the lamp into the socket until the end.
If the steps described above do not give a positive result, take an indicator screwdriver and look for the area where the contact is interrupted in the conductor. The broken contact is not necessarily located in the wire, so we also check the cartridge. If the problem is a broken contact, we restore its functionality using a soldering iron. If necessary, we connect the conductors directly.
Visual inspection
It doesn’t matter what kind of garland you are repairing, be it LED or light bulbs. First you need to look at the integrity of its wire.
Start with a fork. There may be damage in this place, since it is not uncommon for the plug to be pressed when plugged into the network.
The wires must be straight, without cuts or breaks. If there is at least one break, it needs to be corrected.
LED garland diagram
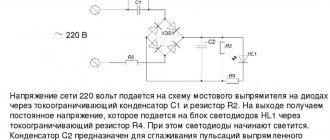
The AC mains voltage is supplied to the power controller through resistors and a diode bridge, already rectified and smoothed through a capacitor.
In this case, this voltage is supplied through the button, which is open in the normal state. When you close it, the controller modes switch.
The controller in turn controls the thyristors. Their number depends on the number of backlight channels. And after the thyristors, the output power goes directly to the LEDs in the garland.
The more such outputs, the more varied the colors the product can have. If there are only two of them, this means that only two parts (or halves) of the garland will work in different modes - some bulbs will go out, others will light up, etc.
In fact, these two lines of diodes will be connected on two channels in series. They will connect to each other at the end point - the last LED.
If for some reason you are annoyed by the blinking of the garland and you want it to glow evenly with only one color, it is enough to short-circuit the cathode and anode of the thyristor on the back side of the board using soldering.
The more expensive the garland you have, the more outgoing channels and wiring will leave the control board.
At the same time, if you follow the traces of the board, one of the mains voltage outputs is always supplied directly to the final LED of the garland, bypassing all elements of the circuit.
Half of the garland is out of order
If half of the garland is working and the other half is not, you probably have a loose or broken bulb. Start with the first unlit bulb and work your way down, wiggling them to see if they are loose in the socket.
If it flickers, then you need to replace it. Otherwise, you have more tedious work ahead of you: Take turns going through the unlit bulbs and replacing them with known good ones until you find the culprit. You will know about this when the garland lights up again.
Scheme and arrangement of the garland
Externally, this is a set of light bulbs of different or the same color, attached to a long wire, which is connected to the power supply. It is the main control element for the decoration (turns it on and off, changes the glow modes).
On the outside of the box, all possible backlight modes are indicated in English. They can be changed by pressing one button.
If you open the power supply with a thin screwdriver, the tip of a knife, or simply by pressing your hand, you will see wires inside, soldered to the board. The largest cross-section is the supply wire. It supplies voltage to the entire garland from the network. Additionally connected to the board:
- resistors;
- controller that creates lighting effects;
- diode bridges;
- capacitor;
- thyristors for each channel of the Christmas tree decoration.
Circuit
Most often, the elements are soldered to the board. But it also happens that they sit on glue. Especially if the product is cheaply made in China.
Remaking a Chinese garland
Most consumers do not have a very good opinion about Chinese products. The garlands also do not stand out against the general background of goods from China: poor-quality connections, too thin conductors, cheap construction materials. As a result, such garlands (including their control units) often fail.
A breakdown of any of the circuit elements can affect the functioning of the garland. For example, a non-working capacitor causes light bulbs to flicker. A thyristor failure entails the shutdown of one of the channels. A burnt-out diode or a failed diode bridge lead to complete system inoperability.
Advice! If you need to change the flicker frequency, it is recommended to add a 0.5–2 µF capacitor to the circuit.
Damaged parts must be replaced with new ones. If you do not have sufficient knowledge in the field of electrical engineering or do not want to bother with repairs, an extremely simple but effective scheme is recommended. We connect the garland directly with a plug, and build a starter from a fluorescent lamp into one of the cable conductors. However, this scheme is only effective for ordinary light bulbs. As for the LED garland, its functionality will be restored in this case, but the light will become dimmer.
How to repair an LED garland with your own hands
Quite often a situation arises that last winter the device was perfectly working, but now it does not work as it should, for example, the LED garland lights up dimly or does not turn on at all. There are also frequent cases when one color of the LED garland out of several does not light up. It is quite possible to carry out repairs and bring the device into working condition on your own. To successfully solve the problem, you need to have an idea of what kind of breakdowns occur most often, as well as possible ways to repair an LED garland in a given case.
How to fix an LED garland: a separate section does not light up
The most common failure is that one or two colors of the garland do not light up. It happens that an entire section does not work. In this case, it is worth starting the repair of the LED Christmas tree garland by disassembling the control unit in order to make sure that all contacts are securely fastened to the board and a broken wire did not cause the malfunction. If you find that the problem is hidden in this particular place, the detached contact must be fixed. You can learn more about this procedure from the video on how to repair an LED garland located below.
If the cause of the breakdown was not found in the control unit, this indicates that it is hidden in the common wire. The fact is that for LED garlands, unlike conventional ones, a parallel connection is used, which eliminates the possibility of a garland malfunction due to the burnout of one element. Therefore, your task is to check the common wire for damage, bites, etc.
How to repair an LED garland if it is completely faulty
If the LED garland does not light up when the power is connected, the problem can also be fixed with your own hands. The LED garland requires a standard inspection for damage to the power cord and power supply. Make sure that all pins are securely connected to the chip and to the board. If all connections are in order, most likely the board itself has burned out.
At this stage, you need to make a decision: is it worth repairing the garland or will it be easier to buy a new one? Of course, if we are talking about an inexpensive Chinese garland, it will be easier to replace it. If you decide to repair the old one, use the tips provided.
The control unit can be replaced with a starter from a fluorescent lamp. Depending on how powerful it is (127 or 220 Volts), the LEDs will blink at different speeds.
You should start by checking exactly how the LEDs in this garland are connected. Here you should be interested in how the extreme elements of the groups are connected to each other. If the connection is made using anodes, you will have to look on the Internet for a diagram of a New Year's garland on LEDs and make some changes to connect the extreme elements with cathodes. This is due to the fact that for normal operation of the garland through the starter, a 5-watt resistor is needed, which will supply voltage to the anode with the required resistance. In addition, you need to include the diodes in the circuit in such a way that they can pass reverse current from the network through themselves.
You can repair a broken Christmas tree garland yourself
Understanding the circuit of an LED garland and repairing it yourself is quite a troublesome task. Therefore, it will often be much easier to buy a new one.
Replacing individual elements of an LED garland
If it is necessary to replace a separate LED that has failed, this can be done quite simply. You just need to disconnect the garland from the power supply to avoid electric shock, unsolder the burnt-out element and install a new one in its place. The main thing in this is to maintain polarity.
Particularly worth noting are the methods for repairing garlands such as duralight. Sometimes you have to deal with such a phenomenon as a malfunction of a separate section of it. But here the solution is simple: you need to locate the problem area (you can do this visually or using a tester), and then simply cut it out, using the special marks that the manufacturer makes as a guide. The non-working part can be thrown out, and the working parts can be combined using a special connector.
Breakdowns are often caused by animals that can chew through the device’s wires.
Causes of failure
There are many reasons that can cause a garland to malfunction:
- insufficient contact on conductors;
- a failed light diode in one of the lamps;
- failure of a capacitor or thyristor;
- burnt out controller chip.
The chip on the board does not light up often. Among all the reasons, burnt microcircuits occur in approximately every tenth case.
Options for cornices for ceiling lighting
A cornice is any device that allows you to covertly install ceiling lighting. There are 2 main ways to solve this problem. The cornice itself is a structure fixed to the ceiling or wall. At the same time, it forms a technical niche in which lamps or LED strip are placed. There is a gap of a certain width between the cornice and the ceiling, which is necessary for the passage of light. Cornices can be very different: wooden, plastic, string, metal. The material is chosen taking into account the style of the room, convenience and technical parameters of the lighting system.
Light sources are located on the closing back side of the device. The minimum distance from the ceiling is 5 cm, from the wall – 10 cm.
A niche in the ceiling appears with a certain method of installing a plasterboard structure. A prerequisite is the presence of at least two levels near the ceiling. There are many ways to organize a niche. Most often, everyone resorts to installing a box, which is mounted so that there is a gap between it and the base ceiling for the passage of light. This option is more effective, as it allows you to really hide the lamps and achieve more uniform illumination.
The niche takes up more space: at least 10 cm wide and 15 cm high. If fairly powerful lamps are installed, the width has to be increased to ensure sufficient cooling. But at the same time, you can arrange the lamps in a variety of ways in order to obtain different lighting effects.
What to do if the light bulb does not turn on at all?
If, after studying the diagram of the Chinese Christmas tree garland, it was not possible to find the cause of its breakdown, it is recommended to make sure that the problem is not in the LEDs. In this case, you should check the control unit and power cord. First, you need to make sure that the cord is intact, since there is a possibility that it was broken, or the contact connections at the connection to the microcircuit were broken. Then you need to try to check the reliability of the soldering of the contact connections to the board. Of course, in order not to suffer, you can buy a new garland, however, if you want to repair the device, then you should act.
So, the control unit can be replaced with a starter from a 220 Volt fluorescent lamp. It is recommended to check the LED connections first. If the extreme elements of the groups are connected by anodes to each other, then you will need to redo the circuit and connect the LEDs with cathodes. The point is that the voltage to the anode to normalize the operation of the starter must be supplied through a 5-watt resistor, while the resistance is 15-20 kOhm. In addition, additional diodes will need to be included in the circuit, which will pass the reverse current of the network through them. This is how Chinese LED garlands are repaired at home.
As you can see, you will have to spend a lot of time and patience to repair the garland. Therefore, if it is not so expensive, it is recommended to simply replace it with a new one of better quality. It is important to note that if it is the LED that burns out, after which the operation of the entire section is disrupted, then the working element should be soldered in, strictly observing the polarity.
What will we get in the end?
The garland that we will make consists of addressable LEDs. These diodes differ from conventional ones by the presence of a logical contact, through which the color and brightness of the light are controlled.
Accordingly, to control such a garland you need “brains”. The control board will send different signals to each diode several times per second, which will allow you to get beautiful dynamic effects and animation.
If an ordinary garland simply turns on the diodes according to a schedule or can produce a snowfall effect at most, then we can make a running line with text and more than 20 effects. Each glow mode will be customizable with the ability to change most parameters.
The principle of operation of the driver in an LED lamp
The driver is considered a key part of the LED lamp; it essentially acts as a general power supply, carries out the process of neutralizing voltage drops, and this element redirects the direct current directly to the diodes, which then form the light emission.
Drivers can be capacitor or electronic. Each option has its own specific advantages and disadvantages. Electronic drivers are used on modern and high-quality dumps of branded products in the luxury segment; such elements rarely break. But condenser lamps, which are used in budget lamps, often require replacement or soldering of connections.
Driver circuits for LEDs from a 220V network
Specialized driver circuits clearly define the connection and operation structure. The basic version assumes that the alternating voltage that comes from the network must be pre-rectified, for which an LED bridge is used (available in all circuits). In the diagram, the values C1 and C2 indicate smoothing capacitors. In this case, the first option is an electrolyte, the capacitance of which is 22 μF, and the voltage is 400V, the second capacitor is made of ceramic and has the following parameters: 0.1 μF, 25V. The microcircuit provokes the generation of pulses that carry out the process of closing and opening the power format transistor Q1. The technical documentation for the LED lamp must certainly contain such a diagram (drawn, describing all the key components).