Arduino Uno board is the center of the large Arduino empire, the most popular and most affordable device. It is based on the ATmega chip - in the latest revision of Arduino Uno R3 it is ATmega328 (although you can still find variants of the UNO board with ATmega168 on the market). Most Arduino developers start with a UNO board. In this article we will look at the main features, characteristics and design of the Arduino Uno board revision R3, power requirements, possibilities for connecting external devices, differences from other boards (Mega, Nano).
Arduino Uno board
The Uno controller is the most suitable option for starting to work with the platform: it has a convenient size (not too large like the Mega and not as small as the Nano), is quite accessible due to the mass production of all kinds of clones, and there are a huge number of free ones written for it lessons and sketches.
Arduino Uno Specifications
| Microcontroller | ATmega328 |
| Operating voltage | 5V |
| Supply voltage (recommended) | 7-12V |
| Supply voltage (limit) | 6-20V |
| Digital inputs/outputs | 14 (of which 6 can be used as PWM outputs) |
| Analog inputs | 6 |
| Maximum current per pin | 40 mA |
| Maximum pin output current 3.3V | 50 mA |
| Flash memory | 32 KB (ATmega328) of which 0.5 KB is used by the bootloader |
| SRAM | 2 KB (ATmega328) |
| EEPROM | 1 KB (ATmega328) |
| Clock frequency | 16 MHz |
Images of Arduino Uno boards
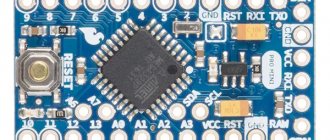
The original board looks like this:
Original and official Arduino Uno
Numerous Chinese variants look like this:
The board is an Arduino Uno clone
More board examples:
Where to buy Arduino Uno
The minimum prices for UNO boards can be found in Chinese electronic stores. If you have a few weeks to wait, you can save a lot by buying cheap (around 200-300 rubles) with free delivery. Moreover, you can find both the simplest options and official or “almost original” boards based on the original microcontroller. Another group of products are unusual boards with built-in WiFi (based on ESP8266 or ESP32), additional connectors for more convenient connection of peripherals. Here are some options that you can buy from trusted suppliers on Aliexpress:
| Arduino UNO R3 (CH340G) MEGA328P. A typical representative of Arduino boards on Aliexpress with a price below 250 rubles | High-quality Arduino UNO R3 board based on CH340G. Set without cable with a minimum price of about 220 rubles | Arduino wholesale – 10 UNO R3 controller boards with MEGA328P ATMEGA16U2 on board |
| Official Arduino UNO R3 MEGA328P based on ATMEGA16U2 – maximum quality | MegaPower Uno board based on the original ATmega328 R3, FTDI FT232RL | Original Arduino UNO R3 (board based on original MEGA and ATMEGA16U2 chips) with USB cable in a cardboard box |
| Two in one! Arduino UNO with built-in Sensor Shield (Atmega328P Atmega16U2 plus Sensor I/O Shield) | Arduino Uno and WiFi under one roof: R3 ATmega328P+ESP8266 (32Mb memory) | An excellent option from KeyeStudio – UNO R3 MEGA328P ATMEGA16U2 with combined Sensor Shield |
If you are interested in Arduino kits, you can find a more detailed overview of the available options on our website.
Automatic (software) reset
To avoid having to press the reset button every time before loading the program, the UNO board has a hardware reset function initiated from the connected computer. One of the data flow control (DTR) signals of the ATmega16U2 chip is connected to the reset pin of the ATmega328 microcontroller through a 0.1 µF capacitor. When the DTR signal goes low, a microcontroller reset pulse is generated. This solution allows you to load a program with the click of a button from the Arduino Integrated Programming Environment (IDE).
Question to the expert
Are there any disadvantages to the auto reset feature?
When connecting the UNO board to a computer running Mac Os X or Linux, the microcontroller will reset each time the program connects to the board. Within half a second, the bootloader will be launched on the UNO board. Even though the loader program ignores extraneous data, it can accept several bytes from the packet immediately after the connection is established.
If the program on the Arduino board is designed to receive any data when it is first launched, it is necessary to send the data with a delay of approximately 1 second after connection. There is a track on the UNO module that can be cut to disable the auto reset feature. The track is marked with the inscription “RESET-EN”. Automatic reset can also be disabled by connecting a 110 ohm resistor between the 5V supply line and the RESET pin.
Circuit diagram and pinout of the board
Arduino is an open platform. In fact, anyone can download the circuit diagram from the official website or one of the popular forums, and then assemble a board based on the ATmega controller. The necessary electronic components can be purchased very inexpensively from many online stores.
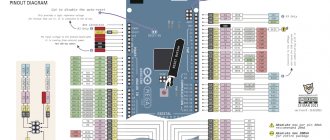
Pinout of board based on ATMEGA 328
Schematic diagram:
Description of Arduino Uno R3 board elements
ATMega 328 microcontroller pinout
Scope of application
The places of use can be listed for a long time, since its possibilities are unlimited. Using this device, you can design many different systems that will help a person in everyday life, as well as in industrial production, medicine and other areas of our lives. Currently, the world is experiencing “Arduinomania”. Many articles and forums on the Internet are devoted to this miniature device. Here are some popular uses for this device:
- “smart home” system;
- all kinds of sensors;
- robotics;
- automatic fans;
- traffic lights;
- security systems;
- mini weather stations;
- multitesters;
- quadcopters.
Advantages
- Open equipment diagrams and specifications. Arduino Uno is based on popular Amtel and ATMEGA microprocessors. Qualified specialists can design their own version of the module for specific tasks based on existing circuits.
- Open source program. Program coding can be extended on the C++ platform.
- Simple and convenient programming environment. The program shell is easy to use for novice programmers, but has sufficient flexibility for the work of professionals. It is most convenient for the learning environment of students, who will easily understand the operation of this platform.
- Programming, connection and power supply are performed using one USB cable or a cable with an adapter on the chip.
- Possibility of functioning on various types of systems. The software operates successfully on Linux, Macintosh, Java and other systems, as it is open source. However, the most popular system for Arduino has become the Windows system.
- Acceptable price. In big cities, Arduino Uno can be purchased for less than 1000 rubles. This is the price for a ready-made, complete device that does not require auxiliary equipment, expensive programmers, or paid programs.
Advantages and disadvantages.
Flaws
The program shell is too simple. This is a very inconvenient code editor. To program, you will have to switch to a more convenient editor, but you still need to leave the Arduino IDE code editor open. Low microprocessor frequency. There is no way to change it. Small amount of memory for saving programs.
It will be interesting➡ What is Arduino: information for beginners
Description of Arduino pins
Arduino pins are used to connect external devices and can operate in both input mode (INPUT) and output mode (OUTPUT). A built-in 20-50 kOhm resistor can be connected to each input by executing the pinMode() command in INPUT_PULLUP mode. The permissible current at each output is 20 mA, no more than 40 mA at peak. For ease of use, some pins combine several functions:
- Pins 0 and 1 are UART contacts (RX and TX, respectively).
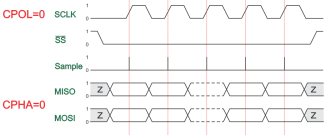
- Pins 10 to 13 – SPI pins (SS, MOSI, MISO and SCK respectively)
- Pins A4 and A5 are I2C pins (SDA and SCL, respectively).
Uno board digital pins
Pins numbered 0 to 13 are digital. This means that you can only read and apply two types of signals to them: HIGH and LOW. With PWM you can also use digital ports to control the power of connected devices.
| Arduino pin | Addressing in a sketch | Special appointment | PWM |
| Digital pin 0 | 0 | RX | |
| Digital pin 1 | 1 | TX | |
| Digital pin 2 | 2 | Interrupt input | |
| Digital pin 3 | 3 | Interrupt input | PWM |
| Digital pin 4 | 4 | ||
| Digital pin 5 | 5 | PWM | |
| Digital pin 6 | 6 | PWM | |
| Digital pin 7 | 7 | ||
| Digital pin 8 | 8 | ||
| Digital pin 9 | 9 | PWM | |
| Digital pin 10 | 10 | SPI (SS) | PWM |
| Digital pin 11 | 11 | SPI (MOSI) | PWM |
| Digital pin 12 | 12 | SPI (MISO) | |
| Digital pin 13 | 13 | SPI (SCK) A built-in LED is also connected to the output (available in most Arduino boards) |
Arduino Uno analog pins
Analog pins of Arduino Uno are designed for connecting analog devices and are inputs for the built-in analog-to-digital converter (ADC), which in Arduino Uno is ten-bit.
| Pin | Addressing in a sketch | Special appointment |
| Analog pin A0 | A0 or 14 | |
| Analog pin A1 | A1 or 15 | |
| Analog pin A2 | A2 or 16 | |
| Analog pin A3 | A3 or 17 | |
| Analog pin A4 | A4 or 18 | I2C (SCA) |
| Analog pin A5 | A5 or 19 | I2C (SCL) |
Additional pins on the board
- AREF – provides a reference voltage for the built-in ADC. Can be controlled by the analogReference() function.
- RESET – applying a low signal to this input will reboot the device.
Interaction
Arduino Uno has several ways to communicate with other Arduinos, microcontrollers, and regular computers. The platform allows you to establish a serial (Serial UART TTL) connection through pins 0 (RX) and 1 (TX). The ATmega16U2 chip installed on the platform translates this connection via USB: a virtual COM port becomes available on the computer. The Arduino software includes a utility that allows you to exchange text messages over this channel.
The RX and TX LEDs built into the board light up when data is being transferred between the ATmega162U chip and the computer’s USB.
A separate library allows you to organize a serial connection using any other contacts, not limited to the standard 0 and 1.
With the help of separate expansion cards, it becomes possible to organize other methods of interaction, such as an ethernet network, a radio channel, or Wi-Fi.
Connecting devices
Any devices are connected to the board by connecting to the contacts located on the controller board: one of the digital or analog pins or power pins. A simple LED can be connected using two pins: ground (GND) and signal (or power pin).
The simplest sensor will require at least three contacts: two for power, one for signal.
With any option for connecting an external device, you should remember that using the board as a power source is only possible if the device does not consume more than the permitted current limit of the controller.
How-to video:
Arduino Uno Power Options
The operating voltage of the Arduino Uno board is 5 V. A voltage stabilizer is installed on the board, so power can be supplied to the input from different sources. In addition, the board can be powered from USB devices. The power source is selected automatically.
- Powered by an external adapter, recommended voltage is from 7 to 12 V. The maximum voltage is 20 V, but a value above 12 V will most likely quickly damage the board. Voltage less than 7 V may lead to unstable operation, because 1-2 V can easily be lost at the input stage. To connect power, you can use the built-in 2.1 mm DC connector or directly the VIN input to connect the source using wires.
- Powered by the computer's USB port.
- Supply 5V directly to the 5V pin. In this case, the input stabilizer is bypassed and even the slightest excess voltage can lead to damage to the device.
Power pins
- 5V – Arduino supplies 5V to this pin, it can be used to power external devices.
- 3.3V – a voltage of 3.3 V is supplied to this pin from the internal stabilizer
- GND – ground output.
- VIN – pin for supplying external voltage.
- IREF – pin for informing external devices about the operating voltage of the board.
Main Stupid Question
Beginners in electronics who do not know Ohm’s law very often have questions like: “what current can be used to power the Arduino,” “what current can be supplied to the Arduino,” “won’t my Arduino burn out from the 12V 10A power supply,” “,” how many Amperes can be supplied to Arduino” and other nonsense. Remember: you cannot supply Amps, you can only supply Volts, and the device will take as many Amps as it needs . In the case of Arduino, the bare board will take 20-22 mA, either from the 5V pin or from Vin. The current indicated on the power supply is the maximum current that the power supply can supply without damage/overheating/voltage sags . You should worry not about the Arduino, but about the rest of the hardware that is in the circuit and is powered by the power supply, as well as the power supply itself, which may not be able to handle your load (motor, LEDs, heater). The total current consumption of the components should not exceed the capabilities of the power supply, that's the point. And even if the power supply is at least 200 Amperes, the components will take exactly as much as they need , and you will have “current reserve” to connect others. If the device is powered by voltage, then remember a very simple thought about the maximum current of the power source: you can’t spoil the porridge with oil .
Arduino Uno R3 memory
The Uno board supports three types of memory by default:
- Flash – 32 kB memory. This is the main repository for teams. When you flash a controller with your sketch, it is written here. 2kB from this memory pool is allocated to the bootloader program, which initializes the system, boots via USB and runs the sketch.
- 2 kB SRAM memory. By default, variables and objects created during program operation are stored here. This memory is energy-dependent; when the power is turned off, all data will, of course, be erased.
- Non-volatile memory (EEPROM) with a capacity of 1kB. Here you can store data that will not be erased when the controller is turned off. But the procedure for writing and reading EEPROM requires the use of an additional library, which is available in the Arduino IDE by default. Also be careful to remember the write cycle limitations inherent in EEPROM technology.
Some modifications to the standard Uno board may support higher memory values than the standard version. But you should understand that additional libraries will be required to work with them.
What does it consist of?
At the hardware level, this is a series of mounted boards, the brain of which is the AVR family of microcontrollers. The boards have on board everything necessary for comfortable work, but their functionality is often not enough. To make your project more interactive, you can use various modules and expansion boards that are compatible with the Arduino platform. This includes sensors (temperature, lighting, moisture, gas/smoke, atmospheric pressure), input devices (keyboards, joysticks, touch panels) and output devices (segment indicators, LCD/TFT displays, LED matrices).
How are capacitors indicated in the diagram?
Read more
What is the difference between parallel and series connection of resistors?
Read more
Oil transformers - what they are, device and principle of operation.
Read more
At the software level, the Arduino platform is a free Arduino IDE. Microcontrollers must be programmed in C++, with some differences and simplifications created for quick adaptation by beginners. The development environment takes care of compiling the program code and flashing the microcontroller firmware. There is also a service based on Scratch, which allows you to more clearly develop on Arduino. It is suitable for teaching children, as well as if you want to create a simple device one-time without learning the Arduino programming language and various documentation. For other cases, it is better to stick to the traditional development process.
Interesting read: What is a trigger in physics.
Programming for the Uno Board
To write programs (sketches) for the Arduino controller, you need to install a programming environment. The easiest option would be to install the free Arduino IDE; you can download it from the official website.
After installing the IDE, you need to make sure that the correct board is selected. To do this, in the Arduino IDE, in the “Tools” menu and in the “Board” sub-item, select our board (Arduino/Genuino Uno). After selecting the board, the project's build parameters will automatically change and the final sketch will be compiled into a format that the board supports. By connecting the controller to your computer via USB, you can upload your program to it with one touch using the “Download” command.
The sketch itself most often represents an endless loop in which pins with attached sensors are regularly polled and, using special commands, a control action is generated on external devices (they are turned on or off). An Arduino programmer has the opportunity to connect ready-made libraries, both built into the IDE and available on numerous sites and forums.
The written and compiled program is loaded via a USB connection (UART-Serial). On the controller's side, the bootloader is responsible for this process.
More detailed information about how programs for the Arduino board are organized can be found in our section on programming.
Installing drivers
If you used the installer, Windows - from XP to 10 - will automatically install the drivers as soon as you connect your board.
If you downloaded and extracted the Zip archive or for some reason the board is not recognized correctly, follow the procedure below.
- Click on the Start and open Control Panel.
- Go to the “ System and Security ” section. Then click "System". Then open Device manager.
- Look under Ports (COM & LPT ). You should see an open port named " Arduino UNO (COMxx) ". If the COM and LPT section is missing, look at the Other Devices, Unknown Device section.
- Right-click on the Arduino UNO (COMxx) and select the " Update Drivers... " option.
- Then select the “ Browse this computer for driver software ” option.
- Finally, locate the driver file named " arduino.inf " which is located in the " Drivers " folder of the Arduino program (not the "FTDI USB Drivers" subdirectory). If you are using an older version of the IDE (1.0.3 and older), select the Uno driver file named " Arduino UNO.inf ".
- Windows will then complete the driver installation.
Difference from other boards
Today you can find many options for Arduino boards on the market. The most popular competitors of Uno are Nano and Mega boards. The first is suitable for projects in which size is important. The second is for projects where the circuit is quite complex and many outputs are required.
Differences between Arduino Uno and Arduino Nano
Modern Arduino Uno and Arduino Nano boards, version R3, usually have a common microcontroller on board: ATmega328. The key differences are the size of the board and the type of pads. Dimensions of Arduino Uno: 6.8 cm x 5.3 cm. Dimensions of Arduino Nano: 4.2 cm x 1.85 cm. Arduino UNO uses female connectors, Nano uses a “comb” of legs, and some models, the contact pads are not soldered at all. Naturally, the larger size of UNO compared to Nano is an advantage in some cases, and a disadvantage in others. With a large board it is much more convenient to install, but it is inconvenient in real projects, because greatly increases the dimensions of the final device.
Arduino Uno boards traditionally use the TYPE-B connector (also widely used for connecting printers and MFPs). In some cases, you can find an option with a Micro USB connector. On Arduino Nano boards, Mini or Micro USB is standard.
Naturally, there are differences in the power connector. The Uno board has a built-in DC connector; there was simply no place for it in the Nano.
In addition to the hardware, there are also small differences in the process of loading the sketch into the board. Before downloading, you should make sure that you have selected the correct board in the "Tools-Board" menu.
Differences from Arduino Mega
The Mega board, in full accordance with its name, is by far the largest Arduino controller in terms of size and number of pins. Compared to it, Uno has much less pins and memory. Here is a list of the main differences:
- The Mega board uses a different microcontroller: ATMega 2560. But its clock frequency is 16 MHz, the same as in Uno.
- The Mega board has a larger number of digital pins - 54 instead of 14 on the Uno board. And analog – 16/6.
- The Mega board has more pins that support hardware interrupts: 6 versus 2. More Serial ports - 4 versus 1.
- In terms of memory capacity, Uno is also significantly inferior to Mega. Flash memory 32/256, SRAM – 2/8, EEPROM – 4/1.
Based on all this, we can conclude that for large complex projects with large programs and active use of various communication ports, it is better to choose Mega. But these boards are more expensive than Uno and take up more space, so for small projects that do not use all the additional capabilities of Mega, Uno will do just fine - you won’t get a significant increase in speed when switching to the “bigger” brother.
How to overcome hardware limitations
Most common boards have similar characteristics, including:
- Uno;
- Nano;
- Pro mini;
- and the like.
But as your development skills develop in this environment, the problem of lack of power and speed of this platform arises. The first step to overcome the limitations is to use the C AVR language.
With its help, you will speed up the speed of accessing ports, PWM frequency and code size by an order of magnitude. If this is not enough for you, then you can use powerful models with a similar approach to development. An Arduino Mega2560 board is suitable for this. Even more powerful is the Due model. Otherwise, you should familiarize yourself with the varieties of single board computers and STM microcontrollers.
Arduino Uno R3 is an excellent board for most projects, which is used for studying digital electronics devices.
Brief conclusions
Arduino Uno is an excellent board option for creating your first projects and smart devices. 14 digital and 6 analog pins allow you to connect a variety of sensors, LEDs, motors and other external devices. The USB connector will help you connect to a computer to flash the sketch without additional external devices. The built-in stabilizer allows you to use various batteries with a wide voltage range, from 6-7 to 12-14 V. The Arduino Uno works quite conveniently with popular protocols: UART, SPI, I2C. There's even a built-in LED that you can flash in your first sketch. What more could a beginner Arduino user want?
Work in conjunction with other systems
The very first thing you can get acquainted with, even without purchasing additional development devices, is serial communication. It is activated by the Serial.begin command (speed, for example 9600 ). You can read more about each command in the training section on the official website of the project Arduino.ru. You can exchange information with the computer. The board, depending on the program code, can send you data, and you can read it through the port monitor in the Arduino IDE.
In addition to the serial port, Arduino UNO supports the following interfaces:
- I2C;
- SPI.
Through them you can communicate between several boards, as well as connect various peripherals: sensors and displays.