The mirror is one of the most important elements of the bathroom. You can’t do without a shower or a washing machine, but it’s absolutely impossible to wash or shave without a mirror. Today the industry offers us a huge number of mirror options. It can be a free-standing mirror of any shape and size, a mirror with shelves, an entire closet with a mirror - it all depends on the budget and wishes for arranging the bathroom.
However, one cannot help but note the real trend - illuminated mirrors. If ten years ago they were mostly a desire, now they are used everywhere.
Photos of a do-it-yourself illuminated mirror can always be found on the Internet, and shots of girls near the ideal place for makeup provoke you to want exactly the same solution for your home in the city or country house.
Let's figure out how to make a backlight for a mirror? What may be required for these manipulations? At first glance, it seems that this is a difficult and impossible task - the mission is impossible for a person who has nothing to do with construction and repair work. However, it is not as scary and difficult as it might seem at first glance.
A mirror with light is primarily needed by women; it helps to shade foundation and carry out cosmetic procedures at the highest level. A plus is that lighting the mirror noticeably changes the mood of the entire bathroom, making it more cozy and boudoir-like at the same time.
Brief overview of the article
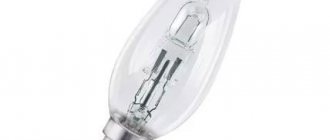
Incandescent lamps
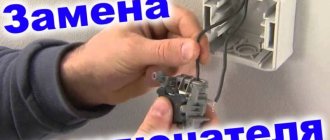
Regular light bulbs. Light can be provided using several ordinary light bulbs of the required light and incandescent type. They are connected in one chain and turned on through a socket and switch.
In this case, it is necessary to provide a convenient placement of the outlet. It should not be noticeable; this is a stage of planning the entire room and the electricity in it.
If the tiles are already laid, it will most likely be quite difficult to make an additional outlet without damaging part of the tiles.
My plans
After watching this video, I made a rough plan of what exactly I would do at home - in an ordinary 1-room apartment with an area of 46 square meters.
Kitchen:
- lighting the cooking area using this strip with 5 x 6 mm LEDs;
- the main lighting is a super-bright strip (luminous flux 9600 lm).
Hallway, room:
- main lighting – super-bright strip with a luminous flux of 9600 lm;
- additional spots in the hallway;
- wall dimmers with remote control - used to control the brightness of lighting;
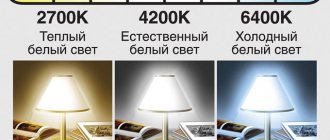
- LED lamps in the bedside area - I chose them based on my experience of using a table lamp; they are perfect for reading.
Bath:
- main lighting – special protected tape for rooms with high humidity
- the lamp above the mirror – I haven’t decided on it yet.
Problem and solution
Having made plans for what I want, a new problem arose - choosing a store. It's no secret that the market is simply flooded with low-quality products. There are tens of thousands of offers on the well-known eastern Internet site, and choosing really good LED strips becomes simply unrealistic.
But I found a solution for myself, in Moscow, and at an adequate price. It was these guys who did the complex project mentioned in the video. Who are they? The LedRus company - its specialists have extensive experience in the field of lighting systems and will help solve the most complex problems. I hope that they will help me realize my ideas.
p.s. I will be glad to hear suggestions and comments on my “project”!
iPhones.ru
But just recently one could only dream of such solutions. We talked about smart homes. Let's talk about light ones
Yes, not about iPhones - just about what is important to every adult. To make your home bright, stylish and beautiful
How it all started While browsing the Internet to prepare the next article, I came across an interesting headline that...
QIWI: 9161768807
Diode strips
Option for a bathroom with a finished renovation. LED lighting for the mirror does not require complex manipulations.
Required Items
What to buy? What materials may be required? We check the sheet of necessary materials, the presence of the necessary materials will help you figure out how to properly make a backlit mirror with your own hands and not spoil the whole idea:
- Components for connecting electricity;
- LED strip - a simple way to use - a structure attached to strong double-sided tape. Speaking of LEDs, when purchasing it is worth checking about the moisture-resistant coating;
- Silicone based sealant.
Note!
- Do-it-yourself wardrobe: a review of ways and methods on how to build a stylish and original wardrobe (video and 145 photos)
- Do-it-yourself furniture restoration - removing chips and scratches, restoring surfaces. Instructions with photos and video tips
DIY ottoman: how to make it at home. The best ideas, master classes. Photo + video review of beautiful ottomans
Assembling the frame frame
So, let's move on to assembling the structure. First, measure and draw all the dimensions.
Step back 1.5-2cm from each edge of the mirror and draw straight lines with a pencil.
This is where the matte diffuser cover, screwed to the profile, will end. Using these dimensions, form a frame square.
Another U-shaped profile is screwed onto the inside of the frame in its upper part. It makes it easier to install and hang the mirror on the wall.
You can do without it by simply making furniture holes for the dowel heads in the frame itself.
The entire structure is assembled on furniture corners and self-tapping screws.
Pay special attention to the corners.
When making mirrors with floating lighting, it doesn’t matter how they are assembled - with or without a 45-degree cut (90 degrees).
But if you have lighting along the entire perimeter “from the face”, through luminous strips, then the corners already play a significant role.
Firstly, you need to collect them with a cut at 45 degrees. Secondly, cut off the corners themselves - like this.
Mistake #10
Without this cut, the corners in the light stripes on the mirror will be too dark.
Such uneven illumination immediately catches the eye. Even factory products from the store suffer from a similar defect.
When assembling at right angles, you simply will not have LEDs at these points.
Tools
As tools, it is worth preparing a soldering iron and a basic set of tools with a stationery knife, pliers and other tools available in every home kit.
Important: when choosing LEDs, keep in mind that the more powerful the diode, the more electricity it will consume. To understand the power of a meter of LED strip, we multiply approximately 5-6 watts by the total length of the strip.
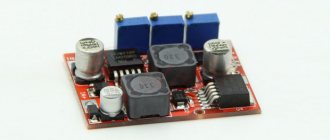
power unit
LED strips require a separate power supply. They are connected to their own power supply, which converts alternating mains voltage 220 V 50 Hz into direct current 12 V. The choice of power supply is made according to the power indicator of the tape.
Here you will have to make some calculation - the power per linear meter (indicated in the technical specifications) should be multiplied by the total length. The power supply is selected with a margin of 15-25%, but not more than 50%, so as not to overload the LEDs. This is dangerous for them and can put them out of action ahead of time.
Which mirror should I use?
There are many mirrors, and their shapes too. Traditionally, the easiest to work with will be a square or rectangular mirror. In this case, the diode strip will need to be attached in straight lines.
If we talk about a round or oval mirror, then it will take a little more time and perseverance to attach the LED strip along a more complex trajectory.
For the corridor
If you need to illuminate a mirror that is placed in the corridor, you don’t need to invent anything special: the best solution is wall sconces. Installation of these lighting devices is carried out according to the standard scheme.
This number of sconces is quite enough to illuminate the mirror in the hallway
As for their location, a completely acceptable option is on the sides or on top. Depends on how much space there is on each side.
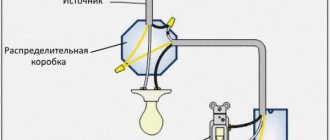
Procedure:
- Turn off the machines on the dashboard.
- Stretch the wires if there are none. Before starting work, check where the phase is and where the zero is.
- Draw conclusions for mounting each lighting fixture.
- Mark their location on the wall.
- Hang the sconce and connect it to de-energized wires.
- Screw in the light bulbs.
- Turn on the machines on the dashboard.
- Check functionality.
- Enjoy using it.
Play of light in mirror surfaces and sconce elements
This is interesting: Popular types of milkweed (video)
Mirror with internal lighting
Another variation of bringing light to the mirror. In this case, the light will be soft and diffuse. The instructions will coincide with the previous version almost completely.
The whole difference is in the location of the LED strip. In this case, we fasten it from the reverse side. The result is the effect of a floating mirror with soft, enveloping light.
Wall mounting methods
Illuminated models, where wood or metal is used to make the frame, have significant weight. Traditional methods such as using special holders, mounting with mounting tape or liquid nails are ineffective and dangerous in this case.
To attach the frame, it is better to use a proven method: fix the dowel-nails in the wall and install special hinges on the frame that will be used for hanging. For massive specimens, it is better to use special plates that have several holes for self-tapping screws.
The owner prefers to leave the dressing room mirror mobile. Most often it is installed on the dressing table. If relocation is necessary, the absence of fastenings makes it easier to move it with all its contents to a new location.
An additional strip, which is attached to the upper part of the frame on the reverse side and is used as a spacer, will help to give stability to the floor mirror. If the family has children or pets, it is better to use wall mounts. In this case, the mirror is installed with a slight inclination: the upper part of the frame rests on the wall, and the fastenings are screwed at a height of 10–20 cm and fixed in the concrete using dowel nails.
Fastening scheme using dowel-nails
Plates and screws for fastening massive mirrors
Tilt Mount
Where else can the technology be applied?
- Bedroom mirror;
- Mirror with lighting for dressing table;
- Luminous mirror wall in the bathroom or dressing room;
- Illumination of individual shelves;
- Light cabinet;
- Creating the effect of a design solution in the corridor.
Choosing to work with your own hands may seem like an unreasonable waste of time. But if you study the market for plumbing fixtures and all related products, you can understand that a high-quality illuminated mirror in a store can be quite expensive, and the size or shape is not entirely suitable for your home and the layout in it.
In this case, creating a mirror with your own hands is an excellent alternative that can help you save money and make the desired item the way it was intended in a specific design project.
Note!
- A simple and beautiful DIY bathroom shelf made of MDF, glass, plasterboard: straight and corner options. Photo instructions, tips, video master class
- How to make a computer desk with your own hands from wood or chipboard. Photo/video master class + description of models
- Do-it-yourself folding table: description of types, calculations and selection of tools and materials. Video master class for beginners
Remember about safety precautions and carry out all manipulations with electricity wisely, everything will work out and the illuminated mirror will delight you for many years!
Design and appearance
Lighting fixtures and the shape of accessories are selected based on the interior features of the room. Mirrors of regular geometric shapes are suitable for modern design, and carved canvases are compatible with the classic style.
External lighting is mounted on a massive frame, the shape and color of which influence the appearance of the room. Transparent lamps are covered with diffuser shades. LED lamps with a matte bulb have an aesthetic appearance, which allows them to be used without special caps.
The built-in lighting is decorated with carved windows in a reflective coating, through which light enters. The reflective layer is carefully cut in the form of drawings, patterns, and ornaments.