Edited by: 05.08.2019
When building telecommunication networks based on twisted pair cables, many different connectors (sockets, jacks) are used. In order not to get confused and find your way when choosing, it doesn’t hurt to have at least the slightest idea about them.
Jack is an indispensable element of any local network, because it is used to connect active electronic devices. That is why they are used in the process of creating a telephone or computer network, as well as a telephone set. The main characteristic of a connector is its type.
Crimping schemes
There are several crimping schemes (2). They are used for various types of connections. If you crimp the cable incorrectly, there may not be a connection. So the main thing here is not to get confused. So, what schemes are there?
Fig.1. Straight Cable Crimping
- Straight cable. Used to connect a computer to a router, TV and other devices of the same type. It is this circuit that is used when crimping a cable to provide access to the Internet.
Fig.2. Crossover crimp
- Cross cable (Crossover). It is used exclusively to connect two or more computers into one network. In this case, the use of routers, hubs and other equipment is not expected. Exclusively PC with another PC. Directly.
If you need to make a cable specifically for connecting to a router and providing access to the Internet, then you need to use exclusively the first option. If you crimp the crossover, there will be no connection.
Which patch cord to choose
Since this article is about connecting a computer to a router, the easiest solution would be to use the patch cord that comes with your router for this purpose. Routers from all manufacturers are equipped with such a cable. But there is one caveat - it is usually very short, most often about half a meter . Rarely is it longer. Therefore, it will suit you if the computer and router are nearby.
But often the router in an apartment is located in the hallway or in the kitchen, and the computer is in one of the rooms. Therefore, a patch cord several meters long may be required. It can be purchased at the store. This is the most convenient option. You can, of course, buy a piece of twisted pair cable and RJ-45 connectors of the required length and make the patch cord yourself. But the price of the components will not be much lower than the cost of the finished cable. And for crimping you will need a special tool, which does not make sense to purchase for one-time use. If you still decide to crimp the twisted pair cable yourself, you can learn how to do it correctly from a separate article on our website.
What is needed for crimping?
In general, it is advisable not to use improvised means, but to crimp the twisted pair cable with a special tool.
This will allow you to achieve the best quality connection. But you don’t always have a crimper at hand. What is needed to perform the crimping operation?
Fig.3. Crimping kit
- Twisted pair network cable of the required length.
- Set of connectors. Minimum – 2 pieces. On one end and the other. But it’s better to have 4 of them. Just in case.
- Insulating cap . Plastic or rubber. Installed at the junction of the cable and the connector and prevents fractures and bends. Not required.
- Crimping tool (crimper) . It is inexpensive and can quickly fix the connectors on the cable without any problems.
- If there is no crimper, then you can use a flat screwdriver . And a knife for stripping contacts.
Incorrect twisted pair crimp
Below are two examples of what this shouldn't look like. In the example on the left, the strands are left too long, which leaves the distance from the connector to the braid unprotected. The cable also loses strength. In the second example, the wires are cut too short, the braid fits into the connector, but the length of the ends does not allow for contact with the connector.
I would like to add to the defects the rare absence of copper “teeth”. Before crimping a twisted pair, be sure to make sure that all eight pins of the connector are present, otherwise you will have to do everything again.
Why it is preferable to use a factory patch cord can be found by clicking on the following link.
Method No. 1. We use a crimper
This option is the simplest and fastest. It involves using a special tool to crimp the cable.
The crimper can replace all other tools. Therefore, many specialists love to use it.
The design of the crimper is such that it can be used to easily perform all cable crimping operations. There are even special blades on the handles for convenient cutting and comfortable removal of insulation.
Fig.4. Crimping with a crimper
- So, first you need to strip the cable insulation. We insert it between the blades on the crimper and slightly squeeze the handles. Turn the tool clockwise. After this, we simply tighten the already cut shell.
- Now we straighten the twisted wires so that they lie flat.
- We trim the veins with a crimper.
- We take the connector and insert each wire into a separate groove in accordance with the direct twisted pair crimp diagram.
- We try to ensure that the connector slightly grips the cable insulation. This will make the connection more reliable.
- If all the wires have been distributed, then insert the connector into the special socket of the crimper.
- Squeeze the handles of the tool until you hear a characteristic click.
- We put on the insulating cap.
- We repeat everything that was done above for the second end of the twisted pair.
That's the whole crimp. Now you can connect the router to the computer’s network card and try to establish an Internet connection.
If everything is done correctly, the connection will appear in a matter of seconds. If something is wrong, you will have to redo the entire cable.
Errors when connecting internet outlets
Before connecting an Internet outlet, be sure to familiarize yourself with the errors typical for this procedure. Their presence is indicated by the absence of a useful signal at the input of the connected device (no Internet connection). Typical errors include the following situations:
When the connector and modem purchased ready-made used one type of connection (“A”, for example), and when installing the socket, the “B” standard was taken as the basis.
After laying in the split contacts, cut off the excess wires only after closing the cover.
You cannot remove the external insulation of a twisted pair cable over a long distance, right up to the walls of the electrical outlet. The length of wires without insulation should be no more than 13mm.
When the first error is detected, you should check the switching standards and, if differences are found, bring them to the same type. In a situation where there is too long a section of the cable left without insulation, you should shorten it and re-make the connection.
And finally, a very unpleasant situation is possible when everything seems to be done correctly - but the outlet still does not work. This case is typical for a defective product that will need to be replaced.
Method No. 2. We use a knife, screwdriver and other available tools
Everything is much more complicated here. Crimping the cable using improvised means will take much more time.
And it’s not a fact that the operation will be successful the first time. Moreover, certain skills in working with the appropriate tools will be required.
To carry out the crimping procedure, you will need a sharp knife, a flat-head screwdriver, a twisted pair of the required length and a set of connectors.
The algorithm of actions is simple, but it will require some skill and extreme caution.
Fig.5. Crimping a twisted pair cable with a screwdriver
- First, remove the cable insulation. To do this, use a punch to carefully cut the rubber tube of the cable. The cut should be minimal, since it is important not to damage the wires. After making the cut, you can pull the insulation off with your fingers.
- We cut off the sharpening veins with some kind of pliers. 20 mm wires will be enough. They fit perfectly into the connector.
- Now you need to take the connector and carefully insert the wires into the grooves in accordance with the straight twisted pair crimp pattern. It is advisable to somehow secure the cable and connector itself, since further actions will require complete immobility of the components.
- Take a flat-head screwdriver and carefully press in the metal contacts on the connector . Care must be taken here, as pressing too hard can damage the contacts. And they won't work.
- We also press in the plastic connector clamp , which should grip the cable insulation.
- We put on the insulating cap.
- We repeat the operation for the second end of the cable.
Basic rules for laying and crimping twisted pair cables.
When stripping cables, the untwisting of twisted pairs should not exceed 12.5 mm, so it is advisable to use special pliers that have knives with limiters. It is also not necessary to remove the insulation from each of the wires.
When laying twisted pair cables, the specified curvature at the bending points must be maintained. Exceeding this may lead to a decrease in noise resistance or to cable destruction.
When laying shielded twisted pair cables, it is necessary to ensure the integrity of the shield along the entire length of the cable. Stretching or bending leads to destruction of the screen, which leads to a decrease in resistance to interference. The drain wire must be connected to the connector shield.
Checking the cable functionality
There are several options for checking the functionality of a newly crimped twisted pair. This must be done before using the cable.
This way you can correct shortcomings even before connecting the cable to the network.
Method No. 1. Using a simple tester (multimeter)
This option is the most acceptable, as it allows you to check the functionality of the cable before connecting it to the network.
It can be used by both professional IT specialists and ordinary users.
All you need is a regular tester (multimeter) used to check the current. It allows you to quickly identify a malfunction and eliminate it.
And using this device is quite simple. No one will have any problems.
- So, first we switch the tester to resistance or sound signal mode. This is done using the mode switch. It may look different. Depending on the tester model. Simply set the switch to the speaker icon.
- Now we “poke” one probe of the tester into any contact on the connector, and the second one into contact with the same color of the core on the other connector.
- If there is a beep, then there is resistance. This means there is also contact.
- Let's move on to another contact.
- We check the rest in the same way.
- If there is no signal somewhere, then we try to press the contact manually and check again.
- If everything is in order, then plug the cable into the network and enjoy a high-speed connection.
Read also: Connection diagram for a contactor via a start-stop button.
This method of checking a twisted pair helps to quickly identify a fault and eliminate it.
Moreover, for the most part the fault lies in insufficient connection of the contact with the cable core. Regular pressure will help.
Method No. 2. Connecting the cable to the network
The simplest and most accessible way to check. It does not involve the use of any specialized tools.
It also does not allow you to determine which part of the twisted pair the problem occurred in.
All that is needed for such a check is a computer with a network card on board, a router (switch, hub, modem, etc.) and the cable itself.
In the future, you may need a multimeter. To pinpoint the location of the problem.
Fig.7. Twisted pair in a router (modem)
- So, we insert one end of the cable into the RJ-45 connector on the user’s computer.
- We insert the second connector into the router.
- Let's start the PC.
- The network card should automatically detect the cable and make the connection.
- If this does not happen, check that the installed drivers are up to date.
- If everything is fine with them, then the problem is definitely in the twisted pair cable.
- We take a tester (multimeter) and look for the specific location of the problem.
- We fix the problem and try to connect again.
This option is good because if no problems arose during the check, then you can immediately start using the Internet.
No need to waste time connecting and setting up. Very convenient for those who do not have free time.
LAN connector RJ45 - what is it and why many people confuse these names
Good day to all! Anyone who has ever come across any network or computer equipment has seen names and designations such as “LAN” connector or RJ45 connector. Immediately questions arise in my head - what is it and why is it needed? In this article I will try to analyze this issue in as much detail and as clear as possible for the average user. It may also be useful for specialists to learn something new from this article.
HELP! If you have any questions or notice an error, please write in the comments immediately.
LAN
Let's start, perhaps, with the abbreviated name LAN, and in its expanded form it sounds like “Local Area Network” - which in translation means: “Local Network”. At this stage, it has already become clearer to many, but just in case, I’ll tell you in more detail.
In particular, LAN can refer to an abstract local network connection. A local network is a network of several devices, computers, laptops, CCTV cameras, servers that are located in one place. A great example is a home local network. If you have a Wi-Fi router (router), then you definitely have a LAN at home.
Let's take a look at the router ports and everything will become clear to you right away. Most often, such devices have at least 1 LAN port for connecting a local device. There are 4 of them in the picture above. And here we can connect a laptop, computer, TV or network printer. They will all be on the same local network.
But there is one more input, which usually stands out from the rest and has the inscription “WAN”. WAN or Wide Area Network is a global network. Usually a cable from the provider is inserted there and the Internet connection comes from this port.
NOTE! Sometimes ports have other designations: “LAN” - “Ethernet”, and “WAN” - “Internet”. The names are similar, but have different purposes.
You can see the general diagram above. The cable from the provider goes to the WAN port. Next, after setting up the Internet and connecting to the router, all connected devices to the local network will have access to the global network. I told you some basic things, but if you want to learn more about LAN and other connections, then feel free to go here.
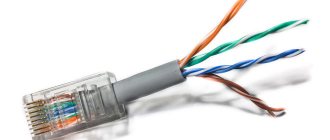
What is RJ45
RJ45 (Registered Jack) is a special physical interface of a certain type that allows you to connect different devices with each other via a special cable - twisted pair. Also called a network connector. For example, to connect a computer and a router. Most likely, you have already seen such a connection at work or at home.
RJ45 is what they call these little plastic things with metal cores, of which there are exactly 8 pieces. Why is this name found on the Internet and among engineers and system administrators? If you google this name, you will immediately see an eight-wire connector. What if I told you that in fact RJ45 does not exist at all.
The fact is that on the Internet, and in particular in Russia and the CIS countries, RJ45 is confused with the 8P8C connector. That is, in fact, it is correct to call it 8P8C, and not RJ45. In particular, RJ 45 or more correctly RJ45S has a completely different look and only 4 cores, and is intended for connecting modems.
As a result, we have 8P8C and RJ45S (8P4C), which are confused with each other. Most likely, they will continue to be confused, since the name has already taken root among IT engineers, system administrators and other specialists who deal with network equipment.
The problem is that in some routers and switches the inputs are called “RJ45”, but as you understand, this is fundamentally wrong. But it is through this interface that network devices are connected. For example, a router and all household computers: computers, laptops, TVs, etc.
Also, to connect such connectors, a special type of cable is used - “Twisted Pair”. It is called that because inside the cable there are 4 more pairs (8 pieces) of wires that are twisted together. This is necessary to protect the transmitted data from electromagnetic influence. I advise you to read a more detailed article about twisted pair here.
Bottom line
I tried to fully address this issue, but you can always contact me through the comments. You can also write your additions or correct my mistakes if you find any. For educational purposes, I would also recommend reading a couple more articles that will open your eyes a little more fully to the world of networks and the Internet:
A little about connecting cables
It wouldn’t hurt to talk a little about the cables themselves. This will make it easier for the user to understand what he is dealing with.
And if he has some non-standard cable at his disposal, he will know everything about it.
Cable categories by protection class
Protection of the data cable is needed in cases where you need to connect a device to a computer that is located at a considerable distance from it.
If you use a protected cable, you can minimize speed losses. According to the protection class, the following types are distinguished.
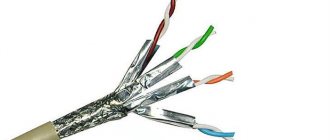
Fig.8. Classic twisted pair (UTP) with stripped insulation
- UTP. The most common type of cable that is used when connecting a router to a PC or two computers on a network. Also called "twisted pair". Does not have any protection (except for the insulating material).
- FTP. A network cable that is equipped with a protective layer of foil. This layer is located immediately after the insulating material. Such a cable is more protected from any magnetic radiation than the notorious “twisted pair”.
- SSTP. A cable that is protected not only by a general foil shield. Each wire is also shielded. It is used in cases where it is necessary to extend the network over considerable distances with minimal speed losses.
- SFTP. The most secure of all cables. There is a foil shield for each pair of cores, copper woven mesh, and an overall foil shield. Used in the most difficult situations. Provides complete speed preservation. But it's also worth a lot.
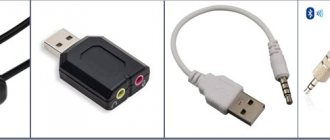
Built-in card replacements
If the built-in card in a laptop suddenly fails, then there is no need to bite your elbows; in the photo below you see an excellent solution to the problem.
USB network card
Or this is a solution, this device will be useful not only for a laptop, but also for a desktop PC.
These devices are called “USB network cards”. Despite the decision of the external design, their essence as a whole does not change. Other examples of devices can be seen below.
USB network card
USB network card
A little about connectors
As strange as it may sound, there are different types of connectors. And not all are suitable for crimping a standard Internet cable.
By the way, there are corresponding connectors for protected (shielded) cables.
Main types of connectors
In order to understand which connector is required to crimp a particular cable, you need to consider the main types of these components.
This is the only way to choose the one that is suitable in a given situation.
Fig. 10. Regular and shielded connectors
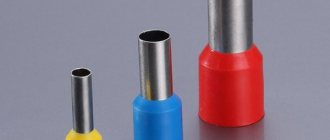
- RJ 11 4 P 4 C . This is the simplest type of connector. It is used in the creation of telephone cable. There are only three contacts on it. Therefore, the crimping scheme is quite primitive. There are only three strands of telephone wire.
- RJ 12 4 P 4 C . A type of telephone connector. It differs from the previous type solely in the number of contacts. There are four of them here. Otherwise everything is the same. Used quite often.
- RJ 45 UTP 5 E. _ Connector for crimping classic twisted pair (UTP). It has 8 contacts and is equipped with a special latch for fixing the cable. Most often used to connect equipment at home.
- RJ 45 FTP 5 E. _ Used exclusively in conjunction with shielded cables. It is distinguished by the presence of a metal casing that protects the data flow from various magnetic radiation.
It is very important to select the appropriate connector for a specific cable type.
If you neglect this rule, then at best you simply will not be able to crimp the cable.
At worst, such a cable will damage your equipment.
The most valuable server cards
There are particularly expensive server network cards. There is even a separate processor for such cards. In operation, such cards performed very well. A large, even very heavy load is common and easy for them. And its own processor also indicates the presence of its own RAM. And it would be more correct to call this device not just a network card, but a network processor.
Network Processor
It’s also nice when such a processor is self-healing. That is, there are drivers here that perform this function. For example, there was a network failure. Then the adapter restarts itself. Then it checks whether the connection to the network is intact. If it is discovered that a port is out of order, it is simply turned off forcibly.
Video: Network card - replacement
Tweet
Share
Plus
Share
Cool
- #LAN card
- #adapter
- #RJ-45
- #connector
Tags:
Related materials:
- Switching from a regular account to a Microsoft account
- Removing the search section from the taskbar in Windows 10
- Reasons why the printer prints in stripes and how to solve this problem
Let's see what a network card is. In general, network cards can be very different. The differences lie in appearance, in what tasks this or that network card can solve. Sometimes you can come across such a name as an Ethernet controller, network adapter or Network Interface Card adapter (NIC). Accessories 4.81 14
coming
Types of cable
There are many different types of cable used to create a network between different computers as well as networking equipment.
The most common types of communication cables today are:
Optic Fiber (fiber optic);
Twisted Pair (twisted pair).
Coaxial was the first to be used to build local networks of various kinds.
It’s quite easy to crimp this kind of Internet cable at home; it doesn’t even require a specialized tool - just a regular utility knife and screwdriver. This is where the benefits end.
This wire consists of three main parts:
insulation (braided with copper or aluminum);
The data transfer speed using this cable is only 10 Mbit. It is extremely susceptible to various kinds of electromagnetic interference; repairing damage to this type of wire is very complex and problematic. Today it is practically not used anywhere.
Optical Fiber is the most modern method for data transmission today.
It consists of the following components:
additional communication wires (some modifications).
Optical fiber is not subject to any type of interference; the data transfer speed with its help is 2 Gbit. The distance between individual nodes that are connected by this type of wire can reach 100 km. There is only one drawback - the rather high cost.
Twisted Pair (twisted pair) - most often used both for building local networks and for connecting to the Internet.
It consists of the following components:
8 copper wires;
Can provide relatively high data transfer rates - from 10 Mbit/s to 1 Gbit/s.
Twisted pair can be:
Twisted pair cables are less susceptible to various types of interference and are easily repaired. Correctly crimping a wire for this type of Internet is quite simple, but a special tool is required - a crimper.
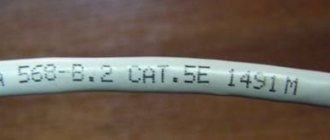
Wire selection and standards
In the last section I mentioned the categories of twisted pair, here we will consider this point in a little more detail. After all, the anatomy and transmission speed on the cord also depend on the category.
I recommended that you take category 5, but category 6 (CAT5, CAT6) is also suitable. All options are shown in the following table:
It will be important to choose a cable for the required speed. And this also depends on the number of wires inside
It usually happens like this:
- 2 pairs (4 wires) – up to 100 Mbps
- 4 pairs (8 wires) – from 100 Mbit/s
Typically, ISP technology limits you to 100 Mbps internet speed. But soon this threshold will be passed. What do I mean - usually there will be exactly 2 pairs on the Internet cable, but on home cables (from the router to the computer) there are already 4 pairs.
4 pairs, or 8 wires
Installation diagrams
The twisted pair installation diagram is the order of the cores by color. Another name is pinout.
The following types of pinouts are most often used today:
Contacts are numbered from left to right with the copper conductors on top and the connector facing the user.
Each type of wiring diagram has its own purpose. First type scheme STRAIGHT-THROUGHT
(also marked as T568) is intended for connecting end equipment (personal PC, printer) with any switching equipment (router, hub).
The crossover scheme is used when there is a need to connect two pieces of network equipment - a router, a computer.
Straight-through
A direct wiring diagram called Straight-through can be implemented in two ways - there are two standards:
The first option is generally accepted, but there are situations in which only the second can be implemented.
Color order when using 568 A:
Color order when using 568 B:
Cross-Over
The Cross-Over scheme is more complex in terms of color marking - their order is somewhat confusing.
There are also two standards, they differ depending on the network bandwidth:
standard – for a 100 Megabit/s network (100 base-TXcrossover);
standard – for a 1 Gbit/s network (1000 base-T/T4).
The standard for a 100 Mbit network has the following color order:
Number
The second type standard - for a network with a transmission speed of 1 Gbit/s - requires wire pinout as follows:
Today, almost all network devices are able to recognize the connection method independently (they have a function called Auto-MDIX). But there is quite a large amount of equipment still in use that cannot do this.
How to crimp an internet cable with your own hands
Pinouting the communication wire with your own hands is quite simple. To do this, you will only need a few items; you can find and purchase them at your nearest computer store. You also need to know the parameters of your network equipment that needs to be connected. Because the crimp type (straight or cross) is selected depending on whether Auto-MDIX is supported.
Tools and accessories
To manually crimp a twisted pair of eight cores, you must have the following tools:
stationery or mounting knife.
Also, in addition to the tool itself, it is advisable to stock up on several connectors, in case the first attempt is unsuccessful.
Work order
The process itself is not complicated, it is only important to follow the procedure:
The top layer of insulation is cut lengthwise to a length of approximately 3 cm - using a stationery or mounting knife. It is important not to damage individual wiring - this may lead to communication problems;
after this, each of the 8 wires must be carefully moved to the side;
all cores are disassembled in order as they should be crimped in the connector;
The connector has special grooves, and each core should be inserted into them in order.
When all of the above operations are completed, it is necessary to perform crimping. This can be done either using special pliers or using a regular slotted screwdriver.
Cable check
Checking a crimped twisted pair is quite simple using a multimeter set to continuity mode. It is necessary to connect the wires by color using contact probes - they should all ring well. If the sound signal is not heard, you should press the connector contacts - they are not tightly pressed to the copper conductors.
You can also check the connection using a special device. It checks the strength of the transmitted signal - accordingly, this device will make it easy to detect poor-quality pinouts.