The electrical panel installed in the garage must be located in any such room. It must be available upon commissioning of the facility. Such a device must meet certain requirements. At the same time, certain GOST standards are observed. It is their requirements that are worth understanding in more detail. In addition, you can easily figure out how to install an electrical panel in the garage with your own hands.
Why is an electrical panel needed and what should be provided for?
Before equipping a room with electricity, you will have to determine why they are installed. There are several types of devices that have different purposes. These include:
- Input-distribution devices. Such models are installed if it is necessary to receive electrical energy from the network or transformer. The equipment is equipped with devices that are responsible for counting consumed electricity and additional protective panels.
- Distribution panel. In terms of functionality, the device resembles the previous model. However, it is more functional, since it contains elements for recording consumed energy and devices for monitoring the performance of the panel.
- Reserve type shield. The device contains special components that, in the event of serious accidents on the line, switch to backup power sources.
- Heating. Used to connect equipment that is responsible for heating and lighting the room.
Organizational matters
First of all, it should be taken into account that the electric grid company makes a connection directly to the power grid only if all requirements for installing a metering panel and completing all necessary documents are met.
Therefore, the first stage is drawing up a project and approving it in the power grid organization. As a rule, an organization has standard designs for connecting to electrical networks and a list of requirements regarding the selection of the rating of protective devices, the type of electric meter, the cross-section of the input wire (cable), the type and design of the housing of the metering and distribution panel, as well as requirements for mounting the panel itself on a support or in the other place. It is possible that, at the request of the supplying organization, it will be necessary to connect the meter to an automated commercial electricity metering system (ASKUE).
Situations often arise when, after purchasing an input cable, installing a switchboard, metering device and the necessary protective devices without prior approval, the energy supply organization refuses to connect to the power grid and you have to correct installation errors or re-purchase a new electric meter, protective devices and other elements.
Therefore, if you already have a ready-made project, then before purchasing the necessary structural elements and proceeding with the installation of the electrical panel, you should agree on the project with the supplying organization.
What is an electrical panel?
An electrical distribution panel is a small panel that is used to install equipment responsible for supplying a room with electricity. Many people consider such devices to be very convenient, since they can install all the necessary switches and electrical mechanisms. This makes it easier to disconnect the garage from electricity, as all you need to do is use a few levers.
When making panels, they use lightweight materials, which simplify their installation in the garage. Most models are equipped with special security doors that are locked with a key. They help prevent accidental contact with equipment inside. Some modern models have doors that close hermetically. This will protect the switchboard from precipitation if it is installed outside the garage.
Main garage lighting
Switchboards are often installed in garages to organize lighting. This is not difficult to do, and therefore every car owner can do this work independently. However, before doing this, it is better to familiarize yourself with the basic recommendations that will help you organize lighting correctly.
There are several features of garage lighting that everyone should become familiar with:
- In order for the lighting system to be of high quality, at least four light sources are installed in the room;
- the lamps are installed in pairs - to the left and to the right of the place where the car will be parked;
- to make the light inside brighter, additionally install light bulbs in the front and back of the garage;
- the distribution panel with electrical equipment is installed in the center of one of the side walls to make it easier to lay the wiring;
- if welding machines or other similar devices are regularly used in the garage, you will have to install shields that can withstand a load of 50 A;
- When working, it is better to use a cable equipped with a copper core, as it is protected from fire and meets all safety requirements.
What should be the correct electrical wiring?
A garage is a personal place necessary for storing a car and carrying out simple or complex repair work, preparing for use of the vehicle. Strangers rarely appear here, but this is not a reason to reduce the requirements for safety, functionality and reliability of electrical wiring. Although most owners easily sacrifice appearance for the sake of more important parameters.
But you can’t do without following simple rules:
Safety precautions involve concealed electrical wiring in the garage. Various cables will have to be laid in the wall cavities - this will help protect the wiring from various negative influences.
If the garage is metal, concrete or wood, this will make it impossible to carry out a hidden version of the electrical wiring. However, you can rely on corrugated pipes, various boxes, metal hoses and other types of similar devices.
Such a device is not difficult to make, but it will require metal rods with a diameter of approximately 15-16 mm. Next, they are fixed vertically along the top; for this, a strip of steel is used based on proper grounding. The resistance level of this device should not exceed 3-4 ohms.
It is usually difficult to get rid of dampness in a garage, which forces it to be classified as a high-risk area. Because of this, it is recommended to use switches, various lighting fixtures, and sockets based on IP44 rating or higher. To visualize how it should look, check out the photo of electrical wiring in any type of garage.
If you plan to set up a full-fledged workshop or its like, it is necessary to provide in advance a three-phase version of the introductory part of the electrical wiring. We recommend using a copper cable with a cross-section of approximately 10 mm2 and a distribution panel with approximately 18 or 20 modules.
Important: A permit will be required to install a three-phase system. You will have to obtain it from the energy service in order to legally use the facility with such equipment.
Charging device
Experienced motorists recommend installing panel models to which you can connect a charger to recharge the car battery. The features of such distribution panels include the following:
- They must be of the power type, since such equipment can work correctly with chargers.
- It is necessary to choose panels that operate with a load of 2 A. This is enough to provide a stable voltage of 220-250 V.
- When installing an electrical panel and distributing wiring throughout the room, you will have to ensure that there is no twisting. Experts advise using terminal blocks that will not only prevent twists in the wiring, but also make contact connections more reliable.
Among the advantages of transformers that can work with chargers are:
- Possibility of using galvanic isolation type. This allows you to divide the network voltage into secondary and primary.
- Increased power output under severe loads. When connecting chargers, the transformer increases the power.
Solving problems with wireless charging
Wireless charging is a convenient feature of a modern smartphone. If your phone stops charging or the charging is very slow, do not rush to change the charger.
Remove the cover
Often wireless chargers have a limited range, and the signal does not penetrate metal, skin or silicone. You can solve the problem of slow charging of your phone or tablet by charging them without cases.
Reconnect your phone to the station
A common reason why a Samsung phone does not charge via wireless charging is loss of signal. Remove the smartphone from the base, wait 5-10 seconds and install it again.
Check standard compatibility
When purchasing a wireless charger, check the phone manual for the types of supported Qi or PMA communication standards. Buy only those that fit the range.
Check standard compatibility
Safety precautions before starting work
Before you begin installing an electrical panel, you need to familiarize yourself with safety precautions, which will significantly reduce the risk of injury from electric shock. When working with the electrical network, adhere to the following rules:
- Mandatory check of the electrical panel for damage and other defects. All electrical appliances are designed to be used with care. Therefore, before use, check the integrity of the insulating elements and the housing. A shield with defects cannot be used, as it can be very dangerous.
- Cleaning the room from water containers. Electrical equipment should not be near liquid, as it conducts current well. Also, do not operate devices with wet hands.
- Read the instructions. Before working with any electrical appliance, you should read its instructions, which describe the main features of its use.
- Do not touch heating radiators and electrical panels at the same time.
- Experts do not advise overloading the electrical panel and connecting many devices to it, as this will lead to network overload and short circuit.
Finishing worries
The electrical panel for the garage was installed according to the instructions with your own hands. Its assembly does not cause any complaints or comments from the supervisory energy service. Internal wiring was done by hand. It is hidden in the walls. The installation of sockets and switches, lamps, inlets in machines and other equipment was carried out flawlessly.
You can rest, but something is bothering you. Concern calls for another inspection of the electrical panel for the garage. Is everything connected there as required by the circuit diagram? How the contacts are sublimated, the grounding is arranged. Before working on the electrical network, you need to make sure once again that the work on assembling the electrical panel for the garage with your own hands with a meter has been done correctly
For garages, electrical panel assemblies are required with a firmly fixed filling. There should be no sparking contacts under voltage. This is one of the important conditions for a reliable device for DIY garages with meters. Guaranteed that there will be no fire due to a short circuit.
Installation
Installing an electrical panel requires certain skills and therefore you need to familiarize yourself in advance with how to install it. This will help you complete the installation work correctly. Equipment installation is carried out in three successive stages:
- Housing fastening. The choice of installation method depends on the type of wiring in the garage. If it is open, you will have to use the hanging method, in which the shield is attached to the wall with screws at a height of 80-90 centimeters. If the wiring is hidden, a special cavity is made in the wall into which the shield is placed.
- Connecting the meter. After installing the panel housing, begin connecting the meter. Most network companies insist that the device be connected directly to the network. This will prevent electricity theft. You can connect the meter yourself or use the services of specialists.
- Installation of machines. They are connected to the panel so that you can independently disconnect individual electrical lines.
Internal wiring
When the electrical box is installed, you can begin the technical processes of installing internal wiring. The work is carried out exactly according to the parameters specified in the pre-prepared diagram. The electrical wire is of the required cross-section. It is allowed to use aluminum or copper wires.
Installation work on internal wiring is performed only with homogeneous wire. The use of copper and aluminum wires will cause corrosion at the connection points. Contact will be lost.
- On solid brick and block walls, a recessed wiring method is used. Using a grinder, grooves of the required depth are cut, wires are laid, and the top is sealed with cement or plaster mortar. The installation operation is easy to do with your own hands.
- Laying on wood is carried out in a different way. The electrical wire is hidden in special plastic boxes, which are attached to wooden planes with self-tapping screws. Sockets and switches use a special design that is easily attached to wooden wall structures.
- Electrical wiring is laid across metal using insulating fastening devices, usually with a cable. But you can also do it with wires if this is not available. Insulators supporting cables are attached to metal structures with special self-tapping screws with rubber dielectrics.
- If garages have combined wall planes, for example, one wall is made of blocks, the rest are made of wood, then the wiring methods recommended for wood or brick are used on dissimilar structures.
Sometimes the owner of a “motorhome” decides to supply energy directly to the machine, located away from the walls. Powering the equipment is allowed by underground cable supply. In this case, it is hidden under the floor in additional insulation: a polyethylene or metal pipe. The work is done with their own hands.
Expert opinion
Viktor Pavlovich Strebizh, lighting and electrical expert
Any questions ask me, I will help!
It is very advisable to install protective devices on each of the inputs that go to powerful household appliances of more than 2.5 kW, and even a hair dryer can have such power. If there is something you don’t understand, write to me!
Selecting equipment for the device
Some experts recommend that before installing the device, familiarize yourself with the list of equipment that can be connected to it. The shield is responsible for the operation of the following equipment:
- Lamps. This is the main source of light, without which it is impossible to work in the garage.
- Ventilation system. Some ventilation systems are equipped with automation that runs on electricity.
- Electrical tools. Motorists often use welding machines and chargers that cannot work without an electrical panel.
- Alarm system. Many people install alarms in garages that protect the vehicle from intruders. In order for alarm systems to work, you will have to connect them to the panels.
- Appliances. Sometimes household electrical appliances are installed in garages, which also require electricity, without which they cannot function.
Connection diagram inside the panel
To correctly connect all the components located inside, you will have to familiarize yourself with the connection diagram. When drawing up a schematic connection plan, you will have to take into account the fact that everything will be connected through protective devices.
Automatic switches are used as protective elements, which will turn off the electricity when the network is overloaded.
Also, when developing the circuit, the type of input machine used is determined. The choice depends on what the main supply network will be. For single-phase voltage, the machine is installed at 220 V, and for three-phase voltage, 380 V. If welding will be frequently used in the garage, it is better to install a three-phase network.
In addition, the schematic plan shows the location of sockets and lighting fixtures. They must connect through a common machine. In regular garages, outlets are connected via 15 A fuses.
Connecting heating elements star - triangle. Areas of application :: Elemag
Different types of tubular electric heaters (TEHs) can be connected to single-phase and three-phase networks. The electric heater can be connected to a three-phase network using one of two main schemes - “star” or “delta”. To distribute the load evenly in each phase, the number of heating elements must be a multiple of three.
For three-phase networks, heaters are used whose operating voltage is rated at 220 and 380 Volts.
Electrical appliances with an operating voltage of 220 Volts are connected according to the “star” circuit, and heaters with a voltage of 380 Volts are connected to the network according to the “star” and “delta” circuits.
Star connections.
For example, let’s imagine a “star” circuit, which is made up of three electric heaters.
The second output (2) of each of the heaters is supplied with the corresponding phase. The first terminals (1) of the heating elements are connected together with the simultaneous formation of a common point, which is called zero or neutral. This type of load connection is a three-wire one.
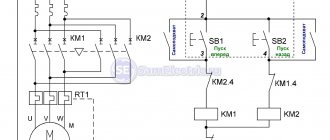
It is advisable to use a three-wire connection at an operating voltage of 380 Volts. Below we propose to consider the installation diagram of a three-wire connection of heating elements into a three-phase electrical network. In this case, the supply and shutdown of voltage occurs thanks to three-pole circuit breakers.
In the presented diagram it can be seen that the terminals located on the right side of the electric heaters are connected to phases A, B and C, and the terminals located on the left are connected at the zero point. Between the terminals on the right and the zero point, the operating voltage is 220 Volts.
In addition to the described circuit, you can also use a four-wire one. When connecting using a four-wire circuit, it is assumed that a three-phase load with a voltage of 220 Volts is connected to the network. In this case, the inclusion of the zero point of the load is connected to the zero point of the power source.
In the diagram presented above, the right terminals of the tubular electric heaters are connected to the corresponding phases, and the left ones are closed at one point, which is connected to the zero bus of the power source. Between the zero point and the terminals of the electric heaters, the voltage will be 220 Volts.
If it is necessary to completely disconnect the load from the mains, automatic switches “3+N” or “3P+N” are used. Such machines turn on and off all available power contacts.
Laws that apply when connecting star-type heaters:
Between each phase and zero, the voltage will always be 220 Volts.
To each branch of the “star” you can connect several heating devices, which will be connected to each other in series or parallel order.
The total power of the connection is calculated from the sum of the powers of the three branches
The power of each individual branch must be the same as that of the other branches.
Delta connection
With a delta connection, the leads of the electric heaters are connected to each other in series order. According to the connection diagram of three tubular electric heaters, the connection is carried out in the following order: the first terminal of the heater No. 1 is connected to the first terminal of the heating element No. 2; the second terminal of device No. 2 is connected to the second terminal of device No. 3; the second terminal of heater No. 1 is connected to the first terminal of device No. 3. As a result of this connection, you should get three arms - “a”, “b”, “c”.
Then the corresponding phase is supplied to each arm: to arm “a” phase A, to arm “b” phase B, and to arm “c” phase C.
Laws that apply when connecting heaters of the “triangle” type:
Between any two phases the voltage is always 380 Volts.
Several tubular heaters can be connected to each branch, which will be connected to each other in series or parallel order.
The power of each branch must have the same values.
The total total power is the sum of the power indicators of all three branches.
The voltage in all diagrams is indicated when connected to a three-phase network with a voltage of 380 Volts.
The Elemag company has extensive experience in the production of heating systems. For any questions regarding the purchase or connection of electric heaters, please contact us by phone or email. Our specialists can advise you on choosing the appropriate connection for heating elements. We use STAR and TRIANGLE connections in the production of dry heating elements and traditional electric metal block heating elements.
Assembly
If a person plans to assemble an electrical panel on his own and install it in the garage, he will have to understand the basic nuances of performing such work. When connecting panel elements, adhere to the following recommendations:
- Connecting the main cable with three cores. It is brought inside the garage from the main line of the pole located nearby. This wire must be reliably protected from precipitation and therefore it is installed inside a steel or metal-plastic pipe. Experts advise carrying it through the back wall of the shield.
- RCD block connections. This component is responsible for protecting equipment from overload and short circuits. For it to work, you will have to connect packets that ensure the operation of lighting fixtures and sockets.
- Installation of connecting blocks. These switching components connect power wires to lighting wiring and outlets, which consume about 12-15A.
Differential machines
Designed to automatically shut off power supply in case of overload to protect against fire. They also allow you to quickly turn off the power supply if it is necessary to modify the electrical wiring. It is customary to divide the premises into groups of consumers, for each of which their own machine is installed. At a minimum, install one circuit breaker for lighting and socket group.
If there are many consumers, and accordingly there are several outlet groups, a separate machine is installed for each of them. The rating of the machine is determined based on the maximum load and wire cross-section.