Landscape design is an integral part of any garden area, especially for those owners of private houses who would like to see their plot decorated and bright. One of the components of landscape design is outdoor lighting. And here the main emphasis is placed on garden paths, artificial ponds, fountains, architectural structures, the porch and facade of the building, completely forgetting how important the illumination of the fence is.
A well-designed lighting system will turn an ordinary fence into stylish decorations and increase the feeling of security, since you will see the entire perimeter of your own yard.
What problems does fence lighting solve?
Fence lighting solves a number of important problems.
- Functional lighting. The equipment illuminates areas of areas that are used at night. Lanterns are often placed at driveway and garage gates, gates, outbuildings, garden paths, etc.
- Object security. Lanterns provide illumination of the area at night, facilitate the correct operation of video cameras and have a psychological effect on intruders.
- Design. In this case, lighting technology performs decorative functions. These include complementing and highlighting various architectural elements, illuminating garden plants, creating contrasts and accents on landscape details.
Photo #1: Lighting on fence posts
Purpose
Illuminating a fence is not just an element of landscape design or decorative design of an estate. In addition to aesthetic functions, it performs important practical tasks. An illuminated fence provides visual information about all events occurring in the perimeter area of the site.
Uniqueness of the landscape Decorative function Comfort in the dark Social signal
In addition, the lighting is a signal for intruders, warning about the presence of people in the house and the impossibility of hidden penetration. An equally important function is safety - you can walk near an illuminated fence without the risk of tripping and getting injured with various consequences.
An important feature of the backlight is the ability to implement any backlight implementation options. All functions of the system will be preserved regardless of the appearance or method of placement of the luminaires. This makes it possible to show your imagination and create an attractive and original lighting design.
Preparatory stage No. 1. Selection of lamps
Various equipment is used to organize street lighting. Let's talk about the most popular options.
Note! The main criterion for choosing devices for street lighting is the class of protection against dust and moisture. It is this that determines the possibility of using lanterns outdoors. Buy lighting equipment with protection classes IP67 and IP68.
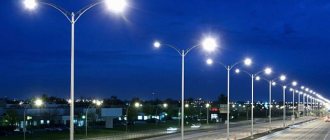
Powerful pole lights
They are most often found and are used to organize functional lighting and for security purposes. Manufacturers produce models of various designs. Lanterns with spherical shades are in greatest demand. They perfectly complement the straight forms of brick and stone supports, harmonizing the space.
Photo No. 2: spherical lamp on a fence post
There is a wide range of such flashlights on the market; you can easily select the models that are most suitable in design, brightness and color of the glow. The equipment does not require serious maintenance. The lamps will only need to be periodically cleaned of dirt and dust.
Fence spotlights
They are compact lanterns that are usually mounted in poles or sections of fences. The equipment has low power. Areas of application for spot models: additional lighting, highlighting architectural forms, texturing and landscape design.
Photo No. 3: spot lighting of the fence
Photo No. 4: spot lighting of the garden path
Spotlights
Floodlights are mounted on fence posts and sections, as well as at their bases. If lighting serves a decorative function, small lanterns usually “look” at the fence.
Photo No. 5: spotlights used for decorative lighting of the fence
If lighting of the area is required, powerful spotlights are installed near the fences or on them so that the rays of light capture the area adjacent to the house as much as possible.
Photo No. 6: combined fence lighting (spherical lights + ground spotlights)
Wall lanterns
They are usually installed on posts or sections of fences. Used if you need to illuminate the area on only one side of the fence.
Photo No. 7: wall lanterns on the fence
Ground powerful lights
Such devices are used to illuminate large areas and, as a rule, are installed near fence posts.
Image #1: Ground Lantern for Fence Lighting
Note! You can buy forged lanterns of this type from us. 5 interesting models are available for order.
Ground decorative lamps and bollards
They are installed for additional decorative lighting of fences, garden paths, plants, etc. Brightness is medium.
Photo No. 8: decorative lighting of the fence with ground lamps
Selection of luminaires depending on the operating principle
To organize lighting for the fences of country houses, three types of lamps are used.
Table No. 1: types of lanterns for lighting fences, advantages and disadvantages of equipment
| Types of lamps | Advantages | Flaws |
| Autonomous | Easy to install. Low cost of installation work | The need to frequently buy new batteries and replace them. Low power. Designed for decorative lighting only |
| Solar powered | Easy to install. Low cost of installation work. At night, the lighting equipment turns on automatically | Low lighting power. Designed for decorative lighting only |
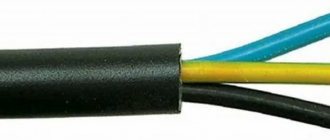
| Powered from a household network | High brightness lighting. Possibility to turn on at any time. Possibility of building automation systems. Ease of use | The need to purchase connecting cables and means to protect them. Difficult to install. Increased energy costs |
If you need good lighting of the area, only the third type of lighting equipment is suitable.
Choosing lamps for lanterns
Lanterns designed to illuminate fences are equipped with lamps of various types. We will sort them by cost and tell you about the advantages and disadvantages.
- Incandescent lamps.
They are as cheap as possible, but they fail faster than all analogues. Service life is about 1000 hours. Organizing lighting for the fence of a country house with the installation of incandescent lamps does not require the installation of additional equipment. Image #2: Incandescent lamp - Halogen. They cost 2–3 times more than incandescent lamps, but they shine much brighter and last twice as long (2000 hours). Installation does not require installation of additional equipment.
Image #3: Spotlight with halogen lamp - Metal halide. They cost even more, have excellent light and last an average of 18 months. The use of metal halide lamps requires the installation of a ballast.
Image #4: Metal halide lampNote! Flashlights with metal halide lamps become very hot. It is not recommended to place equipment near trees and plants. Stems and leaves will become deformed.
- Luminescent. The brightness is the same as the two previous analogues. Average service life is 2 years. The use of fluorescent lamps also requires the installation of a ballast.
Image #5: Fluorescent lampsNote! Fluorescent lamps will not work at air temperatures below +5 °C.
- LED bulbs. They are more expensive than analogues, but are best suited for organizing street lighting of fences. They shine brightly, consume little power and last more than 50,000 hours. This more than compensates for the high cost.
Photo No. 9: LED wall lampNote! Organization of lighting of fences using lamps with LED lamps requires the installation of transformers.
So, you have chosen the most suitable lighting equipment. Go ahead.
The light changes color
Depending on the time of day, the color of plants or objects changes greatly. The same color will look different in the morning, at dusk and in the light of lanterns.
A bright and rich red color in the daytime, with the arrival of evening, it “dissolves” into the darkness earlier than other colors. White, on the contrary, acquires a bright shine.
Properly selected lighting fixtures place new accents in the composition of the area and create a special atmosphere that is different from the daytime one.
For uniform landscape lighting in large spaces, lanterns and overhead luminaires are often used, which are attached to the walls of the house, fence or vertical supports.
Preparatory stage No. 2. Project development, measurements and calculations
- Make a drawing. This is how fence lighting is usually done.
Image No. 6: general principle of organizing fence lighting - When designing your layout, carefully consider where fixtures and accessories will be placed.
- Take measurements. Transfer the obtained data to the diagram.
- Do the calculations. Calculate how many lamps, cables and materials will be needed to protect them.
When developing a diagram, take into account a number of important features of underground cable routing.
- The minimum depth for laying connecting lines is 70 mm.
- Cables should be located at a distance of 1.5 m from large trees and at a distance of 0.75 m from bushes.
Image No. 7: Requirements for underground cable laying - It is necessary to retreat at least 0.6 m from the foundation of the fence. In this case, the likelihood of damage to connecting lines placed in the ground due to ground movements will be reduced to a minimum level.
- Avoid crossing other cables whenever possible. If this cannot be done, learn the following: one of the lines must be at least 0.15 m higher or lower than the other.
Do you need automation?
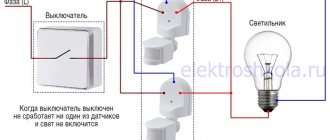
Automatic control of street lighting is increasingly used in private homes and summer cottages. This is not only convenient, but also allows you to significantly save energy. With manual control, as a rule, in the evening you turn on the light on the street, and when you wake up, turn it off. At the same time, all night long the lanterns are used only to scare away ill-wishers from the dacha.
Today, motion sensors and automatic photo relays - light sensors - are popular. These devices allow you to turn on the light when there is movement within the range of the sensor, as well as when it gets dark. In simple words, if no one enters the yard, the sensor will not work. When motion is detected, the lights throughout the area will turn on. This way you can control the safety of your site and at the same time save electricity. The light sensor turns on when it gets dark. Again, it’s very convenient, because if you leave a private house, the light will automatically turn on and off
Preparatory stage No. 3. Purchase of equipment, necessary tools and materials
Order lamps, cables, electrical tape, corrugated boxes at any specialized store. Here are the average prices:
- PVS cable (double insulation) - 27 rub./meter;
- electrical tape - about 80 rubles. for a 25-meter skein;
- corrugated pipes - 25 rub./meter.
Also make sure you have the necessary tools. To organize fence lighting you will need:
- screwdriver;
- good tester;
- drill;
- pliers or wire cutters;
- knife.
Note! For laying cables you will also need sifted sand.
How to make fence perimeter lighting with your own hands
To make fence lighting with your own hands, proceed according to the following scheme.
Stage 1. Marking and digging a trench
Make markings from the distribution panel to the fence, near the fence and on its posts. Dig trenches (20–30 cm wide) to the depth indicated above. If there are other cables in the ground, be careful.
Remove all foreign objects (tree roots, sticks, branches, stones, stele, etc.) from the trenches, pour clean sand into them (layer thickness - 10 cm) and lightly compact the surface.
Note! The bottom of the trench should be relatively flat, without sudden changes! If they are present, the cables may be damaged during soil shrinkage.
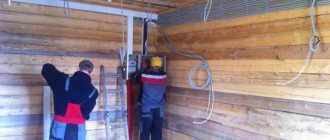
Stage 2. Electrical wiring for outdoor lighting. Laying cables in trenches
Place the cable in the corrugated box and begin installation.
Note! The cable should lie in waves. Do not allow tension under any circumstances.
Image No. 8: Correct laying of the cable in the trench
After cutting and laying all the cables, proceed to backfilling the trenches. When working in each of them, proceed as follows:
- Be sure to inspect the cable and check for damage using a tester.
- If everything is in order, fill the trench with sifted sand (layer thickness - 10 cm).
- Lightly compact the surface (you can just use your feet).
- Fill the trench with a 20-centimeter layer of earth dug out when digging it.
- Place special warning tape or plastic film. This way you will avoid problems due to cable damage when performing excavation work on the site.
Photo No. 10: warning tape - Fill the trench completely. You don’t have to compact the soil - the soil will settle on its own.
Stage 3. Connecting street lighting to the installed utility network
Install lights. When connecting each lamp:
- strip the ends of the cables;
- twist the phase wires with the central contacts of the lamp;
- insulate connections with electrical tape;
- make sure the insulation is tight;
- check the zero-phase resistance and grounding using a tester.
After completing this work, the laid cable can be connected to the switches and the main electrical network of the country house.
Stage 4. Installation of an automatic outdoor lighting control system
Installing an automatic fence lighting control system involves installing a photocell that closes and opens the circuit. After connecting and setting it up, the lighting equipment will begin to work automatically.
Note! Photocells do not distinguish natural light from artificial light. Install the sensor in a place where it will only receive daylight.
You should know it
On the Internet you can find various instructions on how to make outdoor lighting.
The most important thing is that in the end everything turns out harmonious and in the daytime all the lighting fixtures do not contrast with the exterior concept. That is why before you start working, you need to draw up a diagram.
Today there is a huge selection of street lighting products on offer, and often buyers’ eyes literally run wild.
Be sure to draw up a plan diagram of the location of all lighting items. At the same time, you need to think about how the power cable will be laid.
After this, proceed to drawing up an electrical connection diagram. If you doubt your own abilities, it is better to trust the specialists. This is the only way to be completely sure of safety.
Experts in their field do not recommend illuminating the house from the fence. This will create a blinding effect.
Therefore, when preparing a diagram, it is important to take into account all the nuances, even minor ones at first glance.
Results of the work and useful tips
If you do everything correctly, your fence lighting will work reliably for many years. You will only have to periodically clean the lamps and change the bulbs in them.
Please note the following important points.
- If you are just planning to order a turnkey fence for a country house, think about organizing lighting before installing the fence. In this case, you can integrate lighting equipment into fence posts and sections the way you want and hide the cable routes as much as possible.
- Organizing fence lighting is a very labor-intensive and complex job. If you are afraid that you will not be able to cope, use the services of professionals. This way you will receive a guarantee for the installed structure.
Power type
When arranging outdoor lighting, preference should always be given to lamps with an autonomous power source. Pay special attention to solar-powered lanterns. They have their drawbacks: for example, the light emitted will not be very bright. On the other hand, it is enough to install a high-quality light source once, and then enjoy its functionality for many years. The installation process is as simple as possible, and the product can be replaced with a new one at any convenient time.
Note! If you want to worry less about servicing devices, then immediately choose products from a reliable manufacturer.
As for devices connected to a 220 V electrical network, their installation is more labor-intensive and financially expensive. In addition to the fixtures, you will have to purchase a step-down transformer since outdoor lighting fixtures typically operate on 12, 24, or 36 VDC sources.
Safety precautions when carrying out electrical installation work
When carrying out electrical installation work, strictly follow the following safety regulations.
- It is strictly forbidden to work with connecting cables and live devices.
- Take care to protect the electrical network from unauthorized switching on.
- Wear protective gloves and rubberized shoes.
- Tool handles must be insulated.
- Constantly check cables and devices with a tester.
Following these simple rules will help you avoid electric shock.