Modern construction involves the use of various protection systems, which are implemented in private and multi-storey buildings. The presence of grounding is becoming the norm, since it allows not only to save on equipment repairs, but also to protect residents from electric shock. Another important system that should be present even in a multi-storey building is lightning protection? How can it be implemented? This will be discussed in the article.
Is protection really necessary?
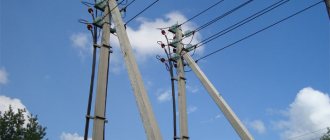
It is quite difficult to call lightning flashes something unusual, since every person in his life is constantly faced with their impact. The experience begins when it hits a specific building or causes certain damage. Multi-storey buildings are magnets and lightning rods for lightning, because due to their high altitude they serve as easy targets for lightning strikes. If this happens, then the discharge will not necessarily go into the power supply network at home. Due to overheating of certain elements, a fire may occur, which will cause maximum damage.
If we compare the cost of constructing a lightning rod for a multi-story building with the benefits that a lightning rod can bring, then the costs can be considered negligible. With the right approach, a lightning rod can be made with your own hands from available materials. At the same time, the need for such a protection system in the form of a lightning rod is simply ignored. This is due to the misunderstanding by many of the nature of lightning and the possible consequences of its strike. It may be a misconception that if the roof is made of metal, then you don’t have to think about a lightning rod. In fact, this is just a misconception. When struck by lightning, it may be dispersed over the roof area, but it heats it to high temperatures, which leads to fires. This is due to the fact that under the sheets of metal there are wooden rafters that flare up like matches.
Note! Indeed, there are cases when installing a lightning rod on a multi-story building may not be necessary. This condition is the presence of another multi-storey building nearby, the height of which is 10 meters higher. In this case, residents of a tall building should think about installing a lightning rod.
Lightning protection of residential buildings and its purpose
Surely, everyone has several sad stories about how negligence in lightning protection cost people lost property, and some even their lives. These examples clearly demonstrate how dangerous messing with nature can be.
Thus, lightning protection is needed first of all:
- To protect people, as well as electrical equipment and other property;
- To normalize the electromagnetic background;
- To prevent the possibility of ignition of various materials.
In other words, the main task of this system is to prevent lightning from reaching the surface of the roof and its other elements.
Classification of objects
Experts in their field have compiled a classification of objects into categories. The latter indicate how much a particular object needs a lightning rod. The first category, due to the need for lightning rods, includes a certain part of industrial facilities whose operation is associated with explosive substances. The second category of objects where it is necessary to install lightning rods are warehouses where ammonia refrigerators are installed, fuel is stored or feed is produced. The third group includes buildings that are used on a daily basis. They include hospitals, schools, kindergartens, pipes from factories and boiler houses, and houses whose height exceeds 30 meters. It is believed that other objects are safe and do not need a lightning rod, but from time to time they are also affected by lightning.
Exercise:
It is necessary to make calculations and make a design for grounding and lightning protection for the facility. Object: one section of a residential apartment building. Soil: sandy loam. Soil resistivity: 150 Ohm∙m. As a grounding device, use an artificial grounding device with a resistance of no more than 10 Ohms. All metal elements protruding above the roof of the building (ventilation shafts, metal stairs, etc.) must be attached to the metal structures of the building
Download a drawing of a residential apartment building (all sections of the house) in PDF format. Download a drawing of a residential apartment building (all sections of the house) in DWG (AutoCAD) format.
System design
A lightning rod in a multi-storey building can be implemented in two stages or divided into two parts. It can be external and internal. Each bears a certain load from lightning to ensure the safety of residents. The external design of the lightning rod is similar to that used in private houses. The element that receives a lightning strike first is the lightning rod. Often it consists of a mast of a certain height that is installed on the roof. This is followed by conductors or a down conductor. Its task is to quickly transmit a lightning discharge to the circuit. Grounding produces rapid dissipation of the resulting lightning discharge into the ground near the building. Although the design seems simple, a more effective method has not been invented.
The inside of the lightning rod requires a professional approach. It includes a number of different modules that are designed to prevent lightning from reaching the wiring, which could paralyze and harm the entire house. Individual elements are installed in each apartment, which increases efficiency. You can make the calculations required to install the external part of the lightning rod yourself, but a number of programs have been developed to automate the process.
Potential equalization of metal structures
The ball screw, the potential equalization bus, is entrusted with the task of connecting conductors coming from metal products and other elements into a single system that ensures grounding of the object.
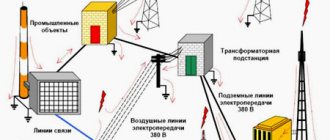
Lightning protection of agricultural buildings, industrial enterprises and residential buildings with grounding functions as follows: a lightning discharge is caught by a lightning rod, redirected through pantographs into the ground, bypassing the protected house, and then neutralized.
Installation process
Once all the necessary data has been received, you can purchase all the parts for the lightning rod and begin its construction. It is necessary to carefully inspect the roof and select the highest point on it. If we are talking about a flat roof, then it can be the roof of a house that is designed to go onto the roof. The lightning rod is fixed at this point. Its role can be an ordinary metal pin or a piece of copper fittings. The cross section is displayed using the calculator. The height of the mast must be sufficient to prevent lightning from striking other roof elements. If necessary, the lightning rod mast is fixed with guy wires to prevent it from being blown away by wind and lightning.
Advice! There must be a dielectric gasket between the roof and the mast rod, which will prevent the lightning discharge from going further.
Not a metal pipe, but a wooden beam can be used as a mast. It is on this that the lightning rod must be secured. The latter is connected to the intermediate link of the lightning rod, which should consist of large-diameter copper wire. The lightning rod cable must be routed to the ground via the shortest route. In this case, an excellent solution would be to use a rainwater collection system as a box. in this case, you won’t have to worry about the cable being torn off by the wind.
Near the house, at the point where the cable will be lowered, it is necessary to dig a pit. Its depth should be no more than 80 cm. Moreover, its location is selected four or three meters from the house. It is better to choose a place where people rarely walk and cars are not parked. After this, metal pins in the form of triangle vertices are driven into the ground. They must be connected to each other by means of a metal strip or corner, which are welded on top. The length of the rod must be at least two meters, and the distance between them is calculated on a calculator. The thickness of the lightning rod fittings must be at least 12 mm. The wire coming from the lightning rod is connected to ground. Next, the pit can be buried. A video of the lightning rod installation process is below.
How to properly install a lightning rod on a building
Having analyzed the principle of operation of a lightning rod, it would be wrong to ignore the method of its construction. In the second part of the article, we will tell you how to install high-quality protection for your home yourself to protect yourself from lightning strikes.
LIGHTNING RODS. Figure 1) Platinum lightning rod tip. 2) Wire cable clamped with a lug. 3) Wire cable with ferrule. 4) Connection of the upper part of rod a, which is shortened and broken off in the drawing to save space. 5, 6) Bundles of rods. 7, 8, 9 and 10) Fastening the base of the rod to the wooden parts of the roof. 11 and 12) Couplings for connecting conductors. 13) Fastening the base of the rod with a conductor that bends down. 14) The end of the underground conductor, lowered into the water of the well. 15, 16, 17) Underground parts of the conductor. 18) Anchor and basket with coal - underground end of the conductor. 19) Protection of the powder magazine, Melsan system. 20) The same - according to the French system. 21) High building defense
There are many options for making a lightning rod, from the simplest homemade options to professional systems from renowned manufacturers. We strongly recommend using factory-made solutions, as they are guaranteed to work (if installed correctly) and, importantly, look much more attractive from an aesthetic point of view.
As an example, we will look at how lightning protection from Belarusian is installed. This system includes a wide range of accessories and components that allow installation on buildings of various shapes and complexity. The basis of the system is the lightning rod, which, depending on the dimensions, can be an air-termination mast or an air-termination rod. In total there are more than 20 types of elements.
Lightning protection "TerraZinc"
The kit will include a base, tripods and down conductor holders. The company presents 30 types of down conductors, which allows you to choose the best option for any building facade. The system also includes 15 types of connectors and down conductor clamps.
Triangular holder
Interesting to know! An 8-mm galvanized rod is most often used as a down conductor for private houses.
The TerraZinc system is also good because you do not need special tools for installation. Installation is carried out in a very short time, despite the fact that it can be carried out on buildings in use. The components are small in size, making them invisible against the background of the building.
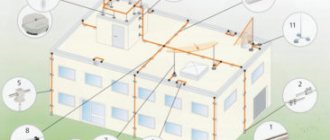
Location of lightning protection elements
Table. How is such lightning protection installed?
| Steps, photo | Description of work |
| Step 1. Installing holders under the down conductor | The work begins with the installation of adjustable holders with a metal rod on the roof ridge. They are fixed very simply by tightening the fixing screw. |
| Step 2. Installation of the remaining holders | Our current conductor will run along the entire roof, so the holders are installed along the entire ridge in 1 m increments. |
| Step 3. Laying the conductor | We fix the current conductor with a diameter of 8 mm in the holders using a plastic latch on the top of the holder. A comment. Some holders have a different way of fastening the conductor, so be sure to read the included instructions before installation. |
| Step 4. End bend of the conductor | To increase the lightning protection coverage area, it is recommended to bend the free end of the conductor protruding beyond the edge of the ridge upward at an angle of 45 degrees. We do this from both sides. |
| Step 5. Installation of the down conductor holder | At the next stage, you need to attach the holder to the down conductor. It is mounted under tiles or other roofing materials, so at the installation site you will have to do a little dismantling to get to the wooden rafter system and sheathing. The holder is fixed using self-tapping screws, after which the roof elements are returned to their place. The resulting hole is additionally sealed to prevent water from getting inside during rain. |
| Step 6. Installing holders on the slope | Next, the holders are attached in the same way directly along the roof to the very bottom. The installation step is also 1 m. |
| Step 7. Further wiring of the current conductor | A current conductor is installed in holders 42202 running along the roof. Fixing the element is similar to what was done previously with ridge holders. |
| Step 8: Conductor Connection | The conductors connected from the sides must be connected to the central one. This is done using clamps No. 51515 when tightening the bolts. |
| Step 9. Installation of the holder under the lightning rod | Next, the process of installing the lightning rod begins. First of all, we install the holder. The easiest way is to attach it to a vertical surface, for example, the wall of a chimney. 1. To do this, holes are drilled in it into which plastic dowels are inserted. 2. The brackets are screwed into them until they are securely fixed. 3. A rod (lightning rod) is placed, which is fixed with brackets screwed to the bracket with bolted connections. |
| Step 10. Connecting the lightning rod to the current conductor | At the lower end of the rod there is a thread onto which the rod clamp No. 55422 is screwed. The height of this element should be adjusted so that it is at the same level as the ridge conductor. Next, the connection occurs according to the principle already discussed. |
| Step 11. Installation of facade holders | Plastic holders are installed along the facade, from bottom to top. Their installation is similar to how we previously attached the lightning rod holder. The installation step is also 1 m. |
| Step 12. Attaching the conductor to the vertical | Next, we connect the current conductor to the wall holders. In this case, the roof overhang must be bent around so that there is no contact anywhere with the roof and other elements, especially metal ones. If during installation it is necessary to bypass the cottage drainage system, then use drainage holders. In this case, the current conductor can be passed through the drainpipe using special fasteners. |
| Step 13: Installing the Control Clamp | The conductor must end at a height of 70 cm from the ground. A control clamp is attached to its end |
| Step 14. Digging a trench | Next, you need to dig a trench along which metal grounding bars will be laid. The length of the trench is 1 m and the depth is 50 cm. |
| Step 15. Install the strip holder | We install a strip holder under the control clamp. |
| Step 16: Install the Ground Strip | Then we attach the grounding strip. It plunges into a trench with a bend and runs along its bottom. |
| Step 17. Installation of the control and measuring well | We install a control and measuring well on the edge of the trench. |
| Step 18. Assembling the pins for the ground electrode | We assemble a set of pins for the grounding conductor. Everything is simple here - a transition coupling is screwed onto the thread, through which the elements are easily connected to each other. Attention! The number of pins, and, accordingly, the depth of their immersion in the soil, are calculated when drawing up the project. |
| Step 19: Preparing the Tool | As they grow, the pins are driven into the ground. To do this, you will need a special attachment for the hammer drill and a counter impact screw, which is screwed into the coupling, after which it is removed and the next pin element takes its place. |
| Step 20: Install the Pin | We hammer the pin with a hammer drill to the calculated depth. When connecting its parts, be sure to use an anti-corrosion conductive lubricant. We also use anti-corrosion tape, which is wrapped around all connections located underground. |
| Step 21. Connecting the pin and ground strip | Next, we install a rod clamp on the end of the pin, after which we connect it to the grounding strip. In this case, the clamp unfolds perpendicularly, as shown in the picture. |
Types of roof lightning protection arrangement
Prices for down conductor holders
Holders for down conductor
This is where the work ends. All you have to do is fill the trench and camouflage everything beautifully. If the installation is done correctly, the system forms a zone around the house, and if it hits, lightning will go into the ground.
Active protection
This is a relatively new concept that is just beginning to be introduced. This lightning rod is more effective than the one described above. A conventional lightning rod is built on the principle that lightning will strike the highest object in a specific area. The task of an active lightning rod is to attract lightning. It sounds a little absurd, but this avoids problems with lightning strikes at other points in the structure. The operating principle of the design is that a high-power discharge is forcibly applied to the receiver, which should attract lightning. In this case, the lightning rod does not need to be connected to electricity; there will be sufficient static electricity in the air.
This is normal, because during a thunderstorm the electric field of the air increases. This process activates the lightning rod, which begins to release this high-voltage pulse, attracting lightning. The basis of the system is a smart electronic unit, which will cost a pretty penny. It is not recommended to install such a lightning rod design yourself, as it can turn into a disaster, so it is better to invite specialists.
Summary
As you can see, the importance of a lightning rod is difficult to leave to the personal discretion of the user, since people’s lives depend on it. A simple lightning rod circuit for lightning protection can be assembled from improvised means without spending a penny on it. To build a lightning rod, you need to choose the right time and weather conditions. It is better to install lightning rods on a clear day before lunch. Work on installing a lightning rod must be carried out in weather without wind. In addition, each of those involved in the installation of a lightning rod must have a safety belt and not be afraid of working at height. The lightning rod must be maintained in good condition to be ready to receive a lightning strike.