Today there are over 10 types of sockets and plugs in the world. That is why, when going on vacation, it is very important to find out in advance what sockets are used in the country you have chosen. Otherwise, you may find yourself in a situation where you simply cannot connect a laptop or mobile phone charger in your hotel room. In the best case, you will have to go and buy a “local” charger or adapter, but if your vacation destination is resort islands, like in the Maldives, then solving the problem will be much more difficult. In this article, we decided to tell readers of the Sam Electric website what types of sockets there are in different countries of the world and why there is not one single standard, which would seem to be a logical solution.
Differences between Euro sockets and ordinary ones
- A ground wire has been added to the housing terminals of European sockets;
- In European sockets, the holes are 0.8 mm wider;
- Euro sockets can withstand loads up to 32A, Soviet ones only up to 10A;
- European sockets have copper terminals on the sides of the holes. Thanks to this, people are protected from electric shock if the device malfunctions. You can see these terminals in this photo of a Euro socket;
Types of Euro sockets
There are many types of Euro sockets that have individual features suitable for various conditions:
- No ground contact. Not much different from the Soviet socket, it is the most primitive version;
- Having a grounding contact. This type of socket can be easily identified by its metal contacts. The presence of grounding increases the safety of using such devices;
- With protective curtains. Sockets of this type have special curtains that will not allow you to insert something inappropriate into the socket. If you try to insert a screwdriver into only one of the holes, the contacts will remain closed with curtains and no current will flow;
- Has an auto shut-off function. The most expensive, as they have special sensors that turn off the current when electricity comes into contact with a person;
- With built-in timer. Such sockets can be set to turn on at a certain time;
- With LED. Everything is simple here, these sockets are equipped with a special indicator that turns on the LED if there is current in the power supply.
There are several other types of Euro sockets, but these options are the most popular. It is also important to remember that the size of the Euro socket will depend on the model you choose.
World standards for sockets
There are the following types of sockets and plugs in the world (we list them with names): A, B, C, D, E, F, G, H, I, J, K, L, M, N, O. Total 14, but there are There are also other classifications, we have listed the most popular and well-known types. Let's look at where they are used and what they look like.
We immediately present to your attention the so-called rosette map of the world:
Type A and B (North and Central America, Canada, Japan). They differ only in the presence of an additional grounding contact - the third connector in the socket and the third pin in the plug (for type B). Therefore, plug A can be connected to socket B, but vice versa will not work, although there is information on the Internet that some craftsmen simply bite off the third contact (grounding) and then you can connect plug B to socket A. But this is not necessary. One more thing: in the Japanese “version” of sockets and switches, the pins and connectors are the same, but in the American version one pin is larger than the other. Therefore, Japanese plugs can be connected to American sockets, but vice versa will not work.
The most famous countries in the world where A/B type sockets and plugs are used: Mexico, Bahamas, Brazil, Dominican Republic, Colombia, Korea, Cuba, Peru, Saudi Arabia, Taiwan, Philippines, Japan. Please note that other standards are also popular in some of these countries.
Important! Only type A and B sockets are powered by 100-127 Volts; all other types, with the exception of N, are powered by 220-240 Volts. Class N operates from 100-240 Volts.
C sockets were previously used in almost all European countries, as well as in the countries of the former USSR, including Russia. The only exceptions are Great Britain, Ireland, Cyprus and Malta. This is an outdated option, which today is practically no longer popular (except that cheap Chinese devices can be supplied with such plugs).
Type D is used in former British colonies: India (including Goa), Nepal, Namibia and Sri Lanka. It is important to note that the Type D is an outdated example of the British Type G plug, which is now used in modern electrical appliances. Therefore, you can only find type D sockets and plugs in outdated housing stock.
The next type, E , are French sockets and plugs. They are more familiar to us, with the exception of the pin in the socket located above the two standard connectors. This is grounding; accordingly, there is a special recess in the plug for a grounding contact. You can find this type of electrical outlets in France, Slovakia, Belgium and Tunisia. In addition, type E sockets are found in such famous countries of the world as Cameroon, the Canary Islands, Madagascar, Morocco, Poland, Syria and the Czech Republic.
F sockets are widely used in Russia, Belarus, Ukraine and European countries. This is a German standard that has gained the greatest popularity among the domestic audience. The reason is the ability to withstand currents up to 16A and convenient design. The German standard can be found in such tourist countries as Austria, Bulgaria, Hungary, of course Germany, Greece, Georgia, Denmark, Spain, Iceland, Italy, Indonesia, Monaco, the Netherlands, Portugal, Turkey, Croatia, Montenegro, etc. So If you're in Bali, don't worry about mismatched plugs and sockets.
Type G - British sockets and plugs. In addition to the UK, they are widely used in Ireland, Malaysia, Singapore, Hong Kong, the Dominican Republic, Vietnam, and Cyprus. It is important to note that this standard is almost the only one used in the United Arab Emirates (UAE). Class G electrical plugs not only have a specific appearance, but are also designed to have a fuse, which is very unusual. So if you are, for example, in England, take into account the last feature.
Type H is quite rare and is used only in Israel; the photo shows what it looks like:
I sockets and plugs are a little similar to the previous ones (H), but the connectors and pins are at a different angle. They can be found in China, Australia, Argentina and New Zealand.
J sockets , which are found in Switzerland and Liechtenstein, and even then quite rarely. It is important to note that type C plugs can connect to J sockets, but the reverse connection is not possible due to the presence of a third pin.
Many people have seen “smiling rosettes” that resemble a smiley face, and for some they even look like a scream. Such cute devices are used in Madagascar, Greenland, and Denmark, and they are given the letter K. Soviet style plugs (type C) can be plugged into these joyful sockets.
Sockets with connectors in a row are type L. They can be found in Italy, North Africa, as well as Uruguay and Chile. Thin-prong Type C plugs can fit into such outlets.
M type sockets and plugs . They are often found in countries such as Swaziland and Lesotho, as well as South Africa.
Also, type J sockets, which we have already talked about, and N . There is a slight difference in the distance from the central connector to the other two, however, the devices are not compatible with each other. Applies to Class N in Brazil, compatible with Class C plugs.
Well, the last type of sockets that will be discussed within this article is O. You can find them in Thailand, the connectors are compatible with C plugs.
Scenarios for installing a Euro socket with grounding
- If there are free grounding clamps, then a busbar made of copper wire is installed to the shield;
- “Grounding” is carried out by connecting the grounding contact of the socket to the neutral cable. This method is the best because it leaves the possibility of installing a residual current device;
- Open to the junction box (if there is one);
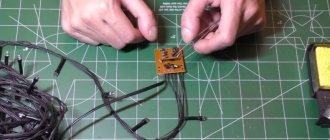
Repair of crimped plugs
Solid pins
Modern plugs do not provide constant contact with the sockets of older sockets because they do not have coil springs.
All plugs are collapsible except solid molded plugs
- made of rubber and plastic.
Mechanical bending forces lead to the fact that inside the rubber or plastic monolith of such a plug, one of the pins loses contact with the core
.
- The fork body monolith
is then cut through approximately at the location of the defect. - The end of the core and the pin are soldered.
- Then the cut of the body is wrapped with insulating tape.
We must remember that such a fork
should be removed and inserted into sockets as rarely as possible and
replaced
as soon as possible.
Solid bodies
, as a rule, have
split pins
wrapped in special nuts. These special nuts are molded into a plastic housing. Each pin is equipped with a nut that is screwed onto the threaded part.
design with split hollow pins
very original. Each needle in the fork body is represented by a plastic round insert. The parts of the pin at the incision are pulled apart by a needle screwed into a round insert.
Eliminate the cause of heating in the plug socket
it can be done very simply. You just need to use a knife or screwdriver to widen the gap in the split pin of the plug.
If the pins are in the sockets of the socket, then the contact is so complete that it is impossible to pull the plug out of the socket.
Currently, most modern electrical appliances use non-separable plastic plugs in a solid housing.
You can disassemble such forks out of pure interest, but they cannot be repaired
.
Installation of a European socket
To install a Euro socket with your own hands, you will need to follow these steps:
Turn off the electricity at the panel. Despite its simplicity, this step is the most important; neglecting it will lead to dire consequences. Mark the place where you will place the Euro socket and cut a small hole in the wall to install the housing. If you are installing a surface-mounted Euro socket, then skip this step.
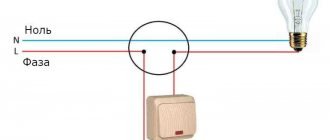
Insert the socket box, then secure it. If you are wiring openly in a wooden house, it will be important to install insulation between the wall and the outlet. Connect the wires to the correct terminals. Remember about grounding! Most often, phase is on the right, zero is on the left, and ground is in the middle. It is advisable to review the connection plan in advance.
Install the frame into the previously cut hole. If the socket is placed on top, secure it with self-tapping screws. Then cover everything with a plastic lid.
Repair of dismountable plugs
Dismountable plugs
have a disassembled body. This fork can be disassembled and repaired yourself.
For collapsible forks
and portable sockets it should be clear how to release the tension and avoid twisting the wire:
- the device for clamping the wire insulation or part of it must be permanently fixed or must be permanently fixed to one of the parts of the plug or portable socket;
- It is unacceptable, for example, to tie a cable or cord into a knot or tie the ends;
- Screws, if present, are used to crimp the flexible cable and not for any other purpose.
NOTE This does not exclude a cover serving to secure the flexible cable in the cord securing device, provided that the cable remains in place in that device when the cover is removed;
- the insulation clamping device must be made of insulating material or equipped with an insulating gasket attached to metal parts;
- The metal parts of the insulation clamping device, including the clamping screws, must be insulated from the grounding circuit
.
Insulating parts
, on which live parts are fixed, must be securely connected to each other. It must be impossible to disassemble the connector without the aid of a tool.
The principle of repairing plugs
with a collapsible housing is to ensure that the design of the plugs ensures
correct and reliable connection of the wires and
that the following rules are observed:
- of wire strands
with each other must be prevented ; - It must be prevented from touching the conductors of wires connected to the contact terminals of accessible metal parts
; - It must be prevented from touching the core of the wire connected to the grounding terminal of live parts
.
Dismountable connectors
must be designed so that the screws or nuts of the terminals do not become loose or fall out of their recesses.
Plugs with split housings
Most have continuous pins. If such a plug breaks at the beginning, you should check the conformity of the plug and the socket.
The principle of design and repair of plugs
with a collapsible body is shown in Fig. 5
1- plug body; 2- working contact pins; 2a - threaded hole of the pin; 3- flexible plug cord; 4- screw securing the housing assembly; 5- core of multi-wire cord; 6- cord retainer with a metal bracket; 7- insulating gasket; 8- bracket fastening screws; 9- nut for screw; 10- contact loop for screw fastening; 11- washer; 12- screw for clamping the contact wire loop; 13-wire contact loop assembled with the fork pin; 14- grooves for working contacts; 15- groove for wire or cable; 16- groove for fixing working contacts; 17- through hole for assembly screw; 18-flex sealing and insulating tube.
Most often, damage to older removable plug configurations occurs due to loose or disconnected wires attached with screws.
(Fig.5 pos.13)
to the fork
pins.
At the same time, the plug with split body halves
(Fig. 5 pos. 1) is often equipped with a metal
bracket
(Fig. 5 pos. 6),
a gasket
(Fig. 5 pos. 7) made of insulating material and
two screws
(Fig. 5 pos. 8).
These fastening parts the flexible cord
(Fig. 5, item 3) on the base of the plug body.
To check the connection points of the pins and cores of the cords (Fig. 5, item 13), you must first unscrew the central assembly screw
(Fig. 5 pos. 4), tightening the halves of the body through
the hole
(Fig. 5 pos. 17).
Pin parts hidden in the body
(Fig.5 pos.2) come in different shapes.
But they have one thing in common - this is a threaded hole
(Fig. 5, item 2a) and
a screw
(Fig. 5, item 12)
with a washer
(Fig. 5, item 11).
If the puck
(Fig. 5, item 11) was a spring, then self-loosening of the screw due to mechanical loads would occur less frequently.
Often, simply turning the screw
(Fig.5 pos.4) or (Fig.5 pos.8)
the serviceability of the plug can be restored
.
Each pin
(Fig.5 pos.2) with a threaded hole (Fig.5 pos.2a) has a protrusion or groove for
screws
(Fig.5 pos.12).
Pin
the cord core loops
to it (Fig. 5, pos. 10), they are fixed in the corresponding
groove
(Fig. 5, pos. 16) of the housing.
This fixation ensures a constant distance between the pins, commensurate with the distance between the sockets of the plug
(Fig. 5, item 14) and the socket.
ATTENTION! You need to know that the conductor loop (Fig. 5, pos. 10) dangling on the pin (Fig. 5, pos. 2) and screw
(Fig. 5, pos. 12) is, as a rule, the main reason for the heating of the plug.
The hot fork pin (Fig. 5, item 2) begins to melt the plastic of the body. As a result, the fork becomes unusable. In this case, you will have to change the plug body, because half measures, such as winding electrical tape, will not work here.
Stranded wire core (Fig. 5, item 5) connected to the clamp
(Fig. 5, item 12), should not touch other live parts after installation.
Plugs must have cable entry
(Fig.5 pos.3) with elastic
seal
(Fig.5 pos.18) or a similar device.
It should be remembered that disassembling the plug
it is necessary above the table or over a cloth (rag) so that when unscrewing
the screw
(Fig. 5, pos. 4) on one side, you do not lose
the nut
(Fig. 5, pos. 9), which is located on the opposite side
of the body
(Fig. 5, pos. 1).
After removing the screw and disassembling the fork body, remove the strips
(Fig. 5 pos. 7 and pos. 8).
Disassemble the assembly (Fig. 5, item 13) on the pins
(Fig. 5, item 2) of the plug.
Cut off the burnt or broken part of the wire
(Fig. 5, pos. 5) and expose part of the wire for new contacts (Fig. 5, pos. 10).
Wire insulation
a length equivalent to the maximum length for making a contact loop and an additional length of
+2 mm is removed
from the end of a flexible wire of the appropriate cross-section.
Before you expose the wire
(Fig. 5, item 5), you need to use a sharp knife to make a small circular cut on the wire insulation. Then pull the wire lightly with your fingers or pliers.
After the insulation has been removed, the strands of the copper wire should be twisted into a flagellum, otherwise it will “fluff” again. You can also solder the rolled wire.
Cord cores
, protruding from the body, at a length of
10-15 mm
are cleared of insulation and
bent into loops
(Fig. 5, item 10), placed in the cavity (Fig. 5, item 2a) on the pin and secured
with a nut and screw
(Fig. 5, item .13).
The place where the end of the strand is twisted to form a loop
(Fig.5 pos.10), wrapped with electrical tape and secured with a metal
bracket
(Fig.5 pos.6) on the body.
Plank
(Fig.5 pos.7) made of insulating material
covers the hinges
(Fig.5 pos.10) in the cavity of the housing.
Then the pins
(Fig. 5, item 2) are screwed
into the special nuts
(Fig. 5, item 8) of the housing so that
the nuts
(Fig. 5, item 13) on the pins press the bar (Fig. 5, item 6).
Contact of veins
Without insulation at the through
hole
(Fig. 5, item 17), the housing does not appear.
End of cord
(Fig.5 pos.3) are placed in the groove of the through
hole
(Fig.5 pos.15) of the plug body and connecting
the two halves of the body
(Fig.5 pos.1) of the plug.
They are secured with an assembly screw
(Fig. 5, item 4) on one side of the body and a nut on the other side of the fork body. And secure the screw with the nut.
However, it happens that the current
still does not enter the electrical appliance.
This occurs because the inner diameter of the loop
(Fig. 5 pos. 10) was not chosen so that
nut could be screwed into it with some tension
(Fig. 5 pos. 13).
Larger loop diameter
(Fig.5 pos.10) than the outer diameter
of the screw thread
(Fig.5 pos.12) of the pin does not always guarantee
contact between these parts
.
If the contact wire
(Fig. 5, item 5)
is burnt
or very
loose
, then it should be cut to the length of the cut section of the wire - expose the wire and connect again, as indicated above.
ATTENTION! When the plug heats up
, it sometimes happens that a faulty plug socket is also to blame.
In this case, overheating is most dangerous for a fork with split pins
.
Special nut
(Fig. 5, item 13), embedded in the body of the plug,
will heat up and melt
the plastic around it.
At the same time, the hole in the gasket increases. As a result, you will still have to replace the plug
.
If the porcelain, bakelite or plastic parts of the plugs are cracked
, they should not be glued together with insulating tape or tied with wire.
Such disconnectors must be replaced
with new ones.
Fasten the lid
(Fig. 5, item 1) with insulating tape is only permissible for a short period, before purchasing a new one - because
such fastening can be a fire hazard
.
3.1. The procedure for disassembling and assembling plugs - briefly
To disassemble the plug, follow these steps:
- Remove it from the socket and unscrew the central screw
(Fig. 5, item 4), which tightens the halves of the plug body.
The screw is screwed into the nut
(Fig. 5, item 9), which is located in the hexagonal recess on the second half of the housing. When disassembling the case, you must carefully monitor the nuts and bolts so that they do not get lost. - Select a stranded wire (Fig. 5, item 3) for connection. The more powerful the core and its insulation, the more difficult it is to bend the wire.
- Expose the wire
(Fig. 5, item 5) to a length of
15-30 mm
; to do this, use a sharp knife to make a small circular cut on the wire insulation. - Then pull the wire lightly with pliers. After removing the insulation, twist the wire into a bundle.
- Make loops (Fig. 5, pos. 10) from the flagellum along the diameter of
the wine fastening (Fig. 5, pos. 12), clamp it between
the washer
(Fig. 5, pos. 11) and
the pin
(Fig. 5, pos. 2). And secure with a screw (Fig. 5, item 12). - Insert the pins (Fig. 5, item 2) into the corresponding grooves
(Fig. 5, item 14) in the fork. - Tighten the bracket (Fig. 5, item 6), which presses the input wire to the half of the plug body with screws
(Fig. 5, item 8). - Close the fork body with the second half of the fork body (Fig. 5, item 1) and screw in the outer central screw (Fig. 5, item 4) so that there is no gap between the body halves.
ATTENTION! It is necessary to take into account that overheating
or some other reasons lead to the fact that
the plug body
may
fall apart
into two halves.
European sockets in the bath
Despite its apparent simplicity, installing an outlet in a bathhouse can become very problematic. The main problem is high indoor humidity. It is better to put the outlet in a safer place, for example, in the dressing room, where the outlet will not be so dangerous.
The socket should have a protection class of at least IP44, and it should be located at least 90 cm from the floor. It is advisable to buy a device with an existing protective cover to ensure maximum protection from troubles.
- Replacing the timing gear
Fire hydrant. What it is.
- Car electrical system breakdown
Basic mistakes when installing a European socket
- Never forget to turn off the voltage;
- It is not advisable to buy very cheap euro sockets, they break quickly and can cause a fire;
- Make sure that the cables match each other in power;
- Do not forget to clean the contact surfaces from dirt;
- Do not overtighten the sockets, this can lead to pinching and deformation of the wires;