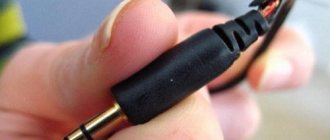
Whatever innovations the modern market of tools for repairing radio equipment offers, the soldering iron remains one of the most reliable and safe devices.
The process of soldering wires and microcircuits is considered effective because it allows you to achieve the strongest possible connection between wires and small parts.
This result can be achieved by adding a special material to the contact area - solder, which has a lower melting point than that of the parts being connected.
Thus, soldering with a soldering iron is the effect of a certain temperature on different metal surfaces for their strong and high-quality connection. However, before you start working with a soldering iron, you should first understand the rules of soldering and other intricacies of this process.
What is soldering and what is the essence of the process
The end result of soldering is the joining of two metal elements. The soldering process itself is provided by an independent metal with a much lower melting point. It is this metal that performs the function of solder.
Each soldering method is based on the principle of heating metal elements at the connection point. The heating temperature must exceed the temperature at which the metal used for solder melts. In this mode, the solder metal, being molten, freely flows into the spaces and crevices between the parts, partially penetrating even into the metal structure itself. After solidification, a mechanical bond and electrical contact are formed in this place.
There are two main conditions, without which it will simply be impossible to solve the problem of how to solder correctly:
- At the point of soldering, the elements must be as clean as possible. The connection to the surface is carried out at the molecular level, and even a small dirt or oxide film will significantly reduce the reliability of the contact. It is quite possible that the parts will not connect at all.
- Compliance with the temperature regime mentioned earlier. If the temperature difference is insufficient, the solder crystal lattice will not be able to form normally due to thermal shrinkage during solidification.
Copper and its alloys are well joined with traditional solders. They are suitable for steel, aluminum and other metals. The only serious limitation is the soldering of large metal parts due to the impossibility of heating them to the required temperatures.
Most often, solder consists of a tin-lead alloy, which may contain varying amounts of tin. The percentage of content is displayed in the marking, for example, POS-40 or POS-60. The melting temperature also depends on this indicator; for the first solder it is 235 degrees, and for the second it is 183 degrees. The melting point of POSV-33 solder, consisting of tin, lead and bismuth, is even lower. Joining aluminum parts requires special solders with a high melting point.
What tools and accessories are used when soldering?
The basis for soldering work is a relatively small number of tools and components:
- Electric (or other) soldering iron.
- Soldering iron stand.
- Solder.
- Flux (the simplest and most popular is rosin).
This is what a simplified version of the hardware and accessories for manual soldering looks like. However, with increasing skills of an electrician and increasing needs for soldering work, it is possible to expand the range when additionally required:
- Soldering Station.
- Device "Third hand".
- Set of solder, fluxes, soldering pastes.
What kind of electric soldering iron is it?
Hand tool - soldering iron, powered from a standard AC outlet (220V). There is a direct power tool and power supply via adapter. There are manual soldering irons for different power (10 - 100 W). However, for most soldering cases, a 25-40 W device is usually sufficient.
Hand-held soldering tool designs come in a variety of shapes and configurations. There are tools complemented by different tip shapes and auxiliary accessories
The main tool of the soldering process is available in different versions. For example, a simple one with a handle or in the form of a pistol.
The design of most soldering irons supports the interchangeability of soldering tips. Thanks to the mutual replacement of tips, different soldering methods are implemented.
Working with a hand soldering iron requires caution and compliance with operating rules, since a high heating temperature of 450-500ºC and a high supply voltage of 220 V are used.
What is the best stand for an electric soldering iron?
This accessory is optional, but recommended in any case. In principle, soldering can be carried out without a soldering iron stand, but this option is accompanied by a lot of inconvenience. Moreover, it is not recommended for novice electrical installers to work without a stand.
A stand for parking a soldering tool is an accessory that provides not only ease of use and soldering, but also safety for the electrician
Convenient work with a stand is seen not only in parking the soldering iron during work. Usually the stand is equipped with trays for solder and flux, which also adds to the comfort during soldering.
Therefore, if you intend to do soldering work, you should acquire not only a soldering iron, but also a convenient, practical stand.
What solders and fluxes are used?
There are many varieties of solder in relation to soldering conditions. This soldering accessory comes with:
- lead alloy,
- lead-free alloy,
- with the addition of flux,
- without adding flux.
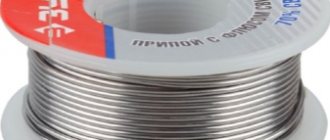
Traditionally, solder is produced in wire form with a diameter of 0.8-15 mm, as well as rods. The wire version is considered the most common.
For soldering electronics, lead-free solder is most often used with or without the addition of rosin. The lead-free type of solder is based on an alloy of tin and copper.
Lead solder (60% tin, 40% lead) is practiced (much less frequently), but this option is considered harmful to health and is not recommended for use.
When using lead solder for soldering with a soldering iron, it is necessary to provide more active ventilation. After completing soldering work, be sure to wash your hands with laundry soap.
Integral accessories for soldering using a hand soldering iron are soldering rosin and wire solder. There are also solder pastes and rod-shaped solders.
Working with solder is accompanied by different types of flux. Among the options used, there is a soldering option where acid acts as a flux (soldering steel, stainless steel).
In this case, a separate “acid” soldering iron core is recommended, since the acid quickly “eats” the non-ferrous metal. “Acid” core can be found in specialized stores.
How to solder with a hand soldering iron and clean the tip?
Soldering requires periodic cleaning of the soldering iron core tip. In practice, a standard damp sponge is often used, thanks to which the tip of the soldering iron core can be kept clean and optimal for work.
The sponge also quite effectively removes oxidation that inevitably forms. The presence of an oxidation film on the tip of the soldering iron core covers the working layer of solder. A black film is formed, blocking active adhesion of solder and uniform distribution over the tip.
Using a regular damp sponge seems to be effective, but this method shortens the life of the tip due to the expansion and contraction of the copper. In addition, a wet sponge temporarily reduces the temperature of the tip. Therefore, the best alternative for cleaning seems to be the use of a brass “sponge”.
A convenient means for cleaning the soldering iron tip from oxides and residues of molten solder is a brass mesh. A better alternative to the traditional wet sponge
An accessory such as a brass “sponge” is a fine metal mesh made of brass, similar to that used for washing dishes. The only difference is that the washing mesh is made of steel or stainless steel.
Why do you need a soldering station and a “third hand”?
A more technologically advanced tool is a soldering station. A tool of this type is practical to use when there is a need for constant work associated with soldering.
The soldering station provides greater flexibility in operation, plus control of operation (automatic adjustment of heating temperature).
The advantage of a soldering station is the ability of the device to maintain the set temperature of the soldering iron. This approach contributes to high quality soldering work on a wide range of projects.
Soldering stations help create a safe workplace by incorporating temperature sensors, alarm settings, and even password protection.
A soldering station and a “third hand” are tools for professional use when it comes to large-scale work, as well as soldering of small electronic parts
In addition to the soldering station, professional electricians use another tool - the so-called “third hand”.
We are talking about a special holder equipped with a magnifying glass. With the help of such a holder it is convenient to solder miniature parts and work with electronic boards with small wiring.
Selection of fluxes and solders
Since the quality of soldering joints largely depends on the correct choice of fluxes and solders, these materials should be considered in more detail. Currently, there are a large number of these components suitable for almost all types of soldering.
The main function of fluxes is to pickle metal parts, remove the oxide film and subsequently protect the surface from corrosion. Flux coating ensures its cleanliness, good wetting and spreading of tin.
Fluxes are selected in accordance with the metals and alloys that need to be joined. The composition of any flux includes metal salts, alkalis and acids that actively react to increased temperature. In this regard, there is a conditional division of these materials into two types.
The first of them is active; it is based on hydrochloric, perchloric and other inorganic acids. Their aggressive effect on metal requires quick rinsing after finishing work. This is the only drawback of such fluxes, but with their help you can join almost any metals. They are available in liquid form and are considered more convenient for application. They add alcohol or glycerin, which completely evaporate when heated.
The second type of flux consists of rosin and is used for joining non-ferrous metals. For steel parts they are considered less effective. At the end of the work, the rosin must be washed off, since over time it causes corrosion and becomes an electrical conductor when left in a humid environment for a long time.
Solder for work is easier to select. Lead and tin compounds marked PIC are mainly used. The percentage of tin content is indicated by numbers following the letters. A higher tin content in solder provides higher mechanical strength and electrical conductivity of connections. At the same time, the melting temperature of solder with a high proportion of tin also decreases. The addition of lead normalizes solidification and prevents the tin from spreading.
Some modern solders are produced without lead (BP), instead of which zinc or indium is added. They have a higher melting point, but the joints are more durable and resistant to corrosion. And, on the contrary, there are solders made of light alloys that can spread from 90-110 degrees. They are used to connect components that are highly sensitive to overheating.
What is a soldering iron?
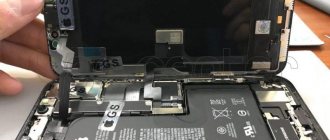
This is a special heat-emitting device with a power of 15 to 40 W, sufficient for soldering wires, circuit boards and microcircuits. There are soldering irons with higher power. They are intended for small soldering - for resoldering poorly connected thick-diameter wires or for unsoldering XLR connectors. The function of the heating element in soldering irons is performed by a nichrome wire, which is wound around a tube containing a “tip” - the working surface of the device. The tip is a copper rod that is heated by a nichrome wire.
The soldering iron uses copper because this metal has high thermal conductivity. Heat is supplied to the wire by electric current. The soldering iron device contains an insulator, which is mica. For safety reasons, it prevents the wires from contacting the metal tube and soldering iron casing.
Soldering iron selection
There are several types of soldering irons used at home. They are designed for different voltages and can operate from 12, 220 and 380 volts.
The power of a particular soldering iron is selected based on the work performed:
- Soldering of electronic parts and components – 40-60 W.
- Parts up to 1 mm thick – 80-100 W.
- Elements 2 mm thick require a power of 100 W or more.
As a rule, home craftsmen have two soldering irons - low and medium power, capable of solving almost all problems. Training can be completed at any of them. It is recommended to solder thick-walled parts using professional equipment.
How to solder with a hand soldering iron - step by step process
Before you start soldering, you should prepare a soldering iron and all the necessary accessories.
- Prepare solder and flux.
- If the soldering iron is new, clean the tip with fine sandpaper until it has a copper shine.
- Heat the tip of the soldering iron core to operating temperature (not higher than 400ºC).
- Dip the tip in rosin and apply to the solder.
- Grab a small amount of solder onto the tip.
- Thoroughly tin the working surfaces of the tip with solder.
The procedure for tinning the tip is recommended to be performed on a copper surface of low mass. Ideally suited for tinning the wide traces of any defective printed circuit board. Having completed tinning, you can proceed directly to soldering.
The procedure for soldering installed electronic parts in itself is not particularly difficult. The quality of creating connections depends on the correct sequence of actions and skill
What should you do before soldering with a hand soldering iron on clean (never soldered) contacts of an electronic board? All soldering points need to be prepared - sanded with “zero” sandpaper to a characteristic shine. Next, perform the following steps:
- Insert the electronic component into the corresponding holes on the board.
- Set the component to vertical/horizontal levels.
- On the back side of the board (solder points), bend the component leads at 45º.
- Dip the soldering iron tip into rosin.
- Grab a small amount of solder.
- Touch the tip to the surface of the board at the soldering point.
The result of touching, as a rule, is a uniform spreading of molten solder around the lead of the electronic component.
Once the solder has filled the soldering point, the soldering iron tip should be removed to allow the applied solder to cure. Repeat the operation at the next point. In this way, soldering of any other points on the electronic board is carried out.
Preparation for soldering
The very first time you connect the soldering iron to the network, it will definitely smoke. At this moment, the factory lubricant burns out. After the emission of smoke stops, the soldering iron must be turned off and allowed to cool. Then, before soldering, you need to sharpen the tip.
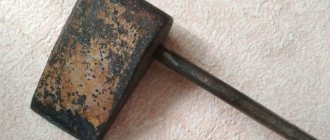
The soldering iron tip is made in the form of a cylindrical rod. The material is copper alloy. Fixation is carried out with a clamping screw. In most cases, the tip comes without sharpening, and therefore it should be prepared. You can change the shape using a hammer, file or sandpaper.
Each type of work requires its own tip configuration:
- The shape is flat or blade-shaped by flattening. Flat corner sharpening may be required to join massive parts.
- Sharpening in the shape of a sharp cone or pyramid is required in order to solder small parts.
- A less sharp cone is needed for soldering thick conductors and large parts.
In the absence of a protective coating, the tip of the tool must be tinning. A thin layer of tin is applied to the surface of the working part. This procedure is performed during the first start-up, when there is no longer any smoke emission. After the tool is ready, we learn to solder.
Soldering LED strip
Today, LED strips are actively used for installing interior lighting of varying complexity. It provides wide design possibilities, is small in size and is not inferior in performance to other lighting devices.
LED Strip Light
Regardless of the size and installation conditions, the tape is soldered according to the same instructions:
- Having cut the tape to the required length, the surface on which it is to be attached is degreased and dried.
- After tearing off the protective film from the back side, the tape is glued to the mounting surface.
- After this, the wires on the input contacts, small parts, dimmers, and controllers are soldered. During operation, you must avoid overheating the tape, this can lead to failure of the diodes.
Pay attention when soldering two strips! Plus should go to plus, and minus to minus!
The soldering process is shown in the photographs below:
We fix the LED strip (electrical tape was used)
A little solder on each contact.
Solder the wires, observing polarity.
Soldering irons with a power of up to 40 W are well suited for soldering diode strips. It is best to use wires with a cross section of 0.75 mm. Red ones are soldered to the positive contact, and black ones to the negative one.
Roll of LED strip.
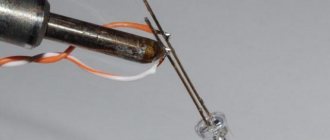
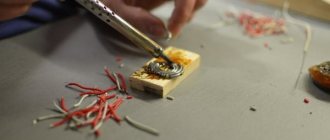
Now let's talk about how to solder LEDs directly onto the board to create LED backlighting with your own hands. To do this, you will need the diodes themselves, a piece of the board for them (you can buy them at a radio store) and soldering accessories. To remove scale, we will use aluminum flux and tin as solder.
- We insert the diodes into the board so that the positive contacts (long “legs”) are located on one side, and the negative ones on the other. And bend the contacts to the sides. Be careful - if even one diode is connected incorrectly, everything will burn out.
- After treating the “legs” with flux, we solder them to the board.
- Cut off the excess length of the contacts using wire cutters. We strip the power wires to a length equal to the length of the diode row, apply them to the corresponding contacts and solder them.
- Ready! Now you can check the operation of the circuit by connecting the wires to a 12 V power source.
Soldering different types of microcircuits
Now let's turn directly to soldering microcircuits of different shapes and configurations, and how they can be soldered:
DIP chips are the most common type of chips, which are simply and easily soldered by installing long mounting legs into the holes. To dismantle the DIP chip, it is best to use a thin needle, as indicated in the paragraph above.
SMD microcircuits - these microcircuits have a fundamentally different soldering method, on the so-called “spots”. However, this does not complicate the work process in any way and even makes it easier if you have such a friend and assistant at hand as an infrared hair dryer.
BGA microcircuits - the contacts of these microcircuits are located underneath them in the form of small balls of solder.
Where can I learn to solder?
You can train at home by soldering ordinary electrical wires. The main thing is to follow the safety instructions.
The work may require:
- soldering iron (according to professionals, to work with small wires in electronics and radio engineering, a tool with a power of 20-40 W will be sufficient);
- pliers;
- knife;
- scissors;
- set of files;
- sandpaper;
- insulating tape;
- rosin;
- solder.
The question “how to learn to solder” will be resolved after several training sessions. The beginner will gain confidence and experience. Step-by-step soldering instructions can help him with this.
What is heat shrink?
When splicing wires, professionals recommend using special heat-shrinkable tubes. Their diameter must be twice that of the wire. The tube is placed on one end of the wire. After mechanically interlocking with another wire and soldering, the heat shrink is dragged to the place where they are connected. It should be positioned so that 1 cm remains at each end of the seam. After this, soldering is performed again. The heat shrink should evenly cover and heat the wire connection. As a result of exposure of the tube to high temperatures, it is sealed, providing reliable insulation in the connection area, as well as strong mechanical adhesion.
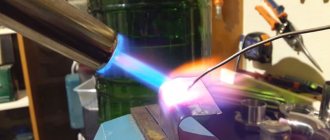
How to solder stainless steel
Soldering stainless steel is a labor-intensive process. How to solder such material with a soldering iron? Soldering is carried out at temperatures from 500 to 700 degrees Celsius using solder (tinol). Solder for stainless steel is selected based on soldering conditions and steel composition. The alloy contains no more than 25% chromium and 25% nickel; such compositions produce very strong connections. Borax is used as a flux, which is applied to the surface in the form of a paste or powder. After the borax melts, the metal heats up and turns bright red, then solder is injected into these joints.
After soldering is completed, the remaining flux is removed using water or sand blasting. The use of nitric and hydrochloric acid is extremely undesirable, since a reaction between the solder and the metal may occur, leading to the destruction of the latter.
Which sting is better?
The working parts of soldering irons, depending on the size, are of two types:
- ordinary, the diameter of which is 0.5 cm;
- miniature with a diameter of 0.2 cm, used for soldering very thin wires and copper parts.
The working parts of soldering irons can have the shape of a needle, cone and blade. The last form is the most common, as it makes it possible to scoop out the required amount of solder. In addition, for ease of soldering, the tip can be straight or curved.
Sequence of work
How to learn to solder correctly will become clear if you follow the step-by-step instructions. Necessary:
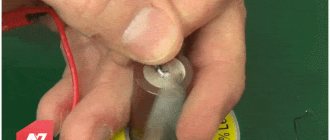
- Place the soldering iron on the stand and plug it into the mains.
- Dip in rosin. This is done 5-7 minutes after connecting to the outlet. The purpose of this procedure is to check the heating temperature of the tip and get rid of scale. The soldering iron is considered ready for use if the rosin boils and melts. If it only softens, then the sting is not warmed up enough. When the soldering iron overheats, the rosin hisses and spatters. In this case, the device needs to cool down a little.
- Treat surfaces with tinning. The joints of metal products are covered with molten solder.
- Press the tinned surfaces together. Apply a new portion of solder in the places where they are combined with a soldering iron. The joined parts must be pressed until the solder cools and hardens.
Soldering different types of microcircuits
To desolder and solder back the microcircuit you will need the following tool:
- Soldering iron or soldering station;
- Tweezers for grasping and holding the microcircuit;
- Gel flux and 1 mm solder. Soldering a microcircuit with thick solder is not very convenient;
- Copper braid or needle for soldering the microcircuit;
- Aluminum foil or Kapton tape.
You will also need a flux remover, since after soldering the microcircuits, in order to avoid a short circuit, you must immediately wash off its residues from the board.
After the old microcircuit is removed, it is time to install a new one. First you need to prepare the place, remove excess solder using a soldering iron and copper braid.