Arduino is a combination of hardware and software for easy electronics development. The hardware includes a large number of types of Arduino boards with built-in programmable microcontrollers, as well as additional modules. The software part consists of a development environment (programs for writing sketches and flashing Arduino microcontrollers), a simplified programming language, and a huge variety of ready-made functions and libraries.
Arduino was created by teachers to get students more involved in electrical engineering. The idea was a huge success and Arduino went much further. Thanks to the open architecture, anyone can produce these microcontrollers, expand the model range, and write programs. All diagrams and source code of the programs are publicly available.
After Arduino became more widespread, many electronics manufacturers began to produce their own boards based on Arduino microcontrollers. When Chinese manufacturers joined production, Arduino became much more accessible and received an even larger audience. Arduino microcontroller boards in Chinese online stores cost from 70 rubles.
Introduction
I am solemnly opening a new blog on Habré dedicated to Arduino! A blog about the universal opensource microcontroller Arduino, which will be of interest to all lovers of microelectronics, homemade gadgets and everyone who is not afraid to pick up a soldering iron.
Arduino is a line of electronic boards that can be connected to a computer via USB, and as peripherals - any devices from LEDs to mechanisms of radio-controlled models and robots. Programs for it are written in a simple and intuitive C-like Wiring language (with the ability to connect third-party libraries in C/C++, for example, to control LCD displays or motors), compiled and loaded into the device with one button, after which you immediately receive working autonomous gadget. No assembler, no extra wires and expensive parts and programmers - pure creativity, plug and play!
Summing up
In this material we learned what Arduino is and its areas of application. The development of systems depends on your imagination, and additional components help achieve your goal.
A low price, availability of modules and an open database will help in realizing the idea. The finished project can be either autonomous or portable. The presence of portable batteries and wireless data transmission sources contribute to the creation of an expanded network of boards and computers.
The available programming language has the ability to install additional components and libraries. Modules add the ability to work with Java. Buy an Arduino kit for beginners and realize your ideas! Your imagination is limitless, and Arduino will allow you to realize it.
Application
After a short story to friends and acquaintances about Arduino (“this is a type of electronic construction kit, a micro-computer into which you can load any program and get any other device”), the most frequently asked question is “Why is all this?” or “How do I benefit from this?” Boring people, aren't they? Is there really not a single radio amateur among your acquaintances, or maybe you yourself are a radio amateur? The use of Arduino is very simple - not for fun, but for brain development. Is it interesting for Linux users to tinker with the kernel code? What's the use of this? Why don’t you do some “hardware” (as opposed to “software”) creativity? Right now, a fellow designer is sitting next to me and understanding... neural networks. In general, what can I say, the spirit of technical creativity has been forgotten, radio circles and aircraft modeling clubs have been forgotten. Everyone just sits at their computers and can’t do anything worthwhile with hardware other than plugging a plug into a socket. Build your own web server, color music installation or cool robot! The Arduino community already knows about successful examples: a GPS tracker with recording on an SD card, a simple audio player, a Twitter display, electronic games with a display and a touchscreen... Try to buy radio components and make something of your own! There is even a ready-made kit for creating a quad-core Arduino cluster...
What can Arduino do?
From a technical point of view, Arduino can receive and send signals according to the instructions in the firmware. It sounds very modest, but in practice this allows you to receive and process information from sensors and transmit commands to actuators or other devices. For example: a microcontroller can receive data from temperature, pressure, humidity sensors and display summary information on the display.
These capabilities are enough to implement complex devices such as unmanned aerial vehicles, 3D printers, robotic manipulators, radio-controlled cars, boats, all-terrain vehicles, etc. Arduino's capabilities are limited only by imagination. If you miss the capabilities of Arduino, then there are more powerful microcontrollers such as Arduino Mega, NodeMCU, STM32, Wemos, Raspberry Pi, Orange Pi.
Specifications
Arduino Diecimila is a small electronic board (hereinafter simply the board) whose core is the ATmega168 microcontroller.
The board has: 14 digital inputs/outputs, 6 of which can operate in PWM mode (and therefore control analog devices such as motors and transmit binary data), 6 analog inputs (the source information is not logical 0/1, but value voltage), a 16 MHz clock generator, power and USB connectors, an ICSP port (something like a serial interface for digital devices), several control LEDs and a reset button. This is quite enough to connect the board to the USB port of your computer, install the necessary software and start programming. Brief Specification
- Microcontroller: ATmega168
- Operating voltage: 5V
- Input voltage (recommended) : 7-12 V
- Input voltage (limits) : 6-20 V
- Digital I/O ports: 14 ports (6 with PWM signal)
- Analog input ports: 6 ports
- Port current: 40 mA
- Current for 3.3V source: 50 mA
- PROM (Flash Memory): 16 KB (of which 2 KB are used by the bootloader)
- RAM (SRAM): 1 KB
- ROM (EEPROM): 512 bytes
- Clock frequency: 16 MHz
Power The board is powered in two ways: via a USB cable (no other tricks need to be done, it is used during the debugging process), or via a special connector like the one found on laptops. You can buy such a connector at a radio store and attach a battery or a 9-volt Krona battery to it. Power supplies can be changed using a jumper on the board.
PURCHASES
Packaging: a thick cardboard box wrapped with traditional yellow tape.
There are no threads or leatherette, so nothing sticks out or smells. Inside the box, everything is packed quite tightly, and without additional protection/cushioning. I don’t know whether it’s bad or not, it arrived intact. Postcards for fans of Arduino Uno
What’s typical is that the board says Arduino, although the seller has a picture of Funduino. On the other hand, I still can’t distinguish an original from a copy. And there is no need for this - functionally they are identical.
Wiznet W5100 Ethernet Shield, $9.87
Conveniently, it fits into the Uno seats without any problems. As for the SD slot, this is, on the one hand, a useful thing, but on the other hand, it is still abstract for me, since I have not yet gotten around to using it in a working way.
set of two blocks of 4 relays, $13.88 per set
As you can see, the relays already have a control cascade on board, so they are controlled directly by Arduno, without additional components. A common ground and digital output of the controller are enough. Each relay can be used in NO/NC (normally open/closed) modes. And each relay has a power-on LED.
Powering from the Arduino output, despite the same voltage (5V), seems to me not the best idea, since a current of about 80 mA is stated per relay. So if you turn on all four, you get 400 mA, and this is too much for the built-in stabilizer. Summary - you can control it with Arduino, but to power the relay coils you need a separate source (well, in one form or another).
Why do I need 8 relays? I wasn't sure I could handle radio control, so I relied on attaching a relay to the buttons of existing remote controls. Eight channels should have been enough for the first time. In addition, Eight Control already had a ready-made solution for this project.
set of two pairs of receiver-transmitter, $5.99 per set
Very spartan things. The transmitter, if I understand correctly, consists practically of a resonator and an RF transistor. The receiver contains an amplifier instead of transistors. They are supplied without antennas, so I had to get creative and make the required wires. For the 433 MHz range, the antenna length is about 17.3 cm. To save space, you can roll it into a tube, but this will worsen the performance.
Transmitter:
According to the subjective feeling, the transmitters are not bad. At least with their 5V supply they switch pretty reliably whatever I want. And they do this clearly better than standard socket remote controls with 12V power supply.
The receivers are no different. The signal from “your” transmitter is received perfectly, but, say, a weather station can only be clearly seen if the wireless sensor is placed next to the antenna.
Receiver:
mock wires mom-dad. Two “ribbons” of 40 pieces, 20 cm long. $8.68 per set.
Advantages and disadvantages
- Price. In Moscow, Arduino Diecimila can be bought for less than 1000 rubles. At the same time, you are buying a complete (well, almost) device that does not require additional equipment, such as expensive programmers and debugging stands, and does not require paid software.
- Cross-platform. Arduino software works on Windows, Macintosh OS X, Linux and other operating systems as it is open source and runs on Java. Most microcontroller systems are limited to Windows.
- Simple programming environment. The software interface is easy to use for beginners, but flexible enough for advanced users to quickly achieve the desired result. This is especially convenient in an educational environment, where students can easily understand the platform, and teachers can develop a course and assignments.
- Open source. The language can be extended with C++ libraries; more advanced specialists can create their own Arduino toolkit based on the AVR C compiler.
- Open specifications and equipment diagrams. Arduino is based on Atmel ATMEGA8 and ATMEGA168 microcontrollers. The module schematics are published under a Creative Commons license so experienced circuit designers can create their own version of the module to suit their needs. Even relatively inexperienced users can mock up a module to understand how it works and save money.
Among the shortcomings, I would like to note, perhaps, a rather poor software shell, a low processor frequency (which is actually quite high and, in addition, reduces power consumption) and a small amount of “disk” (flash) memory for programs. With such a clock frequency and memory capacity, it is unlikely that it will be possible to assemble a simple mp3 player. However, it is unlikely that anyone will try to make, say, a guided cruise missile based on Arduino. In addition, I could not find sane sources for assembling avr-gcc. Well, of course, you will have to know (or study in the process) the basics of electronics at the level of “plus/minus, resistor/capacitor” - there’s absolutely no way without this.
Official Arduino website
Initially, the team of teachers who developed Arduino opened the website arduino.cc. But due to disagreements, a split occurred in the team in 2008. The part that broke away created another website, arduino.org. This led to confusion due to the same names for different Arduinos, programs and firmware.
Only in 2022 the conflict was completely resolved. So there is only one official website left: arduino.cc.
Official Arduino website in Russian
Arduino is a completely open platform. Absolutely anyone can become a developer and manufacturer. This means there are quite a few official websites.
P.S
In the future, I will try to publish other notes, I will tell you how to assemble simple devices using Arduino and radio components purchased in the store, and I will also publish demo videos of finished devices. I would also really like to hear the opinion of Habrapeople about this phenomenon, find out what you would like to read about in the following posts, translate a number of articles for this blog, and perhaps gather a small Russian-speaking community of Arduino fans. Yes, and due to the lack of normal Internet at home, I will not be able to answer everyone at once... I apologize.
What is Arduino for?
Arduino was created to teach students and schoolchildren electrical engineering, programming, radio electronics, and automation systems. Using microcontrollers, you can make not only educational projects, but also really useful devices. Automation projects, smart home devices, portable weather stations, robotic manipulators and many other useful devices are created using Arduino.
The original purpose of Arduino is learning. Children are much more interested in learning if they can immediately apply new knowledge in practice, and even see and touch the fruits of their labors. It is much more interesting to learn by experimenting, rather than listening to dry theory.
RADIO SWITCH CONTROL
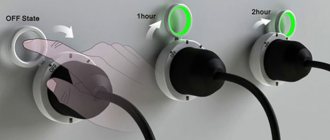
We are talking about Livolo radio switches, purchased about a year ago and wonderfully described by Online_buyer.
I didn't really rely on my own intelligence to solve this problem, so I tried the easiest way first.
One of the ideas was similar to what was done with IR remote control signals a long time ago. Those. record the signal as sound and then play it back. But it turned out that Arduino does not have sufficient performance to reproduce sound with the required quality, although there is a WAV player for the platform and playback does work (the SD slot on the Ethernet shield came in very handy for this purpose).
Therefore, I moved on to the next point in the program. Namely, I decided to try to repeat the signal shape without going into decoding. I proceeded from the fact that the remote controls have PIC16F690, i.e. Crystals with approximately the same performance as I have in Arduino and a regular OOK/ASK transmitter (PT4450). From this I concluded that if you correctly calculate the length of the pulses in the command, then the chances of repeating it are quite high: the modulation is the same, the speed of the microcontroller, despite high-level programming, is the same.
So I connected the receiver through a divider to the microphone input of the laptop, launched Audacity and pressed the same button on the remote control several times, with an interval of 2-3 seconds. This was necessary to verify the identity of the commands, or to understand that the commands change and the problem cannot be solved without decoding.
The start of transmission is determined quite easily even at the minimum scale. If you increase it a little, you can already estimate the length of the command packet: about a second. Moreover, unlike socket remote controls, there are no clearly defined synchronization pauses separating repeated commands.
As you zoom in, a clearly visible command pattern begins to emerge. This is the first success. The second success is that the commands in the package are completely identical, and subsequent clicks of the button do not change anything. Here you can exhale a little - there is no dynamic code, which means life is easier.
It can be seen that in this case the physical level is represented by five different impulses (long down, short up, short down, medium up, medium down). I repeat, I don’t know anything about logic, my task is to simulate a signal in a radio channel.
Therefore, in the next step, I sequentially increased each impulse that interested me and literally determined its duration by eye using the Audacity ruler. You can use ProtocolAnalyzer as an auxiliary tool, but there the signal looks a little different, and it was not possible to estimate the length of the shortest pulse with it. But for relatively long pulses (from 300 µsec) there is a chance to see approximate values, which help with decoding in Audacity.
Here the possible boundaries of the pulses are highlighted in red and blue, and the truth can also be somewhere in between, because in a digital signal the edges are vertical, but here they are oblique due to the peculiarities of analog transmission.
For example, look at the long one downwards and follow the red lines. It turns out: 2.11680 - 2.11624 = 0.56 ms. Multiply by 1000 and get 560 microseconds. I rounded this up to 550. By the way, rounding is also done by eye, within reason. Those. 10 microseconds can be rounded, but 50 is fraught with the fact that the receiving party will not understand.
After I estimated the pulse lengths, I wrote down their sequence in “raw” form. That is, if the up is short, then that’s how we write it: “up is short,” and not “1” or “I don’t know what the hell this is, it seems like it’s neither zero nor one.” In this case, by the way, a toothpick helps a lot, which is convenient for pointing out impulses, because otherwise my eyes just bunch up when I try to count the peaks and valleys.
When I have the pulse lengths and their sequence, I wrote a simple code for Arduino, connected the transmitter, and transmitted the signal. At the same time, I recorded it through the construction described above in Audacity in order to compare two packages - the original Livolo and the newly generated one. The light bulb did not react, but in Audacity discrepancies between the duration of the pulses became noticeable, which I again corrected by eye.
In general, such adjustments can occur until complete satisfaction. But I was lucky: literally on the second iteration I found myself in complete darkness, i.e. the light turned off at the signal of my transmitter connected to the Arduino.
All that remains is to record the signals of all the necessary buttons in Audacity, rewrite their pulse sequences and, in general, that’s all.
Here is a test code for Livolo with commands for eleven buttons on my remote (0 - 9 and “Turn all off”). Since Livolo switches are learning, I think you can easily teach them these commands - you just need to put the switch in learning mode and “press” the desired button.