How can you write programs for the Arduino board?
Arduino natively supports a language which we call Arduino Programming Language or Arduino Language.
This language is based on the Wiring development platform, which in turn is based on Processing, which, if you're not familiar, is what p5.js is based on. It has a long history of projects based on other very open source projects. The Arduino IDE is based on the Processing IDE and the Wiring IDE is built on top of it.
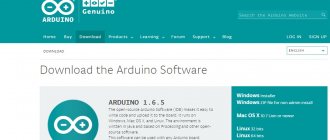
When we work with Arduino, we usually use the Arduino IDE (integrated development environment), software available for all major desktop platforms (macOS, Linux, Windows) that gives us 2 things: a programming editor with support for integrated libraries and a way to easily compile and load our Arduino programs onto the board connected to the computer.
The Arduino programming language is essentially a framework built on top of C++. You could argue that it's not a real programming language in the traditional sense, but I think it helps avoid confusion for newbies.
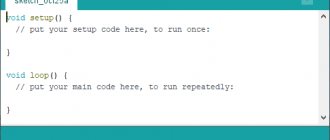
A program written in the Arduino programming language is called a sketch . The sketch is usually saved with the .ino extension (from Arduino).
The main difference from "normal" or C++ is that you combine all your code into two main functions. Of course, you can have more than two, but any Arduino program should provide at least these 2.
One is called setup(), the other is called loop(). The first one is called once when the program starts, the second one is called repeatedly while your program is running.
We don't have the main() function, as you're used to in C/C++, as the entry point for the program. Once you compile your sketch, the IDE will make sure that the end result is a correct C++ program and will basically add the missing glue by pre-processing it.
Everything else is regular C++ code, and since C++ is a superset of C, any valid C is also valid Arduino code.
One difference that may cause you problems is that while you can create your program in multiple files, all of those files must be in the same folder. If your program grows to very large sizes, this could be a deal-breaking limitation, but at that point it will be easy to move to a native C++ setup, which is possible.
Part of the Arduino programming language are built-in libraries that allow you to easily integrate with the functions provided by the Arduino board.
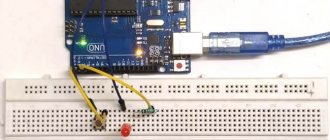
Your first Arduino program will probably involve turning an LED on and then turning it off. To do this, you will use the pinMode(), delay() and digitalWrite() functions, as well as some constants such as HIGH, LOW, OUTPUT.
Like this, the canonical first Arduino project (“Hello, World!”):
#define LED_PIN 13 void setup() { // Configure pin 13 to be a digital output pinMode(LED_PIN, OUTPUT); } void loop() { // Turn on the LED digitalWrite(LED_PIN, HIGH); // Wait 1 second (1000 milliseconds) delay(1000); // Turn off the LED digitalWrite(LED_PIN, LOW); // Wait 1 second delay(1000); }
It's all part of the Arduino programming language, or better called a suite or library.
Built-in constants of the Arduino programming language
Arduino sets two constants that we can use to
HIGH equates to a high voltage level, which may vary depending on the hardware (>2V on 3.3V boards such as the Arduino Nano, >3V on 5V boards such as the Arduino Uno) LOW equates to a low voltage level. Again, the exact value depends on the board used.
Then we have 3 constants that we can use in combination with the pinMode() function:
- INPUT sets the pin as an input pin
- OUTPUT sets the pin as an output pin
- INPUT_PULLUP sets the pin as an internal pull-up resistor
The other constant we have is LED_BUILTIN, which points to the bead pin number, which is usually equated to number 13.
In addition to this, we have the C/C constants ++true and false.
Introduction to the Arduino interface
One of the main elements of Arduino is the main menu of the program, which allows you to access all the available functions of our program.
Below is a panel with icons that display the most used functions of the Arduino IDE:
- downloading the program;
- checking for errors;
- creating a new sketch;
- saving a sketch;
- loading save;
- opening the microcontroller port window;
The next most important element is the project files tab. If this is a simple sketch, then there will be only one file. However, complex sketches may consist of multiple files. In this case, you can quickly switch viewing from one file to another in the tab bar. It is very comfortable.
The largest of the blocks is the editor field for our sketches. Here we can view and, if necessary, edit the program code we need. A separate field for displaying system messages has been implemented. With it, you can verify that saving or loading your sketch was successful, and you can proceed to the next steps. There is also a window in the program that displays the presence of your sketch during compilation.
Compilation is the conversion of high-level language source code into machine code or assembly language.
Built-in functions of the Arduino programming language
In this section, I'm going to make reference to the built-in functions provided by the Arduino programming language.
Program life cycle
- setup() This function is called once when the program starts and when the Arduino is turned off and restarted.
- loop() This function is called repeatedly while the Arduino program is running.
I/O Processing
The following functions help you process input and output from your Arduino device.
Digital I/O
- digitalRead() reads a value from a digital pin. Takes a pin number as a parameter and returns HIGH or LOW constant.
- digitalWrite() writes a HIGH or LOW value to a digital output pin. You pass the pin code and HIGH or LOW as parameters.
- pinMode() sets the pin as an input or output. You pass the pin code and INPUT or OUTPUT value as parameters.
- pulseIn() reads a digital pulse from LOW to HIGH then to LOW again or from HIGH to LOW and to HIGH again on a pin. The program will be blocked until a pulse is detected. You specify the pin number and the type of pulse you want to detect (LHL or HLH). You can specify an optional timeout to stop waiting for this pulse.
- pulseInLong() is the same as pulseIn(), except that it is implemented differently and cannot be used if interrupts are disabled. Usually interrupts are disabled to get more accurate results.
- shiftIn() reads a data byte one bit at a time from the output.
- shiftOut() writes a byte of data one bit per output.
- tone() sends a square wave to the pin used for buzzers/speakers to play tones. You can specify the contact and frequency. It works with both digital and analog outputs.
- noTone() stops the tone() generated wave on the pin.
Analog I/O
- analogRead() reads a value from an analog pin.
- analogReference() adjusts the value used for the high range of the analog input, defaulting to 5V on 5V boards and 3.3V on 3.3V boards.
- analogWrite() writes an analog value to the pin
- analogReadResolution() allows you to change the default resolution of analog bits for analogRead(), the default is 10 bits. Only works on certain devices (Arduino Due, Zero and MKR)
- analogWriteResolution() allows you to change the default resolution of analog bits for analogWrite(), which defaults to 10 bits. Only works on certain devices (Arduino Due, Zero and MKR)
Do's and Don'ts
Arduino runs on a single-core and not very fast processor. Its clock speed is 16 megahertz, that is, 16 million processor operations per second. This is not very fast, plus there is only one core, and it executes one command after another.
These are the restrictions this places on us.
No real multitasking. You can simulate multitasking using the Protothreading technique, but this is more of a crutch. You cannot, for example, say: “When such and such a button is pressed, do this.” Instead, you will have to write a check in the main loop: “Is this button pressed? If yes, then…"
There is no concept of files (without additional gadgets, libraries and hardware). You cannot save anything to the controller except the program that controls it. Fortunately, there are expansion cards that allow you to work a little with files on SD cards.
How can 1 terabyte fit on a microSD card?
It’s similar with the network: without additional boards and libraries, Arduino cannot communicate with anything (except for turning the electricity on and off at its outputs).
Go easy on complex math: If you need something complex like trigonometric functions, be prepared for the Arduino to be quite slow at calculating them. For you this is one line of code, but for Arduino it is thousands of operations under the hood. Have mercy.
Reports? Errors? Only during compilation. The Arduino has no built-in means of telling you that it's not feeling well. If it freezes, it will not show an error window: firstly, it does not have a graphical interface, and secondly, it does not have a screen. If you want an error system or reporting, write it