The name Arduino is currently a sort of “fashionable” word for most radio amateurs and everyone who is more or less familiar with electronics, since this platform allows you to create electronic devices quickly and cheaply. The presence of an extensive online community of this platform makes it an ideal choice for those who have just begun their acquaintance with electronics and programming. Even people who do not have a technical education (and this is exactly who it was originally created for) will find it quite easy to master Arduino.
Why is this platform so relevant? How to get started with it? How can it improve your lifestyle? All these issues will be discussed in this article. To do this, we will learn how to install the Arduino IDE on your computer and load it with a small program that will blink an LED, which we will connect to the Arduino using a breadboard.
What is Arduino
Unfortunately, some novice radio amateurs consider Arduino a microcontroller, but this is not entirely true. Let's try to figure out what it is.
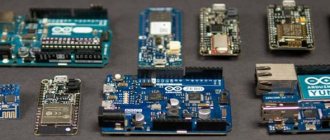
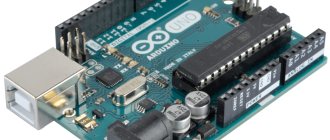
Arduino is an open source development platform that consists of an easy-to-use hardware and programming environment. The most common type of hardware is Arduino UNO, and the programming environment is called Arduino IDE. In addition to Arduino UNO, there are quite a lot of similar boards - Arduino Mega, nano, mini, but in this article, for training purposes, we will use Arduino UNO. And the Arduino IDE is exactly the software environment with which we will program the Arduino UNO board.
Part 4: Launch your first application
Click the "Open" button and select the example application in the dialog box:
- Basics -> Blink.
Check the setting
- To make sure the board is working and connected correctly, click "Download".
- After a short moment of compiling the application, some orange lights, designated TX/RX on the Arduino, will begin to blink. This means that data is being sent or received. When the process is completed, the code will run immediately.
Start experimenting
- That is until this lesson takes you. You have now created your Arduino and figured out how to load applications onto it, confirming that it works correctly.
Installing Arduino IDE
Before you start working with Arduino, you need to install the Arduino IDE programming environment on your computer/laptop. All steps described below for installing this software environment will be focused on the Windows operating system; for other operating systems the sequence of actions will be approximately the same. If you have problems with other systems, help can be found at the following links - for Mac users and Linux users. Before you start installing the Arduino IDE, make sure that you have administrator rights on your computer - this will make the installation easier.
Step 1 . Download Arduino IDE from the official website - https://www.arduino.cc/download_handler.php.
Step 2 . Run the downloaded exe file.
Step 3 . In the window that opens, click on “I Agree” to agree to the terms of the Arduino license.
Step 4 . In the installation options window, check all the boxes (see figure).
Step 5 . In this step, you need to select where to install the Arduino IDE. The default installation path is Program files on drive C - it is highly recommended to leave this path.
Step 6 . In this step, you can watch the Arduino IDE being installed on your computer (see picture). Once the installation is complete, click the “completed” button.
Step 7 . After the installation is complete, run the Arduino.exe file. An IDE window will open with a minimum of code inside it - see the picture.
Part 3: Card and Port Configuration
Launch the Arduino application
Configure the port and board
- On any system you may have a tool menu. Click this and make sure the appropriate board is selected. Uno is the default and may be selected in your installation. Make sure the serial port is selected correctly, too
- On a Mac, the port names are a little more complicated, but it will be one of the listed USB ports. It will probably be listed as cu-USB.
Connecting your Arduino board to your computer
Once you have installed the Arduino IDE on your computer, the next logical step is to connect the Arduino UNO board to your computer. To do this, simply use the programming cable (blue) and connect it to the Arduino board and the USB port of your computer.
The blue programming cable can perform the following three functions:
- It powers the Arduino UNO board, that is, to ensure the execution of programs on it, you simply need to power it using a USB cable.
- The ATmega328 microcontroller located on the Arduino UNO board is programmed through it. That is, the program code is sent from the computer to the microcontroller via this cable.
- It can function as a serial communication cable, meaning it can be used to transfer data from the Arduino UNO to a computer - useful for program debugging purposes.
After you supply power to the Arduino UNO board, a small LED on it will light up - this indicates that power is supplied to the board. You may also notice another LED blinking - this is the result of the LED blinking control program that is loaded into your board by default by its manufacturer.
Since you are connecting the Arduino board to the computer for the first time, it will take some time for the drivers to install successfully. To check whether everything was installed correctly and detected, open the “Device manager” on your computer.
In Device Manager, open the “Ports” option “Ports (COM & LPT)”, click on it and see if your board is displayed correctly there.
It is worth noting that you should not pay attention to what port number is displayed on your Arduino board - it may, for example, look like CCH450 or something similar. This port number is simply determined by the board manufacturer and does not affect anything else.
If you cannot find the “Ports (COM & LPT)” option in Device Manager, this means that your board was not detected correctly by the computer. In most cases, this means a problem with the drivers - for some reason they were not automatically installed for your board. In this case, you will have to manually install the necessary drivers.
In some cases, the specified Device Manager option may show two COM ports for your board and you will not know which one is correct. In this situation, disconnect and reconnect the Arduino board to the computer - which of the COM ports will appear and disappear, which means that is the correct port.
You should remember that the COM port number will change every time you connect your board to the computer - don’t be alarmed, there’s nothing wrong with that.
Four parts:
- Setup on Mac OSX
- Setting up on Windows 7
- Card and Port Configuration
- Launch your first application
So, you just bought or are about to buy an Arduino Uno kit. Your mind is probably filled with questions about how you can get started right away, maximizing your experience. There's nothing stopping you from coding the next big thing on Arduino or using it for something as simple as a server or a thermal unit for your home. To help you with this, this article is about installing drivers and setting up your device. This should be enough to keep you running and exploring!
Loading LED Flashing Program
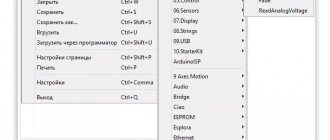
Now let's load our first program into the Arduino board using the Arduino IDE, which we just recently installed. The installed Arduino IDE contains several example programs that will be very useful for beginners. Let's open one of these example programs using the following path File -> Examples -> Basics -> Blink (as shown in the picture).
This will open the Blink program - its purpose is to make the built-in LED on the Arduino board blink. After opening the program, we need to select the correct Arduino board - to do this, select the menu item Tool -> Boards -> Arduino UNO/Genuino as shown in the figure below.
Next we must select the correct port for our board. Earlier we saw that our board had a COM13 port defined. In your case it may be a different port. But for our case under consideration, we must select the menu item Tools -> Port -> COM13.
If everything is done correctly, you should notice that the port number (in our case COM 13) will appear at the bottom of the screen. After this, you need to click the download button (highlighted in blue) to the Arduino board as shown in the figure below.
After clicking this button, you will see the message “Compiling sketch” and then if the program upload is successful, you will see the message “Done Uploading” as shown in the image below.
If at this stage you encounter any errors that are not discussed in this article, then you can try to find them in the article about the 10 most common errors when working with Arduino.
Now let's try to write a program that will light up an LED when a button is pressed.
Part 1: Setup on Mac OSX
Download and install the latest Arduino package
Launch the built-in FTDIUSB driver
Once finished, drag the app to your Applications folder
- You need to reboot your device to activate the new drivers.
Connect Arduino
- When you connect for the first time, Arduino OSX will tell you that it has detected a new interface. Just click on Network Settings and click Apply.
Connection diagram
Shown in the following figure.
We will connect the button to the second pin of the Arduino, that is, one end of the button will be connected to the second pin of the Arduino, and the other to the ground. That is, whenever we press a button, ground will be supplied to the second pin of the Arduino.
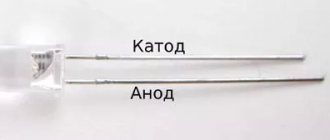
The LED is connected to pin 3 through a 1 kOhm resistor. That is, the cathode of the LED is connected to ground, and the anode is connected to pin 3 of the Arduino through a resistor.
7Loading sketches into Arduino memory
Now you can load the program into the board's memory. Connect the board to the computer, wait a few seconds while the board initializes. Click the Upload , and your sketch will be written to the memory of the Arduino board.
The LED should start blinking cheerfully at you every 2 seconds (1 second on, 1 second off). Below is the code for our first Arduino program. void setup() {
// initialization block pinMode(13, OUTPUT);
// set pin 13 as output. } void loop() {
// loop that repeats endlessly as long as the board is turned on: digitalWrite(13, HIGH);
// apply a high level to pin 13 - light the LED delay(1000); // for 1000 ms = 1 sec. digitalWrite(13, LOW); // apply a low level to pin 13 - turn off the LED delay(1000); // for 1 sec. }
// then the cycle repeats
Read the comments in the text of the program - they are enough to understand our first experiment. First we describe the initialization block setup()
, in which we set the initial values of the variables and the functions of the Arduino pins.
What follows is an endless loop()
that repeats over and over again as long as power is supplied to the board.
In this cycle we perform all the necessary actions. In this case, we turn on and turn off the LED. The delay()
operator specifies the execution duration (in milliseconds) of the preceding operator.
The digitalWrite()
statement tells the Arduino which pin to apply voltage to, and exactly what voltage level. Your first sketch is ready!
Helpful advice
There are many sites on the Internet dedicated to working with Arduino family boards. Read, master, don’t be afraid to experiment and learn new things! This is a fun and rewarding activity that will bring you a lot of pleasure.
Environment version
The current 0.14 version of the Arduino Mega Server system was developed in the Arduino 1.6.5 environment and the least number of problems with project compilation will be in this version of the development environment. There are messages from users that they managed to compile the project in other versions of the environment and you can try to do this, but it is still strongly recommended to use version 1.6.5.