Cordless screwdrivers are used everywhere, both in households and in small industries. Mobility and autonomy allow you to perform work away from the electrical network for a certain period of time. The battery has a certain number of charge cycles, after which it is no longer suitable for further use. There are several reasons; the battery is a very capricious element that fails even if it is not stored correctly and is not used. The high price of a screwdriver prompts you to find out how to convert a cordless screwdriver into a corded one.
Reasons for converting a cordless screwdriver
The absence of a power source makes any energy-dependent thing useless. It is almost impossible to remake a dead battery; there is only one way out - converting the screwdriver into a mains one. The high price of a new battery makes the purchase impractical; to save money, owners of unused tools are wondering how to convert a cordless screwdriver into a corded one.
There are cases when the screwdriver used is discontinued, then it is almost impossible to find a new battery. A screwdriver without a battery is a completely useless thing that will collect dust on the garage shelf if nothing is done. The main advantages of the rework:
- The tool becomes functional and can easily replace a mini drill.
- There is no need to monitor the battery level.
- The tightening force is independent of the remaining battery charge.
The only downsides are the presence of a wire and dependence on the electrical network. After modification, the device acquires an electrical cable, which does not allow work to be done in hard-to-reach places, away from the power source.
Battery assemblies
The power source for an electric hand tool may differ in the configuration of the case, the group of contacts, and the beautiful color, but one thing is constant - they are assembled from piece elements. Each of the manufacturing companies produces branded batteries, paying great attention to quality, since the performance of the tool directly depends on the power source - by which the manufacturer is judged.
Now on the market there are batteries available for sale that differ in: the active component; size; containers; tension. Elements with an active Ca-Ni component were the first to appear in devices as a source of autonomous power supply. Actually, after its invention, it became possible to manufacture battery-powered hand tools. These elements have a number of advantages and disadvantages.
One of the main advantages: these elements work well at temperatures close to freezing down to – 20°C and are sold at a low price.
One of the biggest problems is the so-called “memory effect”. This phenomenon is expressed in the ability of active components to oxidize during prolonged charging, i.e. If the battery remains charged for several days, then the capacity, and therefore the performance, will decrease several times. And, although the manufacturers in the instructions warn about the procedure for mandatory discharge of the battery after finishing work on an additional load, for example, an incandescent light bulb, forgetfulness of users can damage the battery. When used correctly, the number of charge-discharge cycles is up to 500-600 times without limiting the service life.
Metal is a hydride battery in which the contact plate is a nickel oxide alloy, the active layer is made of powder with a nickel filler containing rare earth elements.
With the correct operating mode, the discharge cycle - the charge of such batteries is increased up to 700 times. With the introduction of new active elements, the product received an additional capacity in comparison with Ca-Ni by almost one and a half times, but also acquired a disadvantage: in the event of a controller failure in the battery circuit, when overcharging, the active nickel became activated and became very overheated. In updated batteries, the “memory effect” has been greatly reduced, but not completely eliminated. The service life was limited to three to four years of operation.
Li-ion . A Lithium-ion battery uses lithium ion components. The very first lithium batteries were made of lithium. They had good characteristics - high operating voltage and capacity, however, they had a problem: with a slight overvoltage or internal short circuit of the elements, lithium became active and reacted with the filler, which led to ignition or heating to high temperatures. In order to avoid battery fires, manufacturers were forced to turn battery production towards the use of materials with lithium ions, such batteries received the prefix - lithium-ion. During operation, it turned out that if you systematically recharge the battery, then the active release of lithium begins and its deposition on the walls of the battery. With a certain accumulation, it could enter the active phase with the same consequences.
Do-it-yourself screwdriver conversion
There are plenty of craftsmen in everyday household life; there are many ways to convert a screwdriver to mains power. It is enough to provide the required voltage for the electric drive of the device.
Cordless screwdriver disassembled
In some cases, for rework, it is enough to use the charger from the kit; it is available, because comes complete with a screwdriver. It is quite simple to remake such a design; just disassemble the screwdriver and connect the charging output contacts to the drive wires. The voltage supplied by the charger after modification corresponds to the technical characteristics of the drive; there is no need to worry about the safety of the electrical part. It is also worth noting that there is no need to disassemble the device completely, because Only the wires designated for use should be connected. A significant drawback is the size of the charger; constantly moving it during work is inconvenient and causes discomfort.
Power supply from the screwdriver network can be achieved by several types of blocks. The housing accommodates some of them, the rest are located outside.
There are many ways to convert a cordless screwdriver, all of them have pros and cons.
- In the case of the old battery, a place is organized for the finished power supply. The alteration is simple, intervention in the electrical circuit is not required, it is enough to carry out the work carefully and achieve a perfect appearance. The disadvantages include the time spent searching for a block with the appropriate voltage and dimensions. Also, small devices usually heat up in a closed space; it is necessary to provide ventilation to the device by making holes in the housing.
- Installing a homemade energy source is a more complex solution; it requires finding the necessary radio components and understanding the circuit. The advantages of this conversion method are low financial costs, no losses when using a low-voltage cable, and no changes in the appearance of the device.
- An external power supply can be used when working in one place, since the device’s mobility and compactness are lost. There are also costs associated with finding a suitable voltage for the electric drive of the screwdriver.
- The most common external type device is a computer power supply. The advantages are that it is easy to find at disassembly sites at a reasonable price; there are no complex remodeling processes. However, the bulky design will not be to everyone's taste.
A practical example of how a screwdriver works from a computer’s power supply
There are two screwdrivers at work, we purchased them and with everyday use the batteries lost their capacity and it is no longer useful to charge them; they run out very quickly. We tried to remove the battery and revive it, but it didn’t work and we had to make a power source and work on it in the workshop. So, let’s check how the screwdriver will perform when operating from the mains with a computer power supply.
The block from an old computer was taken as a basis. It's 220 volts. We brought out a wire with a connector to insert into the screwdriver. Convenience is that the device has a switch and indicator. There is enough power reserve. The wire is 2.5 meters.
Let's test it at work. It screws screws and drills holes very well.
It took approximately 1.5 hours to remake the block. The test showed that the power reserve is sufficient to screw screws into pine and chipboard. Let's try to drill a hole. As you have seen, everything works. There are no overloads, smoke, etc.
Connecting a screwdriver to a charger
It is necessary to understand that at low voltage there are losses in the cable, so it must have a cross-section of at least 2.5 mm and a length of no more than 1.5 meters. In order to figure out whether it is possible to connect a screwdriver to a charger, you need to perform a number of steps.
Sequence of conversion to power supply from charger:
- Resolder and remake the wires to the charger, usually the contacts are located in a visible place, one is responsible for the plus, the second for ground. When working, the charger must be disconnected from the network.
- Then you need to disassemble the unusable battery and remove the old elements;
- A hole for the cable is drilled in the housing for a tight connection, the cable is wrapped with electrical tape or fixed with thermal shrink tape.
- To balance the weight, it is necessary to place a piece of dense wood or rubber in the remaining space; this will contribute to proper weight distribution and the hand will not get tired when working.
- The final step is to solder the wires to the power supply of the electric drive and assemble the body of the power tool after the alteration.
Is it possible to connect a screwdriver directly to the charger?
The screwdriver is convenient due to its omnipresence. independence from boundary wires makes it possible to get into hard-to-reach areas. A set of two power modules allows you to power one of them while working with the other. However, each battery pack has a finite number of charge/discharge periods, failing once they are used up. In inexpensive tools, the blocks break faster, and the user receives a gadget with a working motor, but without power. Then the dilemma arises: “is it possible to connect a screwdriver directly to the charger?”
You can power such a screwdriver by connecting it to the network through a power supply, because its motor operates at 220 volts.
Car charger
When looking for a solution to the question “is it possible to connect a screwdriver to a charger,” you can stop at charging with a car AK unit. Modules with manually adjustable current and voltage are applicable. The connection is absolutely not difficult. It is enough to connect the input channels of the tool’s motor with the contacts of the car charging unit.
Installation of a finished power supply in the housing of an old battery
If you managed to purchase a power supply unit on the market with the appropriate indicators, installation and modification are carried out in a few simple steps:
- Dismantle the old battery case and remove the spent cells.
- Install the new power supply so that it fits tightly against the case; if necessary, you can glue it, connect the high voltage wires (output from the 220 volt outlet).
- Connect the low voltage terminals to the power supply of the electric motor of the impact wrench; if there are no contacts, the wires will have to be re-soldered.
- Assemble the housing after modification and install the block on the screwdriver.
Installation of a finished power supply in the housing of an old battery
It must be remembered that compact power supplies heat up in a closed space, so it is necessary to drill several holes on different sides of the case for ventilation.
Other power supply methods
Block inside
The solution to the problem “is it possible to connect a screwdriver via a charger” can be an alternative option for powering the screwdriver. installing the power supply into the empty housing of the instrument power unit.
Before starting action, it is necessary to prevent overheating of the unit, for which purpose holes are pre-arranged in the housing that will ensure air movement and heat removal. With this improvement, it is advisable to reduce the time of continuous operation of a screwdriver to 15 minutes.
A ready-made block is purchased and selected according to the body size and technical parameters. The pulse version of the module is most suitable for use; it is small-sized and lightweight. The use of domestically produced modules from the last century is not recommended. they have large volumes with low efficiency.
Unusable batteries are removed from the stock and a power supply is placed in their place. The contacts are energized and the housing is closed. The assembled hybrid gadget is ready to work from the network.
- The wires can be extended for convenience.
- It is necessary to monitor the quality of the assembly: the structure should not be able to touch metal elements, otherwise a short circuit will occur. It is best to leave some space between the transformer and the board, which will have a positive effect on cooling.
- If any parts of the structure become very hot, it is possible to install modules that remove excess heat or install ventilation slots.
General recommendations
All of the above methods include one step that unites them. disassembling the power module housing. If the frame is secured with bolts, then this is not a problem; fastening with glue requires carefully opening the seam by tapping the gap with a hammer and inserting a knife into it.
When installing, observe the direction of voltage. it should not be supplied to the battery. Therefore, the module is mounted parallel to the power contacts, and a diode illuminator with a certain power is built into the positive line.
Summary: to the question “can a screwdriver work from a charger” there is a positive answer, and several solutions, but caution, some scientific knowledge and dexterity are required.
Homemade power supply
When working with a soldering iron, you need to check the connection to the network of the battery elements and the homemade unit; if there is a connection, you must turn off all power sources for safe operation.
The modification work is carried out step by step; to obtain the result you will need a little experience in soldering and mounting boards:
- Dismantling and dismantling the housing of the old battery;
- In accordance with the diagram, install the elements on the circuit board, solder the contacts and connections.
- After soldering, check the output voltage with a multimeter.
- Assemble the circuit board onto the battery case.
- Connect the appropriate wires to the low voltage outputs of the instrument.
- Check operation by connecting the converted device to the network.
Read also: Surface roughness parameters table
Manufacturing instructions
The alteration must begin by determining the polarity of connecting the power source to the motor of the power tool. In most cases, the polarity is not indicated on the screwdriver contacts.
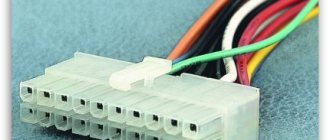
Plug-in contacts on the body of a power tool.
In this case, you need to look at the battery - it should have plus and minus marked on it.
Polarity markings on the battery case.
Having determined the polarity, you need to mark the poles on the contacts of the power tool (although there will be no big harm in case of polarity reversal - the shaft will simply rotate in the opposite direction, which is easily eliminated with a reverse switch).
Polarity marking on the screwdriver body.
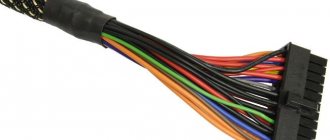
Next, you need to solder wires of sufficient cross-section to the plates (according to the principle “the thicker the better,” but respecting the boundaries of reasonableness and convenience).
Soldering wires to power tool contacts.
At the other end of the wires, it is a good idea to provide a connection connector designed for maximum current. Then the screwdriver can be stored separately or used different voltage sources. But you can make a power tool, wire and power supply as a single system. This is also convenient - there is no risk of forgetting or losing the power source if it is small.
Corded screwdriver as a single system with a power supply.
Next we need to solve one more problem. When converting a power tool to be powered from a household network, the battery must be excluded from operation . But the screwdriver is balanced in such a way that it is convenient to operate if the battery is installed. If you remove it, the center of gravity will shift, holding the tool will become uncomfortable and your hand will quickly get tired. Therefore, if possible, it is necessary to cut off part of the battery case so as to prevent electrical contact of the batteries with the screwdriver terminals. This can be done with a grinder or just a hacksaw.
Removing part of the battery case with contact pads.
If the design of the battery is such that it is difficult to remove the contact part, you need to disassemble the battery case, remove the batteries and securely secure a load of suitable weight and size in their place.
We recommend watching a video trilogy of converting an 18-volt screwdriver to a network one.
Connecting to an external power supply
An external battery is used when compact elements are unavailable or continuous operation of the tool is required.
Cordless screwdriver connected to external power supply
It is worth remembering the steps during disassembly or taking photographs, since intervention and alteration of the electrical circuit of the screwdriver will be carried out, assembly will need to be done exactly in the reverse order.
- Disassemble the device and reinstall the connector for the power supply. Connecting wires by twisting is unacceptable; it is recommended to solder the contacts and insulate them with electrical tape. If necessary, seal the connector with hot glue inside the case.
- In accordance with the parameters of the device’s electric drive, select and remake the required battery. As an option, a power supply from a laptop with a similar configuration is often used; an adapter for a low voltage connector is available at any radio parts store.
- After assembling in reverse order, you need to connect the tool to the network and check the operation.
Connecting to a power supply from a computer
In any computer store or radio components market, you can find used or new computer power supplies for a small fee. You may also need an old computer lying around or a laptop charger. The presence of a switch on the case will be a plus for safe operation; the format must correspond to AT or ATX. To use an average screwdriver, a computer power supply of 300W is sufficient; on older models, the information is provided honestly, so they easily output 16 amps or more, sufficient to operate the impactdriver.
Screwdriver connected to computer power supply
These power supplies are distinguished by the presence of their own cooling system and protection against voltage surges. For connection, only two output wires are used, yellow - 12 volts "plus", black - ground.
The disadvantage of this option is that power supplies must be worn during work and installed in a well-ventilated place.
It is possible to attach a handle for mobility. It is important to understand that cordless screwdrivers with a required voltage of more than 14.4 volts will not operate using this method of power supply.
How to power a screwdriver while maintaining its autonomy
There are situations when you have to work in the absence of electricity. It is possible to power a screwdriver without having a 220 network in several accessible ways. In such cases, if the device’s battery is faulty and alteration from the mains is not possible, there are several ways to operate the impact wrench:
- Replace the battery cells inside the battery with new ones purchased from radio parts.
- Using an external battery-type power source, such as a UPS battery.
- Connected and powered by car battery.
It is important to remember that any alteration requires technical skills and compliance with safety regulations.
Replacing old elements
When purchasing new battery cells from radio components, you need to check their capacity and voltage on site.
If stored incorrectly, batteries lose capacity and do not meet the declared characteristics.
- Unscrew the screws securing the case, remove the cover and old battery cells.
- Place new cells, soldered together, into the battery case.
- Reassemble in the reverse order and test the work after modification.
When soldering, you must act quickly, otherwise overheating the battery may cause it to become unusable due to temperature changes.
Connecting to a car battery
Connecting to a car battery will allow you to work autonomously without an electrical outlet. The screwdriver parameters can be from 10.8 to 14.4 volts; a charged car battery can produce an average of 12.5 volts of voltage. To use it, you need to connect two power wires with alligator clips to the screwdriver.
Connecting to a car battery
The alteration is carried out after the disassembly operation, then connecting the power wires to the wires of the electric drive of the screwdriver. If you don’t have a soldering iron, you can simply connect by twisting, but this does not guarantee reliable contact. After connecting the contacts, insulate the wires and test the tool during operation by connecting it to the battery.
Connecting to an external battery
An external battery source may have a higher capacity; it is necessary to select an element suitable for voltage. Basically, a battery from an uninterruptible power supply is used. Remodeling is not difficult and does not require large financial costs.
For the modification you will need a wire with a cross-section of at least 2.5 mm and a length of up to 2 meters. It is necessary to disassemble the tool, remove old battery cells, and connect the wire to the terminals. Make a neat hole for the power cable, assemble the converted screwdriver and test it during operation.
Precautionary measures
After converting a cordless screwdriver, you need to follow simple rules during operation. The work is carried out intermittently; after every 15 minutes of continuous use of a power tool, it is necessary to give 2-3 minutes of rest. The wire and block are fixed in an accessible and comfortable place for work. The converted tool is not used for work at height; the wire must not be extended to the network.
If you find an error, please select a piece of text and press Ctrl+Enter.
Battery screwdrivers are very convenient to use and are widely used by both professionals and home craftsmen. The battery is usually the first to fail. Currently, all manufacturers of power tools have switched to lithium batteries and purchasing a new nickel-cadmium battery for an old screwdriver is becoming more and more problematic, and the prices for these batteries are much higher than for lithium ones.
Of course, it is possible to purchase batteries on various services that sell Chinese goods. But it takes time for the package with the “cans” to arrive, and again, these are certain costs. There is an alternative to buying batteries/cans - connect the screwdriver to the mains power supply and forget about quickly draining the batteries. Powerful power supply on Aliexpress. There are many inconveniences due to the power cord, but you always have to sacrifice something.
How to make a screwdriver from the network video
The procedure for remaking a screwdriver can be seen in detail in the video:
If, after the batteries have become unusable, the screwdriver is converted to power from a 220 V network, this will allow you to continue using the tool without significant costs.
When batteries stop working, many people wonder how to convert a cordless screwdriver into a corded one. It is impossible to repair batteries with damaged elements. The cost of new power supplies is almost equal to the price of a screwdriver. It is not always possible to find suitable elements; models are often discontinued. But for zealous and skillful owners there is a way out - to power the screwdriver from the network.
The converted tool has one drawback: it is tied to an outlet. But for indoor work this is not so significant. But there are more advantages. Now you don’t have to worry about recharging the battery, there will be no downtime. The current strength remains stable all the time and does not depend on the discharge of the battery, which means constant torque.
Before you go looking for a power supply (hereinafter referred to as PSU), study the screwdriver parameters that are indicated on the case or in the passport. Pay attention to the tension. A 12-volt tool is more common; finding a power supply for it is not difficult. If the tension is greater, the search may take longer. It is necessary to find out the current consumption, which is not indicated in the technical specifications. The purchased unit must produce an average current value (between the battery capacity and the standard charger). Data can be found from the labeling.
There are two main options for converting a 220-volt cordless screwdriver. The first is to use an external power supply. Any rectifier capable of delivering the required DC voltage will do. Even if it is big and bulky, there is no problem. After all, you don’t have to carry it around the room. The block is installed near the outlet, and the cord to the instrument is made of the required length.
Remember that as the voltage decreases, the current increases if the power remains the same. This means that the cross-section of the low-voltage cord must be larger than that from a 220 V network.
The second option is that the power supply is mounted in a battery-powered case. The only obstacle when choosing this method may be the size of the transformer. Mobility is maintained, the radius of use depends on the length of the power cord. It is important to remember that the instrument is supplied with 220 V power, so the cord must be reliable, and the input itself must be made carefully and carefully insulated.
Available power supplies can be used as an external source:
- charger for car batteries;
- PSU from an old computer;
- laptop charging;
- homemade power supply.
Converting a screwdriver to a network one
You can buy an old charger inexpensively on the market. Nowadays, pulse chargers are mainly used, and old devices are often sold as unnecessary. This type of charger, with the ability to manually adjust voltage and current, is ideal for any screwdriver, regardless of its operating voltage. The whole modification consists of connecting a low-voltage cord to the output contacts of the charger.
The computer power supply is purchased from older models; it must have a power off button. It will not be needed, but this is exactly the version of the AT format that is needed. On the radio market, a unit with a power of 300–350 watts is selected, which will ensure reliable operation of low- and medium-power screwdrivers. All technical characteristics are indicated on the sticker on the case. The unit has a cooling fan and overload protection. To convert a computer power supply with your own hands to an external one for a screwdriver, we perform simple operations:
- disassemble the body;
- on the large square connector we find a green wire and any black one;
- We connect both wires to each other and insulate them;
- on the other smaller connector, remove all the wires, leaving yellow and black;
- We solder a low voltage cable cord to them.
To maintain polarity, you should know: the yellow wire is positive, the black wire is negative. The tool operates with a voltage of up to 14 Volts from a computer power supply.
Most laptop chargers have characteristics that allow them to be used as a power source for a screwdriver. Chargers with an output voltage of 12–19 Volts are suitable. The only changes that will need to be made are to the output plug. It should be cut off, strip the wires and solder a cable of the required length to them.
Read also: Measuring motor insulation resistance with a megohmmeter
Persons who have an understanding of electrical engineering can make a homemade power supply. Its circuit is quite simple and includes a step-down transformer, a diode rectifier and two capacitors. All parts can be bought or taken from old radio equipment. A transformer from a tube TV with a 24–30 V output is suitable. A rectifying diode bridge is required. The capacitors used are not in short supply, from old technology: one is 0.1 µF and the other is electrolytic at 4700 µF.
Attention! The structure must be enclosed in a housing. To protect against short circuits, it is necessary to install fuses at the input and output.
The mains power supply for the screwdriver can be placed in the battery case or in the handle. Possible options:
- any power supply unit suitable in terms of characteristics and size;
- Chinese 24 V power supply;
- homemade.
A power supply with the required parameters is selected on the radio market. At home, you should carefully remove it from the case and place it in your screwdriver, securely fastening all the components. If the wires are short, lengthen them so that they do not touch metal parts. Place the transformer and the board separately. For better cooling, install additional radiators on microcircuits. It would also be a good idea to have holes in the housing to allow air to circulate and heat to be removed during operation.
Converting a cordless screwdriver to a corded one
In a radio parts store we buy a 24 V power supply, current 9 A. Screwdrivers operate on 12 or 18 Volts, so the task is to reduce the voltage to the required level. To perform such work, minimal knowledge of radio engineering is required. The output voltage is maintained by resistor R10 with a nominal value of 2320 Ohms. Instead, you should install a 10 kOhm trimmer resistor. How to configure the power supply is described below:
- remove the constant resistor;
- set the resistance of the trimming resistor to 2300 Ohms on the device;
- solder the tuning resistor in place of the constant one;
- With the power supply turned on, adjust the voltage.
The design of a homemade power supply will be based on a 60 W Feron or Taschibra electronic transformer. You can buy them at an electrical supply store and they are designed for halogen lamps. They do not require any modification. By diverting the secondary winding from the midpoint, it was possible to use two Schottky diodes instead of the usual four. The operation of the power supply is controlled by the HL1 LED. The diagram shows all the necessary details.
Transformer T1 winds itself. A non-scarce ferrite ring NM2000 with dimensions 28×16×9 is used. Before winding, the corners are cleaned with a file, and the ring is wrapped with FUM tape. The completed unit is mounted on an aluminum plate 3 mm thick or more, placed in the battery housing. It also serves as a common wire.
Operational reliability and safety depend on the reliability of the installation of the electrical part. A soft multi-core cable is used as a network and low-voltage cable. If the device is external, the ends of the cable should be connected to its terminals. We treat copper wiring and brass contacts with soldering acid, after which they are easily soldered. In practice, special clamps called “crocodiles” are often used. In the screwdriver itself, you cannot do without soldering; the “crocodiles” do not hold so tightly that the contacts do not separate during operation.
Manufacturing a battery-based power supply
The ideal option is to use an old battery case. It is disassembled and the entire internal part is removed. This releases harmful substances; care should be taken to protect the respiratory tract and skin. The body is washed with soda solution, running water and dried. On the inside of the contacts, solder the ends of the cable, observing polarity. In order not to guess, we temporarily connect the cable, turn on the screwdriver and see in which direction the spindle rotates, mark the wires. We make a hole in the bottom of the case and pass the wires through. Inside the housing, the cord should be securely fixed by wrapping insulating tape around it. This thickening will prevent the wiring from stretching and breaking. Then we solder the ends to the contacts.
We place a counterweight inside the body. The best material would be compressed rubber. It has the necessary characteristics: high density, insulating properties. To prevent the rubber from dangling inside, we cut it out with a slight overlap. To place the counterweight in the housing, we bend the material slightly and place it so that it will not oscillate and will serve as additional insulation. Perhaps the counterweight may seem unnecessary to some, but it is not. The design of the screwdriver ensures that the center of gravity is in the handle. This loads the arm, but relieves the hand. When batteries are removed from the case, the center of gravity shifts, increasing the load on the hand. Work becomes uncomfortable and difficult. A homemade counterweight restores the center of gravity close to the factory one.
You have seen how easy it is to convert a cordless screwdriver into a corded one. The practice of craftsmen suggested simple and useful tips for operation:
- after 20 minutes of work, you should give the screwdriver a five-minute rest;
- fix the electrical cable on your hand so that it does not interfere with your work;
- The power supply should be regularly cleaned of dust;
- do not use extension cords to connect the power supply to the network;
- The power supply must be grounded;
- It is prohibited to use corded screwdrivers when working at heights.
Compliance with these rules will extend the life of the updated instrument. Mobility has been lost a little, but the unit does not require recharging and works smoothly and confidently.
When the battery of a screwdriver has completely become unusable, and it is not possible to replace the battery, the most optimal and cost-effective solution remains - to convert it to a 220-volt network. Yuriy Onishchenko looked at what kind of power supply is needed, what to connect and other points of modification. All the necessary radio components can be purchased cheaply in this Chinese store.
How much current does a screwdriver consume?
Before choosing a suitable power supply, you need to understand what current consumption you need to count on. Unfortunately, cordless screwdriver manufacturers do not indicate the current consumed by the motor. The capacity of the battery itself in ampere-hours, which is necessarily indicated on the battery, does not allow us to understand how much current the screwdriver consumes in operating mode
. The maximum that the manufacturer can indicate is the power in watts, but this is very rare, usually the power is indicated directly in torque.
Read also: How to remove the chuck of an assault screwdriver
If the power in watts is still indicated, we can have an idea of the current consumption and select an appropriate power supply with a small current/power margin. To calculate the current, it is enough to divide the power in watts by the operating voltage of the screwdriver, in this case it is 12 volts. So, if the manufacturer indicated a power of, for example, 200 watts - 200:12 = 16.6 A - this is the current consumed by the screwdriver in operating mode.
However, the indicated power is very rare and there is no universal figure that characterizes all 12-volt screwdrivers. You need to understand that when the motor shaft is fully braked, the currents can significantly exceed the rated ones and calculating this value is not very easy. At the same time, an analysis of various forums and our own experience has shown that a current of 10 A is often enough to operate a screwdriver; this is enough to perform many screwing and drilling functions. It is known that current surges during complete braking of the shaft can exceed 30 A.
Well, what conclusion can be drawn from all this? A 12 V power supply providing 10 A current is suitable for a screwdriver; if it is possible to use a 20-30 A unit, this is even better. These are average figures that apply to most screwdrivers.
What is needed for remodeling
To remake a screwdriver, you need to briefly familiarize yourself with the electrical diagram of the tool. The tool is driven by an electric motor. Depending on the power and class of the tool, the voltage can be 12, 14, 18 volts. The electric motor receives power from a battery of batteries of the appropriate voltage.
The engine transmits torque to the cartridge through a mechanical gearbox. Engine speed is changed both by the gear reduction system and by a reversible electronic speed controller combined with a power button.
Screwdriver device:
- Accumulator battery.
- Speed regulator.
- Power button.
- Electric motor.
- Gearbox.
- Cartridge.
Expert opinion
Alexey Bartosh
Specialist in repair and maintenance of electrical equipment and industrial electronics.
Ask a Question
Important! The main difficulty in converting a screwdriver to operate on a 220-volt network is that it requires more power. Nickel-cadmium or lithium batteries provide it without problems. But not every power supply can produce the required power.
How much power does the power supply need and how much does the screwdriver consume from the power supply?
Calculating the required power of the power supply is not difficult - you need to multiply the current consumed by the electric motor of the tool by the voltage. For example, the tool is powered by a battery with a voltage of 12 volts. The current that the electric motor needs to operate is 10 amperes. We get 120 watts. But this is the minimum value.
To ensure normal operation under loads, for example, when driving a screw into hard wood, the power supply must be selected with a margin of 30-40%. Otherwise, the screwdriver will not be able to work normally under load or the power supply will fail.
The current strength, depending on the model, can be 7-10 A for household screwdrivers and 30-40 A for professional models. The battery voltage can be 12 V, 14 V, 18 V depending on the specific model.
Important! The current required by a screwdriver to operate depends on the load. At idle, the current is minimal and increases significantly during startup or when tightening a screw.
The required voltage, power and battery capacity parameters are usually indicated on the label of the tool itself or in the technical documentation for it.
If the operating voltage of the instrument is 12 V, the number of options for choosing a power source increases, for example, you can connect it to a computer power supply. It is quite possible to purchase an old one with a power of 300 W for a low price. In addition, the output power is sufficient with reserve. The advantages of this option include: ease of modification, as well as the fact that a computer power supply with a power of 300 W or more is relatively easy to find.
The block parameters are indicated on a sticker located on the wall. For example, it states that a voltage of 220 v is supplied to the input, a current of 25 A is supplied to the output of 12 v. We get a power of 300 W.
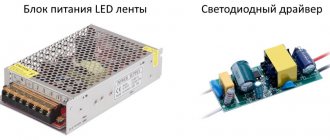
If desired, you can use the following as a 12 V power source from the mains:
- LED driver;
- electronic transformer for powering low voltage halogen lamps;
- car battery charger.
If the instrument is designed to be powered at a different voltage, say 14 V or 18 V, there are few options for choosing a power supply. For a tool operating on a voltage of 14 V and having a maximum current of up to 25A, a universal power supply unit AIDA BSh 14 PRO is available for sale. There is also an 18 V power supply, designed for current up to 20 A, AIDA BSh-18 PRO.
It is not recommended to consider using the original included charger or power supplies for laptops. Such power supplies are not able to supply the current required for normal operation of the tool.
You can make your own power supply for the required voltage. But this requires certain knowledge of electronics. A diagram of such a power supply can be viewed here. There are power supply circuits that can be mounted instead of batteries.
When connecting power from the charger to the screwdriver, you must use a wire with a cross-section larger than 2.5 mm². Otherwise, the wire will become very hot, which can lead to melting of the insulation and a short circuit.
The level of voltage loss also depends on the length of the wire. The longer the wire, the correspondingly greater the losses. If you choose the wrong wire length, it may turn out that the screwdriver “does not pull”, it cannot be used to tighten a screw into hard wood, etc.
The quality of the wire connection also affects the voltage loss. Wires connected by twisting will have a high transition resistance, which will significantly affect voltage losses.
Expert opinion
Alexey Bartosh
Specialist in repair and maintenance of electrical equipment and industrial electronics.
Ask a Question
Important! Do not connect the screwdriver to the power source with a wire having a small cross-sectional area. This threatens failure of the tool itself and a fire.
power unit
We will not consider purchasing any units or transformers, and if we do buy it, it will be a new battery! We will consider using what we have on hand. I’ll say right away that the charger from the same screwdriver is only suitable for drilling overripe bananas, its power is too low.
Ideally, a step-down, powerful 12 V transformer, for example from a computer uninterruptible power supply, would be suitable. The power of such a transformer is usually 350-500 watts. But I didn’t have such a transformer, but I had a lot of computer power supplies. I am sure that if someone has various electronic junk, ATX computers are definitely lying around in it.
The computer ATX unit is quite suitable for a screwdriver; the load capacity on the +12 volt bus allows you to remove currents of 10-20 amperes. I would like to dispel a small myth - it will not be possible to stuff the unit into the battery housing of a screwdriver, the ATX board is too large. You will have to make a separate case for the block or leave it in its original metal case. The disadvantage of the original case is sensitivity to dust, and even the smallest repair requires a lot of dust.
DIY switching power supply for 18 V screwdriver
The weakest point in household screwdrivers is the battery. Like any galvanic element, it has its own service life. The battery for a screwdriver lasts on average 3–4 years, no more, and then must be disposed of. By the way, claims that with proper care and maintenance it will last 10 years are clearly exaggerated.
How to give a screwdriver a second life if the battery has failed?
Switching power supply for 18 V screwdriver: diagram
There is a way out, and there is more than one. You can purchase a new battery. But the price of such a device may exceed the cost of the entire instrument purchased several years ago. Therefore, the most acceptable solution would be to convert the screwdriver to mains voltage.
Options for connecting a screwdriver to a 220 V network
One solution would be to create a power supply yourself. There are many options for creating a homemade power supply:
- universal option;
- with a two-pole resistor;
- with three-pole resistor;
- with amplifier;
- with and without zener diode;
- on one filter.
However, they have proven themselves to be the most reliable pulse modifications.
Component elements of the switching power supply circuit
Making a switching power supply for an 18 V hand tool with your own hands is not at all difficult. For this you will need:
- Output capacitor 5 pF.
- Resistor.
- Integrated negative directivity converter.
- Comparator with two or three plates.
- Low resistance rectifier.
- Channel filters with beam adapters.
- Schematic diagram of a switching power supply.
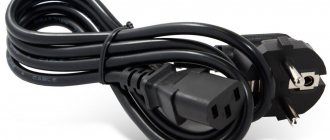
Connecting a cordless screwdriver to a 220 V network: AC adapter
The electric drive of the screwdriver can be driven from a 220 V network by a network adapter. It can be purchased ready-made - the price allows it. You can do it yourself. The purchased adapter must be inserted into the battery housing of the screwdriver, having first removed the batteries. The only drawback is the short length of the cord.
DIY power adapter for a screwdriver: materials
If you need to make a power adapter yourself, then a laptop charger is ideal for this.
The process of converting a cordless screwdriver into a corded one is simple and does not take much time. To do this you need to have:
- Laptop charger.
- Screwdriver with used battery.
- Electrical wire.
- Electrical tape.
- Soldering iron and solder.
- Acid.
Do-it-yourself power adapter for a screwdriver: step-by-step instructions
The rework process includes the following steps:
- First you need to measure the output voltage on the device. It should be 19 V.
- After this you need to take the battery and disassemble it. If it is twisted with screws, then simply unscrew them; if it is glued, then you must first tap it with a rubber hammer. Clean the housing from dirt and prepare it for further work by drilling a hole in it for the power cable.
- Now you need to cut off the connector and strip the wires of insulation.
- The battery should not be thrown away immediately. It can serve as a counterweight for some time. The center of gravity of the screwdriver is shifted and is located in the area of the handle. When the galvanic elements are removed, its location will change, and it will be inconvenient to work with the tool.
- You need to connect an extended cable from the laptop charging to the wires coming from the battery terminals. It must first be passed through a prepared hole in the housing. The cable can be soldered or twisted and insulated with electrical tape.
- When everything is ready, you need to put everything in the case and check the polarity. After this, test the screwdriver.
Power supply for 18 V cordless screwdriver based on an electronic transformer
Another solution for converting a cordless screwdriver to a 220 V network is to use an electronic transformer.
Materials for assembling a transformer power supply
To do this you need the following details:
- Electronic transformer TOSHIBA 105 W or Kamelion 200–250 W. The latter device additionally has short circuit protection.
- Ultrafast diodes KD213 or KD 2999, KD 2997 for 10 A, 4 pcs.
- Choke from a computer power supply.
- Electrolytic capacitor 2200 mF at 25 V.
- 220 nF film capacitor at 25 V.
- Load resistor 1–2 kOhm.
Procedure for assembling a transformer power supply
- The process begins with the modification of the electronic transformer. 4 turns must be added to the secondary winding.
- After this, you can assemble the diode bridge. The circuit assembly is carried out by surface mounting or everything is placed on a printed circuit board.
- Then you need to install a choke in the circuit. A 2200 mF capacitor at 25 V is soldered behind it. This is the optimal capacitance of the device. Neither more nor less is needed.
- A film capacitor must be installed in parallel with the electrolyte. It is needed to ensure that high-frequency residues do not damage the main capacitor, but pass through the film capacitor.
- A load resistor must be installed at the output. It will provide the same voltage value, regardless of the load, and will prevent the failure of capacitors.
- After this, a capacitor must be installed in the electronic transformer to enable starting without load.
- The first time you need to turn on the power supply to the network using a 40 W test light. This is necessary to prevent a short circuit that may have occurred during rewinding of the transformer or assembly. If the lamp does not light up, then everything was done correctly.
- After this, you need to remove the control and check the block under load by connecting it to a screwdriver.
- The resulting unit can be placed in the tool's battery housing.
The reader, having familiarized himself with the information presented in this article, can give his screwdriver a second life.
To do this, it is enough to choose the most acceptable method of converting a battery tool for a 220 V network.
Source: https://pro-instrument.com/ruchnoj/shurupovyort-18-volt-ot-seti.html
Mock Tests
Before starting to build a working structure, you should test everything on the knees, make sure that the screwdriver is operating stable under load and that there is no severe overheating in the power supply.
We take the computer power supply and check it: plug it into the network, find green in the output bundle of wires (they say it can be a different color, but I always came across green ones) and connect it with a jumper to any of the black ones (all black wires at the output are the common output, in our case it is a minus). The unit should turn on and a voltage of 12 volts will appear between the black and yellow wires. You can check this with a multimeter or by connecting any computer cooler to the named terminals.
If everything is in order and the unit produces about 12 volts on the yellow (+) and black (-) terminals, continue. If there is no voltage at the output, we look for another unit or repair this one; this separate topic will be described separately.
We cut off the plug from the output of the block and take 3-4 yellow and black wires coming from the block and connect them in parallel. When cutting off the plug, do not forget about the green starting conductor, it must be shorted to black. We received a 12 V source with a decent current load capacity of 10-20 A, the currents depend on the model and power of the unit.
Now we need to connect our 12 V to the terminals of the screwdriver without a battery; we look at the polarity of the connection using the battery. Well, we check the screwdriver - at idle, then slowing down by hand. At this stage, I encountered a problem: when I press the button fully, the screwdriver works, but when I slowly, smoothly press the screwdriver button, the power supply goes into protection. To reset the protection, you must disconnect the unit from the network and turn it on again. This won’t work at all, we need to somehow correct this instability.
In my opinion, this phenomenon may occur due to the fact that the power supply and the screwdriver button are controlled by PWM controllers; due to interference along the power wires, the controllers somehow interfere with each other. We are trying to solve this problem using an improvised LC filter.
I assembled the filter in 5 minutes from what was at hand: 3 electrolytic capacitors of 1000 uF at 16 volts, a non-polar capacitor of less than 1 uF and wound 20 turns of copper wire with a diameter of 2 mm on a ferrite ring from another unit. Here is his diagram:
And this is what he looks like. This is a purely trial version, in the future this design will be transferred to the battery housing of the screwdriver and will be made more accurately.
We check the entire structure: the block does not go into protection in any position of the button, great! Now you can try to tighten several screws - all in a bunch. It seems that the screwdriver will be able to tighten larger screws.
Well, now you need to remove all the snot and piles of wires, remove the “dead cans” from the battery case, replace them with an LC filter, and test the screwdriver in more realistic conditions.
How to convert a 12 volt screwdriver into a mains one
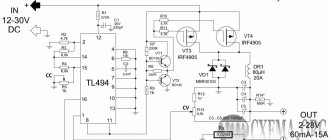
To make such a device, almost any computer source that has a generator on a tl494 chip is suitable. She has an analogue. This is a k 7500 chip.
A suitable block was found; its generator was made on a tl494 microcircuit. But before you start remaking, you need to make sure that the unit is working. To do this you need a 12 volt light bulb and a jumper wire. Each block has such connectors. The red wire is +5 Volts, the two black wires are negative wires, and the yellow wire is positive 12 Volts.
We connect a car light bulb to the 12 volt line. This will be a kind of load and an indicator indicating that the device is working.
There is one more connector. We need a green wire and a black one. We need to close them to turn on the unit and make sure that it is working. We will do this using a jumper wire. We connect 220 volts and short the green and black wires. As you can see, the fan started spinning and the light came on. This indicates that the block is working and can be remade.
Let's analyze the circuit and redo the connection of the tl494 chip, as shown in the diagram in the journal article Radio, 2009, No. 1, p. 38. “Computer power supply - charger.” This magazine can be easily downloaded on the Internet. We don't need the entire circuit, but we do need a node responsible for connecting the microcircuit. The alteration in our case should be done exactly the same as in this part of the circuit. We do this to remove all protections from the unit and allow the generator to operate, so that the unit works immediately and does not turn off under load.
After the modification of the communications circuit has been made, we connect the power cord and connect it. And the power supply should work immediately, and the 12-volt light bulb should light up. All protections are disabled, generator operation is allowed. After this, all the wires that go into the block are soldered to the 12 volt line. This is not enough for us to operate the screwdriver; we need to raise the voltage to 16 Volts for power reserve. At the output of the circuit there is a 16-volt electrolytic filter capacitor. It needs to be unsoldered and a 25 volt capacitor installed, since we will raise the voltage to 16 volts and the previously installed capacitor will not withstand it.
The power supply circuit may contain a resistor for other parameters, but a 3 kilo-ohm resistor should be installed. It is also necessary to replace the section of the circuits in the block that goes to the 12 volt line. Next, we connect a multimeter to the line with the unit running and, using a variable resistor, increase the voltage to 16 volts. After this, the rework can be considered almost complete. You need to solder a wire to the 12 volt line, you can output indicators and switches.
Valery Odinets A year ago And I have a dead professional Hitchi. I tried to power it directly from the original charger - it’s SMART, a bastard, it doesn’t want to! The original charger does not see the proper load and is cut off. I had to put the dead original batteries into the buffer at the exit. The result is that I work endlessly from the network, then for about 5 minutes on dead batteries. Not very mobile, but free. And the Hitachi-Pro is a beast, even with chiselling.
Assembly of the working structure
For ease of use and connection, I brought the cord from the power supply into the battery case. I took a 3.5 meter long cord that was available. I removed all the battery cells from the battery and installed an LC filter. Now, if I somehow get a working battery, I can always put it on a screwdriver and put the power supply away as a reserve. I didn’t throw the batteries out of the battery, I have an idea where to use them, but that’s a topic for another review.
Since the cord connecting the unit to the screwdriver has a certain resistance and inductance, you can try to close the terminals of the L1 coil with a jumper. In theory, this could increase power by a tiny amount.
Read also: How to measure a weld leg
The screwdriver feels great with a cord, but to be honest, it seemed a little weak to me when braking by hand. But trial tightening of the self-tapping screws dispelled my doubts: self-tapping screws 35 mm long can easily be screwed into 20 mm plywood. This means that a screwdriver will cover most repair needs.
I cut off all the output wires from the block, leaving the green starting wire; I soldered its end to the common conductor of the board, where all the black ones are soldered. It's best to carefully desolder all the wires, but my soldering iron was too weak for this and had to be cut. I soldered two short, hard copper wires to the common contact and +12 (where the yellow ones are soldered) and connected them through the terminal block to the cord to the Shura.
This is where we will finish this review, we have achieved what we wanted - the screwdriver works perfectly with a computer power supply. In the future, I plan to make a high-quality plywood case without cracks for the power supply board - tests have shown that the heatsinks on the board do not heat up at all and you don’t have to worry about overheating of the elements in a closed case.
Using a car battery charger
The best option would be an adjustable analog device. It will act as a converter of alternating voltage 220 V into direct voltage 12-14 Volts, consumed by the power tool. The advantage of this option is that there is no need to change anything in the design of the “charger”.
The connection is made as follows:
- in a disassembled battery from a screwdriver, it is necessary to cut the wires connecting the batteries to the contact terminals;
- pass a 2.5-3 meter long cable through the hole made in the case, the ends of which are connected to the wires soldered to the battery terminals;
- connect opposite ends of the cable to the output of the charger;
- Latch the battery, apply voltage - the tool is ready for use.
Appearance of a charger for car batteries
Practical recommendation: Do not use a cable that is too long to connect the impact wrench. This can affect its power - with a long length, the current loss will be noticeable. This can be avoided by increasing the cross-section of the wire cores, but this will affect the ease of operation.
Few additions
To compensate for losses in the cord connecting the screwdriver to the power supply, it is useful to increase the voltage by 2-3 volts. But this is provided that you know the circuit design of ATX computers and know what to do.
If it is possible to use a powerful transformer, then its output, secondary winding should have an alternating voltage of 12 V. If the voltage is different, it is recommended to adjust the secondary winding by unwinding (if the voltage is more than 12 V) or rewinding (if less than 12 V) several turns. It is worth noting that when rectifying and filtering the 12 V AC voltage, it turns out to be about 14.4 V without load. So don’t let this confuse you, this is the EMF voltage and it is natural that it is higher than the nominal one.
In addition to the transformer, a rectifier is assembled; the diodes should easily hold 30 A. It is more expedient to place the capacitor filter in the battery case, as in the ATX version.
If you have a screwdriver and mainly use it indoors, then I think you will find this article interesting and useful. Here we will talk about converting a 12 volt screwdriver with a ni-cd battery.
It would be a good idea to power a screwdriver for your home from an outlet. That's what we'll do today.
A logical question arises: is there any point in redoing anything at all? So aliexpress will not help us in solving this problem. Therefore, I want to offer you another option that is several times more profitable.
Computer power supplies are pretty powerful guys. Also, finding such a power supply will not be difficult. You probably have something like this lying around at home, unused. And if not, then you can go to any computer repair shop and buy a used power supply for a couple of hundred rubles, say, 500 W.
Let it be wrinkled, dirty, covered in dust, but the main thing is that it works. There is usually a sticker on one of the walls containing detailed information on the power lines. On this block we can see the following characteristics: 25 A per 12 V line, and this is no less than 300 W of power.
Enough for a screwdriver. Such a power supply is of course quite large, but at the same time it is much cheaper even than Chinese units with lower power.
You will need to solder a wire with a cross-section of, say, 3 mm 2 to these terminals. In theory, this should be enough to ensure that the energy does not dissipate into heat, even over a wire length of about 2 m. We take a soldering iron and, having previously prepared the wires (by stripping them of insulation and irradiating them), solder them to the terminals.
I don’t know how it will work with your screwdriver; personally, the author managed to bend the terminal ears directly into the plastic and it turned out very reliably.
Supporting it from below, for example, with a screwdriver, we drill a hole through with a drill with a diameter of 3 mm. Then we remove the chamfer with a large drill. Moreover, we remove it so that the m3 screw with the countersunk head does not stick out.
Well, all that remains is to tighten the nut. This option with a screw is many times better than any other fastening.
Also, it is highly advisable to place a 16 or 25 V capacitor with a capacity of about 10,000 μF in parallel with the terminals. You can buy a capacitor at any radio market, in any radio goods store, or you can also pull it out of a dead computer unit. There is a way to get such a capacitor for free. Most likely they will give it to you for free at any computer repair service. They throw them out anyway. You just have to ask. So take action.
The capacitor will serve as an energy buffer for inrush currents. This is necessary in order to reduce the load on the power supply. If this is not done, with a high degree of probability it (the power supply) will go into protection. We take it and solder it. In this case, the author recommends gluing the nut with superglue. Otherwise you simply won’t be able to tighten it.
Well, let’s finally check the torque ratchet at maximum mode to make sure that the power supply draws the maximum starting current in the ratchet screwdriver mode.
And everything is fine here too. The defense didn't work. The experiment can be considered more than successful.
And finally, if you take a weak power supply and it goes into protection, but you have already installed a capacitor, the voltage protection is most likely triggered. And oddly enough, the problem is solved by additional load on the 5 V power line. That is, we take the red and black wires and connect a separate load to them. On the forums they write that 1 A will be enough. To do this, take a 5 W 6 V bulb or two 3 W bulbs, and let them just shine and load the line and everything will work great.
Thank you for attention. See you again!
The best option for powering a battery-powered screwdriver from the mains
What is available for converting a screwdriver in our case? Laptop power supply 15 volt, 6 ampere. There is also a computer power supply, slightly modified, conclusions have been drawn, but there are no changes in the circuit. Power supply from a halogen lamp. Lamp power 12 volts, 50 watts. There is a charger for car batteries with a current regulator. It will be used both as a power source and as a separate ammeter.
Read also: Do-it-yourself Bosch grinder repair video
So let's get started. Let's start connecting directly from the power supply. The pins are already connected. 12 volts, idle - 3 amperes. Maximum ratchet. As can be seen on the device, the current reaches 8 amperes.
We try a laptop power supply of fifteen volts, six amperes. No-load current 4 amperes. In ratchet mode, the maximum current is 9 amperes, voltage is 14 volts. It turns out that a 6-amp power supply copes with this task.
It's the turn of the computer unit. It can easily withstand the load.
Power check
A screwdriver connected to a 90-watt transformer easily copes with screwing in large screws and drilling any materials. After watching this video, it becomes clear that finding a power source for a screwdriver whose battery has become unusable is not problematic. Finding a computer unit is not difficult. An even more convenient option is a laptop unit with 6 amperes or more. It is advisable to find a device with a current of more than 10 volts, since 6-volt ones will go into protection from time to time.
What are the advantages of remodeling?
The power of a cordless screwdriver competes well with its mains counterparts, but only as long as its batteries are charged at a sufficient level. When the battery runs out, it needs to be recharged from the network. This factor is the first disadvantage of this power tool.
The second disadvantage is the limited number of recharge cycles. Moreover, the cheaper the battery pack, the faster its service life is exhausted. Purchasing a new battery is almost comparable in price to purchasing an entire power tool. It also makes no sense to buy a new battery to replace the old one if the cordless screwdriver itself is outdated and rarely used. It would be more practical to adapt the power tool to power supply from a 220 V network.
Making changes will make it possible to further operate this tool with a minimum level of financial investment. The created modification will have all the advantages of network devices:
- there will be no need for periodic charging;
- the power of the power tool (torque) will not drop during operation;
- There is no need to worry about proper storage of equipment during long non-working periods: just put it in a case in a dry place.
These advantages, as well as low costs, compensate for the inconvenience associated with the presence of a cord.
To turn a cordless screwdriver into a network one, you need a power supply unit (PSU), which can be placed in two ways: in the form of an external power supply or mounted inside an old battery case.
It should be taken into account that the cord from the external power supply to the power tool must, according to Ohm's law, have a larger cross-section than directly from the 220V network.
For the practical implementation of any option, you will need the following set of tools and materials:
- screwdrivers with different tips;
- screwdrivers with different tips;
- pliers;
- wire cutters;
- soldering iron with soldering kit;
- insulating tape;
- wiring to jumpers, taken, for example, from a multi-core cable;
- multimeter;
- knife.
Screwdriver device
This mechanism consists of the following parts:
- DC motor. It has the shape of a cylinder; instead of an excitation winding, the housing contains permanent magnets. This simplifies the design and provides sufficient torque at low speeds. The drive (sun) gear of the planetary gearbox is mounted on the electric motor shaft;
- Reversible speed controller. The adjustment circuit is assembled on a PWM controller and a field-effect transistor. Reversing is carried out by switching the polarity of the power connection to the motor brushes;
- Planetary reductor. Made in a separate building. It got its name because of its resemblance to the solar system. Consists of a ring gear, a central (sun) gear, satellites and a carrier. The ring gear transmits force through the spring-loaded balls of the load regulator. There are models with two-speed gearboxes. Increased speed is activated when using the device as a drill;
- Rotation force limitation mechanism. Serves to limit the force when tightening screws. Transmits torque through balls pressed by an adjustable spring;
- Removable battery. Consists of individual elements in one housing. The voltage in different models ranges from 9 to 18 volts.
Screwdriver device
What tools and materials will be needed for the remodeling?
To convert a battery-powered device into a network device, you will need to prepare some tools and materials:
- pliers;
- several screwdrivers of different sizes;
- wire cutters;
- soldering iron;
- construction knife;
- adhesive tape for insulation.
To convert the screwdriver to mains power, you will also need to provide a housing for the converter. The shell from an old battery is quite suitable for this role - it will only need to be slightly altered.
Power Options
To convert a cordless screwdriver into a 220V network, you need to take into account that the device requires a much lower output voltage - from 12 to 18 V. To convert the tool, you will need to equip it with an adapter, or converter.
There are several options for power sources that allow you to convert a battery unit into a network one:
- Pulse. Such a power source works using an inverter system - it first rectifies the input current, and then converts it into high-frequency pulses and transmits it to the instrument either directly or through a transformer. The advantages of a pulsed network element include small dimensions, high efficiency of 98% and short circuit protection.
The disadvantage of a switching power supply is low power - Transformer. Such a power supply consists of several parts - a direct step-down transformer, a rectifier, a stabilizer and a capacitor. Sometimes the system includes a fuse and a high-pass filter to eliminate interference. Transformers are quite powerful and inexpensive, but their efficiency is low and they are bulky
Attention! When using a transformer, you need to take into account that part of the output voltage will be taken by the stabilizer. Accordingly, the maximum current value should be slightly higher than necessary.