Details Category: Electrical Published 09/06/2016 09:02 Author: Admin
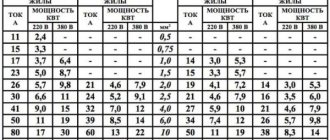
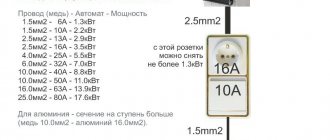
Correct calculation of the cross-section of wires and cables is a necessary and important step in the design and further installation of any electrical installation. To select the correct cross-section, you need to know the maximum possible power consumption of the installation or circuit.
Below are tables for selecting the cross-section of copper and aluminum cables by current and power . The tables were taken from the PUE , the calculation was made using the formulas for an active single-phase and three-phase circuit with a symmetrical load.
Table for selecting copper cable cross-section by current and power
| Cross-section of current-carrying conductor, mm2 | Copper conductors of wires and cables | |||
| Voltage, 220 V | Voltage, 380 V | |||
| current, A | power, kWt | current, A | power, kWt | |
| 1,5 | 19 | 4,1 | 16 | 10,5 |
| 2,5 | 27 | 5,9 | 25 | 16,5 |
| 4 | 38 | 8,3 | 30 | 19,8 |
| 6 | 46 | 10,1 | 40 | 26,4 |
| 10 | 70 | 15,4 | 50 | 33,0 |
| 16 | 85 | 18,7 | 75 | 49,5 |
| 25 | 115 | 25,3 | 90 | 59,4 |
| 35 | 135 | 29,7 | 115 | 75,9 |
| 50 | 175 | 38,5 | 145 | 95,7 |
| 70 | 215 | 47,3 | 180 | 118,8 |
| 95 | 260 | 57,2 | 220 | 145,2 |
| 120 | 300 | 66,0 | 260 | 171,6 |
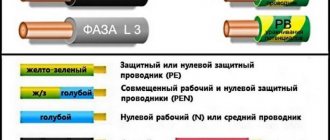
Main differences
If you look at the technical literature, with GOST adopted since Soviet times, you can determine 5 main differences between these electrical conductors:
- number of cores or wires;
- their isolation;
- the cable can be armored;
- place of application;
- difference in service life.
So, the above-mentioned GOST number 15845-80 indicates that the wire includes one or more cores or wires twisted together, and they may have thin insulation or be without it at all.
The cable consists of one or more wires that have a protective sheath and another layer of insulation is wrapped over the entire structure. These additional safety measures protect the cable from various types of damage. The cable can also be armored, which leads to the fourth difference, namely the place of application.
In order to be sure to distinguish a wire from a cable, you should pay attention to the markings, which can be alphabetic or digital.
It is thanks to the additional insulation and armor protection that the cable is suitable for use under water, and this also allows it to be laid underground. It is absolutely impossible to carry out such types of work with wires due to their insufficient protection, which can lead to damage and accidents with varying degrees of danger.
Proof of the above can be found in the rules for electrical installations, which state that electrical wires can only be installed inside electrical distribution devices. Cables or busbars must be installed outside these devices.
The last difference is the lifespan of the cables and wires. As you might guess, thanks to the same additional protection, the cable is more durable and can last up to 30 years. A conductor with a single shell will be suitable for 15 years, no more.
Selection table for aluminum cable cross-section by current and power
| Cross-section of current-carrying conductor, mm2 | Aluminum conductors of wires and cables | |||
| Voltage, 220 V | Voltage, 380 V | |||
| current, A | power, kWt | current, A | power, kWt | |
| 2,5 | 20 | 4,4 | 19 | 12,5 |
| 4 | 28 | 6,1 | 23 | 15,1 |
| 6 | 36 | 7,9 | 30 | 19,8 |
| 10 | 50 | 11,0 | 39 | 25,7 |
| 16 | 60 | 13,2 | 55 | 36,3 |
| 25 | 85 | 18,7 | 70 | 46,2 |
| 35 | 100 | 22,0 | 85 | 56,1 |
| 50 | 135 | 29,7 | 110 | 72,6 |
| 70 | 165 | 36,3 | 140 | 92,4 |
| 95 | 200 | 44,0 | 170 | 112,2 |
| 120 | 230 | 50,6 | 200 | 132,0 |
Example of cable cross-section selection
Let's say we have a load of P=5 kW and we need to determine the required cross-section of the copper cable. Mains voltage U=220 V. For an active load, using Ohm’s law, we find the current flowing through the cable: I=P/U=5000/220=22.72 A
According to the table for a copper cable, voltage 220 V and current more than 22.72 A, we find that the wire cross-section should be 2.5 mm2
A table of permissible long-term continuous currents for wires and cables when laid in the air and in the ground for rectangular and square sections is presented below.
| № | Number of cores, section mm. Cables (wires) | Outer diameter mm. | Pipe diameter mm. | Permissible continuous current (A) for wires and cables during installation: | Permissible continuous current for rectangular copper busbars (A) PUE | |||||||||||
| VVG | VVGng | KVVG | KVVGE | NYM | PV1 | PV3 | PVC (HDPE) | Met.tr. Du | in the air | in the ground | Section, tires mm | Number of buses per phase | ||||
| 1 | 1x0.75 | 2,7 | 16 | 20 | 15 | 15 | 1 | 2 | 3 | |||||||
| 2 | 1x1 | 2,8 | 16 | 20 | 17 | 17 | 15x3 | 210 | ||||||||
| 3 | 1x1.5 | 5,4 | 5,4 | 3 | 3,2 | 16 | 20 | 23 | 33 | 20x3 | 275 | |||||
| 4 | 1x2.5 | 5,4 | 5,7 | 3,5 | 3,6 | 16 | 20 | 30 | 44 | 25x3 | 340 | |||||
| 5 | 1x4 | 6 | 6 | 4 | 4 | 16 | 20 | 41 | 55 | 30x4 | 475 | |||||
| 6 | 1x6 | 6,5 | 6,5 | 5 | 5,5 | 16 | 20 | 50 | 70 | 40x4 | 625 | |||||
| 7 | 1x10 | 7,8 | 7,8 | 5,5 | 6,2 | 20 | 20 | 80 | 105 | 40x5 | 700 | |||||
| 8 | 1x16 | 9,9 | 9,9 | 7 | 8,2 | 20 | 20 | 100 | 135 | 50x5 | 860 | |||||
| 9 | 1x25 | 11,5 | 11,5 | 9 | 10,5 | 32 | 32 | 140 | 175 | 50x6 | 955 | |||||
| 10 | 1x35 | 12,6 | 12,6 | 10 | 11 | 32 | 32 | 170 | 210 | 60x6 | 1125 | 1740 | 2240 | |||
| 11 | 1x50 | 14,4 | 14,4 | 12,5 | 13,2 | 32 | 32 | 215 | 265 | 80x6 | 1480 | 2110 | 2720 | |||
| 12 | 1x70 | 16,4 | 16,4 | 14 | 14,8 | 40 | 40 | 270 | 320 | 100x6 | 1810 | 2470 | 3170 | |||
| 13 | 1x95 | 18,8 | 18,7 | 16 | 17 | 40 | 40 | 325 | 385 | 60x8 | 1320 | 2160 | 2790 | |||
| 14 | 1x120 | 20,4 | 20,4 | 50 | 50 | 385 | 445 | 80x8 | 1690 | 2620 | 3370 | |||||
| 15 | 1x150 | 21,1 | 21,1 | 50 | 50 | 440 | 505 | 100x8 | 2080 | 3060 | 3930 | |||||
| 16 | 1x185 | 24,7 | 24,7 | 50 | 50 | 510 | 570 | 120x8 | 2400 | 3400 | 4340 | |||||
| 17 | 1x240 | 27,4 | 27,4 | 63 | 65 | 605 | 60x10 | 1475 | 2560 | 3300 | ||||||
| 18 | 3x1.5 | 9,6 | 9,2 | 9 | 20 | 20 | 19 | 27 | 80x10 | 1900 | 3100 | 3990 | ||||
| 19 | 3x2.5 | 10,5 | 10,2 | 10,2 | 20 | 20 | 25 | 38 | 100x10 | 2310 | 3610 | 4650 | ||||
| 20 | 3x4 | 11,2 | 11,2 | 11,9 | 25 | 25 | 35 | 49 | 120x10 | 2650 | 4100 | 5200 | ||||
| 21 | 3x6 | 11,8 | 11,8 | 13 | 25 | 25 | 42 | 60 | Permissible continuous current for rectangular copper bars (A) Schneider Electric IP30 | |||||||
| 22 | 3x10 | 14,6 | 14,6 | 25 | 25 | 55 | 90 | |||||||||
| 23 | 3x16 | 16,5 | 16,5 | 32 | 32 | 75 | 115 | |||||||||
| 24 | 3x25 | 20,5 | 20,5 | 32 | 32 | 95 | 150 | |||||||||
| 25 | 3x35 | 22,4 | 22,4 | 40 | 40 | 120 | 180 | Section, tires mm | Number of buses per phase | |||||||
| 26 | 4x1 | 8 | 9,5 | 16 | 20 | 14 | 14 | 1 | 2 | 3 | ||||||
| 27 | 4x1.5 | 9,8 | 9,8 | 9,2 | 10,1 | 20 | 20 | 19 | 27 | 50x5 | 650 | 1150 | ||||
| 28 | 4x2.5 | 11,5 | 11,5 | 11,1 | 11,1 | 20 | 20 | 25 | 38 | 63x5 | 750 | 1350 | 1750 | |||
| 29 | 4x50 | 30 | 31,3 | 63 | 65 | 145 | 225 | 80x5 | 1000 | 1650 | 2150 | |||||
| 30 | 4x70 | 31,6 | 36,4 | 80 | 80 | 180 | 275 | 100x5 | 1200 | 1900 | 2550 | |||||
| 31 | 4x95 | 35,2 | 41,5 | 80 | 80 | 220 | 330 | 125x5 | 1350 | 2150 | 3200 | |||||
| 32 | 4x120 | 38,8 | 45,6 | 100 | 100 | 260 | 385 | Permissible continuous current for rectangular copper bars (A) Schneider Electric IP31 | ||||||||
| 33 | 4x150 | 42,2 | 51,1 | 100 | 100 | 305 | 435 | |||||||||
| 34 | 4x185 | 46,4 | 54,7 | 100 | 100 | 350 | 500 | |||||||||
| 35 | 5x1 | 9,5 | 10,3 | 16 | 20 | 14 | 14 | |||||||||
| 36 | 5x1.5 | 10 | 10 | 10 | 10,9 | 10,3 | 20 | 20 | 19 | 27 | Section, tires mm | Number of buses per phase | ||||
| 37 | 5x2.5 | 11 | 11 | 11,1 | 11,5 | 12 | 20 | 20 | 25 | 38 | 1 | 2 | 3 | |||
| 38 | 5x4 | 12,8 | 12,8 | 14,9 | 25 | 25 | 35 | 49 | 50x5 | 600 | 1000 | |||||
| 39 | 5x6 | 14,2 | 14,2 | 16,3 | 32 | 32 | 42 | 60 | 63x5 | 700 | 1150 | 1600 | ||||
| 40 | 5x10 | 17,5 | 17,5 | 19,6 | 40 | 40 | 55 | 90 | 80x5 | 900 | 1450 | 1900 | ||||
| 41 | 5x16 | 22 | 22 | 24,4 | 50 | 50 | 75 | 115 | 100x5 | 1050 | 1600 | 2200 | ||||
| 42 | 5x25 | 26,8 | 26,8 | 29,4 | 63 | 65 | 95 | 150 | 125x5 | 1200 | 1950 | 2800 | ||||
| 43 | 5x35 | 28,5 | 29,8 | 63 | 65 | 120 | 180 | |||||||||
| 44 | 5x50 | 32,6 | 35 | 80 | 80 | 145 | 225 | |||||||||
| 45 | 5x95 | 42,8 | 100 | 100 | 220 | 330 | ||||||||||
| 46 | 5x120 | 47,7 | 100 | 100 | 260 | 385 | ||||||||||
| 47 | 5x150 | 55,8 | 100 | 100 | 305 | 435 | ||||||||||
| 48 | 5x185 | 61,9 | 100 | 100 | 350 | 500 | ||||||||||
| 49 | 7x1 | 10 | 11 | 16 | 20 | 14 | 14 | |||||||||
| 50 | 7x1.5 | 11,3 | 11,8 | 20 | 20 | 19 | 27 | |||||||||
| 51 | 7x2.5 | 11,9 | 12,4 | 20 | 20 | 25 | 38 | |||||||||
| 52 | 10x1 | 12,9 | 13,6 | 25 | 25 | 14 | 14 | |||||||||
| 53 | 10x1.5 | 14,1 | 14,5 | 32 | 32 | 19 | 27 | |||||||||
| 54 | 10x2.5 | 15,6 | 17,1 | 32 | 32 | 25 | 38 | |||||||||
| 55 | 14x1 | 14,1 | 14,6 | 32 | 32 | 14 | 14 | |||||||||
| 56 | 14x1.5 | 15,2 | 15,7 | 32 | 32 | 19 | 27 | |||||||||
| 57 | 14x2.5 | 16,9 | 18,7 | 40 | 40 | 25 | 38 | |||||||||
| 58 | 19x1 | 15,2 | 16,9 | 40 | 40 | 14 | 14 | |||||||||
| 59 | 19x1.5 | 16,9 | 18,5 | 40 | 40 | 19 | 27 | |||||||||
| 60 | 19x2.5 | 19,2 | 20,5 | 50 | 50 | 25 | 38 | |||||||||
| 61 | 27x1 | 18 | 19,9 | 50 | 50 | 14 | 14 | |||||||||
| 62 | 27x1.5 | 19,3 | 21,5 | 50 | 50 | 19 | 27 | |||||||||
| 63 | 27x2.5 | 21,7 | 24,3 | 50 | 50 | 25 | 38 | |||||||||
| 64 | 37x1 | 19,7 | 21,9 | 50 | 50 | 14 | 14 | |||||||||
| 65 | 37x1.5 | 21,5 | 24,1 | 50 | 50 | 19 | 27 | |||||||||
| 66 | 37x2.5 | 24,7 | 28,5 | 63 | 65 | 25 | 38 | |||||||||
- < Back
- Forward >
Comments
Andrey 02/27/2018 08:09 Tables are not always at hand, so I am amending this article about selecting the wire cross-section. Formula I=P/U=I/s*15%; where s is a resistance of 10 amperes per 1 square, and 15% is the error according to GOST and reactive power.
Quote
Update list of comments
What are the advantages of the method
Open cable routing along walls is most often used not in houses and apartments, but in garden buildings in the country - a garage, a utility block, a bathhouse. Although if you try and choose the right materials, then even in private houses and modern apartments this option for installing electrical wiring will be a winner.
The advantages of open wiring are as follows:
- simpler and faster installation, which even a novice electrician can easily handle;
- fewer tools and materials will be required than when creating hidden electrical wiring;
- You can bring out a new group of wires from the panel or distribution box at any time (for example, if you want to install another socket);
- in some cases, this option has a positive effect on the interior of the room (for example, if you use porcelain rollers and insulators in the bathhouse);
- Repair and maintenance of the line can be carried out without disturbing the decorative finish of the walls.
At the same time, the disadvantages of installing open wiring with your own hands are an increased risk of fire, limited operating conditions and a shorter service life of the electrical network. Please also take into account that the route is more susceptible to mechanical damage than if it is laid in walls.
Do not lay open electrical wiring in the kitchen so that water and heat from the stove get onto the cable lines and sockets; also follow the recommendations described in the article on installing sockets in the kitchen https://samelectrik.ru/rozetki-na-kuxne.html.
In addition, read the rules for laying external electrical wiring on combustible substrates in the article: electrical wiring in a wooden house. In general, it is necessary to ensure a minimum probability of fire; for this you need to use a VVGng-LS cable, modern electrical installation products and installation tools that do not support combustion.
Open wiring in a private house
Difficulties in dismantling wiring
To accurately dismantle old electrical wiring, you need to know the layout of the channels. Unfortunately, it is almost impossible to find such a scheme, which presents an undoubted difficulty for carrying out such work. In addition, electrical wiring could be laid not only in the walls. The ceiling and the junction of the side and top panels were also often used for these purposes.
Dismantling electrical wiring requires significant labor costs and a large list of tools and materials. If you are not ready for such work, it is better to immediately delegate its implementation to a qualified electrician, who will carry out the dismantling more quickly and with much better quality than you. If you still decide to do all the operations yourself, remember the important rules:
- Do not groove in load-bearing walls, especially in the horizontal direction. This can significantly weaken the structure of the entire building.
- Don't get carried away with gating. If possible, new electrical wiring should be installed in old, existing channels.
- If there are not enough channels, make additional grooves with a depth of no more than 10 mm using a hammer drill or wall chaser, and use dowels to secure the wires in them.
- Any finishing work can be carried out only after checking the serviceability of the newly laid electrical network.
Carrying out installation work
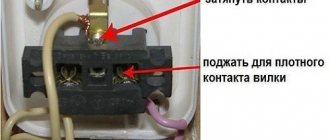
Any electrical repair work requires opening the junction box. When checking the voltage, use a special indicator. If there is no voltage, this is evidence of incorrect connection or broken wires.
Before carrying out any electrical work, disconnect the plugs in the distribution panel. This will ensure safety and allow you to carry out any repair operations on the electrical route without the threat of electric shock.
Other fire and building codes must be taken into account:
- separation boxes, switches, meters and sockets must be installed in easily accessible places;
- GOST recommends installing sockets at a height of 60 cm, switches at a height of 90 cm;
- sockets cannot be installed near metal objects (pipes or radiators), the minimum distance from them should not be less than 0.5 m;
- the number of sockets in a living space is calculated based on the total area of the room - one socket per 6 m2, while the kitchen should not have less than 3 sockets;
- the bathroom is equipped with moisture-proof sockets;
- when choosing switches and sockets, it is better to choose products with a ceramic base and copper contacts;
- cables laid in a vertical position must retreat from window and door openings to a minimum “distance” of 100 mm.
It is necessary to say a few words about the geometry of laying electrical cables in the apartment.
All wires must be laid exclusively vertically. and horizon. lines, with cable turns strictly at an angle of 90. This arrangement will eliminate the risk of damage to electrical wiring when hanging pictures or other decorative elements.
Is it possible to do without gating?
Grilling is a long and complex process, during which a large amount of dust is generated.
And if during a major renovation this is not too much of a problem, then in other cases not all apartment owners are ready to put up with such inconveniences.
Therefore, the question remains relevant: how to change the wiring in a panel house without gating? Replacement of electrical wiring can be done in an open way, when the wires are laid directly along the walls. This method will not disrupt the design of your apartment, since the wires can be camouflaged with special skirting boards or covered with plasterboard panels.
After marking the walls, indicating the installation of sockets, switches and lamps to which electrical wiring must be laid, the wires are laid in the baseboards and attached to the walls. A mandatory step in this method is to check the insulation resistance, and only after obtaining satisfactory results can voltage be applied.
Open wiring has its disadvantages:
- increased costs for the purchase of fastening and other materials;
- a slight reduction in the living space of the apartment due to the use of plasterboard panels.
Partial replacement of electrical wiring
The situation does not always require a complete replacement of the wiring. Often you can get by with repairing a separate section of the electrical network. Having determined the location of the wire deformation and de-energized the electrical wiring, you can begin repairs.
The faulty socket is removed from the socket box and the wires supplying it are disconnected.
EXTERNAL ELECTRICAL WIRING
In another way, external electrical wiring is called street wiring. It is laid outside houses, along the walls of structures and buildings, as well as between them on special structures or supports.
Such wiring is necessary to supply voltage to lighting lamps, alarm systems, CCTV cameras and utility rooms (garage, workshop, shed, sauna, bathhouse, swimming pool).
All this must be taken into account at the stage of construction of buildings and structures.
External electrical wiring in a country house is no less important than internal wiring. In addition to the need to provide sufficient lighting in the area, at any time you may need to connect a power tool (drill, grinder, lawn mower, pump) in the yard. Don’t drag the carriers across the entire house and property; when planning the power supply, it is better to mark out places for installing 2-3 sockets.
The most important difference between external electrical wiring is that it is exposed to atmospheric factors - rain, snow, wind, sun rays. Therefore, it must be reliably protected from precipitation, from mechanical influences and accidental human contact with live parts.
General requirements for electrical wiring.
These requirements apply equally to both apartments and private houses:
1. All boxes, sockets and switches must be located in such places that they are always easily accessible.
2. All connections and branches are made only in boxes.
3. It is prohibited to install sockets in wet rooms (bathroom, sauna, bathhouse).
4. Grounding and grounding conductors are connected only by welding.
5. Grounding of stationary plates is carried out by separate conductors.
According to the PUE (Electrical Installation Rules), the following are also regulated:
- standards for the number of sockets per room;
- the distances at which sockets and switches should be placed in relation to the floor and communications;
- norms for laying wires (vertical and horizontal sections).
Hiding wires in the wall
The most popular option is when the cable is hidden directly in the wall - the so-called “hidden wiring”. To do this, appropriate recesses are cut out in it, where electrical wires are placed, and the recesses are covered. It turns out dusty and takes quite a long time, but if the work is done efficiently, the dangerous parts are securely hidden - it will not be possible to see, much less damage them, without compromising the integrity of the wall.
Into a concrete/brick wall
It is advisable to install electrical wiring at the renovation stage, preferably during the planning of the premises. As long as the walls are bare, there is no decor on them, damage will be minimal
It is important to know that “pulling” the cable diagonally, which is sometimes done in order to save money, is unacceptable - hidden electrical wiring is laid only vertically-horizontally. This will allow you to quickly repair it in the event of an accident, minimizing the risk of electrical damage. The minimum distance from the ceiling to hidden wires is 15-18 cm
The minimum distance from the ceiling to hidden wires is 15-18 cm.
To begin with, a wiring diagram is drawn up, marking is done using the construction or laser method. To make grooves, take a hammer drill, grinder or wall chaser. The parts are attached to the brick or concrete wall with dowel clamps. After the cable is laid, the grooves are primed, covered with plaster, and the wall is leveled.
Into a plasterboard wall
Installing electrical wiring under drywall is much easier than installing into concrete. Here you should also lay the cable along a clear route so that multiple screws do not damage it. To begin with, a frame is “assembled” from aluminum profiles and drywall. The cord must be laid in a special corrugated pipe, which has a fire safety certificate. When there is already a plasterboard wall and it is necessary to lay a cable in it, then a layout diagram of the electrical equipment is drawn up. The cords here are pulled horizontally, vertically, including through holes in the metal profiles supporting the drywall.
Tips and ways to hide wires in the workplace
In a home office, to make it look neat, the laces coming from the computer and router also need to be removed. A stationery clip will allow you to “run” the cord, which gets tangled under your feet, under the surface of the table - from its very edge. The clip is easy to fix on a wall or shelf, and several of these parts make a kind of separators for the inputs of different charges. If possible, the wires hanging near the back of the table are simply covered with a textile curtain. Some of them can be configured into a mini-hammock - the “head” of an extension cord can easily fit there, along with chargers that would get in the way on the table.
Some companies produce special wire separators - two or more cords are neatly laid inside a wooden, plastic, rubber or metal structure. A cool store-bought option for holding wires, it looks like two wire electrical towers. Pockets made from plastic bottles and clothing pockets look funny - the product is hung on an outlet in the wall, the charger is turned on, and the phone itself and its cord lie quietly in the pocket.
Ideas on how to hide the cable from a TV or home theater
Cables, cords from TV, set-top boxes, speakers are neatly hidden behind the shelf on which the TV is placed. If you decide to hang the screen on the wall, the wire is hidden in a box matched to the color of the wallpaper, and under it is placed a climbing plant, the tendrils and branches of which are allowed to curl around the box.
Many designers suggest not hiding the wires, but simply decorating them with colored ribbons, for decorating an apartment in the pop art style, indoor plants (climbing ones are optimal) - for eco-style, hollow driftwood boxes, wooden panels, if we are talking about classic interiors .
When you have to hang a bracket for a heavy TV, the design of the first one is chosen so as to fit all the sockets there. Sometimes a box is mounted on the wall where the TV screen will be placed, in which the cords from the speakers, DVD player, and other electronics will be hidden.