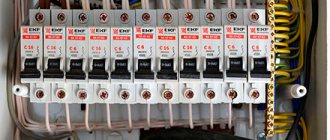
It is perhaps impossible to imagine a new building today without ShchE floor panels. They are responsible for receiving and distributing electricity with a voltage of 220V. They also prevent current leakage to the ground (in the presence of a grounding system). In addition, floor boards protect apartment lines from overloads and short circuits. The floor shield ShchE is necessary for:
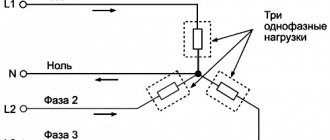
- implementation of distribution and metering of electrical energy of three-phase alternating current with a frequency of 50 Hz. And voltage 220/380 V. in networks with solidly grounded neutral
- to protect outgoing lines during overloads and short circuits
- for necessary operational switching on and off
- for installation of low-current equipment.
About floor panels
Structurally, the shield is a welded metal structure with a partition that forms three compartments:
- subscriber;
- distribution;
- low current
Each compartment has a door, and inspection windows are provided on the front side.
There are three types of shields:
- distribution - for connecting apartment registration and group panels;
- accounting and distribution – for connecting apartment group panels and apartment electricity metering;
- accounting-distribution-group – for connecting group circuits of apartments and apartment-by-apartment electricity metering.
Shields are classified according to the following criteria:
1. Design related to the type of installation
1.1. Wall mounted.
1.2. Built into a niche.
2. The presence of a low-current compartment
2.1. With compartment.
2.2. No compartment.
3. Method of protection against electric shock according to GOST 12.2.007.0-75
3.1. Class I.
3.2. Class II.
4. The presence of a device at the input panel
4.1. With the device.
4.2. Without a device.
5. Number of input phases into the panel
5.1. Single-phase with estimated power at the apartment input <=11 kW.
5.2. Three-phase with a calculated power at the apartment input >11 kW.
6. Number of phases of distribution circuits
6.1. Single-phase.
6.2. Three-phase.
7. Number of phases of group circuits
7.1. Single-phase with estimated power at the apartment input <=11 kW;
7.2. Three-phase with a calculated power at the apartment input >11 kW.
8. Availability of a device for protecting and disconnecting the supply circuit (riser)
8.1. With the device (or a designated place for its subsequent installation by the consumer);
8.2. Without a device.
9. Availability of instruments and devices for remote data acquisition and/or remote control and/or remote (automatic) control of power consumption mode
9.1. With instruments;
9.2. No instruments.
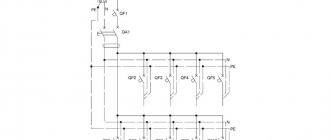
At the first stage, when installing floor panels and creating an installation diagram, it is necessary to adhere to the plan for the location of the circuit elements. This will help make the device compact and less expensive.
Create a schema
It is best to entrust it to an electrical engineer or a specialized organization
The unit of measurement is one module. The module is equal to the area occupied by a single-pole circuit breaker. The width of one module is 17.5 millimeters. This standard is international.
Pipelines
It is not recommended to lay pipelines (plumbing, heating) through electrical rooms.
Pipelines (plumbing, heating), ventilation and other ducts laid through electrical switchboard rooms should not have branches within the room (with the exception of a branch to the heating device of the switchboard room itself), as well as hatches, valves, flanges, valves, etc.
Laying gas and pipelines with flammable liquids, sewerage and internal drains through these premises is not permitted.
Doors to electrical rooms must open outward.
7.1.30. The rooms in which the ASU (input switchgear) and main switchboard (Group distribution board) are installed must have natural ventilation and electric lighting. The room temperature should not be lower than +5°C. 7.1.31. Electrical circuits within the VU (Input device), ASU (Input distribution device), Main switchboard (Group distribution board) of distribution points, group panels (apartment panels) should be made with wires with copper conductors.
That's all about installing an apartment electrical panel according to the rules! Good luck to you in your endeavors!
Especially for the site: Everything about apartment renovation
Preparation of tools
To properly connect modular equipment, you will need the following tools:
- Multimeter (tool for checking the functionality of the circuit before and after connection)
- Phillips and flathead screwdrivers (for working with screw connections)
- Knife or special tool (for stripping insulation)
- Set of pliers, round nose pliers
- Side cutters
- Hacksaw for metal
- Hammer
- Screwdriver with different attachments
Installation of floor board
The installation of the electrical panel should be carried out by a specialized electrical installation organization. In some cases, it is possible to carry out work using an economic method, but at the same time it is necessary to allocate additional human and material resources.
Stages of installation of floor panels:
- Mounting the housing on a wall or in a prepared niche
- Installing Electrical Wiring into the Housing
- Wiring stripping
- Installation of mounting rail (DIN rail)
- Fastening all components to the tire
- Installation of ground and zero buses
- Cutting wires for jumpers
- Connection of installed equipment according to the diagram
- Inspection of the shield and visual quality control of connections
- Sealing and connecting the electricity meter in the presence of a regulatory organization
- Test run.
Table No. 1. Approximate list and cost of floor panel equipment for 4 apartments
| № | Name | Quantity, pcs. | PRICE, (₽) |
| 1 | Residual current switch (RCD) VD1-63S 2P 50A 300 mA (Electromechanical) | 4 | 2047 |
| 2 | Three-pole automatic switch 100A C VA47-100 C 10 kA | 1 | 1797 |
| 3 | Electricity meter CE102 R5.1 145-J single-phase multi-tariff 5(60) accuracy class 1.0 | 4 | 1416 |
| 4 | Single-pole automatic switch 20A C BA47-29 GENERICA 4.5 kA | 4 | 102 |
| 5 | PE earth bus on DIN insulators ShNI-6x9-10-D-Zh | 4 | 76 |
| 6 | Zero bus on DIN insulator ShNI-6x9-10-D-S | 4 | 72 |
| 7 | Single-pole automatic switch 16A C VA47-29 4.5 kA | 8 | 109 |
| 8 | Residual current switch (RCD) 2p 50A 30mA VD1-63 AS (Electromechanical) | 4 | 1277 |
| 9 | Four-apartment floor panel ShchE.4 IP31 metal UHL3 | 1 | 7214 |
Download the table in .pdf format:
List and cost of floor board equipment for 4 apartments
Anti-vandal cabinet KMA
Most often, expensive equipment is installed in floor panels. Therefore, there is often a need to protect it. A simple floor panel will not be able to cope with such a task, since the lock that protects against unauthorized access is too weak. To ensure maximum protection, you will need to use a vandal-proof cabinet. They can also be installed outdoors or indoors. The door in such devices can be retractable or hinged. Special brackets should be used to secure wiring or telephone wires.
KMA floor anti-vandal shields are made of metal with a thickness of at least 0.8 mm. Subsequently, the body is painted with powder paint, which is resistant to corrosion and external influences. A padlock is used as a locking device, which has a high level of security. After purchasing this shield, you can be completely confident in providing reliable protection against dust and moisture.
Anti-vandal cabinet KMA
Sometimes it may be necessary to purchase a KMA with individual sizes. In this case, you should contact the manufacturer and indicate the dimensions you would like to receive. When ordering such a shield, you must immediately decide on the number of electrical devices that will be installed.
Now you know what the floor board looks like, which is installed on the landings of most multi-storey buildings.
We remind you once again that it is not recommended to carry out electrical installation work without experience. It is best to contact professionals who will quickly complete the installation. We hope this information was useful and interesting. No tags for this post.
Selecting a contracting company
When planning any work, people need cooperation with a company that they can trust to resolve issues that arise during the work.
When choosing a contractor company, you need to follow some rules.
1. Conclude an agreement
Companies operating legally must themselves offer to draw up an official document that confirms the existence of an agreement on the scope of work, delivery dates, cost, guarantee and other conditions. Having an agreement will help avoid protracted and complex resolution of problems that arise.
2. Study information about the timing of work in the market and the experience of the organization. Companies with extensive experience in the same field probably have a large portfolio, which means that you can safely trust this organization.
Information about completed work is posted on the official website, in the company’s office, and you can also communicate directly with the organization’s employees.
You can also check a company by TIN. Just enter the TIN number in the search engine.
Example from our organization: TIN: 18311693 82
3. Read customer reviews
It is important to remember that people can be mistaken in good faith or deliberately distort reality. Try to remain neutral and evaluate information objectively.
4. Prepare your costing/budget carefully
The estimate describes in detail the work that is expected to be performed, as well as their sequence. Based on the calculation/estimate, the final settlement between the customer and the contractor will be made.
5. Ask what guarantees the contractor is willing to provide
When a company provides a guarantee of work, it means that the contractor is confident in the quality of the result, and is also ready to eliminate defects that arise after completion of the work.
Warranty obligations protect the customer by providing a chance to legitimately contact the contractor in situations requiring the elimination of deficiencies. The legislation establishes that the period given to the client to exercise his rights is at least a year (from 12 months).
6. Cost of work
When considering company offers, consider the market price. The price conditions specified in the document must be clear and the cost fixed.
In this article, we briefly talked about the functional purpose, structure, types, classification, stages of installation and connection of the floor panel. An approximate list and cost of equipment for a floor panel for 4 apartments is given. Some rules are also highlighted when choosing a contractor company.
We disguise the shield in the hallway - how to hide it without disturbing the interior
The shield is a mandatory element in the home. It has an unattractive appearance and often interferes with the implementation of the desired design. Therefore, you should figure out how to hide the shield in the hallway. There are many ideas and ways to organically disguise an unwanted detail in a room. It can be turned into a highlight, an addition to the overall style.
A camouflaged shield in the hallway.
Why mask the shield?
The electrical panel cannot be dismantled. In order not to spoil the appearance of the room, you can hide it. This will allow you to achieve the desired effect without causing harm to the unit.
Beautiful shield in Provence style.
Disguise can become an additional interior detail. When choosing a unique option, this will become a key feature of the room, the center of attention of guests.
Therefore, it is necessary to carefully study the possibilities of how to hide the shield in the hallways. This will not affect the operation of the device. When choosing the option you like, remember the need for free access to the shield.
It is not recommended to close completely.
Decorated shield in the hallway.
How an electrical panel is most often camouflaged
There are many different possibilities to decorate the shield and make it more attractive. The choice depends on desire, creativity and possibilities. The idea must correspond to the overall interior and the taste of the owner. It is not necessary to choose the most pompous and complex option. Easy solutions often look more organic.
Shield under the painting in the hallway.
Mirror
This detail is perfect for conveniently and simply hiding equipment. The mirror surface allows you to visually expand the space, which is an additional advantage of the method.
To fix the mirror, use double-sided tape or special high-quality glue. The edges should be decorated with cardboard or fabric using a glue gun. Further design depends on the owner of the room.
You can use various techniques to decorate or leave the mirror as is.
Hidden shield behind the mirror.
Use only high-quality fastening materials. This will allow the mirror not to fall and stay securely in place.
Shield in a cabinet with a mirror.
Photo frame or painting
You can decorate the equipment with photo frames or a painting. The latter is simply attached to the equipment. Frames, one or more, are also fixed to the surface of the shield. You can make a large frame around the perimeter of the shield, then insert a picture or photograph. This will create a large frame.
Furniture
To add practicality, you should cover the desired element with a key holder in the hallway. You can take a ready-made model or make it yourself. The finished version is attached to the electrical panel door. In addition to the external attractiveness of the method, it is distinguished by its functionality. There is no need to allocate a separate area for storing keys and small items. Access to the dashboard will always be available.
Hidden shield behind the key holder.
Door trim
You need to make an extension of the cabinet or wall and cover the panel with wallpaper. The method is easy and accessible. If the equipment will not stand out too much on the wall, then wallpaper will help hide its visibility. You won’t be able to hide it completely, but the detail will not be so conspicuous.
If you are a creative person and good at drawing, you can paint the equipment. It will turn out original and fresh. You can paint over the detail to match the overall design or draw something or make a pattern. Decide on the most suitable drawing technique and attractive design. After preparing the necessary materials, you can begin to work.
DIY camouflaged shield.