Intercom device, operating principle
Types of intercoms:
- digital - a two-wire line transmitting a signal. Apartment numbers (addressing of the call) are fixed by jumpers in the subscribers' handsets, which are all connected to one line stretched along the riser (cable channel in the shaft) of the house with taps for each room. The tubes are connected in parallel. The system is much easier to repair and install, since there are fewer wires: it is easier to detect the break point, and so on. But it is more difficult to repair if the electronic board is faulty. Minus: a break in the main line will lead to a malfunction of all subscriber handsets;
- coordinate (coordinate matrix, analog). Popular for apartment buildings (MCD). The signal is transmitted by a switch, from which a loop of wires goes to the objects. For each apartment there are separate cores, the system cable is multi-core (the number of wires depends on the number of objects served). A more reliable system, but more difficult to repair, especially when replacing wires.
Digital intercom systems
To connect devices of this type, only a cable with two cores is used, through which an encrypted signal is transmitted. The handset installed in the apartment, the number of which was dialed on the call panel, responds to the signal. To set the correspondence between the dialed code and the handset, special jumpers are used - jumpers - which bridge the required contacts in the answering machine.
To correctly program the operation of the handset, jumpers are placed between the numbered terminals so that the sum of the numbers equals the apartment number.
The advantages of such intercoms include ease of installation and connection of new subscribers.
The main disadvantage of such equipment is the influence of each tube on the operation of the entire system. When replacing a device due to its breakdown, as well as when connecting new subscribers, the correct installation of jumpers is extremely important.
Currently, to partially eliminate this drawback, floor controllers are used, which allow the fault to be localized within one level.
Another disadvantage of digital intercoms is their relative high cost, which does not allow these devices to become widespread.
Analog installations use a coordinate matrix connection and operate on the principle of a telephone exchange. An additional element of such a system is a switch, which processes and analyzes the signal, as well as redirecting it to a specific subscriber.
To connect the intercom handset to the switch, two buses are used. The contacts of the first of them (D0–D9) correspond to tens, and the second (E0–E9) to ones. Thus, to connect an intercom to an apartment whose number, for example, is 74, you need:
- connect the conductor from the positive terminal of the subscriber handset to the contact corresponding to number 7 on the tens bus;
- the conductor adjacent to the negative terminal is to the contact corresponding to number 4 on the units bus.
In the considered connection option, a device was used that was designed to serve up to 100 subscribers. There are models that can work with a large number of numbers, but their principle of operation is no different from that discussed above.
They are widely used in apartment buildings, so let’s consider the specifics of the process of introducing a new element - an intercom tube. With this addressing scheme, a two-core cable is used, to which subscriber handsets are connected in parallel. The most important requirement is to maintain polarity.
When connecting an intercom handset in an apartment, it is worth remembering that each subscriber device is equipped with a microcircuit. It is programmed with jumpers, or jumpers, to a specific apartment number. Therefore, to find out the apartment code, you will have to disassemble the handset and carefully examine the microcircuit.
Opposite each jumper you can see a special panel with numbers arranged in ascending order: each of them represents a positive power of the number “2”. The apartment code will consist of numbers corresponding to closed jumpers. Having an old disassembled handset in front of you, you can use it as a sample to transfer data to a new device. By following these recommendations, you will immediately understand how to change the intercom handset.
How to connect an intercom
All components are usually included with the intercom:
- External block.
- Electromagnetic lock.
- Entrance exit button.
Components
The type of installation of the intercom system can be in two ways. Usually a coordinate connection diagram is used. There is also a digital connection system. Let's take a closer look at each of the schemes.
Connection diagram
This scheme is implemented as follows. A switch is connected to the mounted external block of the intercom system, where all handsets from the apartments are then connected. Due to parallel connections, they are independent of each other, but there are too many wires (two-core wires are used).
On the external unit, the visitor dials the apartment number. The signal goes to the main controller, is processed and connects the required branch leading to the handset for communication. This scheme is the most common and popular.
Analog connection diagram
Digital circuit
Another, more expensive and less common scheme is based on a digital signal. With this scheme, the devices are not connected to the switch in parallel, and the cable connected to them is arranged like a garland. When connecting, polarity must be observed. If at least one device fails or they decide to replace it without observing the polarity, then the entire system will stop. This causes some inconvenience.
With this scheme, there is a limit on the number of subscribers. The maximum number is 255. The jumper system allows you to generate a digital signal and always connect the right tube.
Instructions for the analog system
Electromechanical
Electromechanical problems can be of several types.
The entrance door lock does not work when using a personal key. If the key itself does not require replacement, it is necessary to check whether the electric lock connection itself is magnetized, since sometimes, even if the circuit is broken, residual magnetization continues to prevent the door from opening. This is easy to check if you have another key at hand. As a rule, several electronic keys cannot break at the same moment. If the doors cannot be opened with another key, the electric lock must be de-energized so that it is demagnetized. Usually the toggle switch for disabling the intercom lock is located on the electrical panel of the first floor, but there is another way - a strip of adhesive tape is glued to the door magnetic plate.
It is impossible to press the digital intercom button. This problem can arise in the entrance of a high-rise building - too frequent pressing. Such systems are highly sensitive because they use a pattern of intersecting light rays. This situation is resolved with the help of a dispatcher - he transmits a signal to the desired subscriber, but when he picks up the phone, he does not answer (if this happens, the panel screen displays “E” or “Err”). Thorough physical cleaning of the buttons can help. If the attempt is unsuccessful, we can say with a high probability that the processor has broken down. Here you will have to call a specialist to repair it.
It is impossible to answer from the handset when receiving a call from the entrance. In this case, the tube itself has failed (failure of either the microswitch or the magnetic reed switch) and will have to be replaced.
If you can still hear the caller downstairs, but you can’t open the door, the handset button is faulty. Simply cleaning the button contacts can help.
If signals from the intercom handset pass through due to interference and interruptions in communication networks or a faulty controller, specialist intervention will be required.
When the sound in the handset disappears, it is phonic (crackling, noise is heard), it is hard to hear, or there is some strong interference, you need to look for them in the wires, namely: weak fixation of the terminals (the subscriber himself pulls them out of the sockets, pulling the intercom cable) ; complete silence on the phone indicates a disruption in network communications; It is useful to pay attention to the position of the sound control (it may be in the Mute position).
To activate the opening button of the entrance doors, you have to press it several times. If you look at the intercom circuit, you can see that the opening of the door is controlled by a microswitch located below the button and connected to it through contacts.
The handset is an important part of the intercom system. Since it is used quite actively, it fails more often than other components of the intercom system
Of course, the easiest way out of the situation is to replace the tube, but there are malfunctions/breakdowns that can be easily repaired on your own; you don’t have to spend money to do this. If it is impossible to reach one apartment, most likely the problem is the handset, namely:
- the problem is in the button for opening the entrance doors;
- problem in the handset dynamics (the caller is inaudible);
- The cable is torn (frayed from frequent use).
What is an intercom handset?
The intercom handset is one of the components of the intercom system of the security system, which provides communication between the owner and those wishing to enter the premises. If the external communication element is a calling panel located outside, then the handset is a home appliance that is installed inside the protected premises. Such a tube can be installed either independently or by calling a special team.
In most cases, the handset provides communication immediately upon picking it up, without the need to press any combinations. Installation of the tube usually falls on the shoulders of professionals.
In the photo you see an image of an audio intercom tube
Each type of protective equipment requires a specific tube, since different devices require a certain number of wires to be laid.
If you are using a digital intercom, then in this case you will need one cable that is laid from the digital panel. Using its individual branches, it connects to each individual apartment. If a coordinate matrix type intercom is installed in the house, then the installation involves laying wires equal to the number of apartments in the entrance.
Possible faults
During operation of the intercom system, various malfunctions may occur:
- mechanical damage to the tube;
- When you pick up the handset, the signal continues to sound;
- failure of the lock release button;
- the voice of the caller is hard to hear;
- if you press the door open button, the call is dropped.
In the first case, it is easier to replace the damaged part (pipe), because they are not so expensive. The main thing is to choose the right intercom for your intercom system model. In situations where the call signal does not turn off when the handset is picked up, there is no connection with the calling visitor and there is no reaction to pressing the lock control button - look for a breakdown in the handset switch. You can repair or replace it yourself, however, it is still recommended to entrust this to professionals, especially if you have never done anything like this before. This procedure requires some experience and appropriate tools.
If you have to press the electric button several times to open the lock, the microswitch is to blame. It is not difficult to change this part yourself, even if it is located on the intercom handset
It is enough to carefully unsolder the contacts of the faulty part, remove it and solder a new one. If the visitor is hard to hear, the problem is in the speaker or microphone
In some models, such a malfunction may be caused by a clogged “Balance” resistor installed on the intercom handset board.
Unauthorized disconnection of a call when the lock is unlocked may be caused by an interruption in the electrical circuit coming from the speaker. In this case, carefully inspect all cable connections - both on the panel and on the intercom. Of course, turn off the device first. If there is a break somewhere, you need to replace the wire or solder the contacts of the wire and terminals. To summarize, we can say the following: in many cases, you can replace a damaged tube of both a digital and a coordinate matrix intercom yourself; this is a fairly simple action. Only in some cases is it worth calling the adjusters of your intercom system.
To learn how to connect different intercom handsets, see the following video.
A handset or apartment intercom device is an integral part of the intercom system. It is installed in each apartment of a residential building and allows you to conduct a dialogue with the visitor and control the electronic lock to open the door. Connecting the intercom handset yourself, if necessary, is not at all difficult. You just need to know a few simple rules.
Design and principle of operation
An intercom is an electromagnetic locking device with the ability to remotely control the opening and closing process from remote controls (handsets) located in apartments or offices. The system is installed on the entrance door and protects the building from unwanted entry.
Depending on the system for connecting apartments to the intercom device, a distinction is made between digital and coordinate devices.
With a coordinate switching system, a separate cable goes from the intercom to each apartment, but with a digital system, there is only one connecting cable. It would seem that digital intercom devices should be cheaper, however, in fact, everything is exactly the opposite - their cost is almost 3 times higher than that of coordinate ones. But it is believed that this pays off with the higher reliability and security of such a communication system.
Based on the type of communication, intercoms are divided into audio and video devices. From the name it is clear that video intercoms have a screen that displays the identity of the calling visitor, while audio devices provide only voice communication. Naturally, devices that transmit video images provide a higher level of protection, but do not forget about the price aspect - they are much more expensive than voice intercoms and, as a result, much less common. Typically, video devices are installed on the gates of large private properties.
Using the adapter
The adapter performs the function of synchronizing the general entrance intercom and the video intercom in the owner's apartment. He must be able to work with both intercoms at once. If it is only suitable for one of the two devices, there will be no guarantee that the video intercom will operate without interruption.
The configuration is selected for specific purposes and tasks:
- Buying two or more cameras if additional visibility is important;
- Signal division mode station for several visitors;
- Sometimes it is necessary to install a signal amplifier.
It must be borne in mind that the vast majority of models have galvanic isolation or dampers installed to eliminate interference. In this case, the audio connection is more stable, and signal interruption is practically eliminated.
A correctly selected adapter, combined with an intercom model, instantly sends a signal, identifying the visitor. Otherwise, the device may turn out to be a completely useless purchase. The video camera will work every now and then, and the sound quality will turn into a bunch of interference and noise.
It is selected according to the following principles:
- Presence of interchange. The functions of the circuits must fully meet the required parameters.
- Module type: MSC or MSC. The connection has separate characteristics.
As a rule, installation outside is more common. It is carried out in a low-current panel.
How to connect the intercom handset in your apartment yourself
The presence of an intercom has long been an indispensable condition for ensuring the comfort of a modern apartment. The main purpose of these devices is to enable homeowners to accept calls from visitors and open doors remotely. Intercoms turned out to be much more convenient than outdated combination locks. Let's find out how to connect the apartment intercom handset yourself.
Aspects to consider when choosing replacement parts
The correct choice of replacement part becomes important in the repair process. Make purchases in special stores. In addition, pay attention to the intercom model for which you are purchasing parts.
Internal components of the device
If we consider modern models that appear in the assortment, intercoms that do not have stands stand out. Consider the type during the selection process. The differences between the proposed options may be as follows:
- Type of call addressing;
- Mode of application;
- Features of functional work.
There shouldn't be any problems with purchasing and choosing. Moreover, the assortment is full of various models. But it’s still better not to install the equipment yourself, but to turn to specialists for help. Of course, they will ask for a fee for their services, but you can be sure that everything will be done with high quality and with a long-term guarantee of service.
Device repair
Watch our educational video to see how specialists carry out repairs.
In country houses and apartments, you can install inexpensive intercoms that will provide control of entrances to entrances or premises. These systems differ from industrial systems in their simpler design and functionality within the stated cost. Due to the availability of home video surveillance and access control, there is a need to decide how to connect the intercom handset in compliance with technical details and security measures.
Intercom design
An intercom is a device that allows someone to enter a room, or vice versa, to deny entry, without direct contact with him. The device has gained particular popularity literally in the last decade; previously, combination locks were most often used to protect front doors.
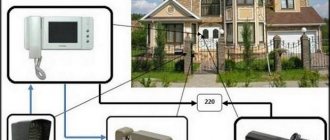
Photo - system design
As an additional security feature, the call can also be supplemented with the ability to connect a video intercom (Kenwei KW-4HPTN, Kocom KCV-A374SD). In this case, all data is transmitted using the camera to a special TV or computer. Unlike an audio intercom, a video system is more reliable in use, because in addition to making a call, visitors are also visually monitored.
Photo – video intercom wire connection diagram
Connection procedure
The sequence of actions will be as follows:
- At the first stage of work, the location of the intercom handset is selected, then it is fixed to the wall using quick installation.
- Next, the installation location of the switch is determined (for analog intercoms). On each floor they are installed in a distribution box for low-current circuits. All of them are connected in parallel, which greatly simplifies the installation process. In the general case, just one switch per entrance is sufficient, but when using such a scheme, you have to stretch wires from the apartments on the upper floors to the installation site of the device.
- After removing the protective cover of the switch, the terminals corresponding to tens and ones are determined, then the connection is made so that the sum of the numbers of these contacts shows the serial number of the apartment.
- The wires are connected to the tube. It is extremely important to observe polarity. The positive terminal is connected to the contact of the commutator corresponding to tens, the negative terminal to ones.
How to install an intercom with your own hands? Tips from Leroy Merlin in Moscow.
1Precautions
In order to understand how to install an intercom yourself without putting yourself in danger:
- Before starting to work on electrical wiring, turn off the electricity using the main switch,
- Follow electrical safety regulations
- Use products that comply with regulations
- Never install the transformer in a damp room or outdoors.
2Electrical wires
Correct selection of wires ensures optimal operation of the device. This table is provided for general information. Don't forget to read the diagram included with the device.
| Audio intercom | Video intercom | ||
| Up to 50 m | More than 50 m | Up to 25 m | More than 25 m |
| wire 6/10 | wire 1.5 mm | wire 6/10 | 1.5mm wire or max cable |
3 Electrical protection
The home intercom must be connected to an electrical network protected by a 10 A fuse or a 16 A circuit breaker. For the safety of people, it is also recommended to install a 30 mA residual current device.
Two types of power supply are possible:
| 1. The intercom is connected directly to a power outlet (power cable). The transformer is integrated into the intercom. |
| 2. The transformer is not integrated into the intercom, but is connected to it and to the electrical network. |
4 Installation
| If necessary, carry out the following preparatory work: – Dig trenches between the outdoor call panel and your house. – Lay corrugated pipes in the ground for the wires. – Route the wires through the pipes, leaving free ends of the wires about 20 cm long. Accurately measure the required length of wires between the location of the outdoor call panel and the intercom. |
Tips • For best performance of the device, avoid additional connections between the outdoor call station and the intercom. • If the wiring is already installed, check the number of wires before purchasing the intercom. • If you are building a house, you must provide trenches in advance and lay corrugated pipes with steel broaches in them.
5Installation of an outdoor call panel
| 1. On the selected wall or pole, determine the location of the outdoor call panel. It should be at a height of 1.60 m from the ground. |
| For overhead models (A): mark the locations of the mounting screws, drill holes and insert dowels into them. For built-in models ( B ): draw lines for the groove and mark the location of the built-in box of the device. |
| 2. Cut the groove using a chisel, taking into account the thickness of the corrugated pipe and the built-in box (for the built-in model). |
| 3. Place the recessed box in the recess and secure it with cement. |
| 4. Place the corrugated pipe in the groove and press it with nails. |
| 5. Fill the fine with cement, after moistening it with water and removing the nails as the work progresses. 6. Remove excess mixture and allow the cement to dry. |
| 7. Cut the wires to the required length and connect them to the device in accordance with the wiring diagram (see part 6). 8. Fix the outdoor call panel to the built-in box. |
Installation of intercom
| 1. Locate the location of the intercom on the wall. It should be at a height of 1.50 m from the floor. |
| 2. Determine on the wall the location of corrugated pipes for laying wires from the outdoor call panel to the indoor intercom and to the transformer. |
| 3. Cut the groove using a chisel, taking into account the thickness of the corrugated pipe. |
| 4. Place the corrugated pipe in the groove and cover it with plaster or cement. 5. Mark the locations of the screws for attaching the intercom or its stand, drill holes and insert dowels into them. |
| 6. Screw the intercom stand to the wall. |
| 7. Cut the wires to the required length and connect them to the device in accordance with the wiring diagram (see part 6). 8. Reinstall the intercom by hanging it on the mounting brackets on the stand. Secure the intercom using the screw provided for this purpose. |
Installing the transformer (if necessary) Mount the transformer in a protected location (for example, on a distribution panel).
1. Connect the transformer to the intercom in accordance with the diagram (see part 6).
2. Connect the transformer to a fused electrical network (see the tip “How to do electrical wiring without putting yourself in danger”).
This is important: Turn off the power before connecting the transformer.
Tips for installing a video intercom • Do not install the video camera in areas exposed to strong sunlight or in front of a strong light source. • Do not install the intercom in a room with high temperatures (over 40°C), or in a humid or rain-exposed location. • Try to protect the intercom and video camera from strong vibrations and shocks.
6 Circuit diagram
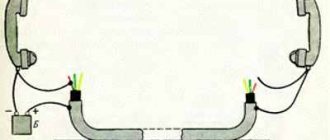
| 7-wire connection diagram |
| Example of a single 2-wire connection diagram: 2-wire connection between street panel and intercom |
| Example of a 2 + 2 wire connection diagram: – 2-wire connection of the street panel with the intercom – 2-wire connection between lock, transformer and intercom |
| All information provided is advisory in nature. When installing, connecting and servicing electrical devices and/or circuits, contact only properly trained and licensed professionals. |
Installation of a street panel
How to connect an intercom yourself? The next item is the installation of an outdoor external panel:
- The approximate height of the element from the ground is 1.6 m.
- For overhead panels on the door or wall, the locations of the mounting dowels are marked, then holes are drilled according to the marks and the device is attached.
- For built-in options, lines are drawn for the groove, and the position of the built-in box is noted.
- Using a chisel, cut the groove, taking into account the thickness of both the built-in element and the corrugated pipe.
- Install and secure the recessed box with cement.
- Then place the corrugated tube in the hole. If necessary, secure its position with nails.
- Carefully putty the fine with the pipe, simultaneously pulling out the nails holding the last one.
- Now cut the wires from the pipe to the required length and connect them to the street panel.
- The action ends by fixing the street panel in the built-in box.
About the design of the intercom
Before connecting an intercom in an apartment building yourself, let’s look at the design of the device. This access device with intercom functions (audio and video communication) has become popular in the last decade, taking the place of less convenient combination locks that previously protected some of our entrances. Intercom systems are most often installed by specialized companies for the entire entrance. They subsequently maintain the system.
The most popular manufacturers of intercoms today are Vizit, Commax, Falcon Eye, etc.
In the diagram above you saw the main components of the intercom system. Before connecting the intercom yourself, let’s refresh our memory of their functions:
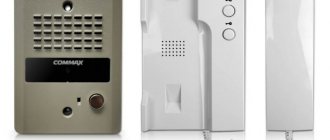
- A tube. It is installed in the apartment so that the tenant can answer the call and open the door for the guest. This subscriber element must be connected to a common locking system.
- Call panel. This is what we see next to the entrance door - a key code reader, keys for dialing an apartment number or code, an auxiliary screen.
- Lock (locking device). Today, electromagnetic variations are the most popular. Although it is still possible to open them without a key with the proper application of physical force, they are considered the most reliable. Previously, there was a popular option with a regular metal valve, which was opened by an electric motor.
- Switch module. This element of the system is responsible for transmitting a signal from the calling panel to a specific resident.
- System power supply.
- Exit button, etc.
In the video intercom system, an element such as a video camera appears at the calling panel. The image is transmitted by a microcomputer.
Results
Vizit intercoms are reliable devices that are characterized by stable operation in various conditions. However, troubles in the form of breakdowns still happen sometimes. If this problem does not pass you by, you can always try to fix the intercom handset yourself, based on the tips given above. Not confident in your technical knowledge and skills? No desire to take risks? It's better to contact service support. The technicians who service intercom systems will diagnose the device that has failed and identify the cause of the failure. In their work, they use special equipment to diagnose and configure intercoms. When it is known what exactly has stopped working, a qualified specialist will tell you what exactly needs to be done - repair the tube by purchasing new spare parts, or completely replace the device.
It is worth noting that the cost of the tube is low, so in case of serious damage, as a rule, experts recommend installing a new device that will work for a long time and without problems, without causing any inconvenience to the user.
How to connect an intercom handset quickly and independently
Today, it is important to ensure the safety of your home. The old, difficult-to-open locks have been replaced by a new modern device - an intercom, which not only ensures the security of your home, but also allows you to remotely control the lock on your doors or gate. This device is widely used in apartment buildings, private homes, cottages, large offices and warehouses. In most cases, intercoms are installed by special companies that sell them. But since this equipment is simple in structure, you can easily install it yourself. In this case, the problem arises in the solution - how to connect the intercom handset. As practice shows, everything is very simple.
Breakdowns that can be fixed
The most common problem is button failure. This seemingly insignificant detail significantly affects the entire repair of the intercom handset, since it has a direct connection with the switch located inside the device. When a problem arises, a crackling sound is heard at the initial stage, and then many people notice that the intercom is making noise, and significantly.
When the caller presses the button, the crackling sound is clearly audible. At the beginning of the problem, the door will open normally. But if you wait a little time and don’t make an effort to repair it, it will stop opening.
Intercom button
The switch itself cannot be repaired. You just need to purchase a replacement part. Its cost is not high. If a professional is involved in the work, then everything will be done not only quickly, but also efficiently.
When guests come to a person and they ring the intercom, a specific sound appears in the room, after which the owner of the room picks up the phone to clarify who has arrived. But when pressed, the button refuses to function. More often, the culprit is the switch, which is located under the button. To understand in more detail the reasons and repairs, we remove the cover of the device and carefully examine its “insides”.
To understand that in the place where the owner assumes, a new part is connected to the problem area for some time through a four-wire version of the system. Thus, through these 4 cables the problem that has arisen is dealt with.
Pay attention to the speaker that the handset is equipped with. It often becomes the reason that the subscriber is hard to hear. Inside the device there is a special resistor that regulates the microphone and speaker. But you don’t need to immediately turn down or turn up the volume. From the beginning, remember the position in which the resistor was located and only then start twisting it.
Design and principle of operation
An intercom is an electromagnetic locking device with the ability to remotely control the opening and closing process from remote controls (handsets) located in apartments or offices. The system is installed on the entrance door and protects the building from unwanted entry.
Depending on the system for connecting apartments to the intercom device, a distinction is made between digital and coordinate devices.
With a coordinate switching system, a separate cable goes from the intercom to each apartment, but with a digital system, there is only one connecting cable. It would seem that digital intercom devices should be cheaper, however, in fact, everything is exactly the opposite - their cost is almost 3 times higher than that of coordinate ones. But it is believed that this pays off with the higher reliability and security of such a communication system.
Based on the type of communication, intercoms are divided into audio and video devices. From the name it is clear that video intercoms have a screen that displays the identity of the calling visitor, while audio devices provide only voice communication. Naturally, devices that transmit video images provide a higher level of protection, but do not forget about the price aspect - they are much more expensive than voice intercoms and, as a result, much less common. Typically, video devices are installed on the gates of large private properties.
Sources
- Law and Economics No. 07/2015; Justitsinform - M., 2015. - 837 p.
- Bogolyubov, S.A. Land law: Textbook / S.A. Bogolyubov. - M.: Higher Education, 2006. - 413 p.
- Pilipchuk G.D. Customs law. Short course. Tutorial; Prospect - M., 2004. - 294 p.
- Nikolyukin S.V. International commercial arbitration; Justitsinform - M., 2009. - 791 p.
- Batyr, K.I. History of state and law of foreign countries / K.I. Batyr, I.A. Isaev, etc. - M.: Prospekt; 4th edition, revised. and additional, 2004. - 496 p.
Video intercom installation
We figured out how to connect a digital intercom yourself. Its variety is a video intercom, connected according to a similar scheme. But before installation, please consider the following:
Independent installation of an intercom is the prerogative of people who have dealt with electricians more than once. If you are doing this for the first time, we advise you to carry out the work under the guidance of an experienced friend, since all descriptive instructions are of a general, advisory nature and do not prevent specific problems during installation.
Nowadays, almost any entrance to multi-storey buildings and office buildings is equipped with an intercom. This is done in order to prevent unauthorized entry into the territory, access to which is by definition limited. What kind of device is this, how exactly does it work?