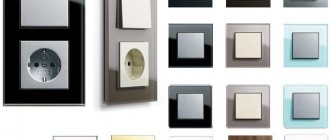
Category: Equipment
Published 09/03/2021 · Comments: · Reading time: 5 min · Views: Post Views: 2,772
Today we will tell you how to connect the handset and the entire intercom system in a multi-storey building for one apartment. Here we will consider both the types of devices and their connection diagrams. In addition, we will offer our instructions for implementing this task.
Types of devices and features of their operation
There are two types of devices that are installed in apartments.
These types look like this:
- Hardware . Inside the gadget there is a matrix, which brings the call to the desired room.
- Digital . Using a two-wire line, the call is forwarded to a specific apartment. Signal reception is carried out thanks to special microcircuits built into the handset.
Important! Each type has subjective nuances that greatly influence the process of installation of the structure and its subsequent maintenance.
Is it worth saving on professional installation?
The services of installers are not cheap, but the contractor is better equipped with tools and has experience in installing such equipment. If you wish, having basic skills in working with electrical equipment, it is not difficult to install an intercom yourself. But in the event of an unfavorable combination of circumstances or critical errors, the cost of the issue will be a complete replacement of the damaged equipment. Therefore, if you do not have confidence in your own abilities, then it is better to trust the professionals.
Note. Installation specialists not only know exactly how the intercom works and works, but also have proven methods for installing the system in an apartment building. They guarantee precise operation of the lock and no malfunctions. Carrying out the work independently imposes obligations on the installer for the outcome of the operation.
Approximate cost of installation work
The cost of services depends on the volume (one apartment, the entire entrance), complexity (audio intercom, video device), and type of equipment. On average, prices start from 1.5 thousand rubles. This is the installation of an overhead calling panel. A mortise one will cost 3 times more.
Switching an intercom into a multitasking remote access network will cost 3.5 thousand. A calling unit for an apartment building will cost up to 10 thousand rubles. When the estimate is distributed among several residents, the cost of the work will be cheaper than for a single customer.
Connecting an intercom with your own hands - all the nuances
There are several features, without taking into account which you can make some mistakes that will either lead to a malfunction of the device for one resident, or disable the devices in the entire entrance.
These features and nuances look like this:
- Compliance with polarities. The connection must be made strictly according to polarity. This is one of the critical errors that leads to the system shutting down in the entire entrance.
- Correct search for decimal and unit bus. You need to find the buses to which the connection will be made correctly. There are several ways to do this, which involve the correct order of steps.
- Wire insulation. Any twist must be insulated; we do the same with wires that were not needed in the system and turned out to be superfluous.
- Device maintenance. You need to report the installation of the device to the company that maintains it in this house or entrance.
- Availability of an individual scheme. You need to study the diagram that is in the box with the tube before carrying out work.
Don't miss: What security system and alarm system should I install in my dacha? Rating of the best alarms for 2021
It is better to study these features before installing the device.
Composition of the video intercom kit
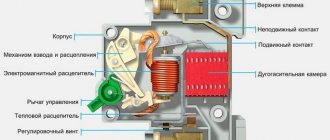
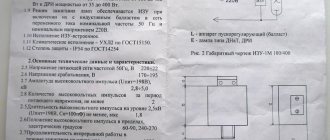
A video intercom is a monitor for indoor installation. The main functions of the intercom are intercom, displaying the visitor, and the ability to remotely control the lock. Call panel - designed for indoor and outdoor installation. Produced in both plastic and metal all-weather, vandal-proof housing. Equipped with a call button, surveillance camera, speaker, microphone, infrared illumination (provides visibility even in complete darkness), as well as a lock control board (electromagnetic or electromechanical).
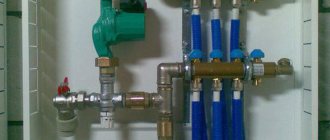
Basic connection diagrams for intercoms
Before connecting an intercom in an apartment yourself, it is important to study the connection diagram of all elements of the system in order to avoid mistakes during the work process.
The scheme includes several elements, among which we highlight the following:
- controller and calling panels;
- electric lock;
- power unit;
- microphone, speaker and video camera.
The first thing you need to connect is the calling panels and communication equipment, which includes a microphone, speaker and video camera.
Each of them is connected to one of four wires, which are divided into power, video and audio, as well as a common wire. This section of the circuit will be supplied with a voltage of 12 V; without this, it will not be possible to connect the intercom handset in the apartment.
Electric locks are then connected to the controller. There may be one or two of them in the system. In the event that they are not included in the structure of the design of any case, the wires must be hidden and insulated from each other.
A diagram of how to properly connect an intercom in a residential area, each model may have its own individual characteristics. They are necessarily indicated in the instructions for the device, and the circuit itself is also located here.
Repair instructions for the button on the intercom handset
If the intercom handset button begins to work intermittently , the reason lies in the malfunction of the push-button microswitch, which is located on the device board under the door open button.
Since this part cannot be repaired or restored, its replacement is required to fix the problem (the cost of a new microswitch is about 10-15 rubles).
To repair the button on the intercom handset, you will need the following materials and tools:
- Phillips screwdriver;
- flat screwdriver;
- new microswitch;
- soldering iron;
- tweezers;
- side cutters (nippers).
When carrying out repairs, it will not be superfluous to have on hand a diagram for connecting the intercom button. This will avoid mistakes when replacing parts.
Here is a diagram for connecting the Metakom TKP-12M intercom handset:
Intercom handset connection diagrams Metakom TKP-12M
Let's look at the procedure for performing the work using the example of repairing the button of the most common intercom Metakom TKP-12M:
- Turn off the intercom and disconnect the wires. It is important to maintain the polarity of the connection in the future. To do this, you can put a mark on one of the wires with a marker or felt-tip pen;
- We disassemble the device body by unscrewing the mounting screws on the back cover of the device;
- Unsolder the old microswitch. To do this, insert the end of a flat-head screwdriver between the switch body and the board, and on the reverse side heat both legs at once with a soldering iron.
- Then gently press the microswitch away from the board until one half is completely disconnected. Solder the remaining 2 legs in the same way;
- Solder a new microswitch. To do this, you need to first clean the mounting holes from solder with a soldering iron, install a new part and grab it with a soldering iron.
- We bite off the excess parts of the legs with nippers;
- We assemble the device body, connect the wires, and test the operation of the calling button on the intercom handset.
VIDEO INSTRUCTIONS » alt=»»> If the pusher of the new microswitch is higher than the old one, it can be easily shortened using the same soldering iron. This must be done extremely carefully, since plastic melts very quickly.
Source
Connection procedure
Before connecting the intercom yourself, we take out the instructions and connection diagram from the box with the device. If the second one is not in it, then we go to the Internet and find it there. Without a diagram, it will not be possible to make a connection.
Important! We prepare in advance a small set of tools and accessories needed for the work.
This set looks like this:
- screws, drill or screwdriver;
- electrical tape, cork dowel;
- pliers and alabaster.
After the circuit has been studied and the tools are prepared for work, we perform the following steps to connect an intercom in a residential area.
Don't miss: Different types of awnings for construction, as well as construction work in winter
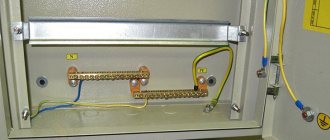
- We find a switching box in the system, examine four or eight wires that go to apartments that have already connected to the system.
- Open the junction box and remove the insulation from all wires. We do this carefully and take our time. We remember which wire connects to each.
- We find a bus of tens. This is an object to which several residents from one stairwell connected at once.
- We connect the positive wire from the tube to the decimal core. At this moment it is important to maintain polarity.
- Now we find not the bus of tens, but the bus of units. To avoid making a mistake, we go up one floor or go down, and here we see which bus each individual user is connected to.
Completion of these stages should result in the intercom starting to work.
To carry out the check, we make a call and monitor its performance.
Advice! We immediately check whether the door can be opened.
Everything that was once analog can become digital
In our previous articles we have already compared analog and digital technologies. In particular, we looked at IP telephony, IP television and IP video surveillance, and it must be said that these are not the last “IP representatives” of modern devices. Thus, opening the intercom from your phone no longer seems impossible.
IP intercoms are a convenient access system for both private and apartment buildings. They differ from conventional intercoms primarily in their integration with the home network. The connection to the router occurs via a standard twisted pair cable or via Wi-Fi if the device supports wireless communication, and communication between the components of the IP intercom occurs via the SIP protocol. This scheme is very similar to connecting digital video surveillance and telephony, and with some additional options, the intercom can work as an alarm and security system, which is more like an access control system than just a device that opens the front door.
- Remote access. Connecting an intercom to a phone, tablet, computer and other devices.
- Forwarding audio and video communications to home network devices.
- Equipped with a motion sensor.
- Saving video recordings to an external drive or other device.
- Integration with various network systems: smart home, alarm, home automation, etc.
Situation four, there is no cable from the switchboard in the MOS to the apartment.
Laying a cable from the switchboard to the apartment does not have any special features, but for reliable operation and subsequent compatibility I recommend using a twisted pair cable. Perhaps in the near future you will have a video intercom or an IP access system, and this cable will be more useful than ever . For the purposes described, you can use any pair of wires of the same color, as well as two pairs of different colors, where wires of the same color are connected to each other at both ends. Further connection steps are described earlier.
Author: Ivan, Moscow region
Important points
And now - the promised seven points that you should definitely pay attention to, regardless of whether you carry out the installation work yourself or contact a specialist. This is your checklist that should be in your head. Well, or before your eyes, written down on a piece of paper. Go!
1. Choose a location for the video intercom that you have easy access to. When we find a panel in a hallway or another room where we often stay or that we have easy access to, we will be much more comfortable using the videophone. It is also worth paying attention to the fact that the videophone monitor is installed at the most convenient level for residents. Visibility of the LCD screen at the correct angle.
2. Cables must comply with the requirements specified in the manufacturer's instructions (appropriate number of wires, appropriate cross-section, reinforcement). Using multi-core telephone wires is a fairly common assembly mistake. Remember that they are very resistant to mechanical damage, they are also not suitable for installation outside, in the ground, even in a protective tube. We must also remember that we should not place cables in easily accessible places. Ideally, if they are shielded, they are insulated so that they are not subject to mechanical damage or flooding.
3. There must be a possibility of emergency opening of the door - if we do not foresee such a possibility, it may turn out that after accidentally slamming the entrance or losing the keys, we will not get to our house. It is worth installing an additional hidden opening button, especially at the gate. It can also be an external panel with coded access. Setting the input telephone
4. Adaptation of space for mounting an external intercom panel or videophone. A mistake, or rather a serious problem, is installing interconnects or videophones in older homes without first preparing niches and areas for assembly and protection of the wires. The problem occurs especially in older houses or their fences. The installation of an intercom or videophone should be planned immediately, still at the stage of installing the house or fence. Then we can, for example, in a brick counter or at the entrance, make special niches for the panel, an electromagnetic latch and prepare space for wires. Thanks to this, you can avoid awkward walls. Typically you need to run the wires inside the walls (monitoring the coupler), even if you have a wireless intercom model.
5. Make sure the lighting is correct - this can apply both to the place in front of the gate and to the entrance to the house. Typically videophones are equipped with diodes that allow images to be captured even in the dark, but they usually have a short range. Therefore, it is worth adding an additional lamp that turns on after dark, shedding light on people entering. It can be turned on using the intercom call button. The video phone lens should not be exposed to direct sunlight because the resulting image will be very blurry. It is worth considering the connection to the installation, as well as the function of turning on the lighting of the house, especially when it is quite long. A twilight sensor and a timer are useful, which limits the operating time of the lighting.
6. Pay special attention to cable routing. The cable connecting the internal and external panels of the intercom or videophone must meet the requirements of the device model (number of cores, minimum cross-section, possible need for shielding). Often multi-core telephone lines are used for this purpose, which - due to their low mechanical strength - should not be placed directly in the ground, but rather driven into a protective tube.
An equally good, although more expensive solution is to use a YkY type power cable, for example 3 x 1.5 mm2 .
When planning the route of the pipeline, it must be remembered that it will not be in a place where the surface will harden. Possible connections are made in airtight cans at a height not subject to flooding.
7. Provide a fence for the calling panel. If you plan to install an intercom or video intercom, it is worth adapting to the installation of an external panel during the construction stage. This is especially important for masonry gate posts. When placing pillars, niches must be made in them under the panel, thanks to which we will avoid cutting bricks.