Cellular operators cannot always provide wireless subscribers with a stable high-speed connection; this is often hampered by the specific terrain and equipment used by the user. As a way out of this situation, the market offers expensive signal amplifiers, which are not suitable for every device. If you have certain materials, you can make a universal 4G antenna with your own hands, which will also improve the quality of 3G Internet and meet modern communication standards.
Homemade MIMO antenna for 3G-4G
Device Features
There are different types of homemade devices for strengthening a mobile signal, the most common of which are:
- Kharchenko antenna;
- MIMO amplifier;
- disk antenna or “Gun”;
- Turkin-Polyakov amplifier;
- Uda Yagi wave antenna;
- panel amplifier.
These universal tools allow you to speed up the Internet in rural areas, outdoors and other places with poor access to a mobile network. If there is no connection with the operator or outside its coverage area, these devices will be useless.
A homemade signal amplifier can significantly increase the efficiency of the connection; it is suitable for creating a wireless network and distributing the Internet from a router. To use such an antenna, you just need to connect it to the appropriate connector of the modem. The selection of a plug or pigtail adapter depends on the device model. In some cases, its entrances are closed with a housing, which is removed or small holes are made in it.
The degree of improvement in communication depends on compliance with the assembly instructions, the dimensions and materials of the selected components, as well as the nuances of installing the device. For greater efficiency, some of the parameters of its components are identified through preliminary calculations.
Next, we examine in detail one of the most popular simple 4G signal amplifiers using Kharchenko technology and its manufacturing process. It was originally intended to improve television reception, but the same design is suitable for improving access to modern wireless networks. Brief recommendations and descriptions for the simplest and more demanding powerful amplifier options are also provided.
Basilica Cistern: a man-made miracle reservoir of the 4th century
Usually, when mentioning sights, most people have images of pompous palaces, ancient fortresses or majestic cathedrals, but the Basilica Cistern falls out of the general range of ancient monuments, because this special man-made miracle is. reservoir of the 4th century. And this most mysterious, exciting engineering and architectural creation is located underground in the very historical center of modern Istanbul.
The Basilica Cistern is an unprecedented beauty and evidence of the development of scientific thought of ancient civilizations (Istanbul). | Photo: aa.com.tr.
This is perhaps the most mysterious and unique attraction that Istanbul inherited from Byzantine architects, who created an unusual underground water tank. Back in 306, the Basilica Cistern began to be built by order of the Roman Emperor Constantine, who decided to provide Byzantium (Constantinople) with a supply of drinking water.
Special illumination of the columns makes the underground storage facility a mystical place (Basilica Cistern, Istanbul). | Photo: istanbul-turkey.ru.
For two whole centuries, thousands of slaves created a beauty unprecedented for underground structures, which can truly be compared with the grandeur of the royal palace. What is especially surprising is how they managed to build a system of water conduits underground that delivered water from natural springs located in the Belgrade forest, which is almost 20 km from the city itself.
After overcoming 52 steps, visitors find themselves in an underground palace, which served as an ordinary reservoir (Basilica Cistern, Istanbul). | Photo: vladimirdar.livejournal.com.
Interesting: Today it is known that there are 40 underground reservoirs near Istanbul, among which the Basilica Cistern is the largest. But researchers suggest that this is not the final figure, so search efforts continue.
The length of the Basilica Cistern reaches 140 m and is located at a depth of 10-12 m. | Photo: weekendblitz.com.
The ancient reservoir surprises with its truly royal scale and gigantic dimensions; it reaches 140 m in length and 70 m in width. The total area is 9.8 thousand m² with a water volume of 100 thousand m³. Naturally, such a reservoir could easily provide the city with drinking water in a dry year or during a long siege.
Construction of the largest underground cistern in Constantinople began in the 4th century (Basilica Cistern, Istanbul). | Photo: javadfesharaki.blog.ir.
As the authors of Novate.Ru learned, the underground reservoir received its unusual name “Basilica” for the reason that on the surface, just above the tank, there was a temple, which had a symbolic structure called a basilica, which literally means “place of worship.” This was a rather significant place for the city’s residents, because in those distant times, religious buildings were built in the central squares, and they themselves turned into cultural and educational centers, where schools operated and libraries were organized.
More than 7 thousand slaves participated in the construction of an underground reservoir, which lasted almost 200 years (Basilica Cistern, Istanbul). | Photo: wemp.app.
The unique beauty of the underground reservoir deserves special attention, because it is not for nothing that the Turks call it Yerebatan Sarnici - an underground palace. To see this unprecedented beauty with your own eyes, you need to overcome 52 stone steps and then 12 rows of majestic columns will appear before your eyes, each of which has 28 marble supports 8 meters high.
The arched vaults of the Basilica Cistern preserved ancient brickwork (Istanbul). | Photo: episodesoftheroad.com.
And the most amazing thing is that among the 336 columns you will not find exactly the same ones; they are made of different types of marble and were brought from various temples, not only Byzantine ones. Arched cross vaults lined with thin bricks (plinth) hold the ceiling of the cistern, and 4-meter-thick walls lined with fire-resistant bricks and treated with a unique waterproofing solution have supported the structure for more than 1,500 years, although there is practically no water left in it.
The columns for the construction of the underground reservoir were brought from temples destroyed by the Byzantines during the wars (Basilica Cistern, Istanbul). | Photo: wordsofwonders.ru.
But this is not surprising, because the Turks who captured the city in 1453 practically did not use the reservoir, and it not only fell into disrepair - it was forgotten. Over time, it was discovered again, and in a very interesting way: a French traveler noticed how townspeople fished in their gardens in the gaps formed, under the floorboards right in the house or in ordinary wells. He was the first to suggest that it was in this place that the Basilica Cistern was located, which was mentioned in ancient manuscripts, but the authorities completely ignored this fact and did so for several centuries in a row.
Through such aqueducts water was delivered to Constantinople (Güzelce Kemeri and Egri Aqueduct). | Photo: moystambul.ru.
Only in the middle of the last century did scientists ensure that this unique architectural monument, which clearly testified to the remarkable talent of not only the architects, but also the engineers who calculated the very design of the tank and the water supply system through the galleries and aqueducts of Constantinople, began to be restored. Considering that the Basilica Cistern had been inactive for so many years, tons of silt and dirt had accumulated in it, so it took a very long time to put everything in order and organize a safe area for excursions.
In 1987, after extensive cleaning and restoration, the Basilica Cistern was opened as a museum (Istanbul). | Photo: stroi.mos.ru.
Since 1987, after the official opening, the Basilica Cistern has become almost the most exciting and mysterious attraction of Istanbul. The organizers of the underground museum took special care of the atmosphere that reigns in this majestic and beautiful place. For this purpose, dim lighting was arranged for all the columns and the vaulted ceiling, and soothing music, enhanced by excellent acoustics, creates the impression of unreality.
The “Column of Tears” is decorated with antique curls reminiscent of eyes from which drops of water slowly flow (Basilica Cistern, Istanbul). | Photo: vladimirdar.livejournal.com.
Naturally, in this underground kingdom, among the 336 columns, there are those that are most popular and, as a result, are surrounded by legends. One of the most popular attractions is the “crying” column, decorated with amazing carved patterns that look like eyes or a peacock’s tail. Moreover, it is the only column from which water flows in a thin layer and this is why it has a green color. Moreover, eyewitnesses claim that it looks as if it was not millions of years ago that green plants of bizarre shapes grew. Such an unusual view not only attracts tourists, they came up with a special magical ritual, after which the most cherished wish would be fulfilled.
Tools and materials
To independently manufacture a Kharchenko biquad antenna, named after the engineer K.P. Kharchenko who created it in the sixties, you will need a number of simple and affordable components. These tools and materials are used on the farm and sold in markets and stores. These include:
- preferably heat-resistant reliable adhesive for plastic surfaces;
- a piece of coaxial television cable from 1 to 2 m long;
- soldering iron for soldering contacts and cables;
- markers or pencils and a ruler for marking;
- small-sized vice or pliers for breaking the cable;
- a plastic cap from a mineral water bottle or similar container;
- sharp scissors or knife to cut the wire;
- 30 cm piece of copper cable with a thickness of 4 mm2;
- unnecessary or worn-out CD/DVD disc, or a sheet of foil or a piece of tin.
If there is a shortage of glue, it is not necessary to buy it; it will be enough to dissolve ordinary polystyrene foam with acetone or gasoline in a glass container.
Basilica Cistern: a man-made miracle reservoir of the 4th century
Usually, when mentioning sights, most people have images of pompous palaces, ancient fortresses or majestic cathedrals, but the Basilica Cistern falls out of the general range of ancient monuments, because this special man-made miracle is. reservoir of the 4th century. And this most mysterious, exciting engineering and architectural creation is located underground in the very historical center of modern Istanbul.
The Basilica Cistern is an unprecedented beauty and evidence of the development of scientific thought of ancient civilizations (Istanbul). | Photo: aa.com.tr.
This is perhaps the most mysterious and unique attraction that Istanbul inherited from Byzantine architects, who created an unusual underground water tank. Back in 306, the Basilica Cistern began to be built by order of the Roman Emperor Constantine, who decided to provide Byzantium (Constantinople) with a supply of drinking water.
Special illumination of the columns makes the underground storage facility a mystical place (Basilica Cistern, Istanbul). | Photo: istanbul-turkey.ru.
For two whole centuries, thousands of slaves created a beauty unprecedented for underground structures, which can truly be compared with the grandeur of the royal palace. What is especially surprising is how they managed to build a system of water conduits underground that delivered water from natural springs located in the Belgrade forest, which is almost 20 km from the city itself.
After overcoming 52 steps, visitors find themselves in an underground palace, which served as an ordinary reservoir (Basilica Cistern, Istanbul). | Photo: vladimirdar.livejournal.com.
Interesting: Today it is known that there are 40 underground reservoirs near Istanbul, among which the Basilica Cistern is the largest. But researchers suggest that this is not the final figure, so search efforts continue.
The length of the Basilica Cistern reaches 140 m and is located at a depth of 10-12 m. | Photo: weekendblitz.com.
The ancient reservoir surprises with its truly royal scale and gigantic dimensions; it reaches 140 m in length and 70 m in width. The total area is 9.8 thousand m² with a water volume of 100 thousand m³. Naturally, such a reservoir could easily provide the city with drinking water in a dry year or during a long siege.
Construction of the largest underground cistern in Constantinople began in the 4th century (Basilica Cistern, Istanbul). | Photo: javadfesharaki.blog.ir.
As the authors of Novate.Ru learned, the underground reservoir received its unusual name “Basilica” for the reason that on the surface, just above the tank, there was a temple, which had a symbolic structure called a basilica, which literally means “place of worship.” This was a rather significant place for the city’s residents, because in those distant times, religious buildings were built in the central squares, and they themselves turned into cultural and educational centers, where schools operated and libraries were organized.
More than 7 thousand slaves participated in the construction of an underground reservoir, which lasted almost 200 years (Basilica Cistern, Istanbul). | Photo: wemp.app.
The unique beauty of the underground reservoir deserves special attention, because it is not for nothing that the Turks call it Yerebatan Sarnici - an underground palace. To see this unprecedented beauty with your own eyes, you need to overcome 52 stone steps and then 12 rows of majestic columns will appear before your eyes, each of which has 28 marble supports 8 meters high.
The arched vaults of the Basilica Cistern preserved ancient brickwork (Istanbul). | Photo: episodesoftheroad.com.
And the most amazing thing is that among the 336 columns you will not find exactly the same ones; they are made of different types of marble and were brought from various temples, not only Byzantine ones. Arched cross vaults lined with thin bricks (plinth) hold the ceiling of the cistern, and 4-meter-thick walls lined with fire-resistant bricks and treated with a unique waterproofing solution have supported the structure for more than 1,500 years, although there is practically no water left in it.
The columns for the construction of the underground reservoir were brought from temples destroyed by the Byzantines during the wars (Basilica Cistern, Istanbul). | Photo: wordsofwonders.ru.
Design and dimensions of the Kharchenko antenna
A signal amplifier made using Kharchenko’s method is an excellent way to save on communication quality costs. This broadband zigzag antenna is famous among radio amateurs for its simplicity and durability; its manufacture does not require special knowledge and skills. The frequency of the amplifier depends on the size of the plate; some antennas are capable of supporting several bands at once.
To manufacture a receiving unit using Kharchenko technology, it will be useful to familiarize yourself with the main categories of Wifi antennas:
- Omnidirectional - receives and transmits transmissions in all directions with equal intensity. This is the simplest option, which is a quarter-wave vibrator and preferably a television coaxial cable. The capabilities of such an antenna correspond to ¼ of the wavelength of the received signal.
The simplest omnidirectional antenna
- Sector - limits the reception or transmission of a signal to one direction with partial capture of the sides. To make it, it is enough to place a curved sheet of iron called a screen behind the omnidirectional amplifier. Antennas with sectors of 120°, 90° and 60° are common.
- The directional type of antenna is considered the most effective option. With the correct curvature of the iron sheet, the radio wave forms a concentrated beam.
The main components of the signal amplifying antenna are:
- vibrator for electromagnetic waves that are induced onto it within the coverage of the telecom operator;
- an antenna wire with a matching component that transmits the signal transmitted by the vibrator;
- an element through which the cable signal is transmitted to the modem input;
- a reflector or screen to increase the strength and continuity of a received broadcast, which also blocks transmission interference and reflections.
Antenna Kharchenko
Antenna vibrator
Particular attention should be paid to the material from which the antenna is constructed and its dimensions. Signal amplifiers are primarily made from copper and, in some cases, aluminum. Waves of different frequency ranges differ in length, which determines the size of the vibrator. For example, for the 4G standard this parameter is about 115 mm. To calculate the wavelength of a certain range, it is necessary to divide the speed of their movement in megameters (300) by its frequency. Minor errors are allowed. The side length of one side of two equal rhombuses or squares is calculated by dividing the wavelength by 4. Approximate diagram of the Kharchenko antenna:
Biquad calculation scheme
In such projects, the following dimensions are usually used (indicated with values for a 4G amplifier):
- H—horizontal screen length (115 mm);
- B - vertical length of the screen (115 mm);
- D — distance between the screen and the vibrator (13.2 mm);
- λ—wavelength (115 mm);
- ρ — characteristic impedance (50 Ohm);
- f - range (2600 MHz);
- L1 - outer side of the square (28.9 mm);
- L2 - inner side of the square (27.6 mm);
- L3 - total length of frames (81 mm);
- L4 - frame width (40.5 mm);
- L5 - central opening between frames (1.7 mm).
The recommended width and height of the Kharchenko antenna reflector are individually equal to the wavelength. To build a 3G-4G amplifier vibrator, 25-30 cm of copper wire is enough. Its exact length, taking into account the folds in the example described, will be 237.9 mm. In the case of a homemade antenna, all given values can be rounded to whole numbers and small errors can be allowed.
Antenna cable
Coaxial cable markings
The use of wires with low characteristic impedance prevents power loss. Its ideal value for Kharchenko antennas, panel and many other 4G amplifiers is 50-75 Ohms. This will eliminate errors when receiving a Wifi signal; an exact relationship with the mechanical dimensions of the vibrator can also improve the effect of the device. It is not recommended to make a long wire from the vibrator to the modem, as well as to allow splicing or reconnecting it on the way to the receiving device. This can significantly reduce the quality of the connection.
An acceptable distance between the screen and the vibrator usually ranges from 0.1λ to 0.25λ. For coaxial cables with a resistance of 50 or 75 ohms, the recommended distance is 16.4 and 17.4 mm, respectively.
The best option would be a cable with a diameter of 2-2.5 mm, the cross-sectional thickness of which is at least 5 mm2. A product with a diameter of 2.3 mm and a section thickness of 4 mm2 is also suitable, but it will slightly reduce signal reception. The smallest permissible cross-sectional thickness of such a cable is 2-2.5 mm2. It can have a noticeable effect on the quality and attenuation of the signal, although in certain conditions it will also be a suitable indicator. The better the central opening of the vibrator matches the cable, the better amplification the device will provide. Good data transmission also requires symmetry of the squares of the antenna design and uniform dimensions of the shielding surfaces.
Reflector design
Antenna with reflector
To make an anti-interference screen, you will need a plate of any metal. Equally suitable are a piece of an unnecessary aluminum pan cut with a grinder, a panel of foil PCB, a tin plane cut with scissors, a non-working or extra CD/DVD disc (due to the presence of aluminum foil on one of its sides) and even cardboard or plywood covered with foil. Reflectors are also made in the form of a mesh or strips of wire.
Mesh reflector
Settings
The setup method is similar to how a satellite dish is installed on a television satellite. On the Internet it's a little different. The plate must be directed lower. You may even have to point it down. This is due to the curvature of the reflection. To set up a satellite dish as efficiently as possible, you need to rotate it and use a special program to monitor how the Internet connection changes. Once you are sure that you have obtained the maximum value, the antenna must be fixed.
The external 4G antenna is fixed, now we can move on to the next step. Now it's worth experimenting with focus. For different modem models it is necessary to configure the converter holder differently. To do this, you need to change the focus position and monitor the quality of signal reception.
In order to correctly adjust the focus, you need to know that the modem antenna is on the opposite side from the USB. Of course, this is not the case on all models, so it’s worth disassembling it to understand where the receiver is.
If you have not achieved line of sight conditions, then you should raise the structure. Increasing the diameter of the mirror can also help improve signal quality. A 4G directional antenna is capable of picking up signals over a long distance. How is diameter related to reception quality? On average, a dish with a diameter of 1 m provides a fairly good Internet connection at a distance of 30 km from the station. To connect the modem to your computer, you need to buy a USB cable. What should it be like? Of course, you should use a high-quality cord, a small cross-section with shielding and ferite at the ends. You can also purchase several of these cords and connect them together, without losing quality.
It should be remembered that you will not be able to use a satellite dish for television and strengthen your Internet connection. Of course, you can attach the modem to a satellite dish to boost the signal a little. But it should be remembered that if the dish is tuned to TV, you do not need to turn it away from the satellite. A high-quality signal can be obtained if the satellite dish is configured for line-of-sight conditions.
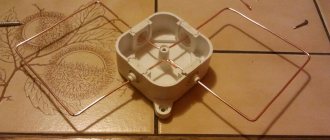
DIY antenna assembly for a 4G modem
The following instructions assume the dimensions from the Kharchenko antenna vibrator diagram presented above. It should be smooth and flat. Before making it, it is useful to fix the wire.
The material for the double squares in the design of the Kharchenko antenna, also called biquadrat, is cut with pliers and bent to the specified dimensions. When making a vibrator, experienced specialists recommend bending both components not into squares, but into rhombuses, whose transverse angles are equal to 120 degrees. According to experts, this will reduce the internal resistance of the device.
The junction of the wire is soldered; the fastening element to the high-frequency wire can immediately be used as the basis for soldering. It is passed through a hole made in the plastic cover and through the middle of a disk adhesive to the cork, which will be the amplifier screen. The cover that will be between the vibrator and the reflector can be replaced with a deodorant cap or a similar item of acceptable size.
Vibrator base
On the plastic component, you should first make cuts to mount the vibrator on the side where it is placed.
Blank for base
The nuances of connecting the cable to the vibrator
Soldering the cable to the vibrator
A homemade signal amplifier is connected to a high-frequency cable by soldering. This speaks in favor of copper as the most suitable metal for a vibrator, however, not every high-frequency cable braid will allow the use of rosin. The soldering problem is solved by placing an F-connector on the wire.
Soldering the F-connector
Then a piece of copper or pins made from it is soldered to it, after which the cable is connected through them to the vibrator in the same way.
Soldering the F-connector to the aibrator
How to install a reflector
Reflector from a CD disc
To quickly attach, for example, a nice-looking disk to the antenna, it is smeared with glue in the center and attached to the plastic bottle cap. A coaxial wire passes through the hole cut in it and through the middle of the disk, connected to a vibrator, which is fixed in slots made on the outside of the cover. The screen and vibrator must be strictly parallel. If it is necessary to adjust the distance between them, the lid is cut off or additional bases are attached.
The resulting structure is securely fixed with thermoplastic glue. Next, the freshly made amplifier is connected to a modem, which can now be configured for maximum performance. If the modem does not have the connector required for the antenna cable, you can simply wrap the main core of the amplifier around it several times.
Connecting the cable to the modem
Description of a homemade receiver
With appropriate settings, this antenna is both an amplifier and a receiver. The inventor and scientist Kharchenko suggested using this biquadrat as an antenna. Biquadrat is a subspecies of loop antennas , which are primarily classified as zigzag.
K. P. Kharchenko proposed this device as an antenna in the middle of the last century (1961) for use as a television receiver. There is a good reason for this: it is a historical, recorded fact that, having tuned his antenna to a frequency of 14 megahertz and giving it the required position, the scientist received a signal from America.
Nowadays, you can buy a mobile phone and Internet signal amplifier without any problems in special stores, or you can make a Kharchenko antenna with your own hands.
Among the factory models of amplifier antennas, it is easy to find powerful devices with high performance. But quite often you can get by with a simple design that can be easily assembled from available materials with your own hands. It is enough to use the well-known development of Kharchenko.
According to the creator’s research, in terms of output parameters, the antenna reliably enhances the operation of digital devices operating on mobile platforms, generating an increase in signal reception of up to 3-4 dB, even without the use of a reflector, and with its implementation - up to 8-9.
Antenna assembly for 3G-4G modems
Modems of the third and fourth generation of communications, belonging to the durable LTE standard, operate in the frequency ranges of 2000-2100 MHz and 2500-2600 MHz, respectively. There are still occasionally 2G modems on the market that are designed for use in the 900 MHz range. They are also offered in combination with 3G and 4G variations, however, mobile Internet devices working with second-generation cellular communications are becoming less and less common. The presented antenna parameters are designed for more modern modems.
The frequency range of the 3G standard is equivalent to a 143 mm wavelength. This differs slightly in wavelength from 4G, but will not be very noticeable when using a wide-range amplifier using Kharchenko technology. This antenna picks up any cellular Internet signals, starting from the one intended by the model and continuing in descending wavelength. The device, assembled for the 3G standard, perfectly accepts transmission in the fourth generation communication range.
The recommended dimensions for the Kharchenko universal amplifier are indicated taking into account the cable resistance level of 50 and 75 Ohms, respectively:
- the outer side of the square will be 35.8 or 35.7 mm;
- the inner side of the square should be 34.2 or 34.4 mm;
- the total length of the vibrator will be 100.3 or 95.5 mm;
- width equivalent to 50.1 or 52.1 mm;
- the opening in the soldering area will be 2.1 or 1.8 mm;
- the recommended distance between the screen and the vibrator is 16.4 or 17.4 mm;
- the reflector width and length parameters will be equivalent to 143 mm in both cases.
The given values can also be rounded to whole numbers or allow for small errors.
Evolution
The antenna, invented by Kharchenko, is a double square made of thick copper wire. The squares are connected to each other with open corners, and at this point the television cable is connected to them. To improve directionality, a grille made of conductive material is installed at the rear.
The perimeter of each square is equal to the wavelength to which the reception is tuned. The diameter of the wire for 1-5 television channels should be about 12 cm. Because of this, for radio communications and meter range television (1-12 channels) it turns out to be very cumbersome. To facilitate the design, a gasket with three wires of a smaller cross-section was used, but it still had a lot of weight and dimensions.
The zigzag antenna created by Kharchenko received a second life when broadcasting appeared in the UHF range. Everyone remembers rhombuses, circles, triangles and other homemade figures as a TV antenna for receiving decimeter waves, which hung on many people’s balconies and outside their windows. They were one of the signs of that time.
In 2001, Professor Trevor Marshall (USA) proposed using this design in Bluetooth and WiFi networks.
This article talks about what devices are available for these purposes and how to make such an antenna with your own hands.
You can use one zigzag antenna drawing for all bands. The only differences are in size.
L1 – outer side of the square; L2 – inner side of the square; L3 – frame length; L4 – frame width; L5 – connection gap; D – height of racks; B – screen width; H – screen length
External 4G antenna
Examples of simple amplifiers
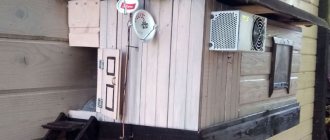
This is the simplest version of a signal amplifier; it is assembled from copper wire, iron household utensils and a USB extension cable for connecting the modem. Copper is wrapped in several turns around the receiving device, which will already strengthen the signal. To select the exact number of turns and the length of the free piece of wire, you will need a more thorough knowledge of the technology, taking into account the terrain, but it is recommended that both the cable and the wire be as short as possible. It is advisable that the modem be fixed in the container parallel to its bottom. Tin cans are also suitable as utensils.
Amplifiers from a can
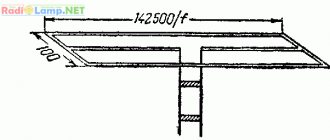
Panel 4G antenna
Panel 4G antenna
A transmitter assembled using this method amplifies the signal by 15-22 dB, catching a Wifi connection within a range of 7 km. Based on the FA 20 antenna circuit, this device is suitable for the 4G standard. To make it you will need:
- fiberglass or a sheet of preferably galvanized iron;
- pliers;
- sandpaper;
- templates;
- drill;
- file;
- 6 pieces of M3 bolts and three times as many M3 nuts;
- soldering iron, tin and flux for soldering;
- drill;
- scissors for cutting metal;
- calipers;
- copper wire with a diameter of 2 mm.
Diagram with dimensions of a 4G panel antenna
The screen is constructed in the shape of a rectangle with dimensions 490 × 222 × 20; on its plane the position of the antenna panels should be accurately marked. Holes are drilled in the places where they are attached. Equally important is the precise cutting based on printed templates glued to galvanized iron. The final stage is assembly, soldering the wire running at the base of the panels and the USB cable at the back.
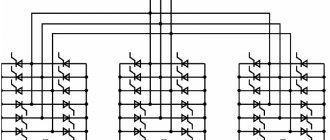
“Double” Bi-Quad (double biquad)
Double biquadrat is also a Kharchenko antenna. It is made with your own hands in the same way as a regular biquadrat. It differs from a regular biquadrat in that at the vertices of the squares, instead of the corners, there are additional squares. The dimensions of these squares are exactly the same as the main ones. Therefore, no additional calculation is needed; you can take the calculation for a regular biquadrat. The calculation for the Kharchenko antenna can be found in this article or use the online calculator program for the calculation. The wires at the intersection are insulated from each other.
The double biquadrat can be continued in the same way. Those who want to make it can easily calculate the length of the wire. This gives additional gain.
Double biquad antenna
Using small homemade directional antennas, you can receive a signal at a distance of up to 2 kilometers. These homemade products are a good replacement for expensive solutions.
Signal amplification features
The shield has a significant influence on the antenna strength. The quality of data transmission can also be improved by directing the vibrator. To do this, when the modem is already connected to the phone, computer or tablet, the antenna plane must be facing the nearest communication center, taking into account polarization.
When there are multiple operators in the area where the antenna is used, they often use different polarizations to prevent interference. The further away the desired station is located, the more the angle of inclination and rotation of the antenna affects the quality of the Internet. Hills, groves and other obstacles in the countryside located in the signal path are also important. According to experts, the optimal antenna direction angle values can vary from 45 to 70 degrees.
Making a reflector
The reflector is a screen located behind the main antenna frame. A metal plate or fiberglass used for printed circuit boards is suitable for manufacturing. You can take a grid consisting of metal rods. Or you can make the screen yourself from thick foil glued to a solid base of the required size.
In this example, the screen is made from the wall of a home PC case.
The following requirements apply to the location of the reflector:
In this example, the spacers are made from old markers held together with plastic cords.
We recommend complete step-by-step video instructions for making a biquadrat with a screen: