Modern access control systems for entrances have become popular because they ensure the safety of residents, the safety of property, and the cleanliness of stairwells. But they can break and require calling an expensive specialist.
However, in many cases, repairs are possible with your own hands if you know the circuit diagram of the Digital intercom handset.
The article very simply explains how to do such work and where to get a diagram of any model of equipment from this company.
Intercom design
An intercom is a device that allows someone to enter a room, or vice versa, to deny entry, without direct contact with him. The device has gained particular popularity literally in the last decade; previously, combination locks were most often used to protect front doors.
Photo - system design
An intercom in an apartment or private house consists of a handset, a calling panel, video equipment (if additional connection for monitoring a door or gate is required), a lock and a switch. Let's look at the functions of each part :
- The digital intercom handset is installed indoors so that the owner of the apartment or house can accept the call and, if necessary, open the door. As a standard, the subscriber device must be connected to the locking system;
- The calling panel is required to dial the required code. It can be of several types: with dial buttons, a special code reader from keys or cards, backlighting, or even a visual identifier. The latter is the rarest type, it is used to protect industrial or government facilities;
- A lock or intercom locking device is used to control the position of the entrance door of an apartment building or the gate of a private house. Nowadays, the most common connection is a digital intercom with an electromagnetic lock. A magnetic lock can be easily opened from the outside, but is considered more reliable than the outdated version with a metal bolt connected to an electric motor;
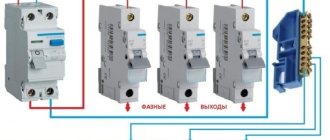
Photo - lock diagram - Using a switch module (for example, Panasonic TDA TDE or PBX), signals are transmitted from the calling panel to a specific subscriber. This practice is more common in an apartment building, since in a private building there is only one subscriber.
Photo - connecting the Commax intercom
As an additional security feature, the call can also be supplemented with the ability to connect a video intercom (Kenwei KW-4HPTN, Kocom KCV-A374SD). In this case, all data is transmitted using the camera to a special TV or computer. Unlike an audio intercom, a video system is more reliable in use, because in addition to making a call, visitors are also visually monitored.
Photo - digital model connection diagram
Most often, such a connection is parallel, which greatly facilitates independent installation. The only thing you need to remember is the polarity of the intercom calling panel, electric lock and apartment handset. If the electrical connection is made incorrectly, then the operation of not only a specific subscriber, but also the entire security system is disrupted.
Photo - intercom control unit
Rules for installing VIZIT intercoms
Why is it necessary to install an intercom in a private house?
The main task that an intercom should perform is to ensure the safety of home owners and protect them from strangers. It is very important to have an audio or video intercom if there are elderly people living in the house or if there are small children who most need the maximum degree of protection. The presence of an intercom will help protect people from danger that may arise due to excessive carelessness.
Installing a video intercom in a private house helps ensure the safety of residents due to full control over the area in front of the gate
Thanks to the intercom, you don’t have to leave the house and walk across the entire yard to the gate in order to see who has arrived, since you can communicate with the visitor via audio or video communication and, if necessary, let him in by pressing a button on your device.
But before purchasing such a device, you need to decide exactly for what purpose it will be used and how much you are willing to spend on your safety. That is why every person should know what types of intercoms currently exist, what functions they perform, what types of locks exist for these devices and how much all this equipment costs. It is also very important to know whether, if necessary, you can install an intercom in a private house with your own hands.
Connection
Step-by-step instructions on how to independently connect the Eltis, Cyfral (Digital) video intercom with the z 5r controller:
- You can connect a key reader (touch memory) or a buzzer, a button that will be used to open an electromechanical lock, a backlight, the lock itself and a power supply to this controller;
- The buzzer and door sensor are optional parts, while the operation of the entire system depends on the door open button and power supply. If necessary, a screen can also be installed; optical control can be carried out through the monitor;
- To connect the board, a terminal block is most often used, the contacts of which will connect the necessary network wires;
- Afterwards, simply connect all the necessary wires to the apartment tube and check the correct polarity.
Domestic intercom models are also very popular, in particular the KS-2006. To connect them, schemes with two switches, one connection module, for several subscribers, etc. can be used.
What to do if the Factorial or Eltis intercom is disconnected from the power supply:
- Twisted pair wires are most often installed in the apartment panel. To find it, you need to open the panel where the Urmet, Digital, Factorial, etc. intercom cable was connected to the entrance or door lock;
Photo - marking of wires when connecting - Then determine which wires are responsible for tens and which are responsible for units. This can be done by looking at similar cables on adjacent connections;
- Be sure to pay attention to the polarity;
- When connecting a cottage intercom, it will be enough to simply connect the cables of the switch and the unlocking lock in polarity.
Device and features of connecting a video intercom
To connect a video intercom you will need a cable with four cores. You can purchase a special wire in the store, where two copper wires are located next to a two-core coaxial wire. It's called a video combo cable. Typically, cable brand KVK-P 2x0.75 is used.
The video intercom is connected to the calling panel using a combined video cable, which has one shielded core
Two more wires are added to the lock, which will allow you to control its mechanism without leaving your home. The call panel is usually screwed at a height of 150 cm from the ground.
If we install a wireless intercom, there is no need to lay and connect a cable. You just need to supply the power correctly.
Video intercom Quantum QM-4HP
Many people prefer to install a convenient, practical and reliable Quantum QM-4HP video intercom in their private home.
Quantum QM-4HP is one of the most popular models among private home owners
Its main characteristics:
- four-inch (approximately 10 cm diagonally) CRT monitor;
- parallel operation of up to 4 monitors in one system;
- door open button;
- connection of one calling panel;
- installing a video memory unit;
- connecting an additional audio tube.
What's inside the intercom? We study the device and connection diagram
Intercoms are one of the types of access control systems. Older people may have seen intercoms for the first time in foreign films of the 70s. The characters in the paintings approached the entrances of houses, selected a button with the name of the person they needed, pressed it, and talked with the resident. With his permission, the front door opened and people entered the building. In the 90s, foreign wonders turned into a familiar attribute of our lives. First, apartment buildings, and then private households began to be equipped with intercom systems. The use of intercoms has increased the level of security for citizens.
In this material we will try to introduce the reader to the structure of intercoms, the principle of operation and the purpose of its main components.
The intercom button does not work - troubleshooting
Intercom is the most popular access restriction system, ensuring the safety of residents of apartment buildings and the safety of their property.
While accessible, this system is practical and reliable.
Communication between the apartment owner and the visitor is carried out through a subscriber device (intercom).
The principle of its operation is quite simple: a person on the street dials the number of the desired apartment on the calling panel, a signal is sent to the device, the subscriber picks up the intercom and opens the front door by pressing a special button.
Problems with intercom systems are rare, since the only thing that can fail is the intercom open button . As a result of intensive use, this part may wear out and begin to work incorrectly.
As a rule, it all starts with the appearance of a characteristic crunch in the tube when you press the button. Over time, it starts to work every other time, and then completely stops giving a signal to open the door.
The simplest thing you can do to fix this problem is to contact a service organization. The technician will come at the appointed time and fix the problem for free.
If you don’t want to wait for a specialist to arrive, you can fix the button yourself.
Purpose of the intercom
As mentioned at the beginning of this material, intercoms are used to restrict access of unwanted persons to a certain area. In the case of multi-user systems, these are the entrances of multi-apartment residential buildings. Single-user (low-user) systems usually restrict access to private households.
In order to enter the territory “protected” by the intercom, a person must go through an identification procedure. Identification can be done using:
- voice recognition during negotiations over a voice communication device (in recent years, video intercom systems have made it possible to identify people visually);
- using an individual electronic key;
- by typing the secret code on the numeric keypad.
In the first case, the decision to grant access is made by the user of the intercom system. In other cases, the identification procedure is performed by a microprocessor device.
Intercom device, operating principle
- digital - a two-wire line transmitting a signal. Apartment numbers (addressing of the call) are fixed by jumpers in the subscribers' handsets, which are all connected to one line stretched along the riser (cable channel in the shaft) of the house with taps for each room. The tubes are connected in parallel. The system is much easier to repair and install, since there are fewer wires: it is easier to detect the break point, and so on. But it is more difficult to repair if the electronic board is faulty. Minus: a break in the main line will lead to a malfunction of all subscriber handsets;
- coordinate (coordinate matrix, analog). Popular for apartment buildings (MCD). The signal is transmitted by a switch, from which a loop of wires goes to the objects. For each apartment there are separate cores, the system cable is multi-core (the number of wires depends on the number of objects served). A more reliable system, but more difficult to repair, especially when replacing wires.
All intercoms of access systems, be they the most popular brands Cyfral, Eltis, Vizit or any others, are based on a similar principle and design.
- call panel with control unit, keyboard, speaker, microphone, indicator showing apartment number, reader for electronic (magnetic) key;
- power supplies: for the system, for subscriber panels (in apartments);
- the coordinated intercom system includes a switch - a device responsible for delivering the signal to the selected user;
- routing of wires in protected (corrugated) sleeves, cable channels;
- in the subscriber’s apartment: a speaking handset or a unit with access control buttons (door unlocking) for communication;
- Repairing a video intercom with your own hands becomes more complicated if the camera and monitor microcircuits have failed, but for other points the repair principles are standard: in the handset, power supplies, switches, microswitches, contacts, holders, wiring are checked, the presence of voltage, the absence of breaks, breakdowns, short circuits;
Main components of intercom systems
Multi-user intercom systems consist of several main units. A typical intercom circuit consists of:
- call block;
- power supply;
- electric lock;
- switching unit;
- subscriber voice handsets.
The figure shows a block diagram of an intercom of an apartment building with a coordinate switch.
Below we will take a detailed look at the structure of all elements of the intercom system.
Electric lock
In modern multi-user intercom systems, two types of electric locks are used:
In electromechanical locks, the bolt (bolt) of the locking device is held in the “closed” state when power is applied to the coil of the built-in electromagnet. When the tension is removed, the bolt comes out of the locking plate under the action of the return spring.
A powerful electromagnet coil mounted on part of an open magnetic circuit is built into the door frame. The second part of the magnetic circuit is mounted on the door. At the moment when the door comes close to the door frame, the halves of the magnetic circuit are attracted to each other under the influence of a magnetic field. When the magnetic circuit “shorts”, the door is kept locked. To overcome the resistance of an electromagnet requires an effort that an ordinary person is unable to create without additional means.
From the above description of the locks of multi-user systems, it is clear that when the supply voltage disappears, they automatically open . This arrangement of locks makes intercom systems vulnerable, but it is dictated by fire safety requirements.
As for the locks of individual intercoms, they are opened using an electromagnet when the supply voltage is applied. The connection diagram for the electromechanical lock is shown in the figure.
In order for entrance doors with electric locks to be able to lock automatically, they are equipped with door closers.
power unit
Intercom power supplies produce power supply voltages for all elements of intercom systems. There are no special requirements for power supplies other than reliability. To increase the reliability of the operation of intercoms, power supplies can be supplemented with uninterruptible power supplies. The use of uninterruptible systems will allow the intercom to continue operating during power outages.
Call block
The call block is the “brain” of the intercom system. Typically a calling block consists of:
- numeric keypad;
- a display reflecting the numbers typed on the keyboard;
- elements of duplex public address system (speaker, microphone);
- electronic key code reader;
- buttons for opening the door from inside the room.
Depending on the type of intercom system and the algorithm of its operation, when typing a combination of numbers on the numeric keypad, you can enter an access code or call a subscriber of one of the apartments. If there is a display, it will display the entered digital sequence.
The latest intercom systems are opened using individual electronic keys (chips). The key chips store a unique code that is read by a special reader. The read code is analyzed by the call block microcontroller. If the entered code matches the code “hardwired” into the call block, the microcontroller will issue a signal to open the door.
In addition to the identification function using a key, the call block performs the function of controlling the switching of voice communication devices. When dialing an apartment number, the speaker and microphone are turned on, and control signals are generated for the switching unit. The switching unit transmits the call signal to the subscriber handset. If the handset is picked up, the caller has the opportunity to conduct a conversation with people in the apartment. Intercoms provide duplex (two-way) voice communication between the calling device and the subscriber device.
If the “open” button is pressed on the subscriber side, the permission signal will be sent to the call block through the switch. The microprocessor system will turn off the power to the lock electromagnet and the front door will open. The door will also open when you press the open button from inside the room.
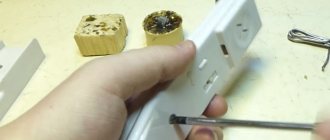
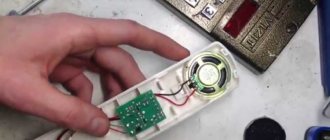
DIY tube repair secrets
Malfunctions can occur due to mechanical damage to the plastic case or as a result of failure of the electronic circuit.
How to fix mechanical breakdowns
Case chips rarely occur. They can be caused by sudden impacts or falls from a height onto a hard surface. Most often, during operation, the tongue on which the tube is hung breaks off.
In these cases, you can try to solder the cracks with a soldering iron.
However, its sting has an increased temperature: it easily burns through plastic. You need to work through foil, a knife blade or any flat metal.
Soldering plastic requires certain skills. In order not to immediately damage the body and do the job carefully, practice doing similar operations on unnecessary parts.
Typical electrical defects
These include:
- Door open button failure.
- Reset information when trying to open the door remotely.
- Drop a call when the handset goes off-hook.
- Decreased audibility.
These faults are covered in some detail in the article on repairing the intercom handset with your own hands. Read. Additionally, pay attention to comments from site visitors. They already ask questions that people have during the operation of intercom handsets from different manufacturers.
We tried to answer them in detail. Don't miss your chance to get acquainted with this information.
For questions about eliminating any defects that have arisen, I recommend watching the video from the owner of All about everything, “Repairing the intercom handset.”
All technical aspects of the operation of the electrical circuit are described here competently and in detail.
Types of intercom code keys and the principle of their operation
Intercom code keys can be divided into two types: contact and contactless. The first intercoms used simple analog keys with two contacts. A resistor of a certain value was soldered inside such a key. When such a key was applied to the reader, a fixed current was passed through it, and the microprocessor system measured the voltage drop across the resistor.
If the fall fell within the specified parameters, the door opened. Such a key could be made not only by an intercom service company, but also by any person with basic knowledge of electrical engineering. Therefore, analog keys were quickly replaced by chips that transmit serial binary code . For such keys, the number of possible combinations is determined by the number of transmitted binary digits.
Contact-type digital keys can be made based on chips from different companies. One of the most common are Dallas Touch Memory from the same manufacturer. Depending on the microchip model, the keys have different amounts of memory and allow you to obtain a different number of numerical combinations.
Recently, many intercoms have been equipped with contactless reading devices. In this case, the exchange between the access key and the intercom is carried out over a radio channel. The devices communicate with each other at frequencies of several tens or hundreds of kilohertz. The range of such “radio equipment” does not exceed several centimeters. Therefore, the possibility of intercepting radio traffic is unlikely.
Required equipment set
If you do not have experience in assembling such video surveillance and access control systems, it is recommended to purchase a complete set of equipment. In this case, there is a guarantee that all equipment is compatible, which means that the possibility of operational failures will be minimized.
The standard equipment package includes the following devices and components.
Monitor
A monitor with an electromechanical or electromagnetic lock control unit displays an image from a camera installed on the calling panel. Various modifications can reproduce black and white and color images. The first of them are significantly cheaper, but the share of such monitors on sale has decreased significantly.
Usually this device is mounted inside a house or apartment at the front door; this location is most convenient.
power unit
The main requirement for a power supply for a set of equipment is that the total power should be 15–20% higher than the total electricity consumption. In addition, the supply voltage must also comply with the technical specifications of the equipment.
In most cases, a separate unit is only needed to connect the controller and electromechanical lock; monitors with a control panel are usually equipped with built-in voltage converters.
Lock
There are two main types of locks used as locking mechanisms, namely:
- Electromagnetic locks are inexpensive. When power is applied, the electromagnet locks the doors in the closed position. The locks are reliable, but they have one significant drawback - if the power goes out, the device stops working and the door can be opened by any stranger.
- A more preferable connection scheme for a video intercom with an electromechanical lock, which does not have the disadvantages inherent in magnetic models. In fact, this is an ordinary lock that is used for installation on entrance doors. But it is driven by an electric drive after receiving the appropriate command from the control panel or controller.
Equipment sets of the first type are most often installed in the entrances of apartment buildings to ensure easy access during a power outage. But video intercoms for private houses are usually supplied with electromechanical locks.
Video intercom calling panel
One of the main parts of the entire set of equipment. The video intercom calling panel provides voice and video communication between the owner of the house or apartment and the visitor. It is on it that the key readers necessary for opening the doors independently are usually located.
Depending on the modification, the panel is equipped with the following equipment:
- A small-sized video camera that captures and transmits images to a monitor.
- An IR illumination device allows the camera to get a clear picture in the dark.
- Microphone and speaker for voice communication.
- A call button that allows you to notify the owner of the house about a visitor.
In some cases, the video intercom connection diagram is supplemented with an external camera, which allows you to take pictures from a different angle.
Connecting wires
The wiring to be laid is required to supply power to an electromechanical or electromagnetic lock, to connect the calling panel to the video intercom for transmitting audio and image signals.
To reduce possible interference, it is recommended to use only braided cables. This requirement applies to video intercoms operating with analogue and digital signals.
The most widely used:
- Conventional coaxial cables RK-75 and their analogues. It should be taken into account that for a four-wire connection, two such cables will be required.
- A similar drawback was eliminated in combined cables of the KVK type. In addition to the shielded core, they contain two additional conductors. Thanks to this, video and audio signal transmission and power supply are ensured.
- If you intend to install a video intercom operating in digital format, then twisted pair wires are used. In this case, the requirement for a shielding braid remains the same, so conductors marked FTP are used (all conductors are protected by a common shield).
- If the distance between devices does not exceed 60 meters, they can make do with cheaper ShVEP 4 x 0.12 wire. To connect the lock actuator, a multi-core SHVVP wire with a core cross-section of 0.75 mm2 is sufficient.
When choosing a wire, pay attention to the distance from the entrance gate to the house. If it exceeds 60 m, it is advisable to choose RK-75, KVK cables.
Most common models
In our country, equipment for intercom systems is supplied by several large companies. Among them we can highlight such manufacturers as Metakom LLC, the VIZIN group of companies (Visit). Both companies offer comprehensive solutions for organizing remote access control systems (ACS). Both companies present a wide range of intercom equipment.
Based on the proposed elements, you can create low-user and multi-user intercom systems of any configuration. The company's products are distinguished by a high level of quality and engineering. The equipment can operate in difficult weather conditions of our country. Anti-vandal design ensures high durability of products.
How to install an intercom with your own hands? Tips from Leroy Merlin in Moscow.
In order to understand how to install an intercom yourself without putting yourself in danger:
Before starting to work on electrical wiring, turn off the electricity using the main switch,
Follow electrical safety regulations
Use products that comply with regulations
Never install the transformer in a damp room or outdoors.
Correct selection of wires ensures optimal operation of the device. This table is provided for general information. Don't forget to read the diagram included with the device.
| Audio intercom | Video intercom | ||
| Up to 50 m | More than 50 m | Up to 25 m | More than 25 m |
| wire 6/10 | wire 1.5 mm | wire 6/10 | 1.5mm wire or max cable |
3 Electrical protection
The home intercom must be connected to an electrical network protected by a 10 A fuse or a 16 A circuit breaker. For the safety of people, it is also recommended to install a 30 mA residual current device.
Two types of power supply are possible:
1. The intercom is connected directly to a power outlet (power cable). The transformer is integrated into the intercom.
2. The transformer is not integrated into the intercom, but is connected to it and to the electrical network.
5. Fill the fine with cement, after moistening it with water and removing the nails as the work progresses.
6. Remove excess mixture and allow the cement to dry.
7. Cut the wires to the required length and connect them to the device in accordance with the wiring diagram (see part 6).
8. Fix the outdoor call panel to the built-in box.
Installation of intercom
2. Determine on the wall the location of corrugated pipes for laying wires from the outdoor call panel to the indoor intercom and to the transformer.
6. Screw the intercom stand to the wall.
7. Cut the wires to the required length and connect them to the device in accordance with the wiring diagram (see part 6).
8. Reinstall the intercom by hanging it on the mounting brackets on the stand. Secure the intercom using the screw provided for this purpose.
Installing the transformer (if necessary) Mount the transformer in a protected location (for example, on a distribution panel).
1. Connect the transformer to the intercom in accordance with the diagram (see part 6).
2. Connect the transformer to a fused electrical network (see the tip “How to do electrical wiring without putting yourself in danger”).
This is important: Turn off the power before connecting the transformer.
Tips for installing a video intercom • Do not install the video camera in areas exposed to strong sunlight or in front of a strong light source. • Do not install the intercom in a room with high temperatures (over 40°C), or in a humid or rain-exposed location. • Try to protect the intercom and video camera from strong vibrations and shocks.
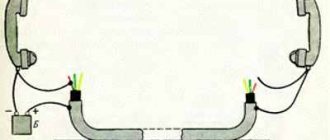
6 Circuit diagram
Example of a single 2-wire connection diagram:
2-wire connection between street panel and intercom
Example of a 2 + 2 wire connection diagram:
– 2-wire connection of the street panel with the intercom
– 2-wire connection between lock, transformer and intercom
| All information provided is advisory in nature. When installing, connecting and servicing electrical devices and/or circuits, contact only properly trained and licensed professionals. |
How to connect an intercom yourself in an apartment building?
An intercom is already a necessary device for a homeowner in an apartment building. It minimizes the access of strangers to the entrance: tubes equipped with audio and, in many houses, video communications allow you to quickly identify the person on the other side of the door. Many people are interested in whether it is possible to connect an intercom in an apartment on their own. Of course, if you understand at least the basics of electrical engineering. And we, in turn, will provide you with detailed instructions that will help you easily cope with this matter.
Connecting an intercom to an entrance intercom
Installing an intercom in an apartment, sooner or later each of us will face the problem of connecting the handset.
- There may be a number of reasons for this:
- Installation of equipment independently in connection with the installation of a protection system.
- Connection of the handset due to a breakdown of the previously installed intercom device.
If you still have to do this work yourself, then first of all you should purchase completely new equipment. In this case, you should take into account the fact that the handset must fully comply with the installed intercom system.
Today, buying a handset for an intercom is not difficult, and you can safely purchase it yourself. Thanks to the many modern companies engaged in this production, there is a wide range of products that are publicly available and suitable for any type of intercom.
It is strongly recommended to purchase goods only from authorized dealers, who guarantee the quality of the goods and provide a guarantee for a long service life. The device must meet all the specified quality conditions, since only high-quality intercom handsets can ensure uninterrupted and reliable operation of the security system. Otherwise, re-installation will not take long.
Installation of handsets for digital intercoms. Digital intercom systems are mainly used in apartment buildings. Installing a handset of this type has its own specifics, namely: this addressing scheme requires a two-core cable to which the subscriber handset is attached. Here you should pay attention to the polarity.
Each intercom handset has its own microcircuit, which is programmed with jumpers or jumpers for each apartment number. In this regard, in order to find out your apartment number, you will have to carefully disassemble the handset and carefully examine the existing microcircuit. Near each jumper there is a special digital panel on which the numbers are in ascending order.
Here the apartment code is made up of numbers related to closed jumpers. A disassembled old handset can serve as an example from which you can transfer the code to a new device. Thus, installing a new intercom handset will not be difficult.
Installation of the handset on a coordinate matrix type intercom. Connecting the intercom handset to this type yourself is not difficult. Here, all the work consists of transmitting a signal to a special switch, which, when a call is received, processes it and, due to the presence of special keys, sends the call signal to the required subscriber device. Installing a handset for such an intercom will force the owner not only to work hard, but also to show ingenuity.
During installation, the whole problem lies in the cable, which is divided into many wires related to each individual apartment in the entrance. It should also be taken into account here that tens keys generally do not exceed seven, including zero. Thus, the total number of users can be more than eighty.
Do-it-yourself installation of an intercom handset consists of finding the required bus of tens, as well as units. It is very easy to deal with dozens - they are located on the panel of the required floor. All that is required is to find the wire to which the wires related to each apartment in the entrance are connected. This way you will select the cable you need.
To select the correct unit bus, you need to go up to the floor with the apartment number that matches the last digit of your apartment, and again find the cable on the panel. A plus is connected to the tens bus, and a minus to the units bus. This is where all the difficulties end.
Installing the device is not difficult. Then we just connect the handset. To do this, we carry out the entire procedure described, paying attention to the polarity. If all existing rules are followed, we can say that the installation is complete.
With electromagnetic lock
Installation and connection of an intercom with an electromagnetic lock. Electromagnetic locks differ in the method of landing on the door leaf.
- There are schemes:
- installation in a cutout with overlays of durable parts of the body on the surface of the sash;
- installation in the inner cavity of the door with the mandatory removal of the magnetic pad flush with the surface.
The first installation option requires less carpentry skills, but can be challenging when working with a metal door. The second one is more accurate and will require professional skills to create a recess in a wooden door. To fix the lock, hand tools, self-tapping screws and another type of detachable connection are used. Welding the locking mechanism to the door is highly discouraged.
It is recommended to place the connection wire either at the end of the sash, or so that it is hidden by the cash strips. You can also run the route inside the overhead cable channel.
Installation of calling panel. Where exactly to place the intercom calling panel depends on the wishes of the owner. In this case, you should be guided by basic common sense: to press the call button or place a face in the capture area of the video camera, you do not need to require any special actions from the visitor.
The calling panel is placed so that all its parts (except the front) are closed to prevent accidental or intentional damage and protected from moisture. To connect, it is worth laying the cables in advance. Their connection is carried out according to the instructions for the device.
- Typical color markings look like this:
- red cable or terminal – for internal buzzer;
- brown – to control the lock;
- red – for positive power cable;
- green – to internal light signal;
- yellow connects to the manual release button (from inside the security zone);
- orange connects to the door close sensor (if used);
- white – to the key contact device.
The black wire is a single marking of the common contact for all devices in the system; it is connected to the minus power line. If it is impossible to lay the cable structure in advance in a fence, soil, or metal structures, it is recommended to place it in a metal or corrugated pipe; durable aluminum cable channels are also suitable.
The diagram of the intercom calling panel is always given in the technical data sheet; the purpose and marking of the terminal comb or branch contact lines of the device are also indicated there.
With electromechanical lock
Connection diagram for an intercom with an electromechanical lock. An electromagnetic lock brought from a store may have a different number of contacts.
- In general, if the manufacturer uses standardized markings, the colors of the terminals or taps correspond to:
- green – main manager, release;
- black – neutral wire for condition monitoring;
- blue, yellow – transmit a signal of the locking or unlocking state, respectively.
The intercom does not use a detailed monitoring system; it controls only unlocking. Therefore, the lock is connected with only two contacts: in the standard case, green (to the control point of the calling panel) and red (to the positive terminal of the power supply of the appropriate voltage). All necessary technical data are always provided by the manufacturer in the product passport.
About the design of the intercom
Before connecting an intercom in an apartment building yourself, let’s look at the design of the device. This access device with intercom functions (audio and video communication) has become popular in the last decade, taking the place of less convenient combination locks that previously protected some of our entrances. Intercom systems are most often installed by specialized companies for the entire entrance. They subsequently maintain the system.
The most popular manufacturers of intercoms today are Vizit, Commax, Falcon Eye, etc.
In the diagram above you saw the main components of the intercom system. Before connecting the intercom yourself, let’s refresh our memory of their functions:
- A tube. It is installed in the apartment so that the tenant can answer the call and open the door for the guest. This subscriber element must be connected to a common locking system.
- Call panel. This is what we see next to the entrance door - a key code reader, keys for dialing an apartment number or code, an auxiliary screen.
- Lock (locking device). Today, electromagnetic variations are the most popular. Although it is still possible to open them without a key with the proper application of physical force, they are considered the most reliable. Previously, there was a popular option with a regular metal valve, which was opened by an electric motor.
- Switch module. This element of the system is responsible for transmitting a signal from the calling panel to a specific resident.
- System power supply.
- “Exit” button, etc.
Design
There are various intercom models available in the market. The simplest are analog systems. The advantage of this solution is the relatively low installation cost. However, due to the large number of cables, they are especially recommended for installation in single-family houses, where there is usually one uniphone (earphone).
Their disadvantage is low comfort of use and interruption of operation when the phone is not installed correctly. This is why most interested in the idea of logging into a phone decide on a digital system. It consists of a central unit and microphones equipped with decoders that display the access code that opens the gate or door.
The digital system can be connected to the telephone system and monitoring. There are also mixed systems - analog-digital, in which uniphones are connected to a digital intercom. The door can be opened using a code or code card.
Radio controlled systems
The most convenient are radio-controlled systems. Their big advantage is the ability to open the door using a special remote control from any part of the house, the range is 400 m, and it is possible to use several headphones to control the entrance.
Videophone is a special version of intercoms, additionally equipped with a camera. Apart from listening, a person can also monitor the caller. The camera is located in a cassette board, and a special monitor is installed in the uniphone. After pressing the button on the door station, the camera automatically turns on. An additional feature of the videophone is the ability to record images away from home.
Basic elements
video intercom calling panel
uniphone - telephone - it looks like a telephone, but does not have a dial; uniphone allows you to contact the person at the door or gate; has a button to open the electric lock;
intercom - it is installed outside the house at the entrance or fence; has the buttons or business cards needed to call the right person; There is a loudspeaker and microphone inside the cassette; you can insert the cassette by placing it in the wall or on the wall; it is usually made of aluminum, steel or brass;
power supply for the input telephone - it connects all elements of the system; supply voltage 12 V;
cassette with an electronic system - the amplifier is responsible for the appropriate voice volume, the acoustic generator activates the electromagnetic lock when the call button is pressed;
electric lock (electric drive) – placed in the door frame or gate;
wires – connecting elements of the intercom; ducts must be properly insulated and have an appropriate cross-section; telemechanical or telecommunications cables are most suitable for this purpose.
Types of intercoms
Before you connect the intercom yourself, you need to decide on the type that suits you best:
- Digital. The guest's call is transmitted over a two-wire line, where the apartment number is recognized. Pairing here is the work of jumpers that transmit a signal to a specific handset over a twisted network. Each of the latter is equipped with microcircuits for such an operation. All apartments, not only the entrance, but also the floor are connected to this controller.
- Coordinate matrix. A simpler option, which is why it is considered more reliable. Here a switch is connected to the coordinator, and when a call is made, it transmits a signal to a specific handset. The connection itself is wires of units and tens. From here, each apartment is defined by two cables, the numbers of which, naturally, cannot be repeated. To establish communication, a signal via DAT1 is required. Then the information is converted and processed by the modulator, after which it is connected to a specific one and ten. The connection to the apartment via LIN occurs due to the operation of an electromagnetic relay.
Components of an intercom
This device consists of several main elements that allow you to contact subscribers and control access to the entrance.
External panel. A key reader is installed on this panel. This device works as follows: when a key is applied, the code is read and compared in the microcontroller base. If there are matches, the door opens. The panel is equipped with buttons with numbers from 0 to 9 and two functional ones, usually * and #. This mini-keyboard allows you to access the entrance or use the service menu. In the service menu, you can include a specific key in the microcontroller base, turn on and off service by the system for certain apartments. All actions of the reader and buttons are reflected on the screen of the external panel.
External intercom panel
- Inner panel. Depending on the cost of the system, audio or video intercoms can be installed. The cameras do not have to be built into the external panel; they can be used separately. For example, a camera is added to the general simple system directly next to the apartment itself. Having called the owner from the street and gaining access to the entrance, the guest will have to pass another barrier - a video intercom into the apartment. An intercom configured in this way allows you to control people who have entered the entrance in an incomprehensible way.
- Switch. This part serves as a kind of information distributor from the external panel to the tubes. Depending on which apartment number was entered by the guest, the switchboard sends a ringing signal to the corresponding subscriber. The operation of the switch depends on the type and connection scheme of the handsets.
Switch
- Entrance exit button. Allows you to open the door from the inside of the entrance. Usually this element is more convenient when it is backlit.
- Lock. An intercom connection with an electromagnetic and electromechanical lock is used. An intercom with an electric lock is more reliable.
The intercom comes with its own lock.
Electrical protection and wiring
We continue to talk about how to connect the intercom handset yourself. The connection itself is only possible to an electrical network protected by a 16 A circuit breaker or a 10 A fuse. To ensure the safety of residents, a 30 mA residual current device is also installed.
Two types of power supply are used for the intercom device:
- The transformer is located separately from the intercom, connected both to it and to the network.
- The tube is integrated with a transformer and is connected to an outlet using a power cable.
One of the important topics regarding how to connect an entrance intercom yourself is wiring. Make sure that it fits only in corrugated pipes. Therefore, you need to accurately measure the distance from the outer panel to the speaking tube in order to lay the pipes to the required length. The free ends of the wires should protrude approximately 20 cm from them.
Types of intercoms and operating features
The latest types of intercoms are distributed by the number of subscribers:
- An individual device designed for installation in a house or cottage. The call panel is mounted at the entrance to the yard (outside on the gate), and the receivers are installed in any convenient place.
- The device, designed for a large number of subscribers, is installed in the entrance of a multi-storey building, there is one input panel, receivers are in each apartment.
According to signal processing technology:
- Analog, or coordinate matrix, models that work like a telephone on an analog switch (like a mini-PBX). Connected to each apartment.
- Digital devices are connected to all apartments with a pair of wires from a digital switch.
Types of modern intercoms
Digital device
The digital intercom works as follows:
- The signal arrives via a two-wire cable.
- The system calculates the apartment number.
- An electronic jumper works, by closing or opening it configures the signal circuit for a specific apartment (jumper).
- The telephone handset in the apartment is equipped with receiving electronics. The controller serves any number of apartments.
The intercom is connected with a 2-wire wire, through which an encrypted command is sent to the controller. The intercom handset is connected to the communication device after receiving a call for a specific apartment. Communication can be video, audio or mixed.
The jumper ensures error-free switching of contacts in the transponder. To correctly program the handset, the jumper is mounted between the terminals so that the sum of the digits of the contacts is equal to the number of the connected residential premises.
- The advantages of digital devices are simple installation, easy connection.
- The negative point is the direct influence of each speaking tube on the operating state of the system.
If the digital handset is connected incorrectly or if there is a short in the signal wiring, the entire equipment may break down or begin to produce incorrect signal codes.
Digital video intercom - general connection diagram
Analog access control device
To install an intercom in an apartment, you need to connect the switch to the room with two wires with different numbers from each other. First, the signal arrives at the switch, after which the modulator converts it into the required format and connects it to a wire with the required digital designation. The intercom is connected to the controlled room by a relay. Analog designs often use parallel connections. The operation of analog equipment is based on the use of a coordinate matrix connection based on the mini-PBX principle. The intercom handset is connected to the switch via two buses. The first bus is numbered in tens (D0-D9), the second – in ones (E0-E9).
To connect the intercom to apartment No. 57 you must:
- Connect the wire from the positive terminal of the speaking tube to contact No. 5 on the D0-D9 bus.
- Connect the wire from the negative terminal of the speaking tube to pin No. 7 on the E0-E9 bus.
If it is impossible to make a connection using apartment numbers, the installer must change the program in the call panel, shifting the numbers to the calculated number corresponding to the apartment numbering. It is difficult to perform such a calculation on your own, so it is recommended to call a specialist who can calculate the offset number.
Briefly about how an analogue intercom works:
- First, the location for attaching the communication tube of the access control system is selected, then it is fixed on the wall with suitable hardware - self-tapping screws, “quick installation” dowels, screws.
- Next, the location for mounting the switch on each floor is determined. Usually this is a junction box for low-current buses. The buses are connected in parallel, which makes installation easier, especially since you only need one switch per floor. The disadvantage of this connection scheme is that you will have to stretch a multi-core cable from the upper apartments to the installation site of the switch.
- After unscrewing the cover of the switch, find terminals D0-D9 and E0-E9 and connect them to the switch in such a way that when adding the contact numbers, you get the number of the apartment to which the call will be sent.
- The wires are connected to the handset in the correct polarity of the contacts. The positive terminal is to the switch contact with tens numbering, the negative terminal is with units numbering.
Operating principle of an analog intercom
Installation of a street panel
How to connect an intercom yourself? The next item is the installation of an outdoor external panel:
- The approximate height of the element from the ground is 1.6 m.
- For overhead panels on the door or wall, the locations of the mounting dowels are marked, then holes are drilled according to the marks and the device is attached.
- For built-in options, lines are drawn for the groove, and the position of the built-in box is noted.
- Using a chisel, cut the groove, taking into account the thickness of both the built-in element and the corrugated pipe.
- Install and secure the recessed box with cement.
- Then place the corrugated tube in the hole. If necessary, secure its position with nails.
- Carefully putty the fine with the pipe, simultaneously pulling out the nails holding the last one.
- Now cut the wires from the pipe to the required length and connect them to the street panel.
- The action ends by fixing the street panel in the built-in box.
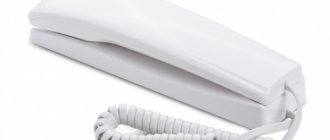
What is an intercom handset?
The intercom handset is one of the components of the intercom system of the security system, which provides communication between the owner and those wishing to enter the premises. If the external communication element is a calling panel located outside, then the handset is a home appliance that is installed inside the protected premises. Such a tube can be installed either independently or by calling a special team.
In most cases, the handset provides communication immediately upon picking it up, without the need to press any combinations. Installation of the tube usually falls on the shoulders of professionals.
In the photo you see an image of an audio intercom tube
Each type of protective equipment requires a specific tube, since different devices require a certain number of wires to be laid.
If you are using a digital intercom, then in this case you will need one cable that is laid from the digital panel. Using its individual branches, it connects to each individual apartment. If a coordinate matrix type intercom is installed in the house, then the installation involves laying wires equal to the number of apartments in the entrance.
Installing the Internal Device
If you don’t always have to install an external device (this can be done by the company that supervises the intercom at your entrance), then installing the handset, if you want to take matters into your own hands, will have to be done by you. Here is an approximate algorithm of actions:
- The approximate recommended location of the tube is 1.5 m from the floor.
- Next, you need to determine on the wall where to lay the corrugated pipes from the external access element. If the transformer is built into the tube, then there is only one path, if not, then two - to the intercom and, in fact, to the transformer.
- Again, you make fines with a chisel along the thickness of the corrugated pipe.
- The next step is to place the pipe in the groove and further cement it or putty it.
- Mark the exact location of the tube, drill holes for the dowels that will hold it.
- Attach the handset stand.
- From the corrugated pipe, connect the necessary wires to the tube.
- Install the intercom on the mounting brackets and secure it with screws.
- The transformer (if it is not built-in) is installed in a protected place (for example, a distribution panel) and connected to the general system with wires strictly according to the diagram. It can only be connected to a network protected by a fuse!
Step-by-step connection
Installation of any type of intercom and accompanying equipment begins with determining the connection points of individual components and equipment elements.
- The cable length is calculated and tolerances are added for convenient connection.
- Ditches are dug or cut into the walls for laying signal and power cables.
- It is recommended to install it in a corrugated pipe if the wall thickness allows. When laying through metal structures, plastic tubes or hoses are used. It is allowed to lay the wire in a plastic cable channel.
Next, he installs a set of communication equipment. First, an electromechanical lock is installed into the door. Depending on the material (metal or wood), carpentry tools or welding are used.
The next step is installing power supplies. For an apartment, a ready-made separate unit is connected to the nearest electrical outlet. To do this, a separate transformer is mounted to the external video cameras and the call panel, which is installed in the electrical distribution panel of the entrance. In your home, it is mounted in a place protected from moisture, preferably in a separate box with a door.
If the components of the communication kit require surface mounting, they are secured with screws, self-tapping screws or dowels. If necessary, first drill holes for hardware. The connection of all devices into a working circuit occurs at the last stage of installation.
Installation and connection of communication equipment
To connect all the equipment into one network, each intercom element of the video and audio system is switched, the wires are connected, and the device housings are secured in areas of the room prepared and marked for hardware. Then the final finishing is carried out - the grooves are covered, the surfaces of the walls are finished with decorative materials.
Equipment installed in niches or in pre-hollowed or cut-out recesses is firmly attached, uneven areas are covered with mortar, the devices are covered with decorative overlays or sealed in another suitable way.
The last step is commissioning. All equipment is turned on, the correct dialing switching, volume and quality of audio and video communication are checked.
Video intercom installation
We figured out how to connect a digital intercom yourself. Its variety is a video intercom, connected according to a similar scheme. But before installation, please consider the following:
- The video camera should not be installed against sunlight or powerful lighting.
- The video eye must be protected from vibrations and mechanical damage.
- The camera must be protected from rain and not exposed to high temperatures (more than 40 degrees).
Independent installation of an intercom is the prerogative of people who have dealt with electricians more than once. If you are doing this for the first time, we advise you to carry out the work under the guidance of an experienced friend, since all descriptive instructions are of a general, advisory nature and do not prevent specific problems during installation.
{SOURCE}
How to connect a video intercom to an entrance intercom
To coordinate the video intercom with the entrance intercom, special elements are used - MSC/MSK interface modules. These devices are used to coordinate a video intercom with a digital/coordinate entrance intercom. The adapter is capable of supporting video intercoms from various manufacturers; the manufacturer promises high-quality work with CTV, Commax and Kocom. There are restrictions described in the instructions for the device.
We connect to a digital entrance intercom. Installation of the MSC adapter is quite simple. You connect the wires that previously went to the intercom handset. Also connect the four wires from the video intercom to the adapter.
The calling panel is connected directly to the adapter, just like the camera. For this purpose, the device has appropriate outputs.
- The MSC module provides all the basic functions of working with an intercom:
- Organization of two-way audio communication with the visitor.
- Opening the lock by command from a video intercom.
The connection diagram looks like this:
We connect to the coordinated entrance intercom. The MSC module is needed to work with a coordinated entrance intercom. Connection and operation are similar to the MSC adapter described above.
The connection diagram using MSC looks like this:
Commax intercom connection diagram
Commax intercoms differ in screen diagonal, type of connection, control method, etc. Some models can divide the screen into four parts. This is convenient if you need to view images from four cameras simultaneously. The user can choose a color or black and white intercom, with a hands-free function and other types of modifications.
If we talk about the device’s memory, then, as a rule, it is enough to take up to 128 frames. Some Commax intercom models can record short videos. Recording begins after the user presses a key, so there is no need to confuse a video intercom with video surveillance.
A more comfortable solution is the ability to connect a cordless handset. Thus, the signal passes not only to the intercom, but also to the handset itself, which is very convenient if the apartment is large and the call cannot always be heard. The presence of such a handset allows you to use it not only as a means of communication with the intercom system, but also as a telephone, for which it is enough to connect to the telecom operator’s network.
The Commax intercom connection diagram includes several elements. These include: calling panels, controller, electric lock, 12 V power supply and video cameras. The connection principle is quite simple.
The user may not install a video camera, but instead mount an additional call panel. This is relevant for protecting large areas with two gates. In most cases, instead of a second shooting, a camera is mounted. Thus, it is easier for the user to decide whether to open the door or not.
The calling panel and camera are connected to the controller using four wires: audio, video, power and common. A DC voltage of 12 V is supplied to the input of the calling panel and to the input of the video camera. This is a transformed value obtained as a result of conversion by the power supply of a household alternating voltage of 220 V.
The system provides for the use of two electric locks, but the user can leave only one or exclude them from the circuit altogether. If you decide not to install locks, then the wires must be insulated and hidden under the panel.
In the case when a video camera is used instead of a second calling panel, the sound is transported through one channel, and only the image through the second. Most often, a video camera is installed immediately in front of the entrance to the apartment, and a calling panel is installed in front of the entrance to a long corridor, after passing which the visitor enters the lens frame.
In some cases, two intercoms are connected. This is convenient if the house is large and one post is not enough, then one, for example, is installed on the first floor, and the other on the second.
The Commax intercom is connected using colored wires. Typically these are red, blue, yellow and white wires. It is important to maintain the order of connections, as incorrect connections can cause equipment failure. In some cases, repair is not possible; the user has to purchase the equipment again.
- The blue wire is common; the power potential is measured against it.
- Red – audio signal.
- Yellow is the positive bus of the main power supply of the equipment.
- White – video signal.
When connecting the equipment, it is necessary to ensure that the device is not exposed to direct sunlight. Excessive heat is the main cause of failure. It is better to place the elements at a height of one and a half meters; if there are children in the family, they will not be able to reach them.
If connecting wires are laid close to high-voltage lines, then it is necessary to use a coaxial cable, which is protected by a metal pipe. This is the only way that magnetic fields will not create interference currents - and this can become one of the reasons for a false signal. The pipe, in turn, will reliably protect the connecting wires from external influences.
It is necessary to monitor the integrity of the wiring, as a violation of the insulation leads to a short circuit, which can cause a fire. After all elements are connected, the correct connection is checked again. It is important that the conductors are securely fixed and the order of the wires is not disturbed.
When connecting the monitor and camera, you must make sure that the monitor is not connected to the network. Power is supplied only when the power cord is connected to an outlet. At the end, the specialist turns on the devices and performs a control check of the functionality of all elements.