Connection nuances
To connect the washing machine to the electrical network with your own hands, if the electrical wiring in the apartment is old (aluminum), you need a separate line made of copper wire with three cores, cross-section 2.5 mm2, with a separate circuit breaker and RCD. The best option would be to use NYM brand cable. It is distinguished by triple insulation and sufficient rigidity, convenient for wiring in grooves.
The connection of wires in a modern electrical plug of a washing machine implies the presence of a grounding wire; it is usually two-colored, yellow-green, connected to a separate screw inside the plug; it should not touch the “phase” and “zero”.
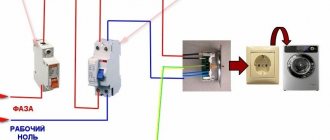
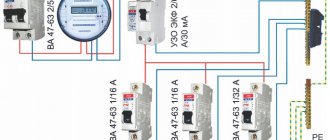
The washing machine is plugged into a special waterproof outlet. Waterproof sockets have several indices characterizing the degree of protection, there are 8 of them, the higher the index, the higher the protection. The socket is connected in the electrical panel to a separate circuit breaker with an operating rated current of 25 A.
Connection in the electrical panel is carried out as follows:
- The blue wire is connected to the zero bus.
- Grounding green-yellow wire to a free-standing screw on the metal panel body.
- Phase wire to a separate circuit breaker or RCD.
Official website of the authorized service center Transservice-Petersburg
Electric stoves have long come into use, however, unfortunately, not everyone knows how to connect them.
So, if you purchased one of these stoves and want to connect it yourself, this article will undoubtedly help you with this. In it, we will try to explain step by step how to do this competently, and most importantly, safely!
It should also be mentioned that even though electric stoves are household, they consume quite a lot of power - this must be taken into account both during installation and during further operation of heating electrical appliances in everyday life.
Before installation, carefully read the contents of the installation instructions. If any points cause you suspicion, it is better to entrust the installation to a competent electrician. Do not forget that the manufacturer’s warranty does not apply if the electric stove is connected in violation of the rules and regulations in accordance with the installation of electrical equipment.
We suggest analyzing how to choose the right components for installation: cable, plug, socket, circuit breaker. Connect the electric stove and oven to a single-phase, two-phase, three-phase power supply network of 220 and 380 Volts with your own hands.
- Self-connection of an electric stove:
- Before starting any work on connecting electrical equipment to the network, you must carefully study the technical data sheet of the product, which must be attached, and also familiarize yourself with such regulatory documents as PUE, 7th edition and PTEEP.
- Step-by-step instructions for connecting electric stoves electrolux, zanussi, hansa, gorenje, bosch, ariston, beko, hotpoint, indesit, greta, kaiser ( Kaiser), aeg, Nord EP Samsung to the power grid:
- Step 1 - Power Cables, Circuit Breaker and RCD
The power supply to the electric stove must be carried out by an independent cable going directly to the distribution board of the living space.
To lay the cable from the switchboard to the socket, you can use cable brands: VVG; VVG-ng; PVS; SHVVP.
And from the outlet to the stove, it is better to connect with multi-core wires, for example PVA or KG, which are more resistant to breaking when repeatedly bent during operation.
The cable cross-section depends on the network voltage, the number of phases and power consumption. Understanding these parameters, you can select the optimal cable from the table. It is better to take the cross-section of the conductors with a margin of one order of magnitude larger.
The connection must be from a separate circuit breaker. The rated current of the machine should be one rating higher than the current consumption of the electric stove.
All characteristics of the electric stove can be found in the technical documentation, which is included with the purchase; they are also indicated on the body. The time-current characteristic of the circuit breaker must be category C.
It is also preferable to install a residual current device (RCD), which will protect a person from electric shock if he accidentally touches damaged equipment.
The RCD is installed next to the circuit breaker and connected after it. Its denomination must be an order of magnitude less than the machine. Ground leakage current is no more than 30 milliamps.
All screw terminals must be firmly clamped as high current will pass through them.
Step 2 - Installing the Outlet
Not every apartment has a power outlet in the kitchen, designed to connect powerful equipment that consumes more than 3 kW. As a rule, this is a single-phase power outlet, which is designed for a rated current of 32 A or 40 A.
We suggest you look at how to choose and install the right socket for an electric stove:
The electrical outlet must be made of high-quality materials and provide strong electrical contact. The number of contacts must correspond to the number of wire strands. Do not connect cables together by connecting them to 1 pin. Use only copper cable to connect the socket.
The cross-section of the cable must correspond to the table above. The socket is installed on a flat, non-combustible surface. If you have a brick wall, it is advisable to install the overhead socket on a special lining, this will prevent the base of the socket from cracking during installation.
Do not place the socket too close to hot surfaces, washbasins, iron pipes, window and door openings. When replacing an old socket, make sure that the insulation of the wires is not damaged and there are no signs of overheating of the cable. The colors of the wires must correspond to the purpose of the wires, both in the socket and in fork.
All screw terminals must be properly secured. Stranded wires must be soldered in advance with a soldering iron at the point where they are attached to the socket contacts.
After installing the socket, make sure the wires are connected correctly. Use a multimeter to check for short circuits.
Turn on the circuit breaker in the residential distribution panel. Use a multimeter to check the presence of voltage at the phase contacts of the socket.
Step 3 - Open the back panel of the cooker
To connect the cable to the electric stove, on the back side you need to find and unscrew the small cover that covers the terminals for the wires.
Step 4 - Securing the Cable
After you have removed the cover, you need to secure the cable. This is to prevent accidental pulling of the cable from the plate. Insert the cable and secure it to the stove body in a special clamp.
Step 5 - Installing Copper Jumpers
Depending on the number of power phases, the wires are connected differently. In order to properly coordinate the connection of the stove to various power networks, special copper jumpers are included with the terminal block. According to the diagram you have chosen, install jumpers in the block and tighten the screws where the wires will not be connected.
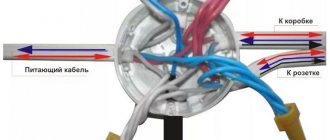
Step 6 - Connect the Wires
It is very important to correctly connect the wires on the terminal block! In the documentation and often on the case itself, near the lid, there is a connection diagram with different types of power supply. According to the diagram that suits your case, connect the wires to the terminals.
The color of the wires must match the connection in the plug and socket. The ground wire is connected first - yellow-green, then the neutral wire - blue. Next are the phase wires, brown and 2 black.
The main thing here is not to confuse anything, so as not to damage the equipment.
Step 7 - Closing the Panel
After connecting all the wires, check the connection diagram again to make sure there are no errors. Tighten the clamp screws well. But do not forget: in all plates the connector is made of fragile material, do not use much force, otherwise you may damage it. Now you can close the cover and tighten the fastening bolts.
Step 8 - Connect to the Network
Before connecting the oven to the network, make sure that the circuit is assembled correctly and all live parts are closed. Turn on the machine and the RCD, check for voltage in the outlet. Plug in the electric stove. According to the instructions, make sure that all its functions work correctly.
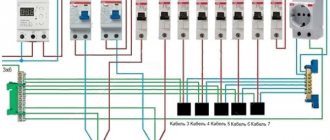
Connection via RCD
Modern washing machines with a power of up to 2.2 kW or more require connection to the electrical network from an RCD, which ensures the safety of people from electric shock. The RCD is selected depending on the power consumption and can be: 16A, 25A or 32A, with a leakage current of 10 mA - 30 mA.
An alternative would be to connect the washing machine from a circuit breaker with differential protection; it is selected in the same way as selecting an RCD.
Fig No. 1. Connecting a washing machine from a separate RCD
There are two ways to connect the washing machine from the mains:
- To the general RCD of the apartment. In this case, due to the large total load, if the washing machine is damaged, there will be a strong current leak, there will be a strong electric shock, and as a result, there will be a power outage in the entire apartment.
- From a separate RCD. In this case, in the event of a malfunction, only the washing machine will be turned off.
Fig No. 2. Connection diagram for a washing machine without grounding, from a common RCD of the apartment
Preparation is the path to success
Installation
Before connecting the automatic machine, it is necessary to carry out several important preparatory work. First you need to choose the ideal location for this equipment. In principle, its installation can be carried out in any room, but mainly it finds its place in the bathroom or kitchen. When choosing a location for it, several important factors should be taken into account:
- What is the distance from the nearest utilities. We pay attention to electrical wiring, sewerage and water supply. It is to these communications that the washing machine will connect.
- Will it spoil or decorate the appearance of the room?
- Is there a flat surface in the selected location?
- Will it be convenient to use?
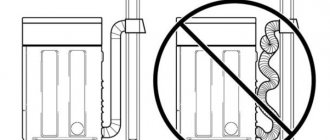
Communications connection diagram
Having considered all the nuances, we proceed to the next stage of preparation - dismantling the transportation parts. This is an extremely important step, because if you ignore it, then when starting up, important components of the machine will fail, and you will not have time to do even one wash. Typically, shipping bolts, wood pieces, and brackets will need to be removed. The dismantling process should be carried out carefully so as not to damage the appearance of the unit. To avoid mistakes, you should once again read the included instructions from the manufacturer.
Remove the shipping bolts
Well, the last point of preparation is choosing a level place with good coverage. The floor surface should be:
- durable;
- flat horizontal;
- resistant to aggressive operating conditions.
If the selected surface does not meet these parameters, then it is important to carry out preparatory work. For example, you can make a new cement-sand screed, lay tiles and the like. The most important thing is that the surface is perfectly flat; check the horizontal level.
Connecting a washing machine without grounding
In the absence of residential grounding, it is highly undesirable to connect the grounding wire to the working neutral wire. Most Russian apartments do not have separate grounding, so in this case the connection can be made through an RCD or a difavtomat.
Advice: To avoid tingling by electric current and false alarms of the RCD, it is advisable to disconnect the grounding of the surge protector capacitors; the grounding is located next to the input of the power cable, inside the machine body. The filter is designed to protect against asynchronous frequency interference; when it occurs, the insulation can be damaged, which happens extremely rarely in 1 case in a million, and getting an electric shock is real.
Important: It is necessary to remember that if you want to protect yourself by independently connecting the protective grounding to an electrical panel that is not equipped with a special protective grounding bus, located on the floor in the entrance, the neutral wire may burn out. This is extremely dangerous and may cause electric shock to people.
Detailed description of the installation process
After all the preparatory work has been completed, you can begin the actual installation of the machine. To do this you need to have a building level. The top cover of the machine is used to check the evenness of the installation. The maximum permissible deviation angle is 2°. The horizontal position is adjusted very simply: to do this, you need to adjust the legs of the unit.
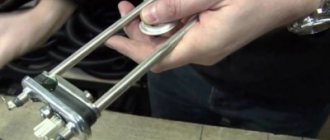
Adjust the legs of the washing machine
It is prohibited to level the machine by placing objects under the legs! The only thing allowed is a rubber mat. It can serve as a protective element on a sliding surface.
When the machine is level, the legs must be firmly fixed. To do this, tighten the locknuts counterclockwise with a wrench. If you want the washing machine installation procedure to be carried out technologically correctly, you must follow the following recommendations:
- The unit will be installed securely, the legs will be firmly fixed, and the floor will be level.
- To fasten supporting structures, it is necessary to use fixing elements.
- To check the correct installation, you need to rock the machine diagonally. If there is no hesitation, then the work was completed at “A+”. Otherwise, adjustment will be required.
Check and launch
Check
When all installation procedures have been completed, you can perform the first test run. To do this, open the shut-off valve for the water supply, connect the machine to the power supply and check for drainage into the sewer. During the watering and draining process, make sure that there are no leaks or other errors.
As the manufacturer recommends, the first wash should be done without laundry. The water heating level is set to the maximum position - this will remove technical grease from the surface of the drum.
If the wash cycle is completed successfully, it means that the washing machine is ready for further use.