A video intercom increases the level of security and comfort, as it allows you to monitor the territory, as well as negotiate with visitors at a distance, and control the blocking of doors/gates from a distance. In the modern market for private homes, devices are usually sold in ready-to-install kits. You just need to buy an additional cable and connect its cores correctly. There are also wireless systems. Let's consider how to connect a video intercom, types of equipment, installation requirements, installation steps, taking into account the principles of operation, type of connection.
Types of video intercoms
An intercom is a system for locking/unlocking doors, gates, and other locking structures at a distance. For apartment buildings with inexpensive housing, equipment without video surveillance is more common. But for more expensive and private housing, equipment with video surveillance capabilities is almost always installed, the types and installation of which we will describe.
Types of intercoms by type of connection:
| Types of video intercoms | Description |
| IP wireless type with Wi-Fi | Communication is carried out via Wi-Fi. |
| Wired analog (coordinate) | The principle of matrix switches is used, as on old mini PBXs. The second name is analog. Each receiving unit with a telephone handset is connected to the calling panel by two wires. Thus, if the system is located in a multi-apartment building (MKD), a thick bundle of wires is formed, which requires space inside the cable shaft. The bundle goes to a common switch, to connect the apartment to it and connect the indicated 2 wirings. Lines D0 - D9, E0 - E9 come out from the main switch. D is the first character of the apartment number, E is the second. For example, lines D6 and E6 will go to room N66, and lines D7 and E7 will go to room N77. |
| Wired digital | There is one line of two wires to which all subscribers are connected. When dialing an apartment number, a specific password signal is sent to the chip. The impulse goes to all premises, but only the switchboard of the subscriber that is configured for the dialed password responds to it. There are jumpers on the board (1, 2, 4, 8, 16, 32, 64). To call a specific object, you need to program their combination so that the sum contains the apartment number (apartment N105: 64+32+8+1). If some levers are not involved in the connection, they are removed. |
| Wired IP intercoms with communication via PoE cables | Communication via twisted pair, like Internet network equipment. |
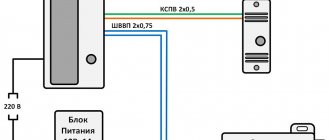
All elements of wired intercoms are connected by cable cores, which carry power and communication signals (audio, video), commands.
For wireless kits, communication is provided by Wi-Fi; there may be wires in the system, but their number is minimal; the main elements are not connected by them. In some cases, wireless is partial, for example, a network cable can run from the outdoor box to the unit with the screen, but the latter communicates with the router via Wi-Fi.
A short summary
Intercom systems in an apartment or private house will increase security, protect the owner from unwanted and strangers, allow you to monitor what is happening at the door, conduct video and audio recording if the intercom system has this function, and be calm that no one will be able to get inside the house without consent of the residents. The money spent on purchasing a video intercom, a special lock and installation of everything by professional workers will pay off due to peace of mind and confidence in the safety of yourself and your family.
Wireless IP video intercom
Installation and connection of a wireless video intercom are the simplest: the equipment is connected like any gadget with a Wi-Fi connection. The parts only need to be secured in the selected places, connected to power, and activated. The elements themselves automatically “recognize” each other and “register”. Adjustment may be required, but it is simple and is carried out on the unit with the monitor.
Principle of operation
A wireless electronic gatekeeper uses a regular network with Internet access via a Wi-Fi router to transmit video, audio, and other signals and control commands.
The composition is not much different from the standard set of elements, but there are some nuances:
- the main equipment unit with a monitor (internal, located inside the apartment) and a call panel (external) in a vandal-proof design with a visor, protection from weather conditions. Features: these elements have antennas (hidden or external), contain Wi-Fi modules (modems, transmitting and receiving units), and there are no wires for communication. And also in the outer part there is a built-in video camera (can be separately), a backlight, a microphone, a speaker, a receiver for magnetic keys, a keyboard for entering a password (not always), and a call button. The internal unit is a box reminiscent of a landline telephone with a speaking handset, a monitor to which the video camera transmits an image, and a control segment with regular buttons or an LCD display;
- control module for the lock and calling unit. This part may be missing, all the necessary electrical circuits can be integrated directly into the panels;
- electronic lock. The locking device for private houses is often electromechanical (EM), less often electromagnetic options are installed, since they require a constant supply of current to them;
- power supplies for the outer segment, lock. Or BOOZ for the latter.
Wireless video intercoms have a not very powerful connection; the range between the calling unit and the base unit is 50–60 m; in the best case, if there is no interference, it is 100 m. This parameter is prescribed in the instructions. Each wall made of concrete or brick reduces the distance by 15–20 m.
A video intercom requires a wireless connection somewhat conditionally, since in any case there are wires to the lock from the calling unit, and the panels can simultaneously use rechargeable batteries and power supplies. There are also more complex systems that combine Wi-Fi and twisted pair cable for RJ-45 connectors. In this case, it is implied that data transmission (communication) is predominantly wireless.
There are kits in which the calling module with the unit with the monitor is connected by a network cable:
Advantages and disadvantages
Pros of wireless systems:
- installation and configuration are easier. There is no need to stretch cables or hide them in trenches, penetrations, or channels. The adjustment is carried out on an LCD display with a simple, intuitive menu;
- the option of recording data from the camera to cloud Internet services is possible;
- viewing information from a smartphone from anywhere in the world where there is access to the network;
- Portable (mobile) handsets with a small screen are possible, which you can carry with you, which will allow you not to approach a certain place in the house each time, and control the system from any point of the serviced facility;
- Easier connection of multiple screens and speaking handsets.
Minuses:
- The Wi-Fi signal is sensitive to obstacles - even one concrete wall of standard thickness can significantly reduce the communication range by 20–30%. The problem is solved by amplifiers, but such devices increase the price of equipment. Devices operating nearby that receive/emit radio signals may cause interference;
- Wi-Fi is easily jammed by special devices that are sold legally everywhere. That is, external unauthorized intervention in the system is possible using more accessible simple means. However, a high-quality system has protection in case of communication interruptions and locks the doors automatically, that is, they can only be opened manually;
- Despite the above disadvantage, the cost is higher than that of wired equipment.
For the type of product described, Internet access with Wi-Fi is required.
An example of a combination of wired and wireless communication for an IP video intercom:
Installation
For private houses, the usual locations for installing an external unit are right next to the entrance doors. If there is a local area, then the element is placed on the entrance gate, on the gate. The distance from the ground to the calling segment is 140–170 cm, that is, close to the eye level of visitors, so that the video camera lens covers them, and also so that it is convenient to reach the receiver for electronic keys, the keyboard for typing a password, pressing the “ Call".
The calling unit is secured using any solid means - self-tapping screws, brackets, bolts, screws. Then the lock, which is included in the equipment set, is inserted in the usual way. The internal part (resembles a telephone with a speaking handset, a monitor) is installed simply: it is hung on the heads of dowels, bolts, and it can simply lie on any surface.
The electronic (electromechanical, electromagnetic) lock is connected to the outdoor unit (call panel) and to the power source via wires (these are one of the few cables in the system). If the connection to the latter is correct (it’s difficult to make a mistake here, since all the terminals are labeled, there are plugs with keys, “foolproof”), then the system immediately starts working.
If the product version provides not only electronic keys, but also entering a password for unlocking, then the combination is set by pressing certain keys on the internal unit, the procedure is prescribed in the instructions. New keys are stored in a similar way. The apartment unit also adjusts sound signals, screen brightness, contrast, and sets the date and time.
An apartment unit with a telephone handset and a monitor can be stationary or mobile (in this case it runs on a rechargeable battery). There are also kits that provide for connecting several such modules, which is convenient if there are many rooms in the house, and smartphones can also be used in their role.
General information
A video recording phone offers more features than a regular intercom. Of course, it’s not free – the price of a video intercom is correspondingly higher.
The video intercom input installation includes an external panel (with or without rain cover) with a call button, speaker, microphone and camera. An internal camera with a several-inch monitor, a door open button, buttons for additional functions and controls for adjusting the sharpness and brightness of the image.
A miniature camera with a wide field of view is placed in a cassette with a door station, and a miniature monitor is installed inside the building. It can be color or black and white. The camera usually turns on after pressing a button on the door station. In some video intercoms, it can be activated by pressing the button next to the intercom. In addition to the miniature monitor, you can connect an additional monitor or even a TV to the intercom.
The video data unit can record images. When we are not at home and the camera is triggered by pressing a button, it will transfer the recorded image to memory along with the date and time it was recorded. This way you can see what kind of guests you have when you return.
There are also more technically advanced systems. After activating the corresponding function in the video intercom, the camera automatically records the image during our absence, remembering it at certain intervals - this is called monitoring. Devices equipped with infrared cameras allow you to monitor an area without additional lighting, even at night.
Features of the lock and its control unit (BUZ)
Before connecting a video intercom yourself, you need to familiarize yourself with the nuances of the lock. After connecting the panels, they begin to install the locking device on the doors and gates. As we have already noted, for private houses and cottages, an electromechanical design is more often used.
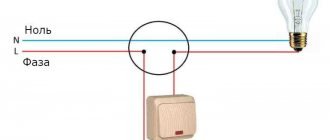
You should never connect the main 12V line from the power supply of the internal intercom panel directly to the lock terminals. The connection is made through the BUZ or a separate power supply unit.
With 12 V coming from the main line (not through the control unit or a separate power supply), at the moment the locking structure is unlocked, a significant voltage drop occurs, which causes interruptions in audio and video, and interference occurs. The lock won't open, and that's the best case scenario. Working with such an error will gradually disable the calling and internal module.
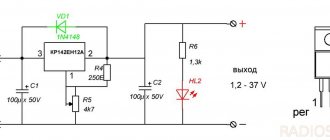
So, there are 2 options: using a BUZ or an individual power supply for the lock. An example of the second diagram is below. As you can see, the internal panel is connected to a 220 V network; inside it there is a step-down transformer that produces 12 V, which goes to the calling module and ensures the transmission of signals and commands. The lock has its own separate power supply also for 12 V.
Another diagram with a separate power supply for the lock:
Another option is to use BUS. This type of device is often used due to the fact that a separate power supply is a box that needs to be hidden in the fence, and even a separate 220 V line must be connected to it. The BUZ is a much smaller part; it can be placed inside the lock body. In addition, the use is much more convenient - no separate line is required for it, the device uses the same 12 V from the internal module.
The principle of operation of the BUZ: the device accumulates voltage from the intercom, and at the moment when the lock unlock button is pressed, a short-term voltage is issued that is much higher than 12V, which is enough to activate the EM coil of the locking mechanism to operate it. The principle is similar to that of capacitors. There is a trigger decoupler inside the device, so its operation does not affect the rest of the electrical circuit.
Connection diagram for BUZ video intercom
The process for connecting the BUZ is as follows. Remove the lock cover. The cable is brought inside.
There may be pieces of wires on the terminals - you can make a twisted connection to them, but it is better to remove them and fasten the wires from the BUZ directly to the terminals, you just need to place them on the seats and tighten them with bolts.
You place the BUZ inside, connect the installed wiring to it (from the 12 V line coming from the apartment module), the terminals are usually labeled. The two ends from the control unit are secured to the original (factory) terminals of the locking device; polarity does not matter.
Some key control units are equipped with three wires, for this option the diagram is as follows:
Two BUZ wires are connected “+” and “-” (GND) from the main 12 V line, the third is led directly to one terminal of the locking mechanism, and one of the “lock” terminal wires from the calling module goes to the second. From the other output of the latter, a wire goes directly to the lock coil.
A few more variations of wire connection diagrams for the intercom lock control unit:
After the above manipulations, the internal video intercom module is connected to the outlet. Check the functionality of the equipment. Configure according to the instructions.
How to unlock a lock with BUZ from home without pressing call
Some BUZ accumulate voltage precisely when the call is pressed, that is, without first activating this button, the lock will not open. For example, a user intends to leave the house by unlocking the door from the same house, presses the unlock button on the interior panel, but the gate remains closed. This happened because no one pressed the call key on the back side.
To unlock the lock from home when the button on the outdoor unit is not pressed, as well as when there is a power outage, there is a special manual unlock button on the part of the lock on the side of the house or room.
How to reverse a lock tongue
During installation, there may be a need for a different position of the locking mechanism tongue, for example, with a certain location of the gate, the direction of its opening. To do this, remove the mechanism cover, press the tongue with your finger, and remove the end cotter pin from the rod.
Next, weaken the spring without moving the rod all the way, unfold the tongue, push the first element into place, and install the cotter pin.
Intercom installation stages
First of all, you need to determine in what place this or that functional part of the intercom will be located. Next, the following operations are performed:
- the conductor is calculated with a reserve - it allows you to easily make the required connections;
- grooves are made on the walls or ceiling, grooves are cut in wooden structures for cables;
- if the surface allows, it is necessary to make a groove in it such a depth that the protective corrugated hose for the conductor will fit. When laying cables over metal structures, it is necessary to install a protective tube;
- direct installation of equipment. First, the lock is inserted. When installing it in a steel door, certain difficulties may arise, which a qualified specialist will help solve;
- installation of power supplies. As a rule, at this stage it is recommended to seek help from a specialist. However, having basic knowledge of electrical engineering, you can solve the problem on your own. When installing an intercom for an apartment, the power supply is installed in the panel - in the entrance. In a private house, a place protected from precipitation is allocated for these purposes. If the shield is overhead, it is securely fastened. Hidden, mortise panels are “hidden” in the walls, for which a niche the size of the box is made in advance.
- combining all parts of the video intercom into a single system. For each element, the video system is switched, conductors are connected, and the equipment is installed in places prepared in advance. It is important to carry out all work carefully and carefully so that you do not have to redo the entire system again;
- The grooves in which the cable is laid are covered, and the finishing elements are restored.
Ultimately, after the installation work, all that remains is to check the functionality of the video intercom.
On video: Installing a video intercom in an apartment with your own hands
IP video intercoms with communication via twisted pair (PoE) and RJ-45 connectors
Equipment with Internet connection can be not only wireless, but also wired. This system is similar to Wi-Fi video intercoms, only the elements are connected to the router via twisted pair cable, like a computer with a network card. Internet access expands options for managing, recording and storing data.
PoE is a technology that allows you to transmit data simultaneously with power through a twisted pair cable. Below is an example of an elementary circuit that can work without access to the Internet and with it: just connect the cord of the router or module with a monitor to the router.
Scheme options for other types of video intercom kits
Above, we examined the most typical connection diagrams for video intercoms, and also described the basics of placing wires and other elements that can be used to guide the installation of other types of similar equipment.
Let us briefly describe other schemes.
Connecting a coordinate analog product. In this example, additional calling panels with cameras are connected directly to the main module with a screen:
Connection via a controller or patch panel is often used. The process of installing wires is not complicated, since the instructions always indicate the pinout of the terminals of this element.
Scheme with switching panel:
Below is another diagram with a controller. This element allows you to connect an increased number of components in a more convenient way. The wires of the parts are connected to its terminal part, and from it to the apartment module there is not a bundle of conductors, but a reduced number of them.
You can include a recording device or video recorder in the circuit: