Any car has its own on-board autonomous electrical network with all the inherent elements, energy source, storage device and consumers. Each of the nodes is functionally complete, they are connected by electrical wiring, and the network parameters are clearly standardized thanks to the accumulated experience in the production of automotive electrical equipment.
The power source for the electronics is a generator, which will be discussed in this article.
Kinds
There are two main types of car generators:
- Direct current, a voltage of a certain polarity is generated directly on the windings;
- Alternating current, since a constant voltage is still required, the generator is equipped with an internal semiconductor rectifier.
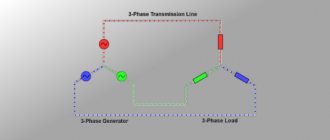
Currently, only the second type is used, since it has undeniable advantages, and its windings produce three-phase voltage, which is easier to smooth out ripples and allows more efficient use of the weight and size of the device.
We will look at what is inside this device below.
Electrical wiring in the house
Before connecting the generator to the house, I analyzed the state of the house network. After the meter I had two 25A machines. I decided to immediately change them, since the wiring in the house is old.
I have many articles on choosing a circuit breaker, here is the main one. Here, in relation to the apartment.
Counter and circuit breakers.
Third, IEK is not connected. The PVS cable that goes up goes to the summer kitchen. It was decided to install the generator near the summer kitchen, under a canopy, so power from the generator will come through this cable.
Device
Externally, all generators are similar at first glance, but those who are familiar with electrical engineering can easily determine which device they are dealing with. The situation is simplified by the fact that DC machines were used only on very relic cars, long out of production.
DC generator
The DC dynamo includes:
- frame;
- field windings on a stator fixedly fixed in the housing;
- power windings on a rotating armature;
- brush assembly with copper-graphite or carbon brushes that remove current from the rotating armature commutator;
- a voltage regulator that stabilizes the output by regulating the excitation current in the stator electromagnet windings;
- drive pulley on the armature shaft;
- bearings in which the armature shaft rotates.
To create acceptable output power, the entire unit had to be massive and metal-intensive, so with the advent of high-quality rectifier semiconductor devices, DC generators were no longer used in cars.
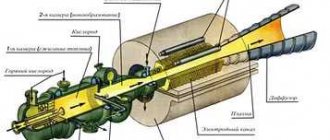
Alternator
In principle, it is designed similarly, but the output power is generated by multiphase stator windings, made of thick wire and not requiring powerful and unreliable current collectors.
The composition of the equipment is also similar:
- housing with mounting brackets and electrical terminals;
- stator windings installed in the housing can be removed when its halves are disconnected;
- rotor with soft electrical iron poles, copper windings and commutator;
- brush assembly, where a pair of carbon brushes is usually installed and an integrated semiconductor voltage regulator is built in, through which excitation power is supplied to the brushes;
- a rectifier block, where a three-phase bridge of six power valves (diodes) and three relatively low-power additional diodes for powering the field winding is located; the number of diodes may differ in specifically designed modern designs;
- bearings on the rotor shaft;
- output connectors, power and control, the second power contact is the metal housing of the generator;
- drive pulley and forced cooling impeller.
The entire structure is attached to the front of the engine for convenient organization of belt drive from the crankshaft pulley. Often, by deflecting the generator to the side, the belt tension is adjusted in cases where the more complex design of the drive of mounted units does not imply the presence of a separate tensioner with a roller.
Electrical circuits of the VAZ 2106 car
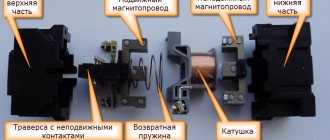
Its design consists of a pair of brushes made of graphite, springs that allow them to be pressed more tightly to the rings on the rotor, as well as a brush holder. Loosen and remove the drive belt. Disconnect the block with wires from the generator connector. Contents: How to connect a standard generator G Replacing a VAZ generator with a G Refining the generator G for a VAZ Checking the functionality of the power supply system Electrical diagram of a VAZ As a matter of fact, if we look at the electrical diagram of a VAZ, which we have given below just in case, it turns out that it differs only from the diagram the presence of additional electrical appliances, which entailed some changes. Conclusion Now you know what elements the VAZ generator consists of
The rectifier unit looks like a large horseshoe into which semiconductor elements are pressed. Consequently, electrical energy is generated. To do this, it is necessary to de-energize all current consumers of the car and increase the engine speed to 2.5 thousand.
Therefore, install a mudguard that will protect your car from moisture.
No generator can do without a rectifier unit and a voltage regulator. In this case, significant current flows through the valves and they are damaged. How is it better than the standard six? GENERATOR VAZ 2101 BATTERY CHARGING LAMP AND PRINCIPLE OF OPERATION
Read more: Measuring electrical laboratories
Connection diagram
The circuit is divided into power and control circuits. The powerful output of the generator is connected directly to the positive terminal of the battery through a power connector made of a large cross-section wire secured with a nut on a stud.
The thin control wire is most often simply connected to the ignition circuit through a control light. There are also other schemes when the light bulb has its own control from a specially designed contact on the body.
Accumulator battery
It is a plastic (formerly wooden) box, usually containing six cans. They are all connected in series to each other, but we are seeing two outputs - plus and minus. There are batteries that require maintenance - the cap is unscrewed from the top, the level and density of the electrolyte must be monitored, and there are already those where these procedures have been made easier and simpler for drivers - a closed battery , where the level will already be constant.
Let's go back to the older ones. When you have a car, it has headlights, interior lighting, and an engine. As many of us saw in old movies, the driver started the engine manually. I manually turned the crankshaft using a lever, which was popularly called the “ starter ”. The engine, having received rotation from the driver’s force, was picked up, started and then worked on its own. The generator , which produces current, is also running Everything is fine, the car works!
When the driver turns off the car's engine, the generator stops, all electricity goes out, and if the engine needs to be restarted, the driver must go outside again and manually turn the engine. Of course, this creates great discomfort for the driver. Therefore, it was necessary to develop devices that could independently crank the engine, set it to such an initial speed that it would grab hold of itself and begin to work on its own energy (fuel combustion). How to do it? How to scroll it? The answer was found with the help of electrical energy. Our fuel engine can be connected to an electric motor.
When we need to start the internal combustion engine , we supply current to the electric motor, it begins to rotate and rotates the gasoline (whether it’s diesel, it doesn’t matter, because I won’t pay attention to it in the future) engine. The rotation started, our internal combustion engine started, the electric motor was turned off and everything was fine. Everything works, the driver's power is now changed by an electric motor. This electric motor is called a starter.
We'll talk more about it below, but let's get back to the topic. Consequently, we have an electric motor, it was installed with the required power so that the latter is enough to crank the internal combustion engine at the required speed, but we have nothing to generate current for the starter. Of course, you can hang sockets on each pole, stretch the cable, turn on the plug. The starter will receive power from the outlet and spin up our internal combustion engine. Then unplug the cord and drive away.
Presented a picture! Funny! Right. Therefore, you need to have your own “socket” in the car. Of course, it’s a little inconvenient to carry the power plant with you, so the engineers had to look for other methods and means. It was decided the following: the car should have its own source of electrical energy, which can supply it independently of the operation of all other systems of the car as a whole. Therefore, in order for this reserve of energy to be there, the latter needs to be “pumped” there. This is our battery. This is a chemical source of energy that is capable of receiving and accumulating electrical energy in certain measures and volumes (by converting it into chemical energy, but we are getting into this too deeply), and releasing it when necessary. I won’t tell you what the efficiency of a battery is, that it will return less energy to us with losses, but we don’t need that. The main thing for us to understand is that there is a battery, it can be charged with electrical energy, and when we need it, we can take it from there and give it to the starter.
The starter cranks the internal combustion engine for us and we achieve the goal - the driver started the engine without much physical exertion, without leaving the car. And as a bonus, we can use the same electrical energy that we accumulated in the battery for our own needs. We're not the only ones who have a starter. We have lights in the cabin, a radio and the like. And thanks to the battery, we have become more independent from the internal combustion engine. We don’t have to start it to turn on the lights in the interior or body of the car.
We have a current source that is ready to give it to us (in certain volumes, of course). What requirements can we place on the battery? Firstly, it should not be large, it should not take up a lot of space, but at the same time, it should have sufficient capacity. The amount of electrical energy that we want to store in the battery must be enough for all our needs. It is also important that this energy in the battery is enough for multiple attempts to start the engine. It’s not like we had one attempt to start the engine, and if it didn’t start, the battery gave up all its energy, discharged, and we were caught. No, the accumulated energy should be enough for us to have a reserve of chances to start the engine, within which it is possible to eliminate the engine malfunction and try to revive it again. Also, in addition to supplying current to the starter, we, according to established norms and rules, must signal the car.
Principle of operation
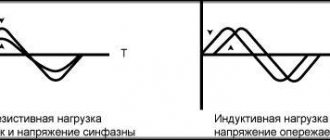
Before starting work, the ignition is turned on in the car, and voltage is supplied to the control contact of the generator through the light bulb. Since the generator is not generating energy at this moment, there is no voltage at the contact, and the light bulb is at battery potential. The indicator lights up and the initial current flows through the field winding.
After the motor starts, the rotating field of the excitation winding on the rotor creates a response induction in the stator windings and the generator begins to generate electricity. Additional diodes raise the voltage at the contact of the light bulb, there is no drop across it, and it stops lighting, signaling that everything is in order, the generator is working.
An electronic circuit in the brush assembly relay-regulator monitors the output voltage, increasing or decreasing the excitation current, thus maintaining the output at a given level, usually 14-15 volts, depending on the type of battery used and its temperature.
The battery at this voltage stops delivering current and goes into charge or hold mode, acting as an additional filter element, since the generator voltage pulsates with the frequency of a three-phase rectifier.
If many consumers are turned on and the engine speed is low, the device is not able to deliver the required power, the voltage decreases, and some consumers begin to be powered by the battery.
When you add speed, the generator increases power, powers consumers, and the excess goes to charge the battery. If the battery is charged and there is excess power, the relay-regulator reduces the excitation current to prevent a dangerous increase in voltage in the network.
Dismantling and checking voltage regulators on a VAZ 2107
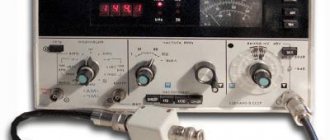
First, let's decide on the tools and devices that will be needed for the job. Here they are:
- household multimeter;
- open-end wrench 10;
- flat screwdriver;
- Phillips screwdriver.
Sequence of work
If the driver suspects that the voltage regulator is broken, then the first thing he should do is check the voltage supplied by the battery.
- The car engine turns off and the hood opens. Using a multimeter, the voltage between the battery terminals is measured. If it drops below 13 volts (or, conversely, rises above 14 volts), then this indicates a breakdown of the regulator.
- Having made sure that the battery is not charging well precisely because of a faulty regulator, it must be disconnected from the car's network, but first the ground wire must be removed from the battery. If this wire is not disconnected, then there is a high probability of a short circuit, which will lead not only to the burnout of many fuses in the closed section, but also to melting of the electrical wiring itself.
- If an old external regulator is installed on a VAZ 2107, then all terminals are manually removed from it, after which the nuts that hold the regulator to the car body are unscrewed with a 10-mm open-end wrench.
- If the VAZ 2107 is equipped with an internal three-level regulator, then to remove it you will need to unscrew a pair of mounting bolts holding this device in the generator housing with a Phillips screwdriver.
- After removing the regulator, the negative pole of the battery is connected to the relay ground (if the regulator is external), or to contact “Ш” (if the regulator is internal);
- The positive pole of the battery is connected to contact “K” (this contact is available on all types of regulators);
- The multimeter is connected either to the generator brushes or to the relay outputs.
- After turning on the multimeter and applying a voltage of 12–15 volts, it should also appear on the generator brushes (or on the relay outputs, if the regulator is external). If the voltage generated on the brushes or outputs remains constant, then this is a clear sign of a breakdown of the regulator. If no voltage is detected at the brushes or outputs at all, there is a break in the regulator.
- Both in the event of a breakdown and in the event of a break, the regulator will have to be changed, since this device cannot be repaired.
- The failed regulator is replaced with a new one, after which the vehicle's electrical system is reassembled.
Video: checking the voltage regulator on a VAZ 2107
Like any other device, the voltage regulator can break down suddenly. And it’s especially difficult for the driver if the breakdown occurs far from home. There is nothing surprising here: drivers who constantly carry spare regulators with them need to look further. But even in such a difficult situation, there is still a way to get home (or to the nearest service center). But you won’t be able to get there quickly, because every hour you’ll have to crawl under the hood and remove the terminals from the voltage regulator. And then, using a suitable piece of insulated wire, connect the positive terminal of the battery and contact “Ш” on the regulator. This is done so that the charging current does not exceed 25 amperes. After this, the regulator terminals return to their place, and the car starts. You can drive it for about 30 minutes, and you should turn on the maximum number of energy consumers - from the headlights to the radio. And after 30 minutes you should stop again and do the entire above procedure again, since without this the battery will simply recharge and boil.
So, even a novice car enthusiast can check the voltage regulator on a VAZ 2107. All that is required is the ability to use a multimeter and a screwdriver. Following the recommendations listed above will allow the car owner to save about 500 rubles. This is how much it costs at a car service center to check and replace the voltage regulator.
Basic faults
The manifestation of malfunctions is the voltage in the network leaving the specified limits, as well as extraneous sounds from the operating generator.
The reasons may be different:
- wear of the brush assembly, it is replaced together with the integral relay;
- deep wear of the commutator with brushes, if it can no longer be eliminated by grinding, replace the slip rings or the armature assembly;
- failure of the armature bearings; they can be easily replaced after complete or partial disassembly of the generator;
- burnout of rectifier diodes, currently they are not replaced individually, the entire diode bridge must be replaced;
- short interturn short circuits or breaks in the armature or stator, the corresponding parts are changed;
- burnt or corroded contacts, they can also be replaced or cleaned.
Not directly related to the generator, but a common malfunction is a strong whistle when adding engine speed. This indicates that the belt is slipping on the drive pulleys; the tension can be adjusted, but it is better to replace the belt.
When removing the generator for repair, it is advisable to immediately change the diode bridge, bearings and relay regulator with brushes. This way, the repaired device will gain the highest possible reliability, although only a new generator from a reputable manufacturer can provide a full guarantee.
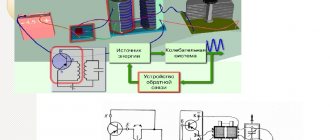
Using a changeover switch
When the input circuit breaker is turned off, the changeover switch connects power from the power plant . This happens in stages:
- Disabling circuit breakers.
- Connecting the switch wire to the generator.
- Starting and warming up the generator.
- Supplying power to the switch.
- Switching on automatic load switches.
When electricity appears in the main network, the generator is turned off, performing the above steps in reverse order.
How to check a car alternator
Ideally, the generator should be checked on a stand, where it will be spun up to rated speed and loaded to maximum, with the power output in this mode checked.
But you can approximately check it without removing it from the car.
- A digital voltmeter (for example, as part of a multimeter) is connected to the output terminal of the generator.
- The engine starts. The voltmeter readings should increase to the nominal 14 - 14.5 volts. The exception will be the case when the battery is very discharged, then the voltage will increase gradually as it charges.
- The engine is brought to medium or high speed, and the car's headlights and other powerful consumers are turned on, the total demand not exceeding the full power of the generator. The voltage should remain stable, which means the generator is delivering its required power.
- The generator should not emit the characteristic howling sounds of worn bearings. If in doubt, simply remove the belt and turn the pulley by hand. The rotor must rotate absolutely smoothly, without vibrations or backlash.
The new generator is very reliable and the first problems may arise only after a run of 100-150 thousand kilometers. But often these devices last much longer, especially with intermediate replacement of the brush assembly.
– –
CONDITION 1
| RESULTS ÐµÐ´ÐµÐ»ÐµÐ½Ð¸Ñ Ñе. â |
registry the ASSESSMENT ROOM Ñного Ð The ¾ Ð´ÐµÐ½Ð¸Ñ ÐºÐ°Ðº вÑÑÑнÑÑ, Ñак и авÑомаÑиÑеÑки. â
RESULTS ² ÑовÑеменнÑÑ Ñепловозов ÑвлѵÑÑÑ Ñо, ÑÑо амР¿»Ð¸ÑÑÐ°Ñ ASSON ¸Ð²Ð°ÐµÑÑÑне в Ñеп¿¸ обмоÑки возбÑÐ¶Ð´ÐµÐ½Ð¸Ñ ÑÑг regurgitation Ð ·Ð±ÑдиÑелÑ. â
RESULTS напÑÑÐ¶ÐµÐ½Ð¸Ñ ÑиÑ. 5 ¿ÑÑжением в ÑÑнкѸи допÑÑÑимого Ñока Ð ´return 1/2 ROOM °ÑоÑов пÑи аваÑийном оÑклÑÑении авѾмаÑоР² главнÑÑ Ñепей двигаÑелей. â
RESULTS › › › › › RESULTS ¶Ð´ÐµÐ½Ð¸ÐµÐ¼ и на генеÑаÑоÑÑ Ñ ÑамовозбÑж дением. â
| RESULTS ROCK ROOM. â |
RESPONSIBILITY 4 points ¾Ñа Ñ Ð´Ð²ÑкаÑкаднÑм магниÑнÑм ÑÑилиÑеР"Response RESULTS бÑждениÑ. â
Comments and reviews
The circuit of a car generator is based on the principle of electromagnetic induction.
The ABP is connected in parallel with the generator.
Modern automatic control systems are produced for solutions, including the control of generators.
Manual switching to an electric generator is cheaper. Their purpose is to determine the time during which the winding must be connected to the network. Other recommendations You can connect the generator yourself.
See also: Checking the loop phase zero technique
The rectifier consists of three pairs of diodes, which are installed on a conductive base and are combined in pairs with each other. Slip rings are used to power the winding.
Only if your backup station is low-power (up to 4 kW) can you connect it through an outlet. For many types of generator sets, the excitation winding has its own rectifier, assembled from 3 diodes.
Common mistakes
The opposite action with the keys will lead to the passage of current from the power line and blocking the flow of energy from the generator. The temperature of a working generator set can be up to 90 degrees, but if there is obvious overheating, the diode bridge should be diagnosed. From this moment on, the device provides the current necessary to power the load in the car and recharge the battery. Features of control, connection and fuel filling.
The starter turns on and the power plant starts working. Also, the car owner must remember a number of prohibitions, namely: Do not leave the car with the battery connected if there is a suspicion of a breakdown of the diode bridge. Modern automatic control systems are produced for solutions, including the control of generators. But as soon as the engine starts running, the generator produces current. Regulator relay. Wiring from scratch. Izh Jupiter/planet 4.5