The question is trivial. First, we recommend determining where to install your homemade fan. Two types of engines dominate in technology: commutator (historically the first), asynchronous (invented by Nikola Tesla). The first ones make a lot of noise, switching sections causes a spark, the brushes rub, causing noise. An asynchronous motor with a squirrel-cage rotor is quieter and generates less interference. You will find the start-up protection relay in the refrigerator. By adding a couple of phrases of humorous phrases, we will return the seriousness of the site. How to make a fan with your own hands without scaring your family. Let's try to answer.
Manufacturing.
We cut out the connector on the USB cable that we don’t need.
2.
Carefully remove approximately 3 cm of outer insulation from the cord so as not to damage the wires located inside. Usually, with a fairly sharp knife, apply slight pressure, around the wire and then pull out the cut part.
Under the insulation there are usually just 4 wires
In my case, the wire is shielded and in addition to 4 wires there is also foil and the screen itself, but this is not important
We cut off everything unnecessary, leaving only the red and black wires
And carefully strip the remaining wires by approximately 1 - 1.5 cm.
5.
We cut off the connector from the fan.
In my case, the fan is without a sensor, so there are only 2 wires, but if the fan is with a speed sensor, then there may be 3 wires (a yellow one is added) or 4 wires if the fan is controlled, as a rule these are processor fans
It doesn’t matter how many wires you have, but if there are more than 2 of them, then just like with the USB cord, we leave only red and black (if there is no red, then yellow and black.), we bite off the rest a couple of centimeters at a time
), we bite off the rest a couple of centimeters.
And carefully strip the wires from the fan in the same way as on the USB cable, by 1 - 1.5 cm.
Twist the black and red wires together. DON'T BE CONFUSED! BLACK SEPARATELY! RED SEPARATELY!
Continue the workflow
Next comes the actual tinning; everything needs to be done extremely carefully. Molten metal is applied in a thin layer to the conductors. Moreover, all four wires that are to be connected are subjected to this procedure. Now you can safely connect all the conductors to each other. To do this, they are pressed against each other, and then warmed up using the same soldering iron.
To make a connection, sometimes it is enough to hold the heated device on the wires for a few seconds. Now you need to check the strength of the connection. To do this, pull the soldered wires. If the soldering is good, then they will be tightly connected to each other. At this point the process can be considered complete.
Of course, you should not immediately insert the connector into the USB, because there is a high probability that a short circuit will occur. The conductors must be insulated. For these purposes, in most cases, ordinary electrical tape is suitable. It is best to wind it not in one, but in several layers at once. This will increase the protection level of the device.
Now all that remains is to place the finished fan on the table, then insert the cord into the corresponding connector on the system unit. Surely he will start blowing. In this case, of course, it will not have any adjustment of the rotation speed. For this purpose, additional devices must be included in the chain. For example, you can install a voltage regulator. This device will allow you to reduce the rotation speed of the cooler by changing the resistance.
The regulator is installed in the circuit.
It often looks like a regular mechanical regulator. Of course, you can do without this option.
USB fans: features
Such a model will not be easy to make. This is an excellent option for individual cooling when working on a computer. Such a device is obtained with sufficient power, and the energy consumption is not much more. To construct this design you will need:
- a couple of CDs for the computer;
- cord with USB plug;
- wires;
- an old motor, the kind usually installed on children's toys;
- wine stopper;
- cylindrical cardboard;
- glue and scissors.
First of all, the disk is cut into blades. The power of the air flow depends on the presence of blades; the more there are, the stronger the blowing will be, but the segments themselves should not be small.
Only one disc is cut, the second will be used as a stand.
They should be turned in one direction. When the disk with blades is ready, a plug is inserted into its center and a hole is made in it.
In order to make the wire usable, the outer winding is removed from one end of the USB cord, under which there are 4 wires. The paired ones can be separated, connected to the motor and insulated.
When working at a computer in the summer, or just on vacation, sometimes you want a gentle breeze, “local” coolness. The air flow of an office air conditioner doesn't create the sweet comfort of a gentle, directional blast that a mini fan provides. It is very easy to make such a device with your own hands.
Modernization of an existing fan
Plastic bottles will come in handy when upgrading a store-bought fan. Almost free available tools will help to significantly increase the performance of the device.
Let's look at how and by what method you can create a pleasant sea breeze in your apartment:
Image gallery
We made parts designed to enhance airflow. They will provide accelerated cooling of the space around.
Now you need to make the basis for fixing them:
Image gallery
After preparing the device designed to enhance the fan’s performance, we proceed to assembly and commissioning:
Image gallery
Idea No. 1 – Use a cooler
As a rule, it will take no more than 15 minutes to assemble a USB fan from a cooler. First you need to prepare the cooler. There are two wires coming out of the device - black and red. Strip the insulation to 10 mm and set the prepared element aside.
Next you need to prepare the USB cable. Cut off one half of it and peel off the insulation at the cut point. Under it you will see four contacts, of which two are necessary: red and black. You also clean them, but it’s better to cut off the other two (usually green and white) so that they don’t get in the way.
Now, as you understand, you need to connect the prepared contacts in pairs, according to: red to red, black to black. After this, you need to carefully insulate the cable connections and make a stand. As for the stand, it’s a matter of your imagination. Some successfully use wire, some very interestingly cut out a seat in a cardboard box.
In the end, the homemade mini fan is connected to the computer, and you can enjoy the operation of your own electrical appliance.
Cooler idea
Continued assembly of the device
A hole is made in the plug and placed on the axis of the selected engine. To secure the shaft, it is first coated with glue. Then the propeller cut from the disk is glued to the part of the axle sticking out of the hole in the plug.
Next, smear a paper tube along the diameter with glue and place it on the plane of the second disk. Then install the motor on top and connect its contacts to the terminals from the USB cable. If the propeller spins in the opposite direction when plugged into the computer port, you need to disconnect the contacts, swap them and solder them again.
By connecting a battery to such a device, you can use it anywhere in the room, in the car, near the pool.
Deciding on the cooler pinout
When choosing a cooler, you need to pay attention to some nuances. One of them is the pinout (diagram) of contacts
The bottom line is that the computer always has a 4-pin connector to connect the cooler. But there are coolers:
- 2-pin (2-pin);
- 3-pin;
- 4-pin.
Let's look at how to connect a cooler to a computer's power supply.
- The main two wires that are present in any pinout are + (voltage) and – (ground). The disadvantage of two-pin coolers is the inability to regulate the fan speed without additional equipment.
- Now let's figure out how to connect a three-pin cooler.
Such devices, in addition to the main connectors, are equipped with a third one, which sends a signal about the speed of rotation of the fan blades to the motherboard. Compared to a 2-pin, the speed of a 3-pin cooler can be monitored and adjusted using software.
To connect such coolers you need to use an adapter or leave additional connectors unused.
- Cooler with 4 wires. An additional wire sends a signal to the motherboard, which, through it, can control the fan speed.
- A fairly common four-pin Molex connector.
It has 2 voltage connectors - 12 and 5 V - and two corresponding ground connections. Such connectors make it possible to change the voltage on the cooler, thereby adjusting the fan speed. If 12 V is a lot and 5 is not enough, you can connect to the voltage connectors in reverse and get 7 V at the output.
Test run and balancing
We make a hole in the very center of the bushing (using an awl), place it on the motor axis, and carry out a test run. Of course, before assembly it is necessary to coordinate the angle of attack of the blades with the direction of rotation of the motor. Otherwise, the fan will blow in the opposite direction. If there is vibration, the propeller can be easily balanced by simply lifting the blades. After making sure that the propeller rotates smoothly and blows where required, we glue the motor onto the stand. Don't spare glue!
We connect the USB cable to the power wires of the engine. Of course, it is better to do this with a soldering iron, but given the scanty power, you can get by with simple twisting. The main thing is not to forget to insulate the connection using electrical tape or tape.
Homemade gas heater
The main advantage of this model is that its production requires a minimum of parts, which can always be found in the household of any craftsman.
Preparation of materials and components
To make a gas heater for the garage, you need to prepare in advance:
- burner with valve;
- tin sheet;
- metal scissors;
- drill with a thin drill bit;
- rivets;
- riveter.
To make the grille, you will need a piece of fine-mesh metal mesh. It’s great if you have a regular wire colander sieve on hand, it will act as a protective grid.
Collet cylinders are convenient because when using them, you don’t have to use up all the contents at once. The presence of shut-off valves allows the devices to be used repeatedly.
If desired, the heating structure can be made using not only disposable cans used for refilling lighters, but also using a small refilled cylinder.
Cutting blanks and assembling the structure
When making the structure, the first thing to do is fix the heater to the burner.
Four rectangular ears are added in the direction of the four sides of the workpiece applied to the galvanized sheet. One of the ears should be made twice as long as the others. The blanks are cut along the intended contour, trying to make smooth, burr-free cuts.
The burner is screwed to the cut-out tin blank using bolts. The ears located on four sides of the workpiece are bent in the opposite direction and used to fix the strainer.
To attach the second protective mesh, take another piece of sheet metal and cut out a circle of exactly the same size from it. Elongated ears are added to the workpiece, necessary for attaching the mesh.
Stepping back half a centimeter from the edge of the circle, drill 10 through holes along the circumference. A strip is cut from a piece of fine-mesh metal mesh, the length of which corresponds to the diameter of the cut tin blank.
The bent ears of round tin blanks are fixed to opposite sides of the mesh strip using a riveter and rivets. When assembled, you should get a cylinder with mesh walls and tin ends.
At the final stage, all that remains is to turn on the gas water heater and check its performance. The heat produced by this small device is enough to heat a small room or garage.
Design and types of fan heaters
To preliminarily estimate the amount of work and select the materials necessary for assembly, it is worth familiarizing yourself with the design of a factory-assembled fan heater. The elements present in the design of all models are:
- Protective housing made of plastic or metal.
- Electric motor.
- Impeller with blades.
- A heating element.
- Protective grille.
- Adjustment and control elements.
Depending on the chosen design and purpose of the device, additional components are selected. You can make almost all types of electric heaters with your own hands. For domestic needs, you can make a mini heat gun with your own hands to warm up and dry the room, a do-it-yourself electric fireplace will allow you to realize your own design ideas and give the room a cozy atmosphere, and a ducted air heater is built into the supply ventilation or air conditioning system.
How to install correctly?
In addition to high-quality assembly, it is necessary to pay attention to the operating conditions, which should include:
- Placement: lower part of the room;
- Dry room;
- The absence of nearby “knocking” units: emitting heat or cold (electrical equipment, air conditioning, open door with a draft).
Having figured out how to connect a thermostat with your own hands, you can start using it regularly. The main thing is that the power of the manufactured device is designed for the relay contacts. For example, with a maximum load of 30 Amps, the power should not exceed 6.6 kW.
Disc fan
If the previous option does not suit you, and you want something more complex, then consider creating a fan yourself from computer disks:
- Engine.
Since we don’t use a cooler, we need to get some kind of motor that drives the blades of our future device. In fact, you can also use the motor of the already mentioned cooler of the cooling system, but this is too simple.
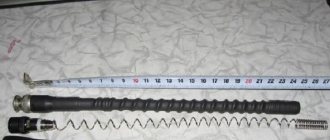
You should find or buy a motor with a specific part that moves (for example, a protruding iron rod). Since we are making a fan from disks, having such a rod would be the best option. Motors from an old VCR or player are also perfect, because they spin discs and cassettes - just what we need for the spinning propeller in our fan.
You should not use a motor from a washing machine or even an old fan - they are extremely strong. Due to the self-assembly of the structure, it will be very flimsy. In the very first seconds, a strong motor will scatter fragments of blades throughout the room and fly off the base.
If there is a running motor, it must be secured with wires in the previously mentioned form.
- Blades.
Having a running engine in hand, you need to concentrate on the disks, which are the main components of our fan. First of all, cut one into 8 equal parts:
To avoid mistakes during the procedure, you can first mark the disc with a pencil. It is best to use a soldering iron (there will be no sharp edges, it is safer), but regular scissors will also work.
Afterwards, the disk should be slightly heated with a lighter so that the material becomes more pliable, and the wings should be bent in the manner of blades, like conventional fans:
You can do exactly the same with a regular plastic bottle:
You need to insert a wooden bottle cap into the center of our propeller. If the size is too big, it can be planed.
- The remaining parts.
You can use a regular toilet paper roll as a center holding the entire structure:
It should be secured in the center of the second disk, which will act as a foundation for the fan. You can place half of the second bushing on top, as seen in the photo, so that the motor is inside it. You need to hang the blades from the disk/bottle on it.
The fan is ready for operation. If desired, you can add decorative elements to make the device look more presentable.
You can see clearly how such a fan is made from a bottle in this video.
Aesthetics from a plastic bottle
If you want not only fresh air, but also a product that pleases the eye, we use other materials. The basic components remain the same: a motor from a children's toy and an old USB cord. By the way, you can connect such a fan to a 220 volt outlet using a smartphone charger (with the same USB port).
The highlight of the design is the body. The propeller is made from a plastic bottle. The twisted plug will serve as an axial bushing. The stand can be made from a bunch of cocktail straws.
We assemble the elegant base from a second PET bottle and a CD glued to the bottom. If you have free components, you can install a connector and a switch.
Despite the “lightness” of the design, the fan turned out to be quite stable. If necessary, you can put some weight in the body.
Wind blower without engine
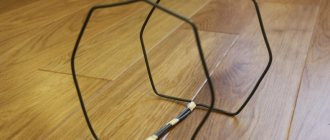
How to make a mini-fan at home without a motor? A very popular option is to create a device using small neodymium magnets.
Take the cooler from the computer and separate 4 transformer coils from its body. Instead of copper windings, you need to install and secure the same number of pieces of magnet. Usually they buy neodyms in the form of half-arcs or remove them from an unusable hard drive. The magnets are placed exactly in the places where the transformer windings were removed, that is, along the perimeter of the cooler frame.
As soon as the last piece is secured, the mini fan will begin to rotate. Using permanent magnet technology, it is possible to assemble an almost perpetual motion machine. To stop it, one of the neodymium pieces that replaced the coil is removed from the circuit.
The field of the magnets must be equal in strength to the field of the disconnected coils, otherwise the propeller will not be able to rotate in a constant, stable manner. The poles are placed diagonally, alternating plus and minus.
What if none of the above methods work and you don't have enough time or parts to make your own fan? In this case, you will have to use a regular factory product.
Glue, cardboard, toy motor
To make a small propeller you will need a piece of corrugated cardboard 30x30 cm.
We glue the support in 2-3 layers, the area is at least two palms. We make the rack for the engine in the form of a prism 10–15 cm high. For cutting, we use a stationery knife. We bend the structure along a ruler.
How to make a mini fan durable and stable? Let's use a glue gun. No other glue will allow the connection to be made as reliably.
Next comes the most difficult part: the propeller. The center sleeve does not have to be made of wood or plastic. We cut it out of the same cardboard.
We connect with hot glue, and as thickly as possible: the structure should turn out to be monolithic. The blades can be made from thinner cardboard. The packaging for a mobile phone accessory is suitable.
This is the most critical element: the blades must be absolutely identical in shape and weight. Otherwise, your propeller will vibrate during operation and will quickly fall apart.
We glue the blades (carefully) onto a cardboard sleeve, observing aerodynamics. The planes should be rotated 30–45 degrees in opposite directions. To simplify the design, we assemble a USB fan with two blades with our own hands. They are easier to balance, and such a propeller can cope with cooling no worse than a three-bladed one.
Wind blower without engine
How to make a mini-fan at home without a motor? A very popular option is to create a device using small neodymium magnets.
Take the cooler from the computer and separate 4 transformer coils from its body. Instead of copper windings, you need to install and secure the same number of pieces of magnet. Usually they buy neodyms in the form of half-arcs or remove them from an unusable hard drive. The magnets are placed exactly in the places where the transformer windings were removed, that is, along the perimeter of the cooler frame.
As soon as the last piece is secured, the mini fan will begin to rotate. Using permanent magnet technology, it is possible to assemble an almost perpetual motion machine. To stop it, one of the neodymium pieces that replaced the coil is removed from the circuit.
The field of the magnets must be equal in strength to the field of the disconnected coils, otherwise the propeller will not be able to rotate in a constant, stable manner. The poles are placed diagonally, alternating plus and minus.
What if none of the above methods work and you don't have enough time or parts to make your own fan? In this case, you will have to use a regular factory product.
Necessary materials and equipment
The propeller can be made from an old disk.
Since all air coolers have almost the same design, the kit for making them will be standard.
To make a compact and silent fan at home you will need:
- ruler, square, pencil;
- soldering iron;
- tape, scissors, stationery knife;
- motor 220 or 12 V;
- cable with corresponding plug;
- thermal glue;
- Styrofoam;
- CDs;
- wine stopper made of natural material;
- cardboard sleeve and box;
- insulating tape;
- hair dryer, candle or lighter.
To ensure safe work, you should wear safety glasses and construction gloves. When handling a soldering iron, ensure good ventilation.
Idea No. 2 – Use a motor
In order to make a USB fan from a motor and a CD, it will take a little more time, but you can still easily make such an electrical device with your own hands in an hour. A motor for such a homemade product should be chosen with an operating voltage of approximately 5 Volts, maybe a little more. If you take the motor to a lower voltage, too much current will flow through the circuit and the motor will quickly fail.
First, we prepare all the elements of the device. In this case, you will need to make an impeller (blades).
To do this, we recommend using an ordinary CD. We draw it into 8 equal parts and carefully cut it with good scissors, almost reaching the center. Next, we heat the disk (it’s convenient to do this with a lighter), and when the plastic becomes more elastic, we bend the blades at an equal angle (as shown in the photo).
If the impeller is not bent enough, then no air flow will be created during the rotation of the disk. However, if you overdo it, the homemade product will also work poorly and unstable.
When the blades are ready, move on to creating the main mechanism. Inside the disk you need to insert an ordinary champagne cork, cut to the required size, which must be placed on the motor shaft. Next, we move on to creating a USB fan stand for a laptop.
Here, as in the previous version, everything depends on your imagination. Of all the available means, the option with wire is the most suitable. When the homemade USB fan is ready, we connect the motor wires to the USB cord wires, as in the previous version, carefully isolate the twist and proceed to testing.
If you don’t have air conditioning or even a household fan at home, and the summer heat doesn’t allow you to live normally, you can use your wits and use old computer parts. Any craftsman can assemble a fan from a cooler, fortunately, the materials for construction are always at hand, and in every home or office you can fish out something useful from computer trash.
Use of factory parts
Let's return to the presence of conditionally unnecessary computer components in the home workshop. For example, a cooler from a power supply or system unit.
The electrical part of the work is reduced to a minimum. If the power is 5 volts, we work according to the scheme: USB cable. To supply 12 volts you will have to look for a power supply or a phone charger. In addition, there are “turbines” that are connected to a 220 volt network.
Actually, to make a fan from a computer cooler, you just need to fix it on some kind of stand. And if you use batteries instead of a USB cord, the flow of fresh air can be organized anywhere.
GPU-Z
A video card is almost a full-fledged “computer within a computer” with its own subsystems and operating modes.
Therefore, developers from TECHPOWERUP have developed a separate program for checking a computer’s video system - GPU-Z. Its basic principles are the same as those of CPU-Z - complete information content and ease of use. It is available online for free use. GPU-Z is an indispensable and necessary tool for anyone who is interested in what their computer consists of. The utility will report to you about all parameters of the video core, video memory and power subsystem, right down to the device identification code and BIOS version. In addition, GPU-Z scans the current readings of the temperature and frequency of the chip, the frequency of memory chips, the rotation speed of the cooling fan, the load and voltage on the core, etc. All these values are recorded at the owner’s request in a text file or screenshot.
The utility has earned special recognition for its ability to detect “fake” video cards that do not meet the specifications stated in the BIOS. Near the name of such a card you will notice the status “”, and an exclamation mark will appear instead of the vendor’s image.
Advantages:
- a full report on the characteristics of the video card and its current condition;
- simple interface shell;
- saving the report as a document or screenshot;
- ability to send a problem report;
- a large website database for checking your adapter and comparing it with similar cards;
- does not require payment.
Flaws:
- the interface is not fully translated into Russian;
- no built-in stress or performance tests;
Errors in selection
To summarize all of the above, we summarize the most common mistakes that should be avoided when going to the store to buy a fan:
12
It is enough for the fan to fall once and its shaft alignment is disrupted. As a result, the bushings will break and the rotor will scrape against the windings.
Moreover, this type of damage due to accidental overturning is not covered by any warranty!
34
5
These are just slightly different, more comfortable moments during operation.
Best inexpensive ones:
Best with remote control:
The best all-metal ones:
https://youtube.com/watch?v=nOpNeZWlqHE
Cooler fan
This is the easiest way to make a home fan. To make it we will need a cooler from an old computer. This part itself is already operational; all we have to do is connect it to the wire correctly.
If the future fan will be located in close proximity to the computer, then a standard USB cable will be suitable as a wire. We cut off the unnecessary edge of the cord with a small connector and strip the wires. We clean the wires at the cooler in the same way.
Sometimes there are more than two wires in the cooler and USB cable, remember, we need the black and red color of two wires in one and the other element. We don't need the rest.
After stripping, we connect the red wire to the red, the black to the black, the connections must be properly insulated. After insulation, the fan is already fully functional; all that remains is to come up with an original stand for it to suit your taste and glue it to the cooler. All! The device is ready!
Where to get a micromotor
It happens that household bins contain appliances that no one has used for a long time. These could be hair dryers or mixers, blenders and children's cars. Even a motor from an old tape recorder, player or some other mechanism may come in handy. We disassemble the unnecessary device and remove the engine, having first disconnected all the wires.
Since we are making a mini-fan, a motor from an old washing machine, refrigerator, vacuum cleaner or other large unit will not work due to its size and noise.
Fan Design Considerations
Before you begin design, you need to imagine the design of a cooling-type product. Depending on their location, they can be floor, ceiling and tabletop.
Both factory and homemade fans consist of the following parts:
- Propeller. The larger its diameter, the larger volume of air will be supplied to the object.
- Electric motor. A product powered by a household network, adapter, batteries or rechargeable batteries can be used. The performance of the finished device is directly proportional to the motor power.
- Stand. Here you need to show imagination and ingenuity. The stand must meet criteria such as safety, stability and presentability.
- The wire. For a small motor, any cable left over from broken watches, lamps and other small household appliances is suitable. It is advisable to install a switch on the wire to control the device without leaving your seat. If you plan to connect a USB, an extension cord or a cord from an old mouse or keyboard will do.
The starting point for starting design and construction is finding a motor. If you have unnecessary tools, toys and kitchen appliances in your home, you can donate them. Motors from a drill, screwdriver, screwdriver, mixer, children's car, trimmer, electric razor can be used. Sometimes in an apartment you can find broken coolers from system units or laptop stands. Considering the saturation of modern housing with technology, finding a motor will not be difficult.
Specifics of soldering guns
Such devices are capable of melting plastic products and even fusible metals. The soldering process is ensured by a stream of hot air, which is supplied through the nozzle of a hair dryer.
At home, such a device, in addition to its intended purpose, is used for minor repairs of plastic products, removing the painted layer on various infusible surfaces, and heating small objects.
There are a number of mandatory requirements for such equipment:
- Equipment intended for soldering electronic circuits and plastics must be equipped with thermocouples and an electric fan that provides air flow heated to eight hundred degrees.
- The presence of tips of various shapes and sizes is necessary. They can be monolithic or composite.
- Due to the elevated temperature, the materials used to make the hair dryer body must be heat-resistant.
- A special thermal relay is required that controls the heating temperature of the coils.
The operating principle of any hair dryer, construction or household, is the same, and consists of pumping heated air onto the workpiece or surface. A homemade hair dryer for hot air soldering must meet these requirements.
Decor
Now you need to think about the design of the fan unit that you made yourself. In order to assemble all the coolers together, you need to decide what shape the structure will be in. You might find it easier to fold them into a square or just line them up.
In any case, for these purposes you will need a glue gun, which is usually used to make DIY products in technical creativity or floristry circles. You can use it to glue the ribs of the coolers in the right places and let them cool. But if you don't have a gun and just have wire and tape, you can fasten the coolers through the bolt holes with wire and wrap the edges with black tape.
So, you have managed to make sure that making a simple room air blower with your own hands is simple and accessible even to a person far from technical creativity. Such simple solutions can help out in a situation where you need to keep the room cool in windless weather, but a regular fan is either broken or simply not in the house. In these cases, simple ingenuity comes to the rescue.
So, all you need to prepare is a sharp knife, electrical tape, an unnecessary USB cord and, in fact, a homemade executive body. As for the latter, it is customary to use one of two options: an old cooler from a computer or a motor from a typewriter. Next, we will look at two instructions that will clearly explain how to make a USB fan at home with your own hands!
Homemade products for the garage: DIY ideas
The garage takes up a lot of space in the life of the stronger half of humanity, even if the family does not have a car. In addition to being used as a room for storing and servicing a car, the garage has a fairly wide range of functions, despite its rather limited area.
First, let's look at several options for ergonomic use and design of the interior space of the garage:
- In 99% of cases, a garage box has a rectangular shape in its internal configuration. Accordingly, the distance from the car to the side walls is not very large and is not comfortable for carrying out any work. The most common arrangement option is to move the work area (workbench, shelving or cabinets with tools and spare parts) to the rear of the garage, to the wall opposite the gate. This area may even have enough space to install any necessary equipment other than a workbench.
- If there is an additional room in a large garage (utility room, electrical room), then on the surface of its door you can organize tool storage using a hanging sheet or fill it with holders in the form of loops of different sizes made of plastic and ordinary ropes.
- The simplest option: if you cannot install a shelving in the garage, you can place a metal grill at some distance from the wall. You can hang almost any objects, clothes and the like on it. You don't even have to install shelves.
- Another way out is to attach hooks to any surface. There simply can’t be enough of them in the garage. You can make them yourself, or you can buy them at the supermarket. Significant savings in free space are guaranteed.
So, the garage has been purchased. At the initial stage of arrangement, we will most likely talk about purchasing pieces of furniture. Finding something that suits the owner and at the same time takes up a minimum of space is not so easy. The way out of this situation is to make the necessary pieces of furniture with your own hands.
A table with a folding hinged top is ideal for a small garage. Such a stand does not take up much space, but can be a table with a very decent usable area. In its manufacture, the materials from which the old cabinet was made are often used.
Source: https://dekoriko.ru/postrojki/garazh/samodelki/
CPU-Z
The CPU-Z program can easily be called the world's most popular Windows-based system analyzer.
It provides comprehensive information about the processor, RAM and its subsystem, and graphics adapter. CPU-Z is completely free and compatible with all current versions of Windows. CPU-Z stands out among competitors due to two qualities: great depth of computer analysis and simplicity of the shell. With its help, you will learn about such parameters of your processor as the type and process technology of the chip, its heat dissipation, core voltage, revision and stepping, as well as the level and capacity of the cache. The same detailed report is available for RAM and motherboard chipset. This data is indispensable both for enthusiastic overclockers and for ordinary users who are interested in upgrading and customizing their computer. However, information about the video system is presented here in a compressed form, and the hard drive is not affected at all.
In addition to dry text display in CPU-Z, you can conduct simple stress tests of the system to check its stability under load. Test reports and PC status reports are saved as TXT and HTML documents.
The appearance of the utility is extremely simple and has not changed since the beginning of its development. Moving through the items is done through the tabs on the top panel. There is also a portable version for running from a flash drive or other media.
Advantages:
- maximum information about the CPU, RAM and chipset;
- works on a computer with any version of Windows;
- undemanding to resources;
- has a simple interface (including in Russian);
- saves reports in text form;
- free software.
Flaws:
- does not display information about the status of the hard drive;
- a meager report about the video card.
- Does not show the temperature of system components.
How to make a fan from a regular electric motor
Probably the easiest and fastest way to acquire a homemade fan assembled with your own hands is to find a regular motor, which is most often found in toys.
Standard electric motor from a toy
Ordering such a thing is not difficult. Moreover, today, without stopping for a minute, caravans of various trinkets from the Middle Kingdom ply. And if not, then just buy an inexpensive toy car and remove the motor from it.
But you definitely shouldn’t expect the impossible from such a device. Rather, it will only be able to move air slightly. But for a desktop model it will do just fine. He will be able to blow air onto the face of someone sitting at the computer.
For such a fan you can use absolutely anything. The main parts will be:
- blades;
- motor;
- on/off button;
- stand;
- supply system.
Otherwise, the limit of the idea will only be within the boundaries of imagination.
After the motor is ready for use, it makes sense to take care of the power supply. These could be batteries, just like in the toy for which the motor was intended. But definitely this kind of energy will not last long. However, there is a plus - the device will remain compact and portable.
The second option is mains power. But in this case you need not to overdo it. Direct connection via a plug is a sure way to burn out the motor. So you shouldn’t experiment, trying to spin the engine to high speeds. On toys, electric motors are usually designed for 3-4.5 Volts, and the desire to provide more rotation due to powerful energy sources, firstly, will quickly drain the source (if it is a battery), and secondly, will seriously reduce the life of the fan, even to the point of failure. The engine will start to heat up and the brushes may melt.
But modern chargers convert the voltage in the network, reducing it to the specified parameters. You can find a power supply, including on sale, that is ideal for the motor.
To create blades, you can take any material. The main thing is that it is light. Due to the weakness of the motor, the less the blades weigh, the faster the rotation will be, and, therefore, the efficiency of the work.
- The easiest option is to take a cork from a regular plastic bottle, which will serve as a fastening for the blades. Make a hole in the bottle the size of the rotating axis of the electric motor.
- The blades can be made from a regular CD. A hole the size of a bottle cap is burned in the center. The circumference of the disk is divided into 8 sectors. They are cut to some distance, but not to the center. Afterwards, the disk needs to be heated with fire to easily bend the blades. A lighter is suitable for this.
Creating blades on a CD
- You can attach the disk to the cork with glue. The second option is when a hole is burned in the middle for the plug - immediately connect the structure. The melted plastic will harden and hold firmly.
- After all this, the structure is connected to each other. Wire is suitable for the stand. This is perhaps the simplest option. And for such a lightweight device, you can’t imagine anything better. You can bend the frame in such a way as to hide the batteries there unnoticed. Or carefully run the power supply wire going to the motor.
- The circuit does not have to be always closed if you use batteries, so you need to secure the button to the body. It's inexpensive. You can use it from a toy from which the motor was removed.
Another option for a propeller design is to use thick paper. The method is even simpler, but less practical.
Foundation stability
Fan stability is the most important factor. If there are children or pets in the family, they can somehow touch the wind blower stand.
And if it falls, many problems can arise. It all depends on where exactly it will fall.
By the way, even a new fan often fails after the first overturn. Read what breaks and how to fix it yourself in a separate article.
There is a huge variety of base designs on which the stand is mounted. But only three are the most common.
The most common type is a cross-shaped base.
Less common is the round stand.
There are also fans of the monoblock type. They don't have any legs at all.
Which of these bases is the most stable? The cross-shaped base, despite its external reliability, is inferior to everyone else.
One good push is enough and such a fan will calmly fall on its side. But the round leg is the most stable option.
Therefore, if you have a choice, then give preference to the round shape.
FurMark
The FurMark utility has been the unspoken “standard” for testing high-performance video cards and integrated computer video systems for many years. It is a set of stress tests to test the graphics subsystem for stability and maximum performance in 3D with support for the OpenGL API. FurMark receives regular updates and is distributed free of charge.
Fur Mark consists of a settings dialog and a test window, in which a complex render of a toroidal-shaped object (or popularly known as a “hairy donut”) rotates. Before starting testing, you must select the graphics level and operating mode. In addition to resolution and anti-aliasing, the user can enable full-screen mode instead of windowed mode. An important point is to indicate the time for the test, since keeping the video accelerator under 100% load for a long time can damage the device.
After pressing the GPU stress test button, a rotating object appears on the screen, drawing which consumes the entire resource of the video card. The upper part shows a graph of changes in the temperature of the video core. Depending on the specified parameters, the test stops automatically after a certain time or manually by the user.
Advantages:
- checking the video card under the maximum permissible load for stability, performance, power consumption;
- several modes of “running” the test;
- simple interface without unnecessary elements;
- includes GPU-Z and GPU Shark utilities;
- free software.
Flaws:
- FurMark puts maximum load on the video adapter, which can lead to failure of the graphics chip, memory chips and other “unpleasant” consequences;
- The interface is not Russified in the official version.