An antenna is a means of delivering an information signal to radio devices. With the advent of the era of cable Internet and television, the need for such structures in urban environments has decreased significantly. In rural areas, the issue of installing antennas is still relevant. Many owners of private housing construction are interested in which bracket for the antenna will hold it firmly and reliably.
Satellite antenna
Requirements for mounting a satellite dish
The bracket selected for fixation must meet a number of requirements:
- Reliable fastening of the structure, which will not suddenly fall on the residents of the house.
- The strength of the formed connection.
- Rigidity.
- Light weight. The distribution of the mass of the entire structure must be uniform over a relatively large area.
- All fasteners used must be resistant to corrosion, moisture, and sudden temperature changes.
- Different types of antenna brackets have different operating features, which should also be taken into account when purchasing a specific model.
The ability to regularly replace fastenings at home, which will significantly reduce the costs of home owners.
Advantages of wall bracket
Modern brackets for satellite dishes are divided into several groups. First of all, there are street, home and automobile devices. According to the method of fixation, wall, telescopic fasteners and rack masts are distinguished.
Features of wall brackets include:
- The L-shaped fastener consists of a vertically located platform for support, as well as a pipe attached to it. The pipe is welded to the support platform at an angle of 90 degrees. Immediately before fastening, it is necessary to measure the protrusion of the roof beyond the facade line so that the bracket takes the optimal position.
- This product is secured using 4 anchors or using quick installation fasteners.
- A metal pipe, as a rule, has standard dimensions (diameter 3.8 cm, wall size 0.2 cm).
- Before installation, measure the distance from the wall, which should be 32 cm.
- L-shaped brackets weigh about 1.6-1.7 kg, and are designed for mounting a satellite or terrestrial antenna.
Also known today is a T-shaped bracket, the support plate of which consists of 5 parts. The design is equipped with a vertical plate, a horizontal remote pipe and a stand for direct mounting of the plate.
The distance from the wall of the house should be 38 cm. The diameter of the pipe is similar to the L-shaped bracket. The regulated weight of the product is 2 kg.
TV antenna for a summer residence: where and how to install
Before you begin installing an antenna in a private home, determine the location of the nearest tower or repeater. You can do this by indicating your location on the CETV coverage map
You may be interested in: CETV coverage map
Once you know the mileage, you can buy equipment. What you will need to install outdoor antennas:
- Antenna, if you follow our advice, then one of the listed;
- Coaxial cable (RG 6 professional steel, SAT 703, SAT 50 copper);
- F connectors, TV plug (according to the number of connections);
- Lightning protection for the cable (optional, but if you want to install the antenna on a mast, it’s better to install it; the price is 300-350 rubles)
- Bracket or mast;
- Ties and clips for cable fastening;
- Device, digital set-top box with TV or TV with dvb-t2 support for setup;
- TV signal amplifier and dividers (if required).
- Fasteners for bracket or mast. Decide for yourself which fasteners will suit you (screws, studs, anchors, etc.).
- Hammer or drill, drill or drill with a diameter of 8 mm. under the cable. A knife for stripping cables, wire cutters and, depending on the circumstances, what may be required.
Everything about the equipment. You determined where to go from the map. Next, we will consider options for installing television antennas.
Features of the telescopic bracket
The design of the telescopic model of the bracket for satellite antennas is almost identical to the wall mount. However, the manufacturer provided one feature.
The external structural element consists of two elbows made of a metal profile. Two elbows are inserted into each other like a “pipe into pipe”. In addition, holes are made in the profiles themselves, allowing you to adjust the size of the distance from the wall for various situations.
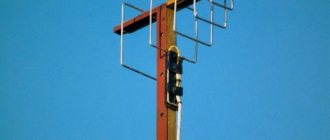
Features of the mast rack
Today, another model for mounting satellite dishes is known. The mast is made of steel pipes, protected from corrosion and moisture, and has a length of 3 meters.
Such structures are usually mounted on the roof of a house. The standard kit also includes two elbows for installing and securely fixing the satellite dish.
Among the advantages of such a model, it is worth noting the large vertical offset, which significantly increases the quality of signal perception. If the quality of perception is poor, you can extend the antenna using additional elbows.
Mast installation instructions:
- If you plan to mount the rack above the ground, you should prepare the foundation. In this case, the heel of the structure is attached to the base with dowels.
- Anchors should be used on a flat roof.
In the case when installation of guy wires is required, a prefabricated ring is fixed to the rack, fixed at three points with anchors or bolts.
Is grounding necessary?
When installing the structure on a mast, make sure that the house has a lightning rod that is higher than the antenna itself. But this is not a guarantee that lightning will not strike the antenna, and therefore it is necessary to carry out grounding. If you are caught in a thunderstorm while watching TV, turn off the device and disconnect it from the power supply, disconnect the plug that goes to the antenna. Basic precautions will help you avoid serious consequences during a thunderstorm.
Back Next
Making a bracket with your own hands
In the case where there is no specialized store nearby, and the antenna needs to be fixed, you can make a bracket at home.
Instructions on how to make a bracket for a satellite dish with your own hands:
- For high-quality work you will need a hacksaw or jigsaw, plane, grinder, drill, screwdriver, axe, hammer, nails, adjustable wrenches. Also, as a base you will need a wooden pole up to 1.6 meters long, one iron plate and a metal pipe.
- The wooden plank should be thoroughly cleaned of old bark, burrs, and irregularities. All work is done using a plane.
- The iron plate in which there are holes must be bent at an angle. The calculation of the angle of inclination should be such that the wooden plank is located on the roof at a right angle.
- The metal pipe is cut into two halves.
- Both ends of each half must be made flat, for example, using a hammer. The resulting flat planks also need to be bent at an angle, the size of which depends on the shape of the roof.
- On the flat ends it is necessary to drill two holes for fastenings.
- Further work consists of installing a homemade bracket. The iron plate is attached to a wooden plank using self-tapping screws.
- A hole is drilled on the bar itself for a bolt, which is pre-mounted on the ends of two metal pipes. Two pipes with flattened ends are inserted behind each other, and the junction is connected with a single bolt.
- Just above the fixing bolt, the metal ends are attached to the wooden plank using ordinary self-tapping screws. The bracket is ready, and then you can attach it to the roof.
It is necessary to make markings on the underlying wall, marking the installation points of the dowels. The material from which the building wall is made is of great importance in self-assembly.
For brick and concrete walls, use ordinary dowels, drilling holes with a hammer drill. For a wooden wall, you can choose wood grouse screws equipped with a wrench head.
Cabling
After installing the receiving antenna device, it is very important to secure the cable correctly and securely. It must be laid and secured in such a way as to minimize the impact of wind, snow sliding from the roof and streams of rainwater. The cable is fastened evenly along the entire length of the mast using clamps at intervals of 50 centimeters, then it is laid along the roof ridge and in the area of the window through which it will be inserted into the house, it is lowered down. At this point the cable must be secured with a bracket. It is first necessary to drill a hole in the window frame with a diameter slightly larger than the size of the conductor. In order to prevent precipitation from entering through the gap in the hole, it must be drilled with an appropriate angle; it would be better if it is possible to seal it with waterproof silicone. Be sure to allow a slight slack in the cable before entering the frame; this is necessary to compensate for temperature expansion.
The installation must be carried out carefully, observing the established technical requirements. The bending radius of the cable should not be less than five of its diameters; when applying fastening brackets, try to avoid squeezing the sheath.