Register Login
Publication date: February 22, 2019
For a homemade windmill, it is convenient to use an asynchronous generator. It produces AC immediately and there is no need to connect an inverter, which simplifies the assembly circuit. This means that all household appliances can be used directly from the windmill. Making an asynchronous generator with your own hands is not difficult. It is enough to find an old asynchronous motor (IM) from any household appliance and use it as the basis for a windmill. It will, however, require a simple alteration.
Operating principle of an asynchronous motor and generator
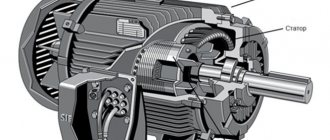
An induction motor is an alternating current electric motor. Its peculiarity is that the magnetic field, which is produced by the current in the stator winding, and the rotor rotate at different frequencies. In synchronous motors their frequency is the same. The most common design of an IM includes a wound rotor and a stator, between which there is an air gap. But there are also engines with a squirrel-cage rotor. The active part of the IM is the magnetic circuit and windings. The remaining elements provide structural rigidity, rotation and cooling. The current in such a motor appears due to electromagnetic induction, which occurs when the magnetic field rotates at a certain speed.
In turn, an asynchronous wind generator is an engine that operates in generator mode. The drive wind turbine rotates the rotor and the magnetic field in the same direction. In this case, negative rotor slip occurs, a braking torque appears on the shaft, after which the energy is transferred to the battery. To excite the EMF, the residual magnetization of the rotor is used, and the EMF is amplified by capacitors.
Frame preparation
The design of wind generators includes rotating parts; looking at them from the side, you can see the similarity of the prefabricated element with a windmill.
To create blades, several types of materials are used; you need to choose the most durable and easy-to-manipulate type of rigidity.
Of the components available to every owner, it is worth highlighting:
- Plywood.
- Plastic.
- Metal.
- PVC.
When considering the future dimensions of a model that you assemble yourself, you must also take into account the wind strength in the region of residence, the number of blades, and the height of the mounting fasteners.
Making a wind generator with your own hands from an asynchronous motor
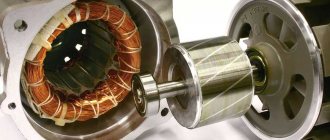
To adapt the IM to a windmill, you need to create a moving magnetic field in it. To do this, carry out a number of transformations:
- Select neodymium magnets for the rotor. The strength of the magnetic field depends on their strength and quantity.
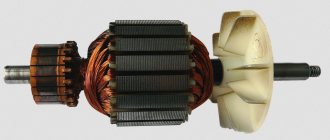
- Grind the rotor under the magnets. This can be done using a lathe. Remove a couple of millimeters from the entire surface of the core and additionally make recesses for the magnets. The thickness of the groove depends on the selected magnets.
- Mark the rotor into four poles. Place magnets on each (from eight per pole, but more is better).
- Now you need to fix the magnets. This can be done using superglue, but then hold the elements with your fingers until the glue sets (the magnets will change their position upon contact with the rotor). Or secure all elements with tape.
- The next step is to fill the free space between the magnets with epoxy resin. To do this, wrap the rotor with magnets in paper, wrap tape over it, and seal the ends of the paper cocoon with plasticine. After making such protection, resin can be poured inside. When the epoxy is completely dry, remove the paper.
- Clean the surface of the rotor with sandpaper. To do this, use medium-grain paper.
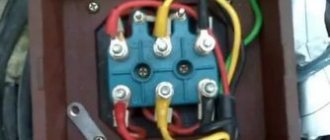
- Identify two rotor wires that lead to the work winding. Cut the remaining wires to avoid tangling.
This completes the main transformations. Additionally, you can purchase a controller and use silicon diodes to make a rectifier for your wind generator. Also, check the rotation of the motor. If movement is stiff, replace bearings. Quick tip: if you want to increase the current and also reduce the voltage in your unit, then take the time to rewind the stator with thick wire.
Legal side of the issue
A homemade wind generator for the home is not prohibited; its manufacture and use does not entail administrative or criminal penalties. If the power of a wind generator does not exceed 5 kW, it is classified as a household appliance and does not require any approval from the local energy company. Moreover, you are not required to pay any taxes if you do not make a profit when selling electricity. In addition, a homemade generating windmill, even with such productivity, requires complex engineering solutions: it’s easy to make it. Therefore, the power of a homemade product rarely exceeds 2 kW. Actually, this power is usually enough to power a private home (of course, if you do not have a boiler and a powerful air conditioner).
In this case, we are talking about federal legislation. Therefore, before making a decision to make a windmill with your own hands, it would be a good idea to check the presence (absence) of regional and municipal regulations that may impose some restrictions and prohibitions. For example, if your house is located in a specially protected natural area, the use of wind energy (which is a natural resource) may require additional approvals.
Problems with the law can arise if you have troublesome neighbors. Windmills for home are classified as individual buildings, so they are also subject to some restrictions:
- The height of the mast (even if the wind generator does not have blades) cannot exceed the standards established in your region. In addition, restrictions may apply based on the location of your site. For example, the landing glide path to the nearest airfield may be passing above you. Or there is a power line in the immediate vicinity of your property.
If dropped, the structure may damage poles or wires. General limits under normal wind load are 15 meters in height (some homemade windmills soar up to 30 meters). If the mast and body of the device have a large cross-sectional area, neighbors may make claims against you on whose property the shadow falls. It is clear that such complaints usually arise “out of harm”, but there is a legal basis. - Noise from the blades. The main source of problems with neighbors. When operating in a classic horizontal design, the windmill produces infrasound. This is not just an unpleasant noise; when it reaches a certain level, wave vibrations in the air have an adverse effect on both the human body and domestic animals. A homemade generator for a windmill, as a rule, is not a “masterpiece” of engineering, and in itself can make a lot of noise. It is highly advisable to officially test your device with regulatory authorities (for example, the SES), and obtain a written conclusion that the established noise standards are not exceeded.
- Electromagnetic radiation. Any electrical device emits ethereal interference. Take, for example, a windmill from a car generator. To reduce the level of interference from a car receiver, capacitor filters are installed in the car. When developing a project, be sure to take this point into account.
Important! Any generating device must be grounded. In addition to ensuring safety, this will help reduce interference.
Claims can be made not only from neighbors who have problems receiving television and radio signals. If industrial or military reception centers are located nearby, it would be a good idea to check the level of interference with an electronic interference control (EW) unit.
- Ecology. It sounds paradoxical: it would seem that you are using an environmentally friendly unit, what problems could there be? A propeller located at a height of 15 meters or higher can become an obstacle to the migration of birds. The rotating blades are invisible to birds and they are easily hit.
Advice: The more documents you have confirming the safety of the wind generator for others, the easier it will be to later repel “attacks” from restless neighbors and annoying inspectors.
Generator testing
Before installing the finished generator on an axial structure or mast, it must be tested. For testing, you will need a drill or screwdriver, as well as some kind of load, for example, an ordinary light bulb that you use in everyday life. Connect them to your unit and see at what speed the light glows brightly and evenly.
If testing shows good results, then you can begin installing the windmill. To do this, it is necessary to manufacture blade elements, an axial structure, and select a battery. You can read more about how to assemble a wind generator here.
Application
In everyday life and in production, such generators are widely used in various fields and areas, but they are most in demand to perform the following functions:
- Used as motors for wind farms, this is one of the most popular functions. Many people make their own asynchronous generators to use them for these purposes.
- Operation as a hydroelectric power station with small output.
- Providing power and electricity to a city apartment, private country house or individual household equipment.
- Performing the basic functions of a welding generator.
- Uninterrupted supply of alternating current to individual consumers.
Rules for operating an asynchronous wind generator
This windmill has a number of features that need to be taken into account during operation:
- Be prepared that the efficiency of the finished device will constantly fluctuate (within 50%). It is impossible to eliminate this drawback; this is the cost of the energy conversion process.
- Take care of high-quality insulation and grounding of the wind generator. This is a mandatory safety requirement.
- Make buttons to control the device. This will greatly simplify its use in the future.
- In addition, provide places for connecting measuring instruments. This will provide you with data on the operation of your unit and allow you to carry out diagnostics.
What energy costs can the installation cover?
Installing a wind generator is cost-effective if the wind speed reaches 4 m/s.
In this case, almost all needs can be met:
When designing and assembling a windmill from a washing machine engine, the instability of wind speed must be taken into account. Electricity can disappear at any second, so equipment should not be connected directly to the generator.
Requires batteries and a charge controller, because... electrical appliances require a voltage of 220V.
Testing a homemade device
Testing of the finished wind generator should be carried out with the structure fully assembled, installed and securely fastened. The temptation to try a windmill in action is great and often forces people to take ill-considered actions, resulting in breakdowns, destruction, and injuries.
The functionality of individual components (for example, a generator) can be checked using an electric drill with adjustable rotation speed. The capabilities of a wind turbine can also be tested separately, without connecting a generator, to obtain data on its performance without load. All other tests or samples require high-quality assembly or connection in accordance with all the rules.
Mast
The mast on which the wind generator is mounted is one of its most important components . It not only ensures the safe operation of the windmill (the lowest point of the circle described by the blades must be no closer than 2 meters to the ground), but also allows it to make the most efficient use of wind energy, the flow of which becomes more turbulent close to the ground.
The high height leads to low rigidity of the wind generator mast and makes its strength calculation quite difficult not only for an amateur craftsman, but also for an engineer. We can only list the main points:
A story about a very simple wind generator from a home fan
Multiplier calculation
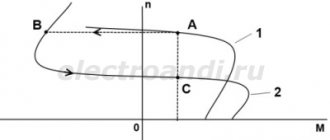
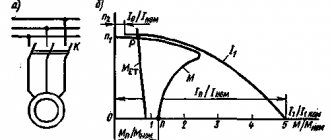
The generator set has an inclined current-speed characteristic: with increasing rotor speed, the maximum power delivered by it increases. Therefore, in order to ensure the greatest efficiency of a low-speed wind generator, we will need a multiplier with a large increase factor.
For a homemade design, the most optimal solution is a belt multiplier: it is easy to manufacture and requires a minimum of machine work. Its speed increase coefficient will be equal to the ratio of the diameter of the drive pulley associated with the propeller axis to the diameter of the driven pulley of the generator. If necessary, the gear ratio can be easily adjusted by replacing one of the pulleys.
When designing a multiplier, it is necessary to take into account both the average speed of the blade assembly and the current-speed characteristic of the generator. If we use a serial car generator, then it can be easily found on the Internet, but with homemade designs, most likely, we will have to go by trial and error.
For example, let’s take a common tractor generator, which we already wrote about above.
Taking the estimated power of our wind turbine at 90 watts, we will find a point on the graph corresponding to the generator’s output at this power. At a nominal voltage of 14 V, we will need a current output of at least 6.5 A - according to the schedule, this will happen at just above 1000 rpm. Let the propeller of our design be rotated by the wind at a speed of 60 rpm (wind of medium strength). This means that we will need at least a twenty-fold ratio of pulley diameters - for a 70 mm generator pulley, a windmill pulley will have to have a diameter of almost one and a half meters, which is unacceptable. This clearly hints at how low the efficiency of wind generators of this type is - without a complex multi-stage gearbox, which itself will lead to large power losses, it is almost impossible to bring a car generator into operating mode.
Windmill made from scrap materials
Homemade windmills are usually made from materials that can be found in a garage, shed or other accessible places. The purchase of materials or equipment is rarely made, since often the entire process of creating a windmill is an experiment with an unclear result, so it is not advisable to incur any expenses. In general, this approach justifies itself, since it makes it possible to evaluate prospects and draw conclusions regarding the parameters of the installation necessary to fully resolve the issue.
Any result of such research makes it possible to create a wind turbine with the required qualities. At the same time, even when making the third or fourth model, craftsmen practically do not acquire any materials, making do with old stocks or remaking existing items. Thus, metal barrels cut lengthwise are often used as blades for vertical rotors. Other methods are also used that do not require almost any expenses, but bring quite tangible results.
The only thing you can’t do without is certain knowledge in the field of electrical engineering, experience and skills in working with plumbing tools.