It is difficult to imagine modern life without the use of various electrical appliances. But their abundance creates connection problems and places a high load on the electrical network, which sharply reduces fire safety. Separate control of electrical appliances can help reduce the load, for which an electrical panel is assembled and installed in the apartment. You can configure it yourself. But in order for electrical appliances to be turned on without danger, it is necessary to correctly draw up a diagram of the panel, understand its structure, and take into account all installation requirements.
Option 1
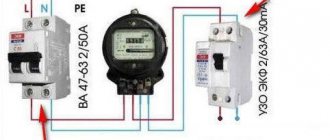
This is the simplest circuit of an input panel with an electricity meter. It shows the TN-S grounding system, that is, when separate independent neutral working and neutral protective conductors come from the power source. In this single-phase switchboard circuit, there is a two-pole circuit breaker at the input.
Here and in subsequent diagrams, the ratings and characteristics of protective devices are chosen arbitrarily. Yours may differ, but the very essence of the connections between circuit breakers and other protective devices remains the same.
After the opening machine there is a counter. To register it, the input switching device and the electricity meter itself must be sealed. Next come single-pole group circuit breakers. The phase is always supplied to the circuit breakers, and the zero to the zero bus. It turns out that all neutral working conductors of different groups are combined with each other, and phase conductors are switched using automatic machines.
This version of the scheme is the simplest and is very often found at various sites.
Next article:
What it is like to connect circuit breakers with wires can be found in the photo. We have already talked about how to assemble a switchboard with your own hands!
Modern shields have a modular design. A modern electrical panel has a durable casing and is locked, so children will not get in unless you leave the key in a visible place.
The electrical circuit is created in several stages.
The rating is selected depending on the power of the consumer.
Assembly and connection diagram To create an electrical panel diagram, you need to determine the type of power supply system in the house, divide electricity consumers into several groups, and based on this data, create a diagram using GOST
This way, you can protect yourself from additional expenses in case of installing additional machines. If you turn everything on at the same time, then, of course, the input circuit breaker will trip and turn off the entire apartment. T 12.2 Assembly diagrams for a group apartment panel
Carrying out work on moving the electrical panel
The electrical switch that supplies electricity is usually located in a single panel on a common area. This often brings inconvenience. Placing a panel with machine guns in your living space is more convenient for many.
To transfer the shield from the site, it is necessary to develop technical documentation and coordinate the project with regulatory organizations. This will be done by Yudu performers who know how to correctly move an electrical panel. Specialists perform the following tasks:
- calculations (in accordance with the parameters of the installed machines and the characteristics of the electrical wiring)
- dismantling the batch switch, old automatic power supply, wires and plugs
- installation of a new machine in your apartment
- installation of a protective grounding device, as well as an overvoltage relay (for protection against power surges in the network)
transferring a panel with machine guns to an apartment of any size
Yudu performers are highly qualified and have extensive experience. Masters will be able to quickly install any machine using special equipment. The performers have all the consumables to move any electrical panels from the entrance. The selected contractor will draw up a project for moving the electrical panel, taking into account the peculiarities of load distribution. Professionals will carry out the transfer of electrical panels from the staircase landing efficiently and quickly.
Reasons to move the device
The main factors for changing the location of the meter and related equipment in an apartment building are:
- obstacle in redevelopment;
- installation of new furniture;
- increased safety.
Moving the counter to the landing will allow you to perform the desired finishing or placement of decorative items. You can also place the device in a hidden way without changing the location. It will not be difficult to complete the task by choosing a very compact electronic meter. In this case, technical requirements will not be violated.
If the counter is initially located in the hallway of the apartment, then new furniture may be the reason for its movement. For example, a wall in a hallway. The meter and traffic jams are a significant obstacle that can easily be moved.
This will be a more profitable option from a financial point of view than custom fitting furniture. Very often, the placement point of the device is located in such a place that it is simply impossible to pick up or adjust the furniture.
This solution involves appropriate equipment with a protective box that will limit access to electrical equipment by unauthorized persons.
In this case, the readings should be easy to read by the controller.
If the wall is load-bearing and made of reinforced concrete, then hiding the device will be problematic and expensive. Therefore, most often they resort to choosing a different location for the meter.
Read more: Documents for changing a passport after expiration
Regular outages due to theft of circuit breakers or simply a power outage can become a reason to move the device from the entrance to the corridor of a privatized apartment. In this case, it is necessary to provide for placement in advance so that even rearranging the furniture does not become a problem.
Another advantage is the guaranteed absence of mechanical damage.
The modern model takes up minimal space and a plastic shield with an ergonomic design is suitable.
If the meter in the entrance is induction, from the last century, then it is better to replace it. At the same time, sometimes apartment owners even leave this one. The motivation is simple – cost reduction.
They only resort to replacing plug-type switches with more modern automatic ones. They are also transferred to the corridor of the apartment. This prevents unauthorized persons from gaining access to them. On the other hand, this approach cannot be considered a complete solution.
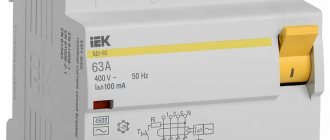
Which electric meter should I choose for outdoor installation?
There are household electricity meters designed for installation outside the home. They are able to withstand fluctuations in air temperature while maintaining accurate readings.
The devices are single- and multi-tariff, single- or three-phase.
Street meters come in different capacities.
To determine it, you need to calculate the total power of all electrical appliances in the room. If it is below 10 kW, then a 60 A meter is suitable, if more - 100 A. The accuracy class must be at least 2.0.
Devices are now being produced that work well even at low temperatures.
When purchasing an installation box, you need to pay special attention to its tightness. Heating is not required
The moisture-resistant box must have a degree of protection of at least IP53-IP54.
The box should be selected taking into account the design of the meter.
It is necessary to have a window on the door to take readings.
As an outdoor option, a single-phase electric meter is most suitable - for a small house and cottage, or a three-phase one - for a multi-storey cottage with a swimming pool, sauna, etc.
In the latter case, the main thing is to correctly connect the device and evenly distribute the load on the network circuits.
Electric meters have a higher accuracy class than induction meters. The readings remain stable despite temperature changes throughout the entire service life.
When selecting the type of device mounting, it is better to give preference to a DIN rail. It is universal.
Before purchasing, you need to pay attention to the seal and the date of the last verification. Its age should not exceed two years - for single-phase devices and 1 year - for three-phase
Electrical diagram
Drawing up an electrical diagram greatly simplifies the installation of the switchboard; it is also indispensable in the event of malfunctions or network improvements. However, there are no clear requirements for drafting.
You can get the diagram in several ways:
Find standard schemes on the Internet
In this case, it is important that all lines are laid, which will facilitate the design. Often such drawings do not contain all the necessary information.
Draw an electrical panel diagram using special engineering programs
This project can be used in typical cases.
If there is a ready-made project for the electrical supply of the apartment, the electrical panel diagram must be present.
Drawing up a diagram can be done in several stages:
- Determining the type of wiring of electrical wires located in the apartment. Depending on its type, the required number of wires supplied to the box is calculated.
- Breakdown of consumers into groups.
- Determination of the total power of all electrical appliances planned to be installed in the apartment, and the power level for each group of consumers. These indicators will be required to calculate the nominal values of the machines that will be mounted in the box.
So, for a current of up to 40 A, a copper cable with a cross-section of 6-10 mm2 is suitable, respectively, automatic machines and RCDs of 32-40 A are suitable for it.
Electrical panel diagram
Calibration interval
Depending on the model, the device can last up to 25 years. In addition, there is also a shelf life and guaranteed performance. They all differ from each other. To link these terms, the meter interverification interval (MPI) is used. It determines how many years of operation the device will withstand within a given error. The quality of different meter models varies, and the inspection frequency can range from 4 to 16 years.
When releasing a new product, the manufacturer's accredited service checks the accuracy of the readings and seals the device. PUEs require that there be a seal with the manufacturer's mark on the screws that secure the meter casing.
Possible ways to lay the wire
Replacing old wiring in a panel house begins with drawing up a new diagram. Also, replacing electrical wiring is divided into two options: partial or complete.
If it is necessary to completely replace all cables in a panel house, then a new circuit should be made. To do everything correctly, a specialist will need an old circuit. The new diagram will serve as step-by-step instructions for performing electrical installation work.
First you need to determine where the load will be. For example, the kitchen typically consumes the most electricity. If we talk about an ordinary room, then one or two sockets per 5 square meters is enough. Considering the needs of the kitchen, the same room will need four sockets. Also, we should not forget that for devices with high electricity consumption it is necessary to draw separate lines from the switchboard. Some household appliances require a copper cable with a cross-section of up to 4-6 squares.
Another room that requires special attention is the bathroom, because it is characterized by high humidity. Therefore, sockets in the bathroom should be connected through a differential circuit breaker or RCD
According to the PUE chapter 7.1. clause 7.1.48 its operation current should not be more than 30 mA. Also, an RCD must be installed to protect individual electrical appliances that are the most dangerous from the point of view of electric shock - a washing machine, a water heater, a hydromassage box, a hydromassage bathtub. In the kitchen there is a dishwasher and an electric oven.
When replacing electrical wiring in a panel house, several methods of laying a new cable are used:
- in ceiling slabs;
- under the ceiling covering;
- on the walls - under plaster, under drywall;
- on the floor in a screed.
The most common method of laying cables is to lay the cable under plaster. In order to carry out installation, holes must be made into which the cable will be laid and secured. After installation, a layer of plaster is applied over the cables. Using this method, you can stretch several lines in one groove. You can also lay cables separately for lighting, various appliances, air conditioners, and other heating devices.
It is ideal to lay cables along old channels, because then you can lay the wires without gating and save time. Therefore, it is advisable to use the paths along which old cables were laid. You can mainly use places where aluminum cables have simply been plastered, for example in the joints between the wall and the ceiling. Seams are places where it is easy to install new wiring.
When replacing old cables, you should remember that the channels in which they were located can be used to bring a new copper cable to an outlet or switch. However, the channel can only be used if the fittings are in the same places and if the old cable can be pulled out during dismantling.
In most cases, it is very difficult to find and use channels, so some experts recommend not wasting time on long searches and cleaning channels. Therefore, for horizontal installation in a panel house, it would be more expedient to stretch the cable along the upper joint between the wall and the ceiling. In this place there is usually a gap that is either plastered or filled with cotton wool.
An alternative option is to run electrical wiring along the ceiling and make grooves only in places leading to sockets and switches. You can hide the cable attached to the top by making a suspended or suspended ceiling.
When replacing electrical wiring in a panel house, you must first determine whether the replacement will be partial or complete. It is also necessary to use old channels. In order to carry out this work you need to have a good tool. However, it is preferable that the replacement of electrics in a panel house is carried out by a specialist.
Important! Remember that it is impossible to make horizontal grooves in the load-bearing walls of panel houses. This could cause the wall to collapse
This is also prohibited by various regulatory documents, for example, Decree of the Moscow Government of February 8, 2005 N 73-PP “On the procedure for the reconstruction of premises in residential buildings on the territory of the city of Moscow.” and Government Decree No. 508 (Clause 11.3 and 11.11 Appendix No. 1).
What to do after the transfer
Installation of the device at a new place of operation is carried out by a representative of energy sales. But the owner of the site needs to ensure that the device is put into operation correctly and that all necessary documents are completed:
- In order for the meter to be put into operation, you need to submit an application to the energy company. It indicates the consumer’s passport details, his contacts, and the number of the contract with the supplier.
- A company representative will fill out the documents and indicate the arrival time of the specialist to install the seal. The first sealing should be free.
- After putting the meter into operation, you need to make sure that it is reliably protected by a special shield with a transparent window for reading readings.
Assembly and installation of an electrical panel in a house, apartment, or country house
Installation and assembly of an electrical panel is a complex job that requires a clear sequence, where every action is important and cannot be neglected.
The main qualities of the device are safety and ease of use.
- accounting for electricity consumption;
- circuit management;
- protection of the circuit from fire due to overload.
It is possible to install an electrical panel in a house, apartment or country house on your own, but to do this you need to have basic knowledge and skills as an electrician.
Electrical panel project
For a person who is far from electricity, it is better to start designing an electrical panel when the wiring installation is completely ready and the wires are brought to the location of the future electrical panel. First you need to draw up drawings for the work and select suitable components.
Consumer calculations
A complete list of consumers is compiled. To do this, you do not need to take into account devices like a fan or a table lamp, but write down and number each wire connected to the panel. Sockets must be recorded separately, lighting - separately. High-power appliances (boilers, washing machines, air conditioners, electric stoves) require wiring protection from overload, so they are connected not through distribution boxes, but directly to the panel.
The list of consumers for a three-room apartment usually looks like this:
- sockets:
- bedroom;
- living room;
- children's;
- kitchen;
- bathroom;
- entrance hall and corridor.
- Washing machine;
- boiler;
- air conditioner;
- electric stove;
- lighting:
- bedroom;
- living room;
- children's;
- kitchen, bathroom;
- hallway, corridor.
All consumers are divided into groups (circuits) in accordance with power consumption: sockets for household appliances in one room such as an iron, sconce, TV and others can be combined into one group (sockets in one room - one group, in another - another), lighting - to the next one, also by room. Each group has its own circuit breaker (or just a circuit breaker) on the panel, and for high-power appliances - washing machine, boiler, electric stove, air conditioner - there is one separately for each. Machines may also be called fuses or bags.
Next, the list is converted into a table where the ratings of the machines and RCDs are entered.
Drawing up an electrical panel diagram
The electrical panel is a housing - a metal or plastic box - with modules inside. A module is a component that occupies one installation “space” (within one DIN rail). Some devices can take up two or even three “places”.
For clarity, you should create a diagram according to which the shield will be assembled.
Examples of 220 V switchboard circuits:
- introductory machine;
- electric meter;
- RCD (residual current device);
- ground bus;
- "zero" bus;
- automatic sockets for high-power devices at 25 A;
- automatic socket group for household appliances of low and medium power at 25 A;
- automatic lighting 16 A;
- L—phase;
- N - zero;
- PE - grounding.
Each house or apartment will have its own layout in accordance with the preferences of the owners.
Selection of components
Depending on the position on the wall, the electrical panel can be of two types:
- internal - recessed into the wall, slightly protruding;
- external - the body is not recessed, but simply fixed to the wall.
If the wiring in the house is hidden inside the walls, then an internal shield is more suitable. It takes up less space and is not particularly conspicuous, since it protrudes from the wall minimally. To install such a shield, you must first prepare a niche in the wall for it. The wall thickness must be suitable.
If the wiring goes over the walls, then an external panel is suitable, which does not require preliminary preparation of the site. It is enough to attach the housing to the wall with self-tapping screws or dowel nails.
An external electrical panel can be installed both inside the house and in the yard on a pole.
It is better to choose a case from proven European companies with removable walls. It is desirable that the DIN rails are also easily removed or moved aside. You should not take frankly cheap cases: they are made of low-quality plastic, which dries quickly and becomes brittle, is not self-extinguishing and smokes heavily when ignited. Good cases are already ready for wiring inside, but cheap ones will have to be completed.
After installing the housing, you need to select automatic machines, RCDs, difautomatic devices (automatic and RCD in one), a meter, contactors and other devices. Additional modular sockets, buses, power supplies, and control devices can be installed on DIN rails.
When selecting modules, you need to consider the following parameters:
- rated current;
- speed of operation of machines;
- shutdown current of automatic machines, difavtomats, RCDs;
- permissible operating frequency for contactors.
The machines are selected separately for each circuit so that the system is balanced. So, if you allocate a 6-10 A circuit breaker for high-power devices, the latter will automatically turn off, preventing the equipment from working, and, conversely, an overly powerful circuit breaker installed for a low-power consumer will not protect the wiring from overload. For lighting, 6-10 A automatic circuit breakers are used, ordinary household sockets, boilers, air conditioners, washing machines - 16 A, electric stoves - 20-25 A. An input circuit breaker is needed for 32-60 A, depending on the total current strength of all consumers of the facility.
In the event of a power surge, the circuits should be turned off independently of each other, preferably in order “from lower to higher,” which makes it possible not to de-energize the entire house in case of problems and makes it easier to detect them. Therefore, the machines are equipped with a “set” for the response time: first the lower one is turned off (0.1 s), then the higher one (0.5 s).
A suitable RCD is one whose rated current is higher than the total current of the machines subordinate to it. So, during a surge, the circuit breakers will turn off first, preventing damage to the RCD. For a 16 A machine, a 20-25 A RCD is installed; a 25 A electric stove machine requires a 40 A RCD.
An integral element of the system are the zero and ground buses - copper strips with holes into which wires are inserted and clamped with a bolt. The bar is placed on a dielectric insulator, which is mounted on a DIN rail.
Assembly and connection
Assembly and connection of the electrical panel requires strict adherence to safety precautions! It is better to place the modules in the shield housing according to the drawn up diagram.
Work order:
- 35 mm DIN rails are installed for the meter, machines, zero and grounding buses;
- automatic machines, RCDs and two buses are installed, to which neutral and grounding wires are connected. The input circuit breaker, to which the power cable of the entire system is supplied, must be installed first in the upper left corner of the case. For convenience, it is better to connect the cable to the machine from above. The excess holes remaining in the case for supplying wires are closed with plugs;
- The input machine is connected depending on its type:
- phase and zero are connected to the two-pole;
- to single-pole - only phase;
- in 380 V switchboards, three phases are connected to the input circuit breaker.
- It is better to connect the phases to the machine from below for the convenience of installing jumpers between the machines from above;
- all automatic devices and RCDs are equipped with special copper busbars in insulation or with ordinary wires of sufficient cross-section. The blue neutral wire from the input cable is connected directly to the neutral bus. When connecting RCDs and automatic circuit breakers, you need to connect the zero to the bus from each separately;
- route and connect the cables to the machines according to the diagram. Neutral wires are indicated in blue, phase wires in red, ground wires in black and yellow.
Private homes and offices are often equipped with 380 V electrical panels. A 4 or 5-core cable is supplied to such a panel: two or three phases, neutral and ground.
The 380 V switchboard diagram will be as follows:
Three phases are connected to the input circuit breaker, after which they go to the meter. Then the phases go to a common circuit breaker, after which the wiring is divided into single-phase lines for 220-volt devices and three-phase lines for 380-volt equipment. The voltage between different phases is always 380 V, and between zero and any phase - 220 V.
Household sockets must always be supplied with zero and a phase, 220 V. If you supply two phases, 380 V, the equipment will quickly fail.
The grounding wire always bypasses the machines and goes from the grounding bus to the sockets. Grounding from the input cable also goes directly to the bus. Zero is connected directly from its bus if the sockets are connected through ordinary machines. If they are connected through an RCD or a circuit breaker, zero passes through them.
At the end of the work, the shield is closed and voltage is applied to it.
Watch the video on the topic:
Electrical panel project
Scheme for assembling and connecting the electrical panel in the apartment: Using the connection diagram, you can begin installing the electrical panel. If it is planned to install consumers with a power of up to 2.5 kW, then it is desirable to install separate protection.
Next, we move on to dividing all connection points into several groups.
One machine serves the lighting group, the second - sockets, and the third - the washing machine.
A single-phase network branch goes to outbuildings. Similar RCDs are installed on entire groups of consumers.
New articles by email
Here, using an example, I will tell you how to read the electrical diagram of a panel, give several examples, and at the end of the article I will give a link to download 19 electrical circuits of the panels. You will also need the diagram when accepting work as an electrician. This is approximately what a properly organized cable entry into an electrical panel looks like: power supply on the left, residential network lines on the right. Installation of an electrical panel in an apartment If you are assembling a panel or moving it, then first of all you need to decide on the installation location.
They break the circuit if an overcurrent or short circuit is detected, protecting the wiring and connected equipment from damage. In order not to make a mistake when purchasing a switchboard housing based on the number of modules, you need to draw up a wiring diagram.
It is very important to decide in advance on the number of machines and select an electrical panel of appropriate dimensions. TN-C - the old type of power supply, the wiring in the apartment includes a two-core copper or aluminum cable, the cable in the panel combines zero and ground
Below are group cables feeding certain groups, indicating the cable brand and its cross-section depending on the load. Each of these machines is responsible for a specific part of the circuit. The RCD is turned on as follows: the phase is connected to the inputs of the machines, and the neutral wire is connected to the neutral common wire.
requirements for the location of the panel on the wall
I remember a rule that goes something like this (I read it somewhere, but forgot where): from the floor to the top edge of the shield there should be no more than 2 m and from the floor to the topmost object in the shield - no more than 1.9 m
Where could this be written, please remind me (as soon as possible)? or did I mess something up?
Well, or in general, where are the requirements for the location of the shield on the wall?
Well, somewhere it should be said that the shield cannot be placed too high, diagonally, with the door inside the wall
and so on.
There is something missing in the Pue, perhaps there is some kind of guest?
Will your shield be with or without a meter? For example, I have it hanging on a support about four meters from the ground.
When I bought the house, the meter and plugs were almost hanging from the ceiling. To look at the readings and change. if you needed a traffic jam, you had to climb onto the tambourette. Not convenient. I replaced all this with a normal cabinet with a counter and automatic machines. When I reported this to the energy sales office, they praised me and allowed me to do it with all sorts of encouragement. I read in some book that the bottom of the counter is no higher than 170 cm from the floor. I asked the power supply company what height to hang it at. A figure of 170 cm was named, but a little higher is possible. The main thing is that the guy with the ice cream doesn’t start swearing, which is too high for him. That's what I did. The counter itself is at head level, the input machine is separate at a height of approximately 200 cm. There were no complaints.
Installation of the built-in model
When choosing this installation method, you should immediately be prepared for the formation of a large amount of construction waste. The labor intensity of this method is much higher, but the shield will look much more attractive.
Built-in panel in the apartment
If the walls are made of plasterboard, then the organization of the niche must be taken care of in advance. A niche must be knocked out in a concrete or brick wall. It is also necessary to leave 3 cm gaps on each side. The dimensions of the niche will depend on the design of the shield that you have chosen. It is necessary to place an electrical distribution panel in the formed niche. If there are no holes for wires in the structure, then you need to make them yourself.
Related article: Do-it-yourself floor mats: examples of self-production
Where are electricity meters located in an apartment building?
.
Important links
useful links
- 10 KILOVOLT »
- Articles "
- Electricity meters »
- Rules for installing electricity meters in an apartment building
How to install an electric meter in an apartment building.
When installing a meter in an apartment building, the most important question is at whose expense the electric meter is installed, and who is responsible for this property. Our specialists have experience with meters in apartment buildings - both communal and individual meters.
We are ready to help solve difficulties that may arise when replacing or moving an electric meter into an apartment. Call – our specialists are ready to give comprehensive advice.
Common house electricity meter at the entrance
Household electricity meter
The rules for installing electric meters in an apartment building do not regulate issues of ownership and payment when replacing or moving an electric meter.
This issue is resolved in accordance with Part 2 of Art. 543 of the Civil Code of the Russian Federation. According to this document, the energy supply organization must ensure the technical condition and safety - unless otherwise established by legal acts or laws.
There is Government Decree No. 530 dated August 31, 2006, which determines the procedure for design, installation work and commissioning of metering devices. This resolution clearly states that the owner of the object (the owner of the premises) is obliged to ensure its safety and integrity.
In judicial practice, this disagreement is interpreted as follows: if the electric meter is located in the entrance, it is the common property of the house, which means that the burden of its maintenance and safety is determined by the agreement concluded by the residents and the management company.
Typically, the contract provides for two options: carrying out work for an additional fee, or at the expense of funds that the company collects from residents.
Thus, the replacement of electricity meters in an apartment building, if the meter is located in the entrance, is in any case carried out by the management company, but the issue of financing this process is determined either by an agreement or by a general meeting of residents - if this item is not regulated by the agreement.
The installation location of the electric meter in an apartment building is selected based on considerations of safety, convenience and the requirements of the PUE rules.
Electric meter inside the apartment
If the metering device is located inside the apartment, it is the property of the property owner, which means that the burden of maintaining and maintaining the technical condition lies with the owner of the premises.
In this case, replacement, installation, as well as transfer of the electric meter from the entrance to the apartment is carried out at the expense of the apartment owner.
The balance limit is determined by the size of the apartment: all communications that are located inside are repaired and maintained at the expense of the owner of the premises, those outside the apartment are for the management or energy-saving class=”aligncenter” width=”800″ height=”800″[/img ]
The specialists of 10 Kilovolt LLC have extensive experience and have connected a significant number of objects to the networks. Our employees have all the permits and certificates that give them the right to connect electricity and install electricity meters. Upon completion of the work, a certificate of replacement or reprogramming of the electric meter is provided.
Where should the electric meter be located in an apartment building?
The date of verification is indicated on the seal of the meter body, Roman numerals indicate the quarter of the last check, and Arabic numerals indicate in which year it was checked. These deadlines are also regulated by the PUE. Requirements for the switchboard The basic standards do not have clear requirements for the design features of electrical switchboards. However, there are still certain conditions:
- there must be free access to the terminals of the electric meter and to the current transformer;
- it is necessary to ensure the possibility of comfortable replacement of equipment;
- so that there are no obstacles to installing the meter at an angle of up to one degree;
- It is very important to ensure that all installation and repair work is carried out from the outside of the equipment.
To attach electric meters, it is allowed to use panels made of wood, plastic and metal.
The wait for a response is about 1 week, since the application is entered into the register;
- After this, you should get a certificate from the energy company and you can go with it to purchase a meter;
- The equipment will come with a device passport, where all the parameters are indicated. Documentation should be retained.
What is required from the documents In old apartment buildings, inspections of electrical equipment are often carried out. It is then that the unsuitability of the devices is revealed, for example, the service life has expired or it has broken down.
Replacing electricity meters in an apartment building
- You must write a statement regarding the replacement of equipment. It must be taken to your local electricity authority.
Rules for installing an electric meter in a private house, apartment, or on the street
Newly installed three-phase meters must have state verification seals not older than 12 months.
, and on single-phase meters - no more than 2 years old. 1.5.27. Meters must be located in dry rooms that are easily accessible for maintenance, in a place that is sufficiently free and not cramped for work, with a temperature in winter not lower than 0 ° C. It is allowed to place meters in unheated rooms and corridors of switchgears of power plants and substations, as well as in outdoor cabinets.
1.5.30. In places where there is a danger of mechanical damage to meters or their contamination, or in places accessible to unauthorized persons (passages, staircases, etc.), a locked cabinet with a window at dial level should be provided for meters.
Replacing an old electricity meter with a new one
Each house has a meter installed to measure electricity. Its location is the entrance of an apartment building. Often it is installed in an apartment. Each device has its own expiration date, during which it can function normally. Then replacement is required.
Devices can also fail. They can be installed either in the same place or moved to another. For example, at the entrance. Equipment removal is usually required outside the city. Since 1996, GOST 6570-96 came into force, according to which it is prohibited to use devices with an accuracy of 2.5 and a current of less than 30 A. It was decided to replace the devices after the verification interval with new meters with an accuracy of 2.0 (2% error). Therefore, the meter is changed in each apartment, although its deadline may not have passed yet. If the owners of the premises installed a device with an accuracy class of at least 2.0, then they are confiscated.
At whose expense are electricity meters replaced: rules and procedure
First of all, the consumer of electricity should know that everything related to the operation of electricity meters is regulated by the Electrical Installation Rules (PUE). Installing electricity meters in an apartment is not prohibited, but has its own characteristics. Content
- 1 Availability of state verification
- 2 Shield requirements
- 3 Installation rules
- 4 Security measures
- 5 Installation in residential buildings
- 6 Features of accommodation in private houses
- 7 Installation at dachas
Availability of state verification You can install electricity meters in residential premises if you have a state verification, the deadline for which has not yet passed.
Where should the electric meter be located in an apartment building?
The electric meter may fail, its service life may expire, it may become technically outdated, or a subscriber of the energy supply company may want to install a more modern multi-tariff device that can significantly save money spent on electricity. The content of the article:
- What is it regulated by?
- Who changes and at whose expense?
- In a privatized apartment
- In public housing
- At the entrance
- In a private house
- Rules and terms
- If it's broken
- Can I replace it myself?
- Procedure
- Is notification sent?
- Checking and sealing
- What documents are issued?
Dear readers! Our articles talk about typical ways to resolve legal issues, but each case is unique. However, the law stipulates the possibility of payment for work by the owner of the apartments, if such a provision is specified in the agreement between the owner of the residential premises and the manager class=”aligncenter” width=”1200″ height=”900″[/img]
If this is not specified in the contract, then all costs must be borne by the management company. In a private house, the owner of a private house fully pays the costs of replacing a failed electric meter in accordance with Russian Government Decree No. 530, since he is the owner of the residential premises. In those rare cases when the user of the energy supply company lives in the municipal private sector, replacement of electricity meters is carried out in the same manner as in municipal non-privatized apartments. Rules and Deadlines When replacing an electric meter, there are strict rules that must be followed.
It is suitable for remote installation when the meter needs to be moved to another location. Electronic meters The operation of these devices differs from previous ones. They are based on mechanics, and the current flows directly to semiconductors and microcircuits.
This is necessary for energy accounting. The device has an electronic display for displaying information. The benefits include:
- Small size;
- You can take into account energy consumption at different tariffs;
- Accounting occurs accurately;
- There is an electronic scoreboard;
- Readings are easily written off.
Disadvantages include high cost and short service life. Many residents prefer to install these devices in their apartments. Replacement of any equipment must be carried out by a specialist. Types of electricity meters Various devices are used for apartment buildings.
Where should the electric meter be located in the apartment or on the site?
Civil Code of the Russian Federation;
- Housing Code;
- Federal Law No. 261 of November 32, 2009;
- Federal Law No. 102 of June 26, 2008;
- decision of the State Standard of the Russian Federation;
- Resolutions of the Government of the Russian Federation No. 530 and No. 491.
Who changes and at whose expense? Do I need to change my electricity meter at my own expense? Depending on the location of the meter inside the apartment (private house) or in the entrance, responsibility for the condition and proper operation of the electricity meters lies with either the owner of the residential premises or the management company. You can learn how to turn off a radio point in an apartment via the Internet from our article.
In a privatized apartment In a privatized apartment, the owner of the residential premises must ensure the safety and integrity of electricity meters, as well as their maintenance.
Where should the electric meter be located in the apartment?
The height from the floor to the meter terminal box must be within 0.8 - 1.7 m. A height of less than 0.8 m is allowed, but not less than 0.4 m. 1.5.6. It is recommended to install meters for calculating the electricity supply organization with electricity consumers at the boundary between the network (according to balance sheet ownership) of the electricity supply organization and the consumer.
1.5.13. Each installed settlement meter must have seals with the state verifier's mark on the screws securing the meter casing, and on the clamping cover - a seal from the energy supply organization. The main basis for drawing up an agreement is the Civil Code of the Russian Federation. Often, the consumer of electrical energy does not fully know the requirements of the current norms and regulations in electrical installations and does not have sufficient economic and legal knowledge in the field of energy.
The electricity consumer, when signing such an agreement, is unaware of possible penalties and restrictions on the supply of electricity from the energy supply organization. Despite the fact that some such sanctions may not be entirely legal, after signing the agreement by both parties they become legally binding, since in accordance with Art. 421 clause 2 of the Civil Code of the Russian Federation “The parties may enter into an agreement, both provided for and not provided for by law or other legal acts.”
Housing and communal services in Russia.
The specific mandatory location for installation (installation) of a residential electric meter is not regulated by any current laws or regulatory and technical documents. However: - when designing apartment buildings, designers use UNIFIED STANDARD floor electrical distribution panels produced by manufacturing plants, in which apartment electricity meters are installed in these panels. - apartment electricity meters are the property of the apartment owner, and, in my personal understanding, “the owner is a gentleman” and can install the meter wherever he pleases.
Therefore, when I changed my meter (and several meters for elderly neighbors) to new electronic ones with a higher accuracy class, I installed them in the hallways of the apartments. There were no complaints, comments or objections during the registration and acceptance of meters by Elektrosbyt employees.
Good luck in installing the meter wherever you want!
Sources
- Federal Law “On the General Principles of the Organization of Local Self-Government in the Russian Federation.” Text with changes and additions for 2022 / Not available. — Moscow: Mechanical Engineering, 2017. — 178 p.
- Law and Economics No. 08/2008; Justitsinform - M., 2008. - 621 p.
- Conformity assessment methods No. 2 2007; Standards and quality - M., 2007. - 961 p.
- Yakovlev, V.N. Ancient Roman and modern Russian inheritance law. Reception of law / V.N. Yakovlev. - M.: Institute of Practical Psychology, 2005. - 128 p.
- Lyubov Aleksandrovna Sharnina Constitutional law. Tutorial; Prospect - M., 2000. - 761 p.
How to move a switch to another place with your own hands: instructions
Changing the location of a switch or other electrical point on your own can be done even by people who are vaguely familiar with electrics. The main thing is to follow safety rules and perform tasks one by one.
Tools
The set of required tools differs from the transfer method.
If you plan to carry it with a cable (for internal wiring), then you will need a tool for cutting - an angle grinder, a hammer drill or a chisel.
Additional required tools:
- dowels with clamps;
- insulating material or electrical tape;
- junction box;
- pliers;
- building plaster or putty;
- hammer;
- drill bits;
- cable.
Removing the old switch
Removal (dismantling) of the previous electrical point - switch is carried out in the following way:
- the power supply from the central circuit breaker of the apartment/house is turned off;
- the device keys are removed (depending on the type - 1,2 or more than 3);
- use a screwdriver (cross-shaped) to unscrew the bolts from the decorative box and inside (in the center of the block);
- the bolts are unscrewed and the core (core) is removed;
- checking the current (required even when the electricity is turned off);
- disconnecting wires;
- stripping contacts and cables, cleaning the socket box from dust and dirt, building mixture.
If you plan to move the location of the switch by laying a new cable from the junction box, then you don’t have to remove the old socket box, but simply seal it with cement mortar or plaster, cover it with wallpaper or other decorative finishing.
Output of a new wire
Laying a new cable in the base groove or output from the junction box is considered a reliable method from the point of view of safety and operation. However, carrying out the work requires time and labor reserves. Subsequence:
- Cutting off the power supply throughout the house.
- Opening the junction box and disconnecting the old wire.
- Removing the old switch.
- Sealing the previous groove with cement or plaster.
- Drilling a new groove and socket for a new location.
- Sealing the new nest with putty and installing the socket box on the wet mixture.
- Installation of dowel clamps in the groove at 50 cm from each other.
- Laying a new cable in the groove with further fixation.
- We stretch the cables to the junction box.
- The wires are connected to the new installation - a switch or socket, on the other hand they are connected to the junction box in place of the old wiring.
Installing the switch in another location
If you don’t want to do the repairs again throughout the entire apartment, but there is a need to move the switch to another wall of the same room, you can use the method of extending the wire.
To do this, the same actions are carried out with turning off the current and cutting to the new location of the point. The difference is that the cable coming from the junction box is not dismantled, and in place of the previous switch the cables are secured using the clamping method. Tips for working:
- The connection of new and old cores is done by fastening with clamp systems; the twisting will not last long.
- When twisting the cable, be sure to insulate it with electrical tape.
- The location of the box with the former switch will now be the location of the new junction box from which the cables come.