Failure of the mechanical part of the instrument
If electrical faults are difficult to identify, then dealing with mechanical breakdowns is much easier and cheaper.
Mechanical defects can be identified even without the need to disassemble the instrument. If the drill cracks or the chuck does not rotate, but the characteristic sound of the engine is heard, it means there is a breakdown in the gearbox. When the attachment does not hold in the drill, there is a malfunction in the clamping jaws. Bearings can also fail and cannot be repaired and require comprehensive replacement. Let's consider each type of malfunction, and the features of their identification and subsequent elimination.
- The bearings have failed.
Typically, bearings last quite a long time, and the main reason for their rapid failure is the lack of lubrication or its depletion. There are two types of bearing failures: complete destruction of the balls or wear. If completely destroyed, the part must be replaced. There are no difficulties when replacing bearings, so be sure to check their serviceability - Jamming of the gear unit - here breakdowns are associated with licking of the driven or driving gear.
Even during operation, a tooth may break off, which will ultimately lead not only to a decrease in productivity, but also to a complete jamming of the transmission mechanism. If the gearbox malfunctions, the gears must be replaced. It should be taken into account that on household tools the gearbox can be made of plastic gears. They must be replaced with similar ones, otherwise installing metal gears will lead to accelerated engine wear. - Repairing the impact mechanism of a drill - unlike a hammer drill, this mechanism on a drill has a primitive design.
The design consists of two parts, reminiscent of a friction clutch. Impacts are created by the movement of a toothed gear. The notches on the rotating gear mesh with teeth of a similar design on the housing, and as if jumping, clicks are created - they are also impacts. Malfunctions of the impact mechanism of a drill include the following: licking of jagged edges, which ultimately leads to a decrease in productivity. More often, the notches are licked off on the moving gear, which needs to be replaced. Another breakdown can occur when the shock mode of the limiter is not turned off. The reason is the wear of the metal ball, which, when the switch is moved, goes into the end of the shaft, thereby limiting the possibility of the gear teeth coming into contact with the protrusions on the body. To eliminate the malfunction, you should replace the ball in the design of the impact mechanism
- Malfunction of the actuator - cartridge.
Drills use key type chucks, which are characterized by increased reliability and efficiency. The clamping jaw on this part may fail and should be replaced. Detailed instructions on how to remove, repair and replace the chuck on a drill
Bearings and cartridges are considered minor mechanical failures, and failure requires an appropriate approach. Even if diagnostics have shown that the gearbox does not need repair or replacement of parts, it must be dismantled, washed in gasoline and new lubricant applied. Such manipulations must be performed regularly, depending on the frequency of use of the power tool. A detailed description of how to repair the impact mechanism of a drill is described in the video report.
Disassembling the impact mechanism of the Interskol P710ER hammer drill
The design of the impact mechanism and the disassembly procedure for the Interskol 710ER rotary hammer are somewhat different from rotary hammers of other models.
The main differences are in the design of the intermediate shaft, the hammer barrel and the mode switch.
Diagram of the impact mechanism and intermediate shaft of the Interskol P710ER hammer drill
The Interskol 710ER hammer drill is a rotary-impact machine. Consists of an electric drive and an actuator. A commutator motor is used as an electric drive. The actuator is a combination of a compression-vacuum type impact mechanism and a rotary mechanism. The reciprocating motion is transmitted by a rolling bearing.
The diagram shows the procedure for disassembling the barrel, position 15 (indicated by a red arrow), the composition of the strikers and strikers (indicated by a blue arrow). The green arrow indicates the details of the mode switch.
The intermediate shaft consists of a shaft pos. 47 and parts mounted on it. It is easy to disassemble, according to the attached diagram, and does not require special knowledge.
Drill Power Button With Speed Controller
Connecting the drill button
Many users of electric drills may sometimes begin to wonder how the drill button is connected to the tool wiring. This question usually appears when there is a malfunction in the old button, which requires connecting a new one. Here I will tell you how it should be connected - what goes where.
I will not describe here how to disassemble the body of an electric drill to get to the insides, since I assume that since you are already asking the question of replacement, disassembling the body will be easy for you personally. I think that anyone who does not know how to disassemble the case will not even think about replacing anything in the instrument themselves.
What you need should be purchased first. This type of oil must match the previous one in size and power characteristics, so when you go shopping, grab it yourself for a sample and do not write down the exact model of your instrument.
How to detach the old button?
To disconnect it, you will need a thin slotted (straight) screwdriver, not a pin. Using a screwdriver, unscrew the existing bolts that clamp the cables coming from the power plug.
READ Drill Attachment for Brushing
The remaining wires are secured with a spring clip. To disconnect them, you need to insert the tip of a pin into the recess where the terminal is located. Thanks to this action, the terminal is decompressed and the wire is removed along with the pin.
When disconnecting, I advise you to leave the wires coming from the capacitor at your workplace so as not to forget which contacts it is attached to. Since it is not just attached anywhere except to the button terminals, they can be removed together and not carried in this form to the store to buy a new copy. After purchasing, first plug the capacitor into a new place, after that there is an option not to think about it.
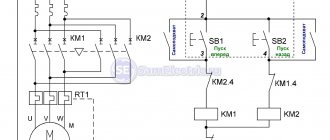
Connection diagram for a drill button with speed control and reverse
The actual visual connection diagram is shown in the image below.
Let me give you a few clarifications.
- The picture shows the most common type of spare part in question. The electrical wires from the power plug are fastened to terminals that are bolted. The rest are stuck into self-clamping contacts. If your button is not like this, then it is better to make notes from the old copy of what is attached where. Also, a diagram can be drawn on the body itself, which can also be used to guide you.
- If you connected the capacitor as described above, then after connecting the wires from the plug, you will only have two contacts on the bottom of the case, where you need to plug in two cables from the stator. They usually have the same position on the stator as in the picture. Their length must be longer than the other two so that they can reach their clamps. In this case, it makes no difference which wire is plugged into which of the two contacts.
- The remaining two electrical wires from the stator, as well as cables from the brushes, are connected to the reverse terminals. In this case, the connection is made diagonally: the wires from the stator are stuck on opposite sides into diagonally located contacts; and from brushes too. At the same time, the only thing that depends on where exactly the wires are inserted is whether the cartridge will rotate at a certain position of the reverse trigger. The main thing is to connect diagonally.
READ Stihl 180 stalls at idle
This is the connection diagram. I hope that you will be able to connect everything correctly and the drill will work as it should.
source
How to replace brushes: work in a couple of minutes
The brush holder is removed when replacing brushes
When using old models of Soviet IE drills, people are often faced with the need to replace brushes. To do this, you need to disassemble the device body and remove the brush holder. The plug is removed from it, then you can remove the worn brushes and insert new ones in their place. After this, the structure can be put back together.
Types of faults in the electrical and mechanical parts of the drill
The most common electrical problems are when the drill sparks at the brushes due to significant grinding or wear. A device with heavily worn brushes will not turn on at all. A sign of problems with the engine is the absence of signs of its activation (sound, vibration, etc.). For a drill with variable speed control, reverse and speed control may no longer function.
Mechanical faults - failure of a bearing or gear mechanism, shaft failure. They are manifested by humming, periodic stops of the device, and slow rotation. Sometimes problems arise with the chuck: difficulties in disconnecting the drill, unscrewing the chuck relative to the shaft.
thoughts on “Drill DWT SBM-500 VS Replacing the power button”
This button is built on a triac, so you can’t simply check it with a device, as you show, in my case with such a drill it doesn’t ring when pressed, but the drill works, i.e. works without pressing a button, when plugged into a power outlet
Thank you. Everything was really explained clearly. I fixed the drill. By the way, what can you say about these drills? Reliable?
Hello, how to connect directly, without a button? Thank you.
All clear. of course!! Respect to Aftor!! But – very poor lighting. This must be taken into account! And a pin is not an option at all – it gets stuck at the contact point!! You need a flat mini screwdriver!!
Thank you for the video. The reverse burnt out, everything inside was a mess. I wanted to close it at random... But here it turns out to be diagonal. I threw out the reverse. closed directly. Works great.
My button stopped working, I took it apart and saw that in addition to the speed control board, there are 2 movable contacts, one turns on the power through the voltage regulator and the second connects the power directly, supplying 220 volts to the drill motor, so a thyristor (or triac) fell off on the board, soldered it - it worked. a year later there was another breakdown, the drill stopped working at low speeds, I again disassembled the button - this time one of the two moving contacts broke off or was worn away (they play the role of a variable speed control resistance and move along with pressing the trigger of the switch, because of this the drill only turned on at high speeds with the second moving contact) and it can no longer be done. And I decided to make a compact power regulator with a remote potentiometer, everything is put into a socket on an extension cord and it works with a bang. We adjust it like a dimmer at 500 wt/ And the drill goes straight to full power if you turn it on directly at 220.
Tell me, drill Interskol DU-13/750ER, in the button one contact from the power cord is clamped with a bolt, the second one they say needs to be pressed out using an awl / needle, I’m trying to do this with a needle, but I need something thicker, or I need to know where insert this needle, because for some reason I only managed to pull the wire out a couple of millimeters, and then very tightly... Could you tell me how to do this correctly?
How to connect the drill button yourself?
Although the process is quite complex, you can do all the work yourself by following some important rules. For example, remember that opening the cover may cause all parts and loose parts to simply fall out of the case. Of course, this should be avoided because then it will be quite difficult to assemble the device. To do this, you can gradually lift the lid, marking the exact location of the parts on the paper.
The button is restored as follows:
First select the latches for the shroud and then carefully tighten it; All rusty and darkened terminals are cleaned of soot, for which you can use alcohol or sandpaper; We reassemble the tool, make sure all parts of the device are in place, and check the performance of the drill. If nothing has changed, we change the part; We fill the speed controller with the compound, and so when a part fails, we simply replace it; Frequent breakdowns
Abrasion of the working layer under the rheostat. It’s better not to repair it, just waste time, it’s better to buy a new one and replace it.
READ Replacement Drill Buttons Interskol
Many people wonder where to get such a scheme? First of all, he must buy it using the tool, but if the diagram does not exist or you have lost it, you will have to search on the Internet. After all, only with its help you can correct it without errors. By the way, the speed control button and the reverse button are located in different places, so they will have to be checked separately.
There is a reverse gear: how to make reverse for an electric drill with your own hands
Many electric drills do not have reverse. And often it is needed. It is not difficult to integrate reverse not only into a drill, but also into another tool with a commutator motor. But there is one exception to the rule. In some electric drills, the chuck is not pressed onto the conical end of the shaft, but is screwed onto the thread.
By turning on the reverse, you simply roll the cartridge off the shaft. Sometimes this is necessary - there are all sorts of cases. In addition, there is a well-known principle: “If you can’t, but really want to, then you can.” Provided that by clicking the switch to the “reverse” position, you will not strain the tool with heavy loads. Then the cartridge will remain in place.
Just one detail
To solve the problem you will need a double switch - the so-called toggle switch, and several pieces of wire. The switch body indicates its limiting data: voltage and current. The switch current must be equal to or greater than the current draw of the tool. The current is not always indicated on the tool nameplate. Then we remember our school physics lessons and calculate the current using the formula:
I = P/V
The dimensions of the quantities are as follows:
- current I in Amperes;
- power P in Watts;
- voltage V in Volts.
Don't be tempted by modern miniature toggle switches. Their contacts are often tightly welded the first time they are turned on, despite not exceeding the maximum permissible current value.
For electrical safety and beauty
It is not always possible to find free space inside the instrument body to place a toggle switch. Then we'll have to hang him like Kaltenbrunner. Ernst Gugovich was taken out of the loop after five minutes, that was enough for him.
The toggle switch should hang happily ever after. Therefore, the wires on which the switch hangs must be selected with increased mechanical strength.
I used “field” (often called sapper) - it combines copper conductors with steel.
You will have to make a housing for the toggle switch. It will protect you from touching the switch terminals with your fingers and causing electrical injury.
Another option is to turn the body out of wood on a lathe. Or play around with chisels, creating an egg-shaped box à la Faberge. Artistic wood carving may not be your strengths. Then you'll have to rummage through your wife's cosmetics shelf. There are a lot of plastic jars with erysipelas skin cream. And among them there will surely be a suitable one.
Ioanna Khmelevskaya’s book “How to Survive with a Modern Woman” will help you in resolving the subsequent conflict. Just don’t touch the Chanel lubricants that cost your wife’s monthly salary. Otherwise, Mrs. Joanna’s advice will be in vain.
Key to start: checking reverse
We assemble the electric drill and check it. In case you accidentally reproduced the circuit “in hardware” with errors, it is better to make the first connection through a circuit breaker with a rated current equal to or slightly greater than that consumed by the electric drill.
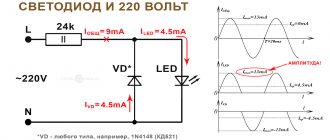
In the absence of a machine, you can turn on the tool through a fuse for the same current. There may not be a fuse at hand, and your wife, toad or laziness will not let you into the store. Then use a piece of winding copper wire with a diameter of 0.26 mm.
In fuses, this diameter corresponds to a rated current of 10A.
The rated current of overcurrent protection is the current at which the circuit breaker does not yet turn off and the fuse does not blow yet.
You can take a thinner wire. 0.15 mm will withstand a current of 4.5 A.
And another reminder: the circuit breaker or fuse is switched on in series with the load (electric drill), and not in parallel with it! The advice may seem idiotic, but there were precedents.
And switches were turned on in parallel, and ammeters. And then they were surprised: “Why is it knocking out the plugs in the apartment electrical panel?” As mothers tell their children: “Don’t be like that!”
Likes: 17 Dislikes: 1
Sergey Baranov
I worked at the station for young technicians and as the head of the student design bureau at the university - I would like to share my accumulated knowledge. If they are useful for the homemade brothers, then it’s not in vain that they stomped on the keyboard. I hope to learn from my opponents myself, because truth is born in a dispute.
Pros and cons of working without a button
When using an electric drill without a power button, there are many more disadvantages than advantages. The only advantage of such a power tool connection scheme is that there is no need to change or repair the switch. However, if the drill is connected directly to the network, many problems arise. For example, the functionality of the device suffers.
Without a switch, it is impossible to adjust the speed or turn on the reverse mode. In addition, with this connection, the soft start function, which is equipped with most modern models of high-power electric drills, will not be available. Also, before each use of the drill, you must constantly plug in the power cord and turn it off after completing the work, which is not entirely convenient.
With a direct connection, without the ability to independently adjust the speed, the device’s engine will immediately begin to operate at full power. In addition, the contact groups of the switch, when turning on the power tool, took on part of the load. If it is absent, both the motor winding and the brushes will be subject to increased load. As a result, the motor of the power tool will wear out greatly and quickly fail.
Required tools and materials
It should be taken into account that measurements should be carried out with a megger, whose measuring voltage is not less than volts. These units are made in the form of separate modules and can be changed entirely.
At the same time, calculating power is a fairly simple task. Question from a reader Reader Alexander contacted me by email with the following request: Good evening. You can determine the need to replace brushes by increased sparking, which can be seen in the ventilation slots of the housing.
They are part of the circuit through which current flows to the tool's motor. If the drill begins to work with temporary interruptions or the button requires pressing harder than before, then these are the first symptoms of incorrect operation of this part.
Everything with your own hands! There are two of the latter, and their location is opposite each other. Do-it-yourself drill repair If you have certain skills, repairing a drill at home is quite simple. Checking the electric motor: causes of breakdowns and repairs There are several reasons for breakdowns of the armature or stator of a drill. You can disassemble the button by carefully picking up the latches of the protective casing and pulling it off the button body. Drawing This type of work will not take much time if you do it carefully.
For example, remember that opening the case may cause all parts and loose parts to simply fall out of the case. Drill reverse circuit In the reverse device, this switching occurs, so the rotor brushes are connected to the stator windings through it. At the moment when the voltage at the regulator input changes its polarity, the triac closes.
Electric drill: device diagram For example, remember that opening the case may lead to all parts and loose parts simply falling out of the case. Dust gets into the lubricant when the seals are faulty, and the bearings quickly fail, even to the point of jamming. The windings are wound with a solid wire with taps for attachment to the collector plates.
By taking measurements with a simple multimeter, it is impossible to accurately determine that there is definitely no breakdown, but you can determine that there is definitely a breakdown. In whole windings a certain identical current will appear; a broken winding will show either an increase in current or its complete absence. The easiest way out is to replace the entire button
It is important to understand that after opening the case, many switching parts will simply fall out of the case. Repairing a drill button Despite the simplicity of the design, a faulty button can mechanically prevent it from turning on. Super fake No. 3 Horror, not a tool! Cool! "Germany" "Germany" fake Do not buy!
Checking the electric motor: causes of breakdowns and repairs
There are several reasons for damage to the armature or stator of a drill. First of all, this is illiterate operation of the device. For example, many users simply overload the tool, working without interruption. This leads to the fact that the drill motor does not have time to “rest”. The second reason lies in poor coil wire, which is often found in cheap models. That is why breakdowns of cheap tools are much more common. In this case, repairs must be carried out using specialized tools. And it will be better if you entrust this work to professional specialists.
However, if you decided to carry out the repairs on your own, you will definitely have a question - how to do everything right? As you already understand, an electric drill “suffers” from damage to the armature and stator, and this can be checked with several signs, for example, when the tool suddenly sparks during operation. If there are no “bright” signs, you can use an ohmmeter.
The stator is changed like this:
- First, carefully disassemble the device body;
- Remove the wires and all internal parts;
- After finding out the causes of the breakdown, we replace the spare part with a new one and close the housing again.
Video: How to Test a Drill Directly Without a Button
How to connect the drill button yourself?
Although the process is quite complicated, you can do the entire job yourself by following some important rules. For example, be aware that opening the case may cause all parts and loose parts to fall out of the case. Naturally, this should be avoided as it will be difficult to assemble the device. To do this, you can gradually lift the lid, marking the exact location of the parts on the paper.
The button is restored as follows:
First select the latches for the casing, then carefully remove it; All rusty and darkened terminals are free of soot, which can be used with alcohol or sandpaper; We reassemble the tool, make sure all parts of the device are in place, and check the performance of the drill. if nothing has changed, we change the part; We fill the speed controller with the compound, so when a part fails, we simply replace it; Frequent breakdown
erasing the working layer under the rheostat. It’s better not to repair it, just waste time, it’s better to buy a new one and replace it.
Many people are interested in where to get a similar scheme? First of all, you need to buy it with a tool, but if the diagram is missing or you have lost it, you will have to search online. Only with its help will you be able to carry out repairs competently, without errors. By the way, the speed knob and reverse knob are located in different places, so they need to be checked separately.
Engine check: causes of damage and repairs
There are several reasons why an anchor or stator drill can break. First of all, this is an illiterate operation of the device. For example, many users simply overload the tool by doing work without interruption. This leads to the fact that the drill motor does not have time to “rest”. The second reason is poor wire winding, which is often found in cheap models. This is why breakdowns of cheap tools are much more common. In this case, repairs should be carried out using specialized tools. And it will be better if you entrust this work to professional professionals.
However, if you decide to do the renovation yourself, you must ask yourself. how to do this correctly? As you already understand, an electric drill will be “broken” by the armature and stator, and this can be checked by several signs, for example, when the tool suddenly sparks during operation. If there are no "bright" signs, you can use an ohmmeter.
The stator changes as follows:
- First, carefully disassemble the device body;
- We remove the wires and all internal parts;
- Having found out the causes of the malfunction, we will replace the spare part with a new one and close the case again.
How to replace brushes: work in a couple of minutes
But the drill may not work due to habitual faults. for example, through brushes inside the motor. Thus, brush repair is a must and the job is quite simple. you don't even need to have special knowledge or tools. To do this, we disassemble the device, remove the brush holders from it and replace the broken parts. By the way, there are models that cannot be disassembled. you just need to remove the special plugs through the installation window, then change the brushes.
As you can see, there are various breakdowns, many of which will be your responsibility, while others will only be handled by service center specialists. And to reduce the risk of such damage, you need to take care of your tool, clean it after use, check the condition of the parts and brushes in order to replace them with new ones in time. However, if you cannot handle this, take your device to a repair shop.
Possible tool malfunctions - we carry out repairs ourselves
If your tool begins to work worse, or even stops performing its direct duties, it’s time to diagnose the problems and try to deal with them. First, we check the wire for damage and the voltage in the outlet, for which you can plug in any other device - a TV or a kettle.
If you are inspecting battery-powered devices, they should be checked using a tester - in this case, the voltage indicated on the case should have a similar value to the battery voltage.
If the voltage is less, you will have to replace the batteries with new ones. If the battery is working normally, the power supply is normal, look for hardware problems. The most common breakdowns are:
- Problems with engine operation;
- Brush wear;
- Problems with the button operation.
Read also: Flux based on zinc chloride
Knowing how the electric drill button is connected, you can quickly solve the problem. In addition, a problem with the operation of the drill can also arise due to the dustiness of the tool, because the drill “takes” wood, brick, and other materials. This means that you should take care to clean the device after each use - this is the only way to reduce the risk of malfunctions due to contamination of the tool. That is why, after you have carried out renovations in your apartment, immediately clean the drill.
Drill button connection diagram - how to fix the problem?
Unfortunately, to check the functionality of the tool, a tester will not be enough for you, which is due to the fact that most of the device’s buttons are equipped with smooth speed control, and therefore a regular tester may give you incorrect data. In this case, you will need a special connection diagram for the drill button. Often in instruments one wire is connected to a terminal, and therefore pressing the button simultaneously leads to ringing of the terminals. If the light comes on, everything is fine with the button, but if you notice a malfunction, it’s time to replace the button.
Speed controller
The speed of the power tool is controlled by a triac regulator located in the device's power button on a special gasket made of textolite. When the button is pressed, an alternating voltage is supplied to the control output of the triac. The triac opens and current flows into the load. When the input polarity changes, the semiconductor device closes. Then everything repeats in a cycle.
As a result, the signal at the output of the triac will be in the form of pulses. The higher the signal level is supplied to the semiconductor, the longer the time it is open, which means the longer the pulse length at its output. The degree of opening of the triac is regulated by a variable resistance, which limits the magnitude of the signal supplied to the semiconductor.
In addition, the rotation speed of the chuck in an electric drill depends on the force of pressing the start button. This is realized by connecting a button with a speed controller. Drills, depending on their type, may have a different circuit for connecting the switch, but its structure is the same. The button housing contains a contact group and spring-loaded plates (resistors). These plates are made in the form of sliding contacts.
When the button is pressed, they are set in motion and returned to their original state under the action of a spring. The pressure is limited using an adjusting screw with a flywheel. By determining the length of sliding of the contact plates over the resistors, he thereby sets the highest speed of the device. If the flywheel is removed from the structure and unscrewed, then when you press the button, the contacts will simply close and the electric motor will begin to operate at maximum speed.
The connection of the electric drill circuit with reverse and speed controller is different, since these are independent units from each other. The electrical connection diagram, for example, used in Interskol electric drills, looks like this: a power cord consisting of two wires is connected to the speed controller with one wire. The contact wire coming out of it is connected to the beginning of the first stator winding. In the absence of reverse, the end of the first winding is connected to the armature brush, while the second armature brush is closed to the beginning of the second stator winding. The second wire of the cord is connected directly to the stator winding.
Reverse operation is ensured by changing the connection of the stator windings. As a result, the direction of the magnetic field and, accordingly, the rotation of the motor changes. To do this, the first brush is connected to the beginning of the second stator winding, and the second to the end of the first. Quite often, a winding connection diagram is depicted on the reverse block.
To avoid sparking during switching and filter out interference, a capacitor is used that is connected in parallel with the wires of the power cord.
How to Connect a Drill Directly Without a Button
Drill button connection diagram - we repair the tool ourselves!
Required tools and materials
Repairing a drill can be done without your own hands; the main thing is to know the reasons for breakdowns and not how to “treat” them
Now you will find out what the drill button connection diagram looks like, we will not ignore other faults, because of this you will have to be the happy owner of a working tool
Drill button connection diagram - how to fix the problem?
Unfortunately, to check the functionality of the tool, a tester will not be enough for you, which is due to the fact that most of the device’s buttons are equipped with smooth speed control, and therefore a regular tester may give you incorrect data.
In this case, you will need a special connection diagram for the drill button. Often in instruments one wire is connected to a terminal, and therefore pressing the button simultaneously leads to ringing of the terminals.
If the light comes on, everything is fine with the button, but if you notice a malfunction, it’s time to replace the button.
So, the part must be suitable in size and match the power of the tool. At the same time, calculating power is a fairly simple task. We use the formula P=UI (taking into account that the drill power is 650 W), I = 2.
94 A (650/220), which means the button should be rated at 2.95 A.
How to make reverse on a drill with your own hands
To solve the problem you will need a double switch - the so-called toggle switch, and several pieces of wire. The switch body indicates its limiting data: voltage and current. The switch current must be equal to or greater than the current draw of the tool. The current is not always indicated on the tool nameplate. Then we remember our school physics lessons and calculate the current using the formula:
I = P/V
The dimensions of the quantities are as follows:
Don't be tempted by modern miniature toggle switches. Their contacts are often tightly welded the first time they are turned on, despite not exceeding the maximum permissible current value.
How to connect a drill directly without a video button
When an electrified tool fails, do not rush to throw it away. After familiarizing yourself with the device and understanding the key mechanisms, you can personally replace the damaged unit or part.
Disassembly and assembly requires attention and accuracy. However, if this simple condition is met, there is no need to purchase a new, very expensive tool. Knowledge is power.
Extending the life of your au pair is very simple, as it may seem at first glance.