Relocating an electric stove socket
How to move a socket for an electric stove to a new location? This question often arises during a kitchen renovation. After all, an electric oven is a fairly powerful energy consumer, and improper handling of it can lead not only to its breakdown, but also to a fire. Therefore, this issue should be approached in good faith, and we will help you do everything correctly.
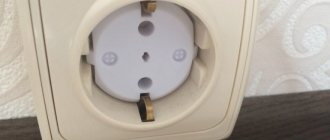
What kind of outlet should there be for an electric stove?
For an electric stove, you should buy a grounded outlet. The power supply in the house can be single-phase, three-phase and rarely two-phase. Based on this feature, you need to select a socket that has the necessary contacts and lay the appropriate power cable.
Interesting materials:
How to clear the built-in memory on Android? How to clear the built-in memory of an Android phone? How to clear the built-in memory? How to clean grease from a kitchen hood? How to clear a clogged file? How to clean a dirty sofa? How to clean Suede from a ballpoint pen? How to clean suede sneakers? How to clean suede sneakers? How to clean suede on sneakers?
Extension cord for electric stove
The easiest way to move an electric stove or hob some distance from a power outlet in the kitchen is to use an extension cord.
Everything is simple here, we plug the extension cord into the existing socket, connect the connector itself to the new installation location of the stove, and this, in fact, completes the transfer.
The main advantages of this transfer method are:
- Simplicity. Using an extension cord, any person who does not have any special knowledge and skills in electricity and electrical installation can easily move the outlet for the stove to the place they need.
- Low cost. This solution will most likely be the most cost-effective, because you will only need to buy an extension cord for the electric stove.
Unfortunately, this method also has serious disadvantages that make this method of transfer undesirable:
— Lack of extension cords for electric stoves . It is quite difficult to find an extension cord for an electric stove on sale, especially if a three-phase connection is used. Since the electric stove is the most energy-intensive device in the apartment, the extension cord uses a large cross-section cable, as well as a special power outlet designed for high current. In addition, a large variety of power connectors of various types complicates the selection task.
Most likely, you will have to assemble such an extension cord yourself by purchasing the appropriate cable, plug and socket.
— Unreliable connection . When using an extension cord, several unnecessary connections appear in the power supply circuit of the electric stove, some of them detachable, which sharply reduces the reliability of the entire system. There is a high probability of contacts loosening and heating, which often leads to fire.
— Possibility of mechanical damage to the power cable . When moving an electric stove, the electrical cable is most often laid openly, simply placed on the floor or passed through furniture, for example, across a kitchen unit. In such conditions, there is a high probability of mechanical damage to the cable under various circumstances - this could be rodents, chafing of the cable, pets or children, or simply a break as a result of careless work nearby.
- The appearance of the room is spoiled. In everyday life, we are surrounded by many electrical appliances, all of which are plugged into an outlet. The kitchen is probably one of the most loaded rooms with various equipment; if you do not organize the connection points correctly, you can simply “drown” in the wires; they will interfere not only with cleaning the room and moving around it, but also simply irritate you with their appearance. Therefore, an extension cord for an electric stove lying on the floor will not add attractiveness and practicality to your kitchen.
— Possibility of electric shock to a person . Elements of electrical wiring accessible to people, which include an extension cord, are dangerous in themselves because they can, under certain conditions, for example, if the insulation is damaged, cause harm to human health through electric shock. In addition, due to the presence of water in the kitchen, these risks increase significantly, because pipes or plumbing fixtures may burst, and, what happens even more often, your neighbors above may flood you. In such conditions, using an extension cord becomes especially dangerous.
As you can see, this method has more disadvantages than possible benefits; the extension cord should be used only as a temporary solution, until the implementation of a more reliable, complete, comprehensively safe one, such as those presented in the following paragraphs of our article.
Strobe laying technology
Strobe dimensions
The dimensions of the groove can be chosen arbitrarily, and given the negative consequences of creating a groove and its subsequent sealing, it is better to choose the minimum dimensions so that the wire can fit in the channel. In most cases, this is true, but in practice it is unlikely to be possible to maintain certain dimensions of the groove along its entire length. So some numbers will come in handy.
- The depth and width of the groove should be 1–1.5 cm larger than the diameter of the wire.
- The depth of the channel, in any case, should not exceed 5 cm. The point here is that the thickness of each layer of the mixture used to seal the groove should not exceed this size. To apply subsequent layers, the underlying ones need to set. All these forced downtimes can prolong the repair process for a long time.
- It is almost impossible to make a small groove in concrete of 1–2 cm, especially in heavy concrete with a large fraction of filler.
- The width of the groove largely depends on the tool used. If it is a wall chaser or a hammer drill, then making the gate width narrower than 2 cm simply won’t work.
What and how best to do it
Definitely, with a wall chaser using a cyclone-type vacuum cleaner. Working with an angle grinder and the same vacuum cleaner will take a little more time, but still, these two methods of cutting grooves are the fastest and cleanest.
Further, everything only gets worse. A hammer drill, a drill, a chisel, whatever you choose from this list will turn out slow, sloppy and destructive to the wall material adjacent to the channel.
How to connect a new point from the panel
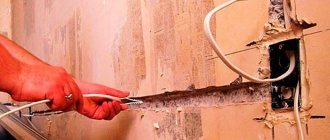
To carry out this operation, a niche for the socket box is drilled and a groove is selected for laying the conductor. It is possible to run the line directly from the distribution board.
Then proceed as follows:
- the network is de-energized;
- the previous device is removed, including from the wire;
- the insulation is removed from the cable conductors;
- Copper wires are inserted into the niche and connected;
- a socket box is installed;
- the device is connected to the conductors and fixed in the box;
- The niche is closed, the surface is finished.
Advantages:
The wire cross-section can be selected independently, so it is possible to connect high-power devices. This unit is very reliable.
Minus:
significant installation costs.
When laying a new wire, it is necessary to leave some margin at both ends. This will ensure the quality of the connection. Connection is made using terminals with screws or springs. “Phase” is attached to the left clamp, and “zero” to the right. The “ground” is connected to the “whisker” terminal located on top of the housing.
Wire extension options
You can install the socket at another point by extending the wire. Performing such a transfer is quite simple. There are two options for extending wires, which depend on the cross-sectional shape of the wire strands and the characteristics of the manufacturing material.
To move the socket you will need to make a wire extension
Using terminal blocks and spring terminals
Connecting the wires with terminal blocks and spring terminals is not at all difficult, since no auxiliary tools are needed.
Self-clamping spring terminals have a lever mechanism. To connect, you just need to strip the wires, insert them into the hole and secure them. Such connecting devices are used for conductors made of aluminum and copper. Spring clamp terminals are available for disposable and reusable use.
Terminal blocks are a group of metal contacts with fastening units, which are located in a special housing made of a material that does not conduct electricity. Such connecting elements are selected according to the cross-sectional diameter of the cores.
Their use is not recommended for wires with an aluminum core, since such material tends to break easily. The cleaned cores are inserted into the block on both sides and pressed with special screws.
Spring terminals and terminal blocks provide reliable fastening of electrical wires.
By fixing with plastic caps
Plastic insulating clips - PPE are quite practical for everyday use. Their main advantage is ease and reliability of use. Inside these caps there is a galvanized spring, and the body is made of non-flammable material.
Siz fasteners are available in various shades. A variety of colors allows you to mark all the necessary connections - “grounding”, “zero” or “phase”. The cores are fixed inside the cap by springs.
By twisting and soldering
To connect the wiring in this way, you need a soldering iron. Initially, the ends of the cores required for alignment are stripped and twisted together. The joint is then dipped into the molten hot solder. After cooling, the intertwined areas are wrapped with a special insulation tape. It is not recommended to cool wires in cold water. After a sharp temperature change, the quality of soldering deteriorates.
Methods for transferring a connection point
There are two simple methods that allow you to transfer sockets without destroying the wall finish:
- By creating a loop - involves creating a jumper from the old “point” to the new connection point.
- By extending the wire - involves extending the electrical line in the cavity of the new groove.
If the new chosen location is much further than the previous one, you can make a complete replacement of the entire line by laying a separate wire from the distribution box located at a slight distance. But, unlike the two methods described above, laying a new line requires large-scale repair work.
When choosing a daisy chain method for connecting a new outlet, keep in mind that such a connection is very unreliable for installing three or more power points. If one section or socket is damaged, the entire sequential chain of devices will be inoperative. And, according to the rules of the PUE, it is not allowed to be used to power powerful electrical appliances: microwaves, electric stoves, refrigerators, washing machines, etc.
Another negative side is that when two sockets are connected with a single cable, the current load sequentially passes from one device to another. Therefore, when several devices are plugged into sockets connected through jumpers at the same time, there may not be enough voltage for their operation.
FAQ
Question No. 1: How can you create a reliable connection of wires when moving a socket at home? The simplest and most affordable methods are crimping and soldering. To perform crimping, special pliers and a sleeve crimped on both sides, made of the same metal as the wire, are used. Question No. 2: What can result from poor quality work? When moving an outlet, each step should be taken responsibly. Otherwise, there is a high probability of sparking, melting and ignition of parts of the housing, and a short circuit.
Features of the household appliance
p, blockquote 18,0,0,0,0 —>
When choosing a power outlet or a connector for it, you need to understand that such fittings are intended to work with high-power equipment. The ability to pass a large current through themselves, in comparison with conventional household devices, is considered their main feature. For example, simple sockets can be used with a load of up to 16 Amps, with a voltage of 220V.
p, blockquote 19,0,0,0,0 —>
Power fittings are marked as 32A 220V, 40A 220V. Using it with current and voltage exceeding the rated values will lead to heating of the terminals, wire connections and melting of the plastic fittings.
p, blockquote 20,0,0,0,0 —>
The socket for the high power induction cooker has a working mechanism, an outer decorative cover and connecting screws. When disassembled, you can find reinforced terminals for connecting the power wire at the input, and at the output there are corresponding contacts that transmit voltage through the plug to the household device.
p, blockquote 21,0,0,0,0 —>
If the distance between the stove and the wall is minimal, it is advisable to opt for an internal socket in order to prevent the wires from bending and coming into contact with the surface of the device.
p, blockquote 22,0,0,0,0 —>
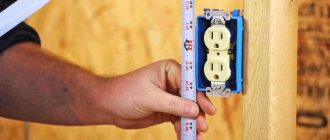
Preparation for installation
Let’s try to answer the question that worries many: “How to make a socket with your own hands?” Since this process is not simple, we will explain in detail each working nuance.
A separate power supply line is provided to power the electric stove. It follows from the regulatory documents that for a furnace with a power of up to 8 kW, it is desirable to have a separate circuit breaker with a rated current value of 25 amperes.
At the second stage, the selection of wires takes place, so copper must have a cross-section of at least 2.5 mm^2, aluminum - from 4 mm^2.
If it is impossible to connect a separate power line and you plan to connect the electric stove to the general apartment network, then, according to the standards, it must be powered from a machine that conducts a current of 40 amperes.
Replacing the power supply cable for an electric stove from the panel
The most reliable, but at the same time, the most expensive option for moving an electric stove socket is laying a new electrical cable from the electrical panel to the required installation location .
At the same time, you get a solid cable that does not have unnecessary connections, damage, wear, etc. is the best way to move a stove socket. In addition, you can install a larger cable and use a more powerful electric stove or hob.
The advantages of this method are obvious:
- Reliability. Having decided to lay a new cable from the electrical panel to the new installation location of the power outlet, subject to all the rules for choosing a cable and laying the wiring, you will receive the most reliable solution that will satisfy all possible requirements and will serve you for many years.
The disadvantages include:
- Price. Laying a new line to the stove outlet will be the most expensive and labor-intensive method. This price is for maximum reliability.
— Installation time. Complete replacement of the electrical wiring to the electric stove socket from the input panel is a long process. If you follow all installation rules, and also take into account the future visual appeal of such an installation, you need to put in a lot of effort, which will accordingly take a sufficient amount of time.
Most often, the power cable for an electric stove is replaced entirely when a complete renovation is carried out in an apartment or house. In cases where complete confidence in the wiring is required, when it is possible to combine the transfer with general reconstruction and quickly repair all possible damage.
The most optimal, in my opinion, option for moving an outlet for a hob or electric stove is to extend the existing cable and lay it to a new location for installing the outlet , in accordance with all the rules and regulations of electrical installation.