May 26, 2020
Every person from time to time needs to change the interior or simply move an electrical appliance to another, more suitable place. In such cases, you have to change the location of electrical outlets in the house or move one of them, for example, to another surface. To perform such work, you can, of course, call a specialist to your home, or you can move the socket yourself. This procedure is quite simple - no special skills are required. You just need to carefully study all the stages of the work ahead and carefully follow the instructions, as well as observe safety precautions.
Safety standards come first
Before you start moving sockets in your apartment, you should definitely familiarize yourself with the following safety standards.
Before starting work, you will need a wiring diagram for the apartment. If there is none, then you can find the old wiring using a non-contact indicator. This procedure is required to dismantle old wires and install new ones carefully, without damage.
Be sure to turn off the machines in the panel located at the entrance to the apartment, breaking the connection of both the “zero” and the “phase”. If only one wire is disconnected, then use an indicator screwdriver or multimeter to make sure that no current is being supplied.
If complete de-energization of the wiring is not possible, it is imperative to use dielectric gloves for any action and exercise extreme caution to avoid short circuits. In the absence of lighting, a battery-powered flashlight is used.
It is permissible to move the socket with your own hands using a cable with a cross-section of at least 1.5 square meters. mm.
The cable can only be laid vertically and horizontally. If the installation is horizontal, the distance from the ceiling should not be less than 20 cm, and not less than 10 cm from the cornices and beams. If the installation is vertical, the distance from corners, as well as windows and doors, is at least 10 cm.
Sockets are placed at a distance of 0.5-0.8 m from the floor, and 0.5 m from heating radiators, steel pipes and gas appliances.
Connections of cable branches must be made in special housings - boxes. Terminals (clamps) are used for any connections—tightening the wires just like that is strictly prohibited.
A new socket is mounted from 80 cm to one meter, sometimes up to one and a half meters.
Dangerous moments
Safety precautions are written for a reason, but for our safety. The price of irresponsibility in electrical matters is too high. Due to the lack of experience and skills, beginners often commit dangerous and even fatal actions when moving a new location of an electric point:
- Twist the wires without insulation and without bending, but simply beating them around each other several times.
- Connect copper and aluminum without adapters.
- They install cables of different sections without calculating the degree of load on the network.
- Perform work without turning off the current.
- They do not test the current in the cable.
All of these parts are dangerous and can cause irreparable harm to both human health and the building. A short circuit or lack of contact, and, as a result, a broken switch is the most harmless thing that can happen.
Comfort in the home is a number of factors, including both the appearance of the room and the functional equipment. If a new switch near the TV or at the base of the bed is not enough for comfort, the electrical point is moved. There are several methods for this process, each with its own characteristics, advantages and disadvantages.
How to move an outlet
After studying safety standards and drawing up a preliminary diagram, the home master is faced with the question: how to properly move the outlet without disturbing the wall decor? A household socket has a dielectric base inside and a front panel on the outside. Dismantling the old socket begins with the front panel - it must be removed, that is, using a screwdriver, unscrew the screw with which it is attached to the dielectric base. In some types of models, the panel is secured to the inside using latches. In this case, you can pry it off with a knife with a thin blade. The front panel also needs to be removed when wallpapering a wall. In this case, the base of the socket is not removed from the installation box. Once the panel is removed, the dielectric base becomes accessible. Spacer tabs securely fix it in the box. By loosening both screws securing the tabs using a screwdriver, the dielectric base can be removed. Then the socket must be disconnected from the network wiring. The socket should be carefully inspected for damage, and if any is found, replace it with a new one.
Possible causes of malfunction
To start repairing, you need to follow the following algorithm:
- Check all outlets. If one product does not work, they look for the reason in it.
- The electrical circuit is susceptible to breakage in weak points, for example, when connected by twisting or unreliable insulation. If everything is fine in the electrical outlet, a break is looked for in the junction box.
- Find out how the voltage went out - the devices stopped functioning or the machine was triggered before that.
- Determine whether the outlet is regular or special for high-power electrical appliances.
In one room there is light, but the socket does not work
The most common problem is when the lights in the room turn on, but the sockets do not work. At the same time, voltage is supplied to other rooms. Possible reasons for inoperability:
- exceeding the permissible load;
- failure of a cable section.
It is necessary to check the electrical wires in the panels, the working part of the power points. If the cable breaks or breaks, call an electrician, as new wiring may be required.
The most common problem is careless installation or damaged insulation. In this case, the indicator will show a power failure in the faulty area.
One outlet does not work, but the rest are working in one room
When one power point does not work, the cause may be a loose connection or melted insulation.
If during a visual inspection the cover is melted and the socket does not function, then the contact wire has burnt out. When disassembling the device, the burnt area is visible.
The problem may be in the wire itself, then you need to inspect the cable, check the condition of the core and insulation.
If overheating occurs repeatedly, there is a high probability of destruction of the core, so you will have to replace the faulty piece.
If the insulation breaks, put a cambric or electrical tape on the exposed area. Darkened contacts are carefully cleaned with sandpaper.
Another cause of failure is a short circuit (short circuit). A short circuit is determined simply - the closed section of the conductor is missing, and the inner part is covered with an oily coating. In this case, the socket cannot be repaired - only replaced with a new one.
The socket in the kitchen near the stove or hood stopped working
A stove, hood, and washing machine are appliances with a power above 2000 Watts that require separate sockets. The most common problem is choosing the wrong power point, which is designed for less power. In this case, replace the electrical outlet with a new one with the required value.
If the permissible power is exceeded, the wire may break. The problem should be fixed by a professional.
A separate machine is installed for powerful devices. It can be triggered by a current drop. To return the voltage to the outlet, you need to look at the machine and turn on the toggle switch leading to the kitchen.
What to do if the socket itself is broken, but there is voltage
Before starting repairs, make sure that the outlet can be repaired. The burnt device is replaced with a new one. If there is no voltage when checking with a multimeter, the wires are checked. After making sure that everything is in order with the conductors, proceed with the repair.
To repair you will need:
- screwdrivers;
- sharp knife;
- insulating tape;
- pliers;
- multimeter
Procedure:
- Before carrying out work, turn off the power to the apartment. It is prohibited to repair a live power point.
- Unplug devices from the electrical outlet.
- Use a screwdriver to remove the housing.
- Unscrew the clamping bolt and check the quality of the connections. Loose contacts are strengthened.
- Trim the melted ends with a knife or wire cutters. Repair damaged insulation using electrical tape.
- If the clamping bolt is broken, install a new one.
- After troubleshooting, reassemble the socket.
- Turn on the electricity and make sure the problem is corrected. To do this, you need to connect a low power device. If the outlet works without unusual sounds or odors, the repair was successful.
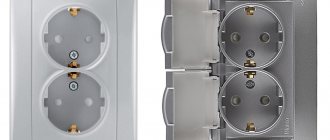
Socket selection
According to Russian standards, a socket used in everyday life must meet the following criteria:
- mains voltage from 220 to 240 volts;
- current strength from 10 to 16 amperes. For powerful devices, use devices rated at 32 amperes or more, which have more powerful contacts.
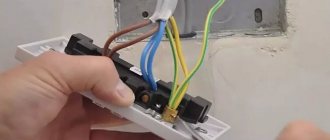
If the cable has a grounding conductor, then the socket must also have a grounding contact. A grounding conductor is an indispensable condition when the air in the house is too humid. In addition, when connecting electrical appliances with high power and those associated with the use of water. The wires are attached to the outlet using screws or clamps.
If the fastening is screw, then the wire:
- must have a loop bend;
- have a direct configuration.
In the first case, you need to use pliers to bend the ends of the wires in the form of loops, completely unscrew the screws of the clamps and screw them back when the loops are inserted. This process is quite troublesome, but the socket is connected firmly and reliably. In the second case, everything is much simpler: the end of the core is stripped (the insulation is removed), then the core needs to be tucked into the guide hole and screwed in with a screwdriver. The screwless fastening is connected without hassle: the wire, stripped of insulation, must be inserted into the guide hole of the spring clamp. Automatic terminals guarantee reliable contact and good connection.
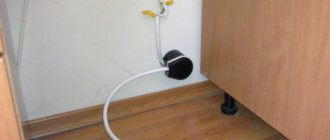
Wire routing.
A cable is laid into the prepared “glass” along a hollowed out groove (groove in concrete), which will supply the stove with electricity.
A violation of the established norms and rules for moving sockets is the presence of connections on the line. It would be best to replace it, especially if a fairly large extension is required. It is also strongly recommended to make an installation reserve when running the cable from the junction box in order to avoid repeated work if this wire needs to be extended again. In reality, this is usually difficult to implement, so preference is given to connecting such a cable, which, according to the PUE, can be done by crimping, welding, soldering or using compression. For self-extension, clamp terminals are usually used, since the first three connection methods require special equipment.
The terminals are:
- Quick-clamping or screw with special brass tips - if you need to connect flexible copper conductors;
- Self-clamping - if you need to connect an aluminum wire.
Conductor shortening method
Sometimes it is possible to use wires from used wiring. Typically, this procedure is relevant when the displacement of the device is close to the distribution box. For a new device, the wall must be drilled using a special drill bit. Having dismantled the used socket, all contents are transferred to a new location. The further workflow is as follows:
- bend the wire and drill a hole in the wall where you plan to place the box;
- run the wire and place the box in the drilled niche;
- Use putty to cover the wall near the box and itself;
- connect wires to the device;
- At the end of the process, close the new device with a lid.
Using this method, the home master has advantages: there is no need to develop a new groove, used materials are used.
Necessary tools and how to replace the missing ones
A good tool speeds up the work significantly. If you wish, you can make do with improvised means, but here you need to look at whether the loss of time is worth the money saved, for which you could rent the necessary tool.
- Wall chaser. Helps to quickly make grooves - works in tandem with a construction vacuum cleaner and does not leave dust. Having your own wall chaser is rare, so it can be replaced with a grinder with a disc for concrete or a hammer drill, but they will create a lot of dust.
- A powerful drill with an attachment for drilling a hole for a socket box. You can replace it with a concrete drill - drill holes around the perimeter of the circle and knock out the remaining concrete from the inside. It is also needed in conjunction with a wall chaser, if the groove goes along two walls - add 10-15 cm that the furrower will not grab near the corner.
In particularly difficult cases (there is no electricity), it will be possible to make a groove in the wall the old fashioned way - with a chisel and a hammer, but it is difficult to say how long this will take.
- Wire clamps - help to make a quality connection. If necessary, you can do without them - you can simply twist the wires well and crimp them with pliers.
The rest is necessary in any case: a socket box, a socket, a wire, pliers, a knife, electrical tape, plaster or cement for installing the socket boxes and sealing the grooves.
Conductor extension method
When a newly installed device is planned far from the former node, a method is used that involves lengthening the conductor. With this method it is possible to use an old box. Sequencing:
- develop a groove on the surface of the wall from the previous point to the new one;
- drill grooves for the socket;
- de-energize the network;
- dismantle a used socket by connecting wires in its box - new and old;
- stretch the cable to the fine;
- insert the conductor into the updated box, and then install it;
- connect the conductors to the updated device and cover with a lid;
- putty the new groove.
To connect conductors, use:
Spring terminals and terminal blocks.
The former are suitable for copper and aluminum conductors, while the latter should not be used for aluminum conductors, which are characterized by increased fragility. The pads are either disposable or reusable.
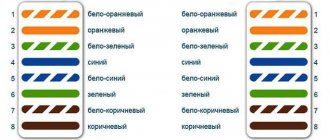
Insulation clamps.
They come in several colors, which clearly mark the conductors (“phase”, “zero”, “grounded”).
Twisting and soldering.
The most reliable way to weld is with a soldering iron. The cable ends are twisted and immersed in a container of solder. After soldering, electrical tape is wound.
Transfer methods
In order to move the power point to a more convenient location for its use, there are various ways to move outlets.
We will try to analyze the two most popular of them, describe the advantages and disadvantages of each method, so that it will be easier for you to choose the most preferable method for yourself.
How to use an old socket box
If a used socket box is used as a distribution box when extending wires, it is necessary to ensure that the connection does not come into contact with the putty. The “folk method” is cutting out a plasterboard tab, the size of which corresponds to a “glass”. For fastening, “liquid nails” are used, and covered with a layer of liquid putty on top.
The main mistake made by an inexperienced craftsman is to lay the extended wire in the same old grooves and then cover it with plaster or alabaster. In this case, the availability of the connection is lost, and this leads to delays if a breakdown or failure of a section of the circuit occurs.
Connection diagrams
There are two known schemes of varying complexity that allow you to move the socket to a new location without destroying the finishing material of the walls:
- By forming a kind of loop, in which wires are laid from the previous installation location to a new point by simply building up the phase and ground busbars.
- Laying a completely updated line starting from a linear machine and ending in the desired wall area in the kitchen, for example.
The first of these techniques is used when the new installation point is slightly removed from the old location, and the second - if the distance exceeds 5-7 meters.
The second installation option will require major work related to the preparation of the layout of the future route, as well as the selection of the type of wire and method of its wiring. But in this case, it is possible to do without an unwanted intermediate connection, which can degrade the performance of the entire power supply system. If an extension scheme is nevertheless chosen, the following important points must be taken into account:
- To implement this option, it is best to use wires made of the same material and with the same core cross-section as the original cable connected to the old location. This will improve the quality of connections and eliminate the need for special terminal blocks.
- The reliability of a loop of several parallel-connected sockets is very low compared to laying a new line.
- An accidental break at the very beginning will lead to de-energization of the entire chain of sockets connected to it.
When choosing an extension cord connection diagram for a new socket(s), you should proceed from the specific operating conditions of the household equipment and the quality of the wall surfaces. Taking these factors into account allows you to successfully cope with the task and eliminate problems that often arise in electrical circuits.
Cording of sockets
It is appropriate to talk about this method when it is not intended to connect high-power electrical appliances (refrigerators, electric stoves, microwave ovens, washing machines). This creates a jumper from the old to the new point. In other words, the transfer is done by a common loop. You must remember that you can transfer no more than 3 points. If even one socket is damaged, the entire circuit will fail. A cable is not about moving the socket higher or lower, but about mounting a new point as close as possible to the old one.
An undoubted advantage of looping is its cost-effectiveness. You should buy an outlet and prepare the materials:
- wire with the required cross-section;
- plastic socket box;
- perforator;
- indicator screwdriver;
- pliers;
- hammer;
- a simple screwdriver;
- a device used to remove the braid.
The wire can be laid closed (in a groove) or open (inside the cable channel). To choose the right socket box, you need to know what the wall is made of (concrete, brick, plasterboard). For the first and second, ordinary ones, made of plastic, are chosen, for the latter - those with spacers in the form of legs.
Preparation
Work begins with determining the future location of the outlets and drawing up a diagram. After this, sections of the wall are checked for hidden wiring - if you skip this step and start laying the cable along a section along which wiring already runs, an emergency situation may arise.
Important! In accordance with the requirements of NBP and GOST, cables can only be laid along horizontal and vertical lines; the diagonal laying method cannot be used. When drawing up a diagram, you need to take into account that a minimum of 20 cm is left between the ceiling line and the cable.
To determine whether the selected section of the wall is free, they study the design or wiring diagram in the apartment - the document can be requested from an electrician who is on the staff of the house management company.
If you cannot find a plan, you can invite a specialist to help determine the location of hidden wiring.
How to lay the cable and connect the terminals
The cable is placed in a niche and secured every five centimeters with clamps. The distribution box is opened and the cable conductor is disconnected from the wire of the previous outlet. The former line is being dismantled.
If the old groove is opened, it is filled with putty. Next, the device is immersed in the box and secured with bolts. Voids are not allowed! Otherwise, the socket may subsequently fall out. It is also necessary that the wires fit tightly against each other. Therefore, the twisting method will not work here. It is better to install pads, terminals with springs or caps.
Next, the socket box must be firmly fixed to the surface. For concrete surfaces, putty is used. If the surface is plasterboard or wood, the “glass” is secured with claws with spacers.
Loop creation technology
The loop method is the safest of all options. It involves not simply moving the old outlet up or down, but creating a new “point” in close proximity to the old one.
The main advantage of the daisy chain method is the ability to connect a new outlet, placing it on the section of the wall required for work, and at the same time keep the old one
The only drawback of this connection is that the cable from socket to socket is laid horizontally. Knowing that traditionally the branching to the same switches and sockets is laid in a vertical route, due to your forgetfulness you can inadvertently damage the wire.
In addition, if one of the cores is damaged at the switching point, then all the elements following it will stop working. Therefore, the fewer connection points the system includes, the more reliable it will be.
Selection of required materials
When using this method, material costs are minimized.
In addition to purchasing the newest outlet for work, you need to prepare:
- wire of the appropriate cross-section;
- plastic socket box;
- hammer drill with crown D70 mm;
- indicator screwdriver;
- pliers;
- hammer;
- flat screwdriver;
- braid removal tool.
The wire itself does not have to be laid in a groove, but can be laid openly using a cable channel.
To transfer the connection point to a new location and avoid the procedure of wall slitting, it is recommended to use an overhead cable channel model
The choice of socket box model depends on the base material into which it is supposed to be buried. For concrete and brick walls, ordinary plastic “glasses” are chosen, and for plasterboard bases, models equipped with spacer legs are chosen.
Making a niche and installing a socket box
Before moving the hidden socket to another place, you need to prepare a place for installing a socket box and make a groove for laying a section of the electrical network. Having outlined the location of the future connection point, use a crown to drill a hole.
In the absence of one, you can use a hammer drill equipped with an impact drill or a grinder. In this case, holes are first drilled along the marking contour, and then individual fragments of the wall material are chopped off using a chisel.
The depth of the niche is made such that the floor is completely recessed into it, and at the same time there remains a margin of 3-4 mm
A “glass” is immersed in the prepared niche. The electrical cable coming from the junction box is inserted through its back wall.
The socket box is fixed in a concrete wall using gypsum mortar. After the mixture has hardened, the product is cleaned of gypsum residues, and its inner walls are wiped with scraps of fabric. To secure the socket box into a plasterboard or wooden base, the “glass” is immersed in the made niche and fixed using the side spacer tabs
Connecting a new point
Having measured the cable of the required length to power the new point, one end of it is connected to the terminal blocks of the old socket, and the other to the contact part of the new “point”. The neutral, phase and ground wires are connected in parallel directly to the socket contacts.
To prevent short circuits between conductors, each core is insulated with a plastic braid. When connecting the cable, it must be removed. To make the task easier, use a cross-connecting knife, which can easily remove the insulation without damaging the core.
The work of stripping the braid should be done as carefully as possible, because if the core turns out to be damaged or defective, it will certainly “prove” itself very soon.
Neutral and phase conductors are allowed to be connected directly to the contacts of the socket, and the protective PE conductor only through a branch using a terminal block
When dealing with a PE conductor, keep in mind that according to the PUE, it is important to maintain its continuity. After all, if the grounding conductor on one of the sockets breaks, all other devices will be ungrounded.
Having connected the neutral, phase and grounding conductors, all that remains is to fix the working part of the product in the installation box and install the decorative cover.
How to connect a new point from the panel
To carry out this operation, a niche for the socket box is drilled and a groove is selected for laying the conductor. It is possible to run the line directly from the distribution board.
Then proceed as follows:
- the network is de-energized;
- the previous device is removed, including from the wire;
- the insulation is removed from the cable conductors;
- Copper wires are inserted into the niche and connected;
- a socket box is installed;
- the device is connected to the conductors and fixed in the box;
- The niche is closed, the surface is finished.
Advantages:
The wire cross-section can be selected independently, so it is possible to connect high-power devices. This unit is very reliable.
Minus:
significant installation costs.
When laying a new wire, it is necessary to leave some margin at both ends. This will ensure the quality of the connection. Connection is made using terminals with screws or springs. “Phase” is attached to the left clamp, and “zero” to the right. The “ground” is connected to the “whisker” terminal located on top of the housing.
Signs of an error at work
When moving an outlet on their own, people who do not have sufficient experience and knowledge may do something wrong.
A signal of an error is one of the following signs or a combination of them:
- the socket sparks;
- there is no electricity, appliances plugged into the network do not work;
- when the plug is disconnected from the socket, the latter jumps out of the socket;
- It heats up during and after use.
If you notice such symptoms, you should immediately stop using this point and check the entire network one by one.
Outdoor installation method
To reduce installation costs and labor, you can choose a surface-mounted outlet and external cable management. The cable is protected by a PVC channel, which can have various types and configurations. The cable duct must be covered with strong insulation (which is grounded) to prevent electric shock. Outdoor installation is good for every connection system, but has disadvantages in terms of aesthetics. Therefore, it is more often used in industrial facilities or as a temporary option.
Having considered how to move an outlet, it is appropriate to conclude that this procedure is simple, but it is necessary to be aware of the degree of responsibility. After all, we are talking about electricity! Any mistake or minor error can lead to a short circuit and fire. No matter how reliable the connection diagrams are, no matter how carefully the safety measures are followed, there is no one hundred percent guarantee. Therefore, the first move of an outlet in an apartment is best done under the supervision of an experienced technician.
Tags:
- electrician
Rate the material:
Consequences of incorrect installation
Incorrect or poor-quality work at any stage of installation of such devices can lead to undesirable consequences. The most common ones are:
- Unreliable fixation of the working part of the device in the socket box.
- Overheating of contacts, as well as melting or fire of dielectric parts of the case.
- A short circuit occurs when connecting power to an outlet.
- Sparking or breakage (burnout) of electrical contacts.
Connection options
If a wire needs to be extended, there are several ways to connect it to another wire. The choice of a specific option depends on the material from which the cores are made, as well as their cross-section and the number of conductors.
Connection with adapter screw terminals
This method is one of the most reliable and has been used for many decades when organizing lines even at industrial facilities. Adapter terminal blocks can be used in two versions, one of which involves the presence of spring terminal blocks, and the other - terminal blocks.
Spring terminals are equipped with a lever mechanism. The use of spring terminals is acceptable for both aluminum and copper wires.
There are numerous terminal block models on the market. Often you come across low-quality products
Therefore, when purchasing, you should pay attention to the quality of the product, its ability to firmly press the cable and withstand mechanical pressure when tightening the screws tightly
There are disposable pads on sale (they cannot be repaired) and reusable spring plugs (the contact can be disconnected multiple times). It is recommended to select the pads based on the diameter of the inlet hole being the same as the cross-section of the cores. Unlike spring terminals, it is not advisable to use terminal blocks to connect aluminum wires, since this metal is very fragile and can be deformed during tightening.
Stranding with welding
This method of connecting wires was previously used everywhere, including when working with aluminum wiring. At the moment, twisting with welding is also used, but is no longer so relevant, since simpler methods have appeared. The main disadvantage of this technique is the need for special equipment and an experienced welder.
Fixation with plastic caps
In this case, the wiring connection is made through the use of PPE (connecting insulating clamps). Plastic caps are made of fireproof material, which prevents fire due to a short circuit in the area where the cores are connected.
The caps are convenient to use. They are made in different colors for zero, phase and ground.
The only drawback of the caps is the large number of fakes when the product is equipped with a weak internal spring.
Stranding with soldering
Connecting electrical wiring using soldering is considered the highest quality option. However, to perform such work, the ability to use a soldering iron is required. If you follow all the technological nuances, the twist will retain its performance characteristics for decades.
Instructions for creating a twist with soldering:
Strip the ends of the cable to ensure the required contact area of the side surfaces. It is necessary to leave only the pure metal from which the cores are made. The length of the area to be cleared is 8-10 centimeters. Grasp the wire with pliers on both sides and create a tight twist
It is important not to overdo it when tightening the wires, as the wire may break. Solder the twisted wires with solder and rosin. Important note: acid fluxes are unacceptable, as they will cause metal corrosion in the future.
Note! Some home craftsmen try to speed up the cooling of fastened wires after soldering by immersion in cold water. This is strictly forbidden, since due to a sharp temperature change the metal surface becomes covered with microcracks, which reduces the quality of the bow.
Wago terminal blocks
The design of these terminal blocks makes it possible to carry out electrical installation work efficiently and as quickly as possible. The quality of contact is ensured by an internal spring system. Wago terminal blocks have received a European quality certificate and are the preferred method of connecting wires among foreign electricians.
Wago terminal blocks do their job well during network overloads. However, these devices also have a drawback: the contact area does not allow for good heat transfer, removing energy through their design. As a result, if the loads are higher than permissible, heat is transferred to the wires, and this leads to fire of the insulation. Thus, the use of Wago terminal blocks is only permissible in combination with a machine that avoids overloads in the local network.
Why move the switch?
In real conditions, the need to move a light switch indoors may arise for various reasons:
- Inconvenient height position. The switch is too high for small children to reach. Or, on the contrary, the children have already grown up, and he is too low - he has to bend down.
- Access limitation. For example, he ended up behind a cabinet or bar counter.
- The desire to rearrange the furniture, and the switch turns out to be closed.
- Increased convenience. Ensuring that the light is turned on from another room or from several places, bringing the switch closer to the bed or chair, etc.
- Consequences of repair. A good reason is to combine several rooms. Moving, for example, the kitchen into the living room, dividing a large room into several rooms, reinstalling the front door, etc.
Perhaps the opportunity has arisen to install a new structure, but it does not fit in its original place.
Should you contact a professional?
Today, many organizations offer their services for electrical work. Professionals are ready to perform installations of varying complexity. The quality of such actions is most often quite high. Each such company provides a guarantee for the installation of electrical equipment.
However, every homeowner knows that the services of a professional can be quite expensive. In this case, it is extremely important to comply with all safety requirements and PUE. Otherwise, an unprofessional technician risks serious injury. In this case, the operation of the electrical system will be unsafe. Faulty sockets and switches can cause fire, property damage and pose a threat to human life and health.
Useful video
Sources
- https://220.guru/electroprovodka/rozetki-vyklyuchateli/perenos-rozetok.html
- https://srtmx.ru/novoe/perenos-rozetok-i-vyklyuchatelej.html
- https://oboiman.ru/ingeneer/kak-perenesti-rozetku-v-drugoe-mesto-instruktaz-po-perenosu.html
- https://prostroiku.info/kak-perenesti-rozetku-v-drugoe-mesto-instruktazh-po-perenosu/
- https://lemzspb.ru/chto-nuzhno-dlya-perenosa-rozetki/
- https://www.asutpp.ru/kak-perenesti-rozetku.html
- https://StrojDvor.ru/elektrosnabzhenie/perenos-rozetok/
- https://ElektroKlub-nn.ru/provodka/kak-perenesti-rozetki-v-kvartire.html
- https://HouseDiz.ru/kak-perenesti-rozetku-ili-vyklyuchatel-v-kvartire/
- https://MasterpoToku.ru/full/kak-perenesti-rozetku-v-drugoe-mesto-svoimi-rukami.html
- https://kachestvolife.club/elektrika/kak-pravil-no-perenesti-rozetku
- https://SamElectric.ru/elektrika/perenos-rozetki-bez-shtrobleniya.html
- https://stroypomochnik.ru/perenos-rozetok-v-kvartire-panelnogo-doma-svoimi-rukami-poshagovaya-instruktsiya/
- https://elektrika.expert/vykljuchateli/kak-perenesti-vykljuchatel.html