Motion sensors (hereinafter referred to as motion sensors) gained worldwide recognition in the 90s of the last century. With their appearance on the radio engineering market, universal devices solved the important problem of saving energy and significantly extending the “life” of lighting devices. Today, household infrared radiation detectors are widely used to illuminate local areas, entrances, staircases and premises for various purposes. However, devices may break during operation. Many novice home craftsmen are interested in how possible it is to repair a motion sensor with their own hands.
What you need to know and be able to do
Before you start repairing an electrical appliance, you need to check that it is working properly. To do this, you need to know its structure, the location of the component parts and the connection diagram. If the sensor was installed by the previous owner, then you should study the passport data. The documentation provides detailed instructions for installation and adjustment, as well as a diagram for connecting the device to the electrical network and the lamp. If there are none, everything can be found on the Internet under the DD brand.
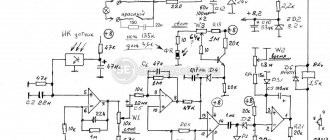
Typical DD scheme:
How does an IR detector work?
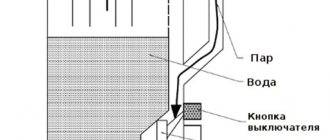
The operating principle of an infrared motion sensor is based on recording changes in the density of thermal radiation in the controlled space using a Fresnel lens. As long as the infrared background of the room is stable, the sensor is in standby mode. As soon as a person enters the room, the level of thermal radiation changes the balance towards increasing the IR flux. This will cause a change in resistance in the lens, which will give a signal to the relay, which in turn will turn on the light. When the movements of people in the room stop, the reverse process will occur, and then the light in the room will go out.
Operating principle of the IR sensor:
Operating principle of the infrared sensor
The infrared sensor responds to any change in the thermal field in the scanned area. Detectors register every object that emits heat: a person, an animal, or any moving object whose temperature field differs from the background one. The detector sensor records infrared waves, which are collected through a lens system built into it. According to the electrical circuit, the sensor voltage goes through the transistor, then goes to the relay. The relay contacts are open when the detector is scanning. If an object enters the scanning area, the level of illumination of the sensor by infrared radiation changes, which leads to the closure of the relay contacts. As a result, the light bulb or lamp lights up.
What could cause a malfunction in the operation of the DD?
We need to find out why the problems arose.
This may happen after:
- voltage surge in the network;
- emergency shutdown and restoration of power supply;
- the appearance of a burning smell;
- falling of the device on the floor;
- children's games (imbalance of adjustment screws, change in orientation of the sensor lens).
Correct viewing angle setting:
To identify the reasons why the motion sensor does not work, we will analyze it.
To do this you need:
- Remove the cover of the device (you will need a Phillips screwdriver).
- Then release all the wires from the blocks, remembering their original position. It’s better to take a sketch or photo on your phone.
- Next, conduct a study of the power and low-current boards.
Connecting DD via pads:
Motion sensor repair methods
You should always start with a visual inspection of the sensor. There may be mechanical defects, damage to lenses or housing. Pollution accumulates on them. Often, simply wiping the lens will fix the problem.
DIY drill repair
When all external factors that can affect the operation of the device have been checked, the case is opened and the search for internal defects begins.
Important! You will need to check the device under voltage, so you must know and follow all electrical safety rules.
- After opening the outer casing, you should check whether the detector is connected correctly;
Motion detector connection diagram
- Using a multimeter or tester, check whether the voltage at the input contacts of the sensor is suitable;
- If voltage is present, you should begin to artificially create conditions for the detector to trigger. When modeling, you must first set the settings: set the degree of illumination (average for day and night), set sensitivity to maximum, response time to minimum;
- If adjusting the settings does not lead to a positive result, you need to turn off the voltage from the device and disassemble the sensor, gaining access to the printed circuit board;
- A visual inspection is again carried out to identify burnt components. At the same time, it is checked whether the wires are intact and whether the soldering is secure. If visible defects are detected, the wires and elements on the printed circuit board must be repaired;
- If burnt out parts are identified, it is necessary to replace them, selecting identical ones in the relevant parameters, and be sure to check adjacent elements, even if they show no signs of damage;
- Cases when, when simulating external conditions for operation (passing of a person), a clicking sound of closing the contacts of the output relay is heard, but the lighting devices operating from it do not light up, may indicate a malfunction of the electrical circuit from the relay contacts to the lighting devices. The defect may be in the relay itself, for example, oxidation of the contacts, then they need to be cleaned. The integrity of the wires going to the external load is also checked. If there is only one lamp, it may burn out. But, as a rule, this is given priority attention;
- The detector circuit is powered by a converted DC voltage from 8 to 24 volts. To detect defects in the converter, you need to check the voltage at its output. This indicator is measured in relation to “zero”. For “zero” you can take the minus point of the capacitor installed after the bridge of diodes. If there is no voltage, all parts of the converter circuit are checked, including the diodes of the rectifier circuit;
Motion sensor circuit board
- Power is supplied to the relay through a transistor. Its serviceability also affects the operation of the circuit. Its performance characteristics are monitored with a multimeter.
Adjusting Sensor Settings
On the front of the motion sensor housing there are adjustable adjustment knobs for lighting:
- SENS. Serves to set the degree of sensitivity;
- TIME. You can set the time interval from the appearance of moving objects until the sensor is triggered;
- LUX. Setting the required level of illumination.
Motion Detector Controls
Adjusting the settings serves to set the operating parameters required by the user. The settings affect the correct operation of the detector.
For the LUX regulator, they usually start adjusting from the middle position, but if the installation sites are too dark, then you can set it closer to the “night” icon.
Important! Particular care must be taken in adjusting the SENS regulator, since incorrect operation of the sensitivity parameter blocks the functioning of the complete sensor circuit.
When regulation begins, SENS is set to maximum and TIME to minimum, and artificial conditions for the circuit to operate are created. During normal operation of the sensor with these settings, you can gradually set the desired indicators, checking the correct functioning of the device with each shift of the controls.
A working detector does not turn off the circuit
There are situations when the sensor is working properly, but the lighting devices do not turn off, despite the absence of external conditions for operation. The reasons may be the following:
- The TIME interval is set too long. We must try to reduce it;
- High level of illumination. It is necessary to lower it by moving the LUX control;
- A third possible cause, rarely observed, is residual load on the circuit after being under voltage for a long time. In this case, you can remove power from the device and reapply it after a short period of time.
Spontaneous sensor activations can be observed in the presence of nearby sources of radio waves, electromagnetic fields, and nearby heat sources. Most of these factors can be eliminated by correctly positioning the sensors.
Correct installation of sensors
If the motion sensor does not work, the search for causes should begin with external inspections and checking the settings. Only trained users can begin more complex repairs on their own.
Visual-tactile diagnostics
Repair of motion sensors may be limited to identifying damaged radio components and replacing them as a result of visual-tactile diagnostics of the infrared sensor. The device is disassembled and placed on the desktop under the light of a table lamp, armed with a magnifying glass: Check the integrity of the radio elements. There should be no swollen containers, darkened, cracked or loose elements. The smell of something burning will indicate the presence of burnt parts. They are clearly visible on the board.
The board track may burn out. Cracked, burned and broken grooves are restored by soldering jumpers. Analysis of the breakdown will help to avoid further malfunctions in the detector.
Troubleshooting:
It is necessary to check the soldering of all radio elements. A tactile inspection reveals poorly secured elements on the board, and they are soldered again. All suspicious parts are replaced with new elements.
Common malfunctions and how to eliminate them For motion sensors for lighting, the most typical manifestations of operational failure can be characterized as follows:
- The lamp does not turn on.
- The sensor does not turn off the light.
- False alarm.
- Sensor orientation is incorrect.
Useful advice from professionals
A self-made sensor that reacts to movements is good because it can be adjusted to your needs. Any available materials and tools that can be found and purchased in specialized stores are suitable for this.
Helpful Tips:
- You can use a webcam as a motion indicator. To do this, you need to connect it to a signaling device or computer. The latter option will require a special program that is installed on the PC.
- When connecting the sensor to the alarm system, you need to make sure that there are no large household appliances or fans nearby. Their operation can affect the device and lead to incorrect or untimely notification.
- When creating a “smart home”, it is recommended to use touch switches that already have a similar motion sensor installed.
- It is better not to use a laser device to protect residential premises. This is because infrared radiation can harm human eyes.
- You can make a car alarm in the same way. The only difference will be the addition of a special sound signal.
Manufacturing and repairing a sensor that responds to various movements is a rather difficult undertaking, which, if you have the skills, can be done with your own hands. With the right approach to business and following all the advice of professionals, you can independently make a useful device that will reliably protect the room and make life easier for the owners.
The lamp does not turn on
If the DD does not turn on the light, then you need to check the current flow to the low-current board. This is easy to do using a tester. Having made sure that there is voltage at the input of this circuit, move on to the tuning regulators. Typically, there are three screws on the device body with the following symbols:
- SENS - it regulates the sensitivity of the pyro receiver;
- TIME — sets the delay time for turning off the lighting;
- LUX - sets the threshold for the level of illumination.
IR detector settings screws:
The device is connected to the network and to a 40-60 W lamp. The adjusting screws are brought to the extreme maximum position, gradually decreasing the values of all three adjustments. This achieves optimal operating conditions. You can adjust the settings in the opposite direction from the minimum values.
Adjustments on the ceiling detector body:
If there is no response from the device, check the power supply to the power circuits. They test the relay, that is, establish the presence of voltage on its coil. For safety reasons, the test is carried out with the low-current board completely disconnected. Next, they close the base with the emitter of the transistor and make sure that it is closed, while the relay should be turned off. The base is connected to a constant voltage through a resistor, and the transistor should open and the relay will operate. If none of the above processes occur, then the transistor must be replaced.
Assembly diagrams
Microwave
To control open spaces and monitor the presence of objects in the desired area, there is a capacitive relay. The operating principle of this device is to measure the amount of radio wave absorption. Everyone has observed or been a participant in this effect when, approaching a working radio receiver, the frequency on which it operates gets lost and interference appears.
Let's talk about how to make a microwave-type motion sensor. The heart of this detector is a radio microwave generator and a special antenna.
This circuit diagram shows a simple way to make a microwave motion sensor. Transistor VT1 is a high-frequency generator and also a radio receiver. The detector diode rectifies the voltage by applying a bias to the base of transistor VT2. The windings of transformer T1 are tuned to different frequencies. In the initial state, when the antenna is not affected by external capacitance, the amplitudes of the signals are mutually compensated and there is no voltage on the detector VD1. When the frequency changes, their amplitudes are added and detected by a diode. Transistor VT2 begins to open. As a comparator for clear processing of the “on” and “off” states, thyristor VS1 is used, which controls a 12-volt power relay.
Below is an effective diagram of a presence relay using available components, which will help you assemble a motion detector with your own hands or simply be useful for getting acquainted with the device.
Thermal
Thermal IR (PIR) is the most common sensor device in the business sector. This is explained by cheap components, a simple assembly scheme, the absence of additional complex settings, and a wide temperature range of operation.
The finished device can be purchased at any electrical goods store. Often this sensor is equipped with lamps, alarm devices and other controllers. However, now we will tell you how to make a thermal motion sensor at home. A simple pattern to follow looks like this:
A special thermal sensor B1 and a photo element VD1 make up an automated lighting control complex. The device starts working only after dusk; the response threshold can be set with resistor R2. The sensor connects the load when a moving person enters the control zone. The time of the built-in timer for shutdown can be set using the R5 regulator.
The sensor does not turn off the light
In this case, first turn to adjusting the settings. You can try to repair the sensor by adjusting the SENS and TIME screws. Due to incorrect settings of these parameters, the lighting may not go out. The fact is that if the rotary lever is set to the extreme right position, the relay will stop opening the power supply circuit of the lamp.
Pyroelectric sensor:
Violation of the DD operating mode may occur due to the appearance of residual load. Then the functionality of the device is restored by disconnecting it from the power supply for 10-15 seconds. If this is the reason, the sensor will work in its original mode. If the detector still does not turn off the light, check the operation of the relay. If a defect is detected in this part, it is replaced with a new device.
The most common problems with ultrasound sensors:
- Erasing the lens
- Bubbles on the lens
- Damage to the matching layer between the lens and piezo crystals
- Decay of piezocrystals
- Cable damage
- Connector damage
Do you have one of the above problems? A story about how to identify a malfunction , detailed advice on the repair and maintenance of an ultrasonic sensor and the price of repairs can be obtained by calling or asking a question on the website.
Repairing an ultrasound sensor will require a qualified specialist, spare parts and special diagnostic equipment.
Full information support
Top technical experts
Affordable and reliable repair of boards and blocks
Organization, support, package of documents
We work with regions of the Russian Federation and CIS countries
False alarm
Over time, the infrared sensor can take on a life of its own. Regardless of whether there is movement in the room or not, it automatically turns the lights on and off. False positives can be caused by both direct and indirect reasons. These can be powerful heat flows emanating from various heating equipment, or jets of cold air from air conditioners. Therefore, when installing the device, you should avoid close proximity to ventilation and air conditioning systems. The multilens should not be exposed to direct sunlight, which can interfere with the detector settings.
Operating principle of the IR detector:
Excessive cluttering of the viewing area of the device with furniture or other large objects can cause involuntary switching off or, conversely, switching on the lighting. Also, the increased sensitivity of the DD will cause it to be triggered by the movement of pets and even flying parrots. To prevent this from happening, the sensor is installed in the place of maximum access to the entire internal space of the room and the sensitivity level is reduced by turning the SENS screw counterclockwise.
Operating rules
When planning the placement of detectors, a number of rules are followed:
- The lamp should not be located directly above the motion sensor
- There should be no glass partitions in the detector scanning area; glass does not transmit infrared radiation.
- You should check whether the sensor will be located near large interior items that would complicate the scanning process.
- The presence of an air conditioner or heater in the range of the device interferes with its operation, since the detector detects moving air currents and falsely triggers, turning on the lighting
In large rooms, detectors mounted on the ceiling are used. The devices detect moving objects in a circular area.
Incorrect sensor orientation
In the accompanying documentation of the motion sensor, the manufacturer usually indicates the orientation of the motion detector in the space of the room. The horizontal device is made in the form of a volumetric toroidal disk, which is attached to the ceiling. The DD review is 3600. Its installation is quite simple and does not cause any difficulties.
Horizontal sensor:
Corner and wall modifications require proper orientation. If the room has two doorways in adjacent walls, then install corner models. In other cases, the device is hung on one of the walls, but not opposite the windows. Direct sunlight can have a detrimental effect on the condition of photocells. Incorrect setting of the DD can create “dead” zones where the device will not respond to the appearance of a person. Therefore, you need to spend some time walking around the room while tilting and turning the head in order to obtain the optimal detection range and range of the device.
If the room is an L-shaped room or corridor in plan, then it is advisable to install two sensors. They should be turned as close as possible to each other so that there are no “dead” zones. It is also important that the luminaires are kept out of the detection range. The light flux should not fall on the multilenses of motion detectors.
When purchasing a motion sensor for lighting, it is better to pay attention to branded devices and not go for cheap ones. High-quality sensors will not cause short circuits and will last for decades. If you lack experience and knowledge of radio engineering, then it is better not to undertake repairs yourself, but to have the broken device repaired by professionals.
Settings
SENS
Sensitivity is indicated on the case with the letters “SENS”. This setting is the most difficult. You should adjust the parameter so that the sensor does not react to small pets, but at the same time it is triggered if a person enters the room. Set the SENS control to maximum, wait until the light turns off, and check how the sensor works. Reduce sensitivity until you reach the optimal value.
LUX
The LUX parameter is used to configure the detector to turn on the lighting only when it is dark. During the first adjustment, you need to set the maximum, and in the evening adjust the optimal time period at which the sensor will operate.
TIME
Time – delay time. Detectors are sold in which the delay time increases with each subsequent switching on. First, set the regulator to minimum, then quickly check the parameters.