The air grill is designed for cooking food by heat treatment. The products are heated by a stream of hot air. Structurally, the convection oven can be divided into three components: a heater, a fan and a control unit. Troubleshooting and repairing an air fryer with your own hands at home can also be divided into several stages according to the number of components:
- the device does not turn on or the operating modes are set incorrectly;
- the air does not heat up or does not heat up enough;
- There is no airflow, the fan is loud.
Fan motor diagnostics
Typical malfunctions of the air fryer blowing system:
- there is no airflow;
- the fan hums when turned on;
- a rumble or grinding sound is heard during operation;
- air flow is too weak.
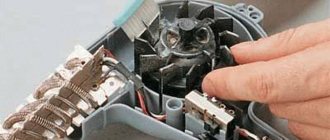
To check the fan, you need to continue disassembling the device. Unscrew the screws securing the bottom of the fan and the electric motor.
We inspect the electric motor.
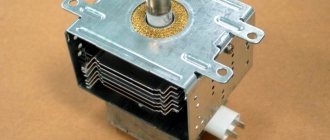
One of the possible reasons why the motor and, accordingly, the fan rotates slowly or does not rotate at all, may be grease on its shaft. Once hardened, the fat interferes with the normal operation of the engine. This can be seen in the picture. That’s why you hear a hum: the engine cannot cope with the load and its winding begins to hum.
The accumulation of fat is removed with a rag, and the residue is washed off with gasoline, alcohol or another liquid that dissolves the oil. Simply removing fat from the shaft is not enough. The shaft needs to be lubricated. For this you will need Ciatim type machine oil.
Rattling, grinding and other unpleasant sounds during operation can be caused by a faulty bearing on the motor shaft. The bearing is located on the back of the engine.
Most often, it is also a matter of thickened lubricant. By unscrewing the two mounting screws, you gain access to the bearing itself. As before, apply new lubricant inside it. We return the cover to its place and make several revolutions of the shaft with our hands to distribute the oil evenly.
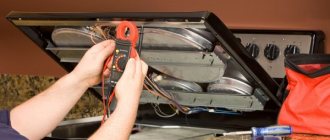
All the proposed operations make sense when the motor winding is not damaged. Therefore, during disassembly, we carefully examine the connecting wires for integrity. We call the motor winding terminals with a multimeter. A broken winding usually cannot be eliminated; the electric motor will need to be replaced.
Tips for using an air fryer to extend its lifespan
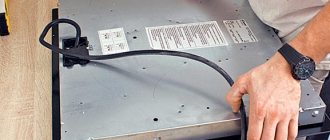
It does not turn on, a common problem, the first malfunction is the socket or plug, cord or contact inside the grill on the input device. Disassembling a fork is sometimes pleasantly surprising. There, defects immediately become obvious, poor contact, a burned-out wire, or a broken wire. The contact point of each core can be easily eliminated by dismantling and installing the conductor in place to the plug.
It is important to know! Always use a voltage probe or tester for any repairs.
Air fryer does not turn on
If the device does not turn on, the indication on the control unit does not light up, then the search for the cause must begin with an external inspection of the device. The problem may be a faulty power cord, electrical plug, or damaged housing.
If the integrity of the cord insulation is damaged, it must be replaced. The supply wire may not have external damage, but nevertheless be faulty. You will need a multimeter to check. The cord is disconnected from the device and checked for contact between the ends of the cable with a multimeter in resistance measurement mode. The serviceability of the fuse is also checked and the blown one is replaced.
Many air fryer models are equipped with a limit microswitch on the lid, which does not allow heating to be turned on when the working bowl is not closed. If you press the switch with your finger, you can hear a distinct click. The absence of sound indicates a broken contact. The limit switch can be replaced only after disassembling the cover body. The lid is also a housing containing all the working elements.
The fan does not rotate
This is the most important element of the device, ensuring uniform baking and frying of the product due to blowing with a directed hot stream. It turns on when the heating element reaches the specified temperature. If it fails, the quality of cooking decreases. The problem may be due to a broken solder joint, which can easily be repaired on your own, without leaving home without visiting a service center. If the node is completely inoperable, it needs to be replaced with a functional one:
- for this purpose, you will need to completely disassemble the cover;
- conduct a visual inspection of the contacts;
- if they are in order, replace the unit with a functional one that exactly matches the technical specifications. parameters.
The benefits of air frying
Food is cooked quickly thanks to the hot air flow. It blows air over the food and heats it evenly from all sides. This cooking mode preserves all the beneficial elements, natural taste and even color of the food. Fans of healthy eating will certainly appreciate this. Cholesterol formation does not occur in cooked foods, as in foods fried in a pan, which significantly lose in beneficial properties. When the convection oven is turned on, the spiral, which is built into the lid, heats up. The heating element maintains the set temperature and retains heat in the working chamber.
The Hotter convection oven is easy to use, equipped with a stabilizer and is not afraid of voltage surges. It can be used not only in an apartment, but also in a country house or at a recreation center.
It saves your time and can cook several dishes at the same time. There is no smell or smoke during the process. The air grill operates in automatic mode. It is enough to load all the necessary ingredients into it, pre-cut or grated, turn on the desired mode, set the time and calmly do other things. The device uses electricity sparingly - its consumption is significantly lower than, for example, a kettle or iron.
Why the air fryer does not work: obvious reasons
An air fryer is called a jet oven. One such device can replace several at once. Therefore, there is simply a huge number of dishes that can be prepared according to various recipes. All you need to do is put the necessary products into the device and set the appropriate program. All you have to do is wait a little while the beep sounds.
For example, a 1 kg grilled chicken can be cooked in just forty minutes. Moreover, the entire process can be observed through transparent elements.
But sometimes there are problems with the performance of this device: it does not heat, does not turn on, the fan does not work. To make the correct repair, you will need to determine the cause of the failure.
Causes
If we consider the convection oven structurally, then it is a relatively simple technical device in which, in fact, only three components can break: the heating element, the thermal fuse and the control unit.
Thermal fuse is broken
In this case, the problem can be considered the smallest. Eliminating the cause will not be difficult.
It costs a lot to repair an air fryer if this element breaks. After all, it cannot be repaired, but it costs a decent amount. True, sometimes it is possible to restore the device. But only specialists can do this, and not always.
Broken heating element
This is also a solvable problem. All you have to do is buy a new one. However, some clarification is needed here. The fact is that previously a steel heating element was used in this capacity. It can serve reliably for ten years. However, such an element has disadvantages: it is not environmentally friendly, high energy costs, and slow heating. As a result, it was replaced by carbon and halogen elements.
Such devices not only save energy, but also heat food more quickly. They provide illumination from inside the air fryer. As a result, the cooking process is clearly visible.
Moreover, halogen radiation can kill bacteria. Also, a halogen heating element is cheaper. As a result, it is most often used in popular air fryer models.
There is one more drawback. The supply of such air fryer components to the regions is not well established. As a result, the breakdown of such an element may be associated with the need to search for spare parts.
But let’s return to the consideration of breakdowns and possibilities for eliminating them.
Doesn't turn on
In this case, you should disassemble the device and check the fuse.
If there was a power surge in the network, this element could fail, thereby preventing further power supply to the air fryer.
If a visual inspection confirms the assumption, the fuse will have to be replaced with a new one. The location of this element can be determined using the diagram attached to the instructions.
It should be noted that disassembling the convection oven should only be done in extreme cases. After all, sometimes it happens that we forget to plug in the device and think that it is broken. Although there is no problem. Therefore, you should first try all possible options before proceeding with “surgical intervention”.
And the device should be disassembled strictly following safety precautions.
Fan doesn't work
If it turns out that the fan in the device will not work, you should disassemble the convection oven, get to this element and visually assess whether there is any damage and whether all wires are connected properly. If the wiring is broken, it needs to be soldered using a soldering iron and solder. Otherwise, the fan may need to be replaced. To do this, you need to purchase one that is similar in size and characteristics.
Not warm
The problem is either in the circuit or with the heating element. Everything should be visually assessed after disassembly. If there is a break in the circuit, it needs to be reconnected. If the element has carbon deposits or its size has changed, it will have to be replaced. Sometimes it is possible to restore the device, but this is most often done by specialists.
On your own or with the help of a specialist?
How to carry out repairs is up to everyone to decide for themselves. After all, for this you must have at least basic knowledge and experience in handling technology. If there is no such luggage, then you should still contact the workshop. This will be more reliable, and the likelihood of restoring the air fryer’s functionality will increase significantly.
Disassembling the air fryer and checking the heating element
You need to start disassembling the unit by unscrewing the screws securing the mesh from the bottom of the case.
Shown are photographs of disassembly using the example of a Hotter brand air fryer.
The heating element and fan blades are visible under the mesh.
The screws and nut highlighted in the photo allow you to disconnect the part of the device on which the heater is attached. The heating element contacts are highlighted below.
We check the heating element if it does not heat up. We disconnect the terminals with wires from the heating element, now it is possible to check its serviceability. The test is carried out with a multimeter in the same way as the cable was checked. A faulty heater will show an open circuit and the heating element will have to be replaced. Along with disassembly, inspect the connecting wires for damage; this may be the cause of the problem.
Checking the heating elements
If the control unit is functioning normally and all internal electrical wiring is intact, and the device heats very little or does not heat up at all, then the heating element is not working. In an air fryer, heating can be carried out using a heating element or a halogen lamp (or its carbon analogue). The latter fails more often, as it has a shorter service life (about 24 months) compared to the heating element (about 10 years).
You can replace a halogen lamp or heating element yourself with parts of the same power. To do this, you will need to disassemble the entire device. In this case, the first thing that needs to be done to replace the heating element is to unscrew the bolts that hold the mesh at the bottom of the device body (a model from the Hotter brand is taken as an example).
Under the mesh there are heating elements and a fan (its blades are visible in the photo below).
The following photo shows the contacts of the heating element.
Important! To check the serviceability of the heating elements, it is necessary to disconnect all contacts. The functionality is checked using a multimeter, just like the power cable: if it breaks, the tester will show an open circuit. Then the heater needs to be replaced.
It is definitely recommended to inspect all wires for breaks or poor contacts at their connections. This is due to the fact that the reason may be precisely in them.
Common Problems
Any DIY repair to an electric grill or similar device requires familiarity with the internal workings. The electrical circuit consists of a switch on the cover and handle. From it, a signal goes through a timer to the motor that starts the fan. Relays and quartz lamps are connected in a parallel circuit.
We often encounter the following problems:
- the device does not turn on and does not respond to control;
- The device heats up poorly;
- The air fryer fan does not spin;
- The main control unit is broken.
Typically, a chicken carcass weighing about 1.5 kg is cooked in about 1 hour. The degree of readiness can be observed through the transparent walls. If the time period increases noticeably, this indicates possible malfunctions. There are also other problems - the convection oven simply does not respond to pressing buttons or other malfunctions occur. But your device can still be repaired.
Is it worth repairing the air fryer yourself?
A modern convection oven is a fairly simple device consisting of the following basic elements:
- Containers for food.
- The cover in which the heating element and fan are located.
- Control unit.
- Auxiliary mechanisms - bracket, stand, etc.
ozon.ru
In this case, its operating parameters are set by adjusting the heating level and blowing speed. At first glance, it may seem that there is nothing complicated in its design. Therefore, many begin to repair it without hesitation. However, not in all cases it is appropriate to repair it yourself. So, if the device is under warranty, then in any case it is better to take it to a service center. Otherwise, there are malfunctions that you can fix yourself in a matter of minutes, on the other hand, when you cannot do without specialized equipment, components and knowledge, you have to contact a workshop.
Note! Some air fryer models, thanks to a special locking system, will not respond to the start button while the lid remains loosely closed.
Quick DIY air fryer repair
If the heating element fails, you can simply buy a new heating element. A regular steel model is inexpensive and can last for ten years. However, the disadvantages include slow heating and high energy costs. You can spend a little more but buy more efficient carbon or halogen heaters.
If the problem is with the thermal fuse, then usually the convection oven does not turn on at all. A short-term power surge in the network often leads to this problem. Although, before taking serious measures, it is better to also check the outlet and wiring.
Disassembling the air fryer with your own hands is carried out in several stages:
- the quartz lamp grille is unscrewed;
- the lower fan blades are dismantled;
- the partition between the blades is removed;
- the upper “cage” is removed (the motor of the device opens behind it);
- the quartz lamp is removed, attached with brackets to the partition;
- If you need to replace a quartz lamp, you need to remove the cable connectors.
Before starting work, you should carefully inspect the air fryer body and find all the screws that are hidden in deep grooves or behind decorative plugs.
The steel blades should be removed from the back, where the grip nut is usually located. This will be much more convenient and safer.
Don't forget that before you start repairing your air fryer, do a full diagnostic. There are several reasons that can be confusing:
- the socket is out of order;
- the device is incorrectly configured or the wrong mode is selected;
- The lid is not closed all the way.
Sometimes it is cheaper to replace one or another part than to buy a new convection oven. You can repair it yourself quickly and efficiently.
Disassemble the air fryer
You should start with the grill of a quartz lamp. Then the lower blades and the partition are removed. By removing the top “squirrel cage”, we gain access to the wall of the engine compartment. Behind it is the filling of the device. The quartz lamp is attached to the partition with brackets. The cable connectors are removable, it is better to dismantle them, do not touch the metal fasteners. Unless, of course, you need to replace the quartz lamp.
We hope that now the readers of the VashTekhnik portal can repair the Hotter convection oven and repair Ves convection ovens, which are designed in a similar way. Prepare shish kebab and chicken. It comes out great, it goes into the mouth even better: om-nom-nom.
- Steamer for air fryer
- DIY bread machine repair
- Do-it-yourself repair of fluorescent lamps and chandeliers
- DIY fan repair
Good afternoon. I have touch controls in my air fryer. Now the numbers do not show completely, probably some lights inside have burned out. How can they be replaced at home?
Can you tell me at what frequency the air fryer fan should rotate?
There is a device on the convection oven that resembles a diode or resistance; the aupo bf133 Tf 133C does not ring. The air fryer is not working. What is this?
This is a 250 volt 10 amp 133 degree thermal fuse. There is no need to set it to a high temperature. It is attached by crimping, because When soldering with a soldering iron it will fail. A working thermal fuse rings with the device, 0 ohm.
The fan stopped working.
I decided to wash the top of the HOTTER air fryer, after which the fan stopped working, while the heating element was working and the symbols on the display were flashing. Best regards, Evgeniy.
The fan stopped working.
The heat-resistant glass bowl is cracked. Where can I buy a replacement?
The “Start” button does not turn on the HOTTER air fryer
Good afternoon! Air fryer SUPRA SGS-1247. After connecting to the network, everything works as it should. but after the program runs and the fan stops, the heating element continues to heat. It can only be turned off by unplugging it from the socket. I've already gone through everything, but I still don't understand what the reason is. It is not practical to carry it for repairs for economic reasons.
Please answer: where can I purchase spare parts for the HOTTER HX-1087 TIGER air fryer? Specifically the fan.
Where can I buy a hotter air fryer fan?
Common problems with air fryers
Air fryer repair may be required in various situations. Despite all its apparent simplicity, its most vulnerable part is the electrical circuit. It consists of switches on the control unit and handle. From them, current is supplied through a timer to the winding of the fan motor.
Electrical circuit of the air fryer
The parallel circuit includes a thermal relay and a quartz lamp. Some models are equipped with a conventional heating element. The largest number of failures is associated with malfunctions of the listed elements. The most common of them require separate consideration.
Doesn't respond when turned on
The absence of a response from a household appliance when turned on indicates changes have occurred in the electrical circuit. The following are subject to inspection:
- fork;
- power cable;
- a leaky closure blocker, which is usually located in the handle of the air fryer;
- all internal components of the electrical circuit.
Any home craftsman can eliminate visible defects such as broken wires or disconnected contacts. Replacing failed electrical devices will require the purchase of similar parts, their correct installation and connection. With due care and precision, this should not cause serious problems either.
Most often, the convection oven does not turn on due to a broken fuse that blocks operation when the lid is open or not tightly closed. When you press a working device, you should hear a characteristic click.
If there is no sound, test it with a multimeter by connecting to the contacts or two wires suitable for it. When you press the microswitch, the tester should display a change in its resistance from infinity to zero. To replace the fuse, you will have to disassemble the air fryer cover.
Use a multimeter to detect problem partsCheck! Sometimes an incorrectly set operating mode cannot be performed by the device.
Doesn't heat well
The absence of heating or its insufficient intensity indicates deviations in the operation of the heating element, which is a halogen heater for your convection oven or an ordinary heating element. In this case, it is necessary to inspect it for the presence of visible defects, to “ring” the device itself and the sections of the circuit leading to it. The heating device should be replaced with a similar one.
The heating element needs to be replaced with a similar one
The fan doesn't spin
When an air fryer does not have a fan working, it loses all its operational benefits. Symptoms of such a malfunction are:
- uneven heat treatment of food, expressed in the lower layers of the dish not being cooked;
- absence of the characteristic sound of a running motor.
Sometimes the cause of failure is a broken wire or disconnected contact. If it turns out that the motor has failed, you will have to replace the motor or the entire set along with the fan.
The control unit has failed
A malfunction of the control unit may result in the inability to turn on the device or in its refusal to switch modes. The biggest problem is caused by the breakdown of touch devices. In this case, expensive equipment will need to be replaced by a professional technician.
Most of these faults can be corrected with your own hands when repairing an air fryer, but if you are not confident in your own abilities, contact a repair shop.
Be careful! Often, a carelessly inserted plug into an electrical outlet or a loosely closed lid can lead to unnecessary concerns about the performance of the air fryer.
The most problematic is the breakdown of touch devices
This is interesting: How to make a kitchen hood run on battery power: getting to the bottom of it
Common problems and solutions
The most common symptoms that the air fryer has become unusable and requires repair are the following:
- No response to switching on.
- The display is active, but the device does not function.
- Poor heating level or no heating at all.
- No blower.
- Limit switch faulty.
Let's look at each reason in more detail, and whether in each specific case it is worth doing the repairs yourself or whether it is better to entrust it to a specialized workshop.
Air fryer does not turn on
If the air fryer does not react in any way when turned on, it is likely that one of the following situations has occurred:
- The supply cord is not connected to the network or its connection to the network is poor. The check is quite simple - you need to make sure that the plug is plugged into the outlet and sits tightly in it. You also need to pay attention to the place where the cable connects to the device itself - there may also be a disconnect here.
- Broken power cord. If external signs of damage are not detected, you need to test the wire with a multimeter - alternately checking each wire at both ends. If a malfunction is detected, the wire should be replaced with a new one.
- Network output not working. The convection oven may also not turn on due to the absence of a phase or zero in the outlet itself. To check, the power cord of the device must be pulled out of it, and each of its sockets must be checked with an indicator screwdriver, or use another 220V outlet in the room.
- The operating mode is not set on the control panel. When checking, zero values of parameters should be detected - first of all, time.
- The limit switch on the lid is open due to the handle not being tightly closed. Each time the device is closed, it should be accompanied by a characteristic click, confirming its tightness. Therefore, if the air fryer does not work for this reason, you need to repeat the procedure.
Similar materials
DIY air fryer repair
If you are convinced that the connection is correct, that there is voltage in the socket and that the lid is tightly closed, but the convection oven refuses to follow your commands, you need to check the functionality of its electrical components. To do this, the entire electrical circuit and its individual sections are “tested” with a multimeter in order to detect the source of the malfunction. During the inspection and to replace rejected components, you will have to disassemble the household device.
Disassembling the air fryer structure
How to properly disassemble an air fryer? Perform a series of simple operations sequentially:
- Make sure that the appliance plug is unplugged from the socket;
- Unscrew several screws and remove the quartz lamp grille;
- Remove the outer fan impeller;
- Remove all partitions that prevent access to the motor and quartz lamp;
- Disconnect the wire connectors of the faulty element and replace it.
Before assembling the repaired convection oven, make sure that the contacts of the replaced part are secure. Assembly is carried out in reverse order and ends with operational tests.
Replacing an element
If the heating element fails, replace it with a new part of the same design and power. To do this, you completely disassemble the device, insert and fix the spare part purchased in the store using available fasteners, carefully make all connections and reassemble the air fryer.
The heating element must be replaced with the same one
Sometimes the owner wants to replace a halogen lamp, designed for two years of operation, with an ordinary spiral heating element, which is usually used for 8-10 years. Such an intervention in an initially thought-out and repeatedly tested factory design will require independent production of the fastening unit. At the same time, it is necessary to take into account the change in power consumption and heat exchange conditions. Even involving an experienced craftsman in this work does not guarantee a positive result.
Air fryer: principle of operation, purpose, functions, varieties, features
To eliminate all the above-described malfunctions, no special knowledge or skills are required. Anyone can carry out repairs with their own hands in such situations. Another thing is more complex breakdowns associated with the failure of the control unit, heater or fan.
Important! You can determine the integrity of the electrically conductive part of the conductor or a separate component of the air fryer circuit during repairs with your own hands using a multimeter. To do this, you need to touch it with probes to the opposite ends of the chain. If it is working properly, the meter will give a resistance value equal to zero, and if there is a break - in the opposite direction - to the maximum.
The indicator is on, but there is no action
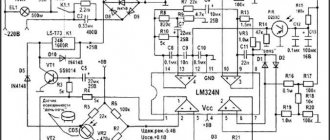
If the air fryer indication is working properly, but there is no response to pressing the buttons, that is, neither the fan nor the heater turns on, then a breakdown has occurred in the control module or one of the contacts of the electrical circuit has come loose, a typical diagram of which is shown in the figure below:
The average user sometimes does not have enough knowledge to do DIY repairs in such a situation. Therefore, it is better to take the device to a workshop.
Recommendation! For those who have sufficient practical experience in assembling and repairing radio devices, we can recommend completely disassembling the convection oven and using a multimeter to separately ring each element of the electrical circuit of the convection oven with your own hands, and replace the found broken component with the corresponding working one.
Disassembling the air fryer and checking the heating element if the device does not heat
If your air fryer heats weakly or not at all, the heater is most likely to blame. Let's look at how to disassemble, check for functionality and repair a heating element using the Hotter model as an example.
- First of all, it is necessary to dismantle the protective mesh on the inside of the device cover. To do this, you need to unscrew the three mounting screws;
- then the screws and nut in the middle securing the heater panel are also unscrewed;
- then the contacts with the terminals of the heating element are disconnected;
- after this, the heating element is checked with a multimeter and, if necessary, replaced with a new one;
- all internal supply wires are also checked for breaks;
- After repair, assembly is carried out in the reverse order.
Note! In some expensive convection oven models, a quartz lamp is installed as a heating element. In working condition, it emits a faint glow. If, when checking, it either flickers, or periodically goes out, or does not shine at all, then repair or complete replacement is required.
The fan does not spin
An indirect sign that the blower in the convection oven is not working is that the bottom of the dish is undercooked while it burns at the top. Among the obvious symptoms that the fan motor requires repair or replacement are the following symptoms that appear when the device is turned on:
- Presence of extraneous humming.
- Extraneous sounds in the form of grinding and rumble.
- Insufficient air flow.
To carry out steps to repair or replace it yourself, you need to continue disassembling the device (as described in the paragraph above using the example for the Hotter model) according to the following instructions:
- Unscrew the screws securing the fan panel;
- unscrew the electric motor;
- Inspect the drive for faults.
The most common failure of a fan motor is the penetration of fat into the shaft rotation area. As it heats up, it hardens and slows down the acceleration of the device. For this reason, symptoms such as hum and hum are observed, indicating an overload of the winding. Do-it-yourself repair procedures in this case boil down to the following manipulations:
- To begin with, remove surface fat accumulations with a rag soaked in alcohol or gasoline.
- The drive shaft is lubricated with a special lubricant, for example, “Ciatim”.
Recommendation! If special lubricant is not available, regular Vaseline can be used. However, it should be taken into account that due to constant rotation of the shaft, such a substance will quickly be used up and the malfunction will soon resume.
To eliminate problems caused by the “drying out” of the bearing (characteristic symptoms are grinding and rattling), it is necessary to lubricate it according to the following algorithm:
- remove the mounting strip from the back of the motor;
- add a portion of new lubricant inside;
- install the cover in place;
- rotate the shaft manually to distribute the lubricant evenly.
If the bearing has simply crumbled, worn out or has a crack in the cage, you can also replace it with a new one yourself, not forgetting to add lubricant to its cavity before installing the cover.
Important! All of the above procedures for repairing an air fryer fan motor with your own hands make sense if its winding is in good condition. Therefore, at the very beginning you should inspect it for integrity, and also test it with a multimeter. If a rupture is detected, the motor must be replaced. The new drive must have suitable dimensions and characteristics.
Checking the limit switch
There is another possible malfunction - a broken limit switch on the air fryer lid. If the first paragraph spoke about its not being turned on due to an improperly closed device, then in this case it means its complete failure. To repair or replace it yourself, you will need to disassemble the entire case. However, first of all, you need to check its functionality in accordance with the following instructions:
- Identify a couple of wires leading to it from the printed circuit board.
- Unsolder/cut them off from the electrical circuit and connect them to a multimeter.
- Press the limit switch and look at the device readings.
If the multimeter is in good working order, the moment you press the limit switch, it will move in the direction from infinity to zero; if it breaks, it will do the opposite.
Attention! In some cases, when repairing a convection oven with your own hands, an attempt is made to modernize the heating element - instead of a standard installed halogen lamp with a metal heating element. This is motivated primarily by the fact that the latter is designed for 10 years of work, and not for 2-3 years, like the first. However, in order to carry out such a replacement without consequences, it is necessary to take into account several factors - the manufacture of a new fastening element, calculate the power and heat transfer. All this creates additional difficulties and does not always guarantee a positive result.
Design features of the air fryer
An air fryer is a kind of oven with air draft, a mixture of a heater and a fan. A special grille performs the function of a heating element, which in turn is blown by air currents. The primary heat source is an infrared lamp. All these important parts are separated from the glass bowl where the food is placed.
The design usually consists of several elements:
- sealed glass bowl;
- a quartz lamp, covered with a grille and slightly lowered inside the bowl;
- a fan consisting of lower and upper blades (the lower ones work to blow food, and the upper ones cool the motor);
- partitions between the blades with holes for air exhaust;
- bimetallic plate for temperature control;
- control unit and display system.
The lid is usually equipped with a functional handle that completely cuts off the power when opened. Cooking begins only when the appliance is hermetically sealed. Problems may be associated with the listed elements, so repairing an air fryer with your own hands often begins with diagnostics.
Air fryer device
The convection oven is a modernized version of the household convection oven. Streams of air heated to high temperatures play an active role in cooking here. Structurally, a typical device of this type consists of:
- volumetric glass bowl;
- a quartz lamp with a grille enclosing it;
- an electric fan responsible for air circulation inside the bowl and protecting the motor from overheating;
- temperature controller sensor based on a bimetallic plate;
- a control and data display unit, which includes a mechanical timer, a temperature control knob and a pair of lights indicating the state of the switched on equipment.
Air fryer device
Need to know!
The power lock system does not allow you to turn on the device when the lid is not tightly closed. The operating principle of an air fryer is not much different from the operation of an ordinary iron. The quartz lamp gives off its energy to the circulating air and the food placed in the bowl. When the set temperature is reached, the regulator opens the electrical power supply circuit to the lamp. Repeated cycles of switching on and off make it possible to maintain the required heat treatment mode with sufficient accuracy for a period of time set by the timer.
Careful housewives, getting used to the operation of a new convection oven, try to determine the degree of readiness of a dish based on its appearance, which is facilitated by the transparent walls of the bowl. As you gain experience, the role of the timer becomes the main one.
Quick DIY air fryer repair
If the heating element fails, you can simply buy a new heating element. A regular steel model is inexpensive and can last for ten years. However, the disadvantages include slow heating and high energy costs. You can spend a little more but buy more efficient carbon or halogen heaters.
If the problem is with the thermal fuse, then usually the convection oven does not turn on at all. A short-term power surge in the network often leads to this problem. Although, before taking serious measures, it is better to also check the outlet and wiring.
Disassembling the air fryer with your own hands is carried out in several stages:
- the quartz lamp grille is unscrewed;
- the lower fan blades are dismantled;
- the partition between the blades is removed;
- the upper “cage” is removed (the motor of the device opens behind it);
- the quartz lamp is removed, attached with brackets to the partition;
- If you need to replace a quartz lamp, you need to remove the cable connectors.
Before starting work, you should carefully inspect the air fryer body and find all the screws that are hidden in deep grooves or behind decorative plugs.
The steel blades should be removed from the back, where the grip nut is usually located. This will be much more convenient and safer.
Don't forget that before you start repairing your air fryer, do a full diagnostic. There are several reasons that can be confusing:
- the socket is out of order;
- the device is incorrectly configured or the wrong mode is selected;
- The lid is not closed all the way.
Sometimes it is cheaper to replace one or another part than to buy a new convection oven. You can repair it yourself quickly and efficiently.
When you find that your air fryer does not start working, do not rush to call the repair shop. There are many minor problems that the owner can detect and fix. If you know how to hold a screwdriver, reading this article will help you save on minor repairs and avoid serious damage to any representative of this type of household appliance.
Electrical surface
First, let's talk about how to repair an electric hob and what problems this version of the stove may have. Most often, owners are faced with a situation where the hob does not work or one of the burners does not heat up when the power is connected.
In this case, the repair comes down to the following steps:
- Check the voltage in the outlet, because Perhaps this particular electrical point has failed, resulting in no power.
- Carefully inspect the cord and plug for mechanical damage. Sometimes the repair ends there - you just need to replace the electrical plug or cord.
- Remove the hob from the countertop by disconnecting all wires and unscrewing the mounting strips.
- Using a multimeter, check the thermal fuse (pictured below) and the transformer. If there is no resistance or differs from the nominal value, you need to replace the circuit elements with new ones.
- Check all wire connections (on the control unit, switches, thermostat, burners) and make sure that there is no simple open circuit. First, try to visually find the fault, and then use a multimeter to test all sections of the circuit according to the diagram.
Often, finding a breakdown of an electric hob with your own hands is not difficult if you know how to use a multimeter. If this device is not available, you can use an indicator screwdriver, which will show the presence of voltage in a certain section of the circuit.
In addition, I would like to tell you why the hob may stop working, so that you know the cause of the malfunction and how to repair each one. So, among the main breakdowns, the most common are the following:
- The fuse blows due to a power surge. Replacement is not difficult, and the cost of the fuse is negligible. To protect equipment from such a malfunction, it is recommended to install a network surge protection device.
- The burner (one or several at once) does not work. Most likely there was a break in the circuit on the heating element. If the wiring is unsoldered, DIY repairs will not be difficult if you have a soldering iron. If the heating element burns out, it must be replaced with a new one. They rang the heating element, but is it intact? Check the control unit; sometimes a contact break occurs on the switch, which needs to be either repaired or replaced.
- The sensor does not work. Here things are more serious, because... A touch-sensitive hob will be difficult to repair for a novice electrician. First, as in previous cases, ring the sensor. If you cannot find the banal cause of the malfunction, you will have to either replace the touch panel or send it in for repair. Typically, failure of this circuit element is extremely rare and is caused by improper operation of the equipment. If you find that the sensor does not turn on after washing, it means that the control unit has simply burned out from the saline solution that some would-be advisers on the forums recommend washing the surface with.
- Does not heat up or heats up weakly. Again, check the heating element, thermostat, temperature controller. The opposite situation may occur when the electric hob gets very hot and does not turn off. In this case, with a 95% probability we can say that the cause of overheating is a failure of the thermostat, which does not turn off the power when the burners are sufficiently heated. The thermostat cannot be repaired, so it must be replaced.
- The surface is cracked. The rarest of cases that can happen with a glass ceramic hob. If you see that a web of cracks has formed on the surface, and at the same time you are 100% sure that no one in the family dropped heavy dishes on it, there may be two reasons.
The first option is a defect from the manufacturer, which sometimes happens, as we were convinced of from one of the reviews on the Internet, which said that the Ariston electric hob cracked on its own and the victim was replaced with a new one under warranty. However, another explanation for the malfunction is more common - improper operation, which is described in detail in the instructions for the equipment. In the latter case, repairing the hob will be expensive and only through your fault.
We immediately recommend watching the visual video instructions, which show how to properly repair an electrical surface:
How to repair equipment yourself
Advantages and disadvantages of an air fryer
Why the air fryer is designed this way is a big question. Judge for yourself:
Inside there is a quartz lamp, separated from the working compartment by a grille. The steel is specially equipped with thick overlaps so that half of the radiation is left by the grating. Where does the rest go? Warms the table, floor, cooks, ceiling!
It's not rational. It is known that the efficiency of a halogen lamp is 98%, if the light heats the room, it is not good for cooking. The air fryer bowl is made of glass and stops ultraviolet radiation, not infrared. It's definitely useful for a cook. Infrared radiation is used for treatment, prevention, and relief of post-syndromes in diseases of the nasopharynx. You will feel the warmth of the air fryer lamp when you raise your hand. Not convective heating! When the lamp turns off, the hand stops feeling warm. The only big drawback of the air fryer.
The appliance does not operate automatically when cooking other dishes. Some will object: the multicooker is not omnipotent. However, the main recipes are automated. You will have to work hard on the side effects. In the air fryer, we consider the dominant advantage to be the advantage of obtaining fries without oil. The main dish cannot be prepared automatically. The cook must monitor the actions of the air fryer and turn the meat on the grill at the right moment. The recipe book misses the point, the chicken won't cook if it's lying on one side. The roast is baked on top, but receives little heat from below.
This is interesting: How to repair a boiler at home: we consider it in order
Control module
The most difficult problem to fix on your own requires skills in working with electronics. The control module ensures the functioning of:
- timer;
- thermostat;
- starting the device.
Externally, the control panel can be made in a push-button or more modern touch version, which is more often prone to failure. In the event of such a breakdown, the device does not turn on or refuses to accept settings for the desired operating mode.
The board is located in the device body, fixed above the lid; to access it you will have to completely dismantle the structure. After confirming that it is faulty, it is best to return everything to its place and contact a service center.
The best way to avoid malfunctions and extend the life of your air fryer is to strictly follow the manufacturer's instructions. If a breakdown does occur, there is no need to rush and rack your brains over the question of how to repair the air fryer with your own hands. First of all, you should correctly assess the complexity of the problem and possibly take your device to a specialist. This will be more expensive, but will avoid wasted time and loss of the device associated with self-repair errors.
No heating or airflow
If all the lights on the device are on, this indicates a proper power supply. But in the case when heating or blowing of the prepared products does not occur, it is recommended to contact a specialized center. With such a malfunction, most likely, there was a break in the wires connecting the parts of the device.
Advice! To fix such a breakdown with your own hands, you need to completely disassemble the convection oven to check the integrity of each wiring and the condition of all electrical connections.
Lack of heating or airflow may also be a consequence of a failure of the control unit. In this case, the following elements do not work:
- timer;
- thermostat;
- mode switch button.
The problem with the control unit most often occurs in cheap, non-original devices without certificates with touch screens. The problem is considered one of the most complex breakdowns, requiring special knowledge in the field of electrical engineering to resolve. In case of malfunctions of this kind, it is better to immediately disconnect the device from the network by removing the plug from the socket.
To repair it yourself, you need to check the integrity of the contacts and ring the board using a tester (multimeter). If there are no signals, then repairs at home will be very difficult for non-professionals. It is better to take the unit to a repair shop.
Checking the limit switch
The limit switch on the lid was mentioned earlier. To get to it, you will have to disassemble the entire body. But you can check its serviceability in another way. To do this, you need to determine which wires go to it from the printed circuit board. This is not at all difficult: two conductors go in his direction. We disconnect them from the electrical circuit board and connect a multimeter to them. When you press the limit switch, the resistance on the tester display should change from infinity to zero. Otherwise, the limit switch is faulty and needs to be replaced.
Possible malfunctions of a fairly cheap Hotter model are discussed above. Similar manipulations can revive similar convection ovens from Supra. Expensive convection ovens have a more complex structure; they are controlled by electronic circuits, so it is better to repair them in service centers, although you can try to fix some of the faults listed above yourself.
Source
Popular models of Supra air fryers
AGS-1201 and AGS-1221 are considered popular models; they can be purchased for about 55-60 dollars.
Model 1201 has the ability to regulate the temperature; a heating element is used for heating; its power is 1300 W. In model 1221, the temperature is not regulated, there are functions of delayed start, self-cleaning and a carbon heater. This is where the differences between them end. In both models, the lids are removable, there is a timer, and mechanical control. When opened, the device will automatically turn off.
One of the latest models is the Supra AGS-1241 multifunctional convection oven with a 1300 W halogen heater. It states almost all the functions that an air fryer can perform: grilling, frying, barbecuing, baking, stewing, boiling, sterilization and others. There is a delay start timer. This is currently the most expensive Supra air fryer; you can buy it for $80-85.
All of the above convection ovens have the ability to increase the useful volume to 17 liters due to an additional ring.
The most inexpensive model (only about 50 dollars) is AGS-1101 with a mechanical control type. The flask is designed for 11 liters and cannot be increased. In this model, among other things, you can steam cook.
Another Supra AEG-1211 model with mechanical control and a halogen heater. It differs from 1241 only in the type of control. Costs approximately 55-60 dollars.
It is difficult to place any increased demands on the quality and functionality of equipment in this price category, but, nevertheless, Supra air fryers are performed properly, and the guarantee for them is the same as for more expensive equipment. There are no extra features of dubious usefulness that increase the price. In the event of serious breakdowns (failure of the heating element), especially after the warranty period has expired, it will most likely be easier to buy a new convection oven than to repair it. Supra is the best budget air fryer option!
Why the air fryer does not work: obvious reasons
An air fryer is called a jet oven. One such device can replace several at once. Therefore, there is simply a huge number of dishes that can be prepared according to various recipes. All you need to do is put the necessary products into the device and set the appropriate program. All you have to do is wait a little while the beep sounds.
For example, a 1 kg grilled chicken can be cooked in just forty minutes. Moreover, the entire process can be observed through transparent elements.
But sometimes there are problems with the performance of this device: it does not heat, does not turn on, the fan does not work. To make the correct repair, you will need to determine the cause of the failure.
Causes
If we consider the convection oven structurally, then it is a relatively simple technical device in which, in fact, only three components can break: the heating element, the thermal fuse and the control unit.
Thermal fuse is broken
In this case, the problem can be considered the smallest. Eliminating the cause will not be difficult.
It costs a lot to repair an air fryer if this element breaks. After all, it cannot be repaired, but it costs a decent amount. True, sometimes it is possible to restore the device. But only specialists can do this, and not always.
Broken heating element
This is also a solvable problem. All you have to do is buy a new one. However, some clarification is needed here. The fact is that previously a steel heating element was used in this capacity. It can serve reliably for ten years. However, such an element has disadvantages: it is not environmentally friendly, high energy costs, and slow heating. As a result, it was replaced by carbon and halogen elements.
Such devices not only save energy, but also heat food more quickly. They provide illumination from inside the air fryer. As a result, the cooking process is clearly visible.
Moreover, halogen radiation can kill bacteria. Also, a halogen heating element is cheaper. As a result, it is most often used in popular air fryer models.
However, there is a problem - the fragility of such heating elements. The service life is about two years. Although the savings on electricity bills over such a period may be enough to purchase several items.
There is one more drawback. The supply of such air fryer components to the regions is not well established. As a result, the breakdown of such an element may be associated with the need to search for spare parts.
But let’s return to the consideration of breakdowns and possibilities for eliminating them.
Doesn't turn on
In this case, you should disassemble the device and check the fuse.
If there was a power surge in the network, this element could fail, thereby preventing further power supply to the air fryer.
If a visual inspection confirms the assumption, the fuse will have to be replaced with a new one. The location of this element can be determined using the diagram attached to the instructions.
It should be noted that disassembling the convection oven should only be done in extreme cases. After all, sometimes it happens that we forget to plug in the device and think that it is broken. Although there is no problem. Therefore, you should first try all possible options before proceeding with “surgical intervention”.
And the device should be disassembled strictly following safety precautions.
Fan doesn't work
If it turns out that the fan in the device will not work, you should disassemble the convection oven, get to this element and visually assess whether there is any damage and whether all wires are connected properly. If the wiring is broken, it needs to be soldered using a soldering iron and solder. Otherwise, the fan may need to be replaced. To do this, you need to purchase one that is similar in size and characteristics.
Not warm
The problem is either in the circuit or with the heating element. Everything should be visually assessed after disassembly. If there is a break in the circuit, it needs to be reconnected. If the element has carbon deposits or its size has changed, it will have to be replaced. Sometimes it is possible to restore the device, but this is most often done by specialists.
On your own or with the help of a specialist?
How to carry out repairs is up to everyone to decide for themselves. After all, for this you must have at least basic knowledge and experience in handling technology. If there is no such luggage, then you should still contact the workshop. This will be more reliable, and the likelihood of restoring the air fryer’s functionality will increase significantly.
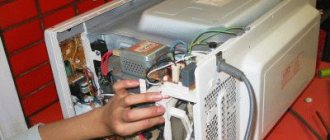
Do-it-yourself repair of Hotter air fryer, model hx 1037 classic.
In this article we will tell you how to repair a Hotter HX 1037 classic air fryer with your own hands; the air fryer motor does not work.
For repairs, we need a Phillips screwdriver; in our case, we use an electric screwdriver. a screwdriver, if you have one at home, you can use it, it will make the repair easier.
Take a screwdriver and unscrew the 3 bolts of your hotter air fryer and remove the top cover.
Next, take a screwdriver and unscrew the 4 bolts that secure the lower part, as well as the 4 bolts that hold the air fryer blower motor.
In this article, we examined one of the possible options for self-repair of the Hotter hx 1037 convection oven. As can be seen from this material, making repairs yourself is not difficult, and you can repair your device yourself at home.
Source
The control unit has failed
Well, the last, most complex malfunction is when the control unit - timer, thermostat, power button or mode switching - does not work. In this case, the opposite situation may even occur when the convection oven does not turn off. Most often, this situation occurs with touch screens; although they are convenient, they are more susceptible to breakdowns and expensive repairs.
The only thing you can do is check the integrity of the contacts and ring the touch panel with a tester. If it really doesn’t work, the repair will be beyond the capabilities of a novice electrician, so you will have to take the equipment to a service center. Don’t be afraid, because the situation when the convection oven does not work due to a malfunction of the control unit is very rare and only occurs if you bought a cheap Chinese model of the device.
So we have listed all the most popular malfunctions of this type of household appliances. As you can see, it is quite possible to repair an air fryer with your own hands, so if the device does not work, now you know what to do to repair it yourself!
Also read:
- How to choose an electric grill for your home
- How to detect a short circuit
- The fan heater does not heat - how to fix it yourself
Doesn't heat well
If the convection oven does not heat up or only heats up weakly from below, we can say with confidence that the heating element is not working. The cause of the malfunction may be wear of the heating element at the end of its service life or an open circuit. In the latter case, you can try to repair the damaged area, but according to many reviews on the Internet, it is easier to buy a new part than to spend more than one hour on repairs.
By the way, it should immediately be noted that more often the heating element in the form of a halogen lamp fails, the service life of which is already 2 years compared to the 10 years of a metal heating element. If the lamp under the cover does not heat, you should not replace it with the same one. It would be much more correct to replace the heating element yourself with a metal one. In this case, you will need to dismantle the protective grille, remove the brackets, unscrew the heater and disconnect the wires. After replacement, the parts are assembled in the reverse order. As you can see, you can repair a convection oven with your own hands, which does not gain temperature, without any specific knowledge in electrical engineering!
Doesn't respond when turned on
The first malfunction that is encountered most often is that the air fryer does not turn on. There is no need to panic, because sometimes the following trivial situations can cause a breakdown:
- The electrical plug is not connected to the outlet or the contact is poor. No matter how strange it may seem, lack of power is very often the so-called reason for the breakdown of the air fryer. Pay attention not only to the contact with the outlet, but also to the connection of the cord to the equipment itself (at the back, as shown in the photo). Very often it is the last connection point that causes problems. In addition, check the integrity of the cord that you may have broken. If necessary, replace or repair the damaged area yourself. We talked about how to replace the plug in the corresponding article!
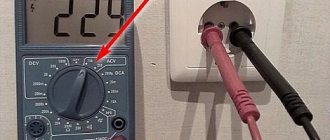
- The socket has failed. Check the connection point itself to see if there is voltage at it. The air fryer may not turn on because the outlet is not working. All you need for repair is to check the voltage in the socket with an indicator screwdriver as shown in the photo.
- The correct mode is not set. If the display lights up, but nothing happens when you press the Start button, most likely you have set the operating mode incorrectly. This will be indicated by a timer that will display the numbers 00:00.
- The handle is not lowered all the way. Many models have a button under the handle that protects the equipment from accidental activation. If the handle does not fit tightly, you will not be able to start cooking.
If all of the above points do not fit your case, you will have to carry out a more complex repair of the air fryer on your own - disassemble the body and check each element of the circuit in turn.
To test the parts, you need to use a special tester - a multimeter. Using this device, check the resistance of the fuse, which blows during power surges. If the convection oven really does not work due to the failure of the thermal fuse, replace it with a new one with the same parameters (costs pennies). Replacement instructions are provided in the video lesson:
How to replace the air fryer fuse with your own hands
If the fuse is normal, check all other elements of the circuit - heating element, control unit, and also visually inspect all wire connections. There may be a broken contact somewhere that will need to be soldered. You can see how this technique works in this video:
Review of existing models
Doesn't heat well
If the convection oven does not heat up or only heats up weakly from below, we can say with confidence that the heating element is not working. The cause of the malfunction may be wear of the heating element at the end of its service life or an open circuit. In the latter case, you can try to repair the damaged area, but according to many reviews on the Internet, it is easier to buy a new part than to spend more than one hour on repairs.
By the way, it should immediately be noted that more often the heating element in the form of a halogen lamp fails, the service life of which is already 2 years compared to the 10 years of a metal heating element. If the lamp under the cover does not heat, you should not replace it with the same one. It would be much more correct to replace the heating element yourself with a metal one. In this case, you will need to dismantle the protective grille, remove the brackets, unscrew the heater and disconnect the wires. After replacement, the parts are assembled in the reverse order. As you can see, you can repair a convection oven with your own hands, which does not gain temperature, without any specific knowledge in electrical engineering!
The fan doesn't spin
You may also encounter a situation where the air fryer does not fry the bottom of the dish or does not heat up at all due to the fact that the fan is not spinning. In this case, equipment repair comes down to the fact that it is necessary to disassemble the case and visually inspect the contacts connected to the fan. If a wire breaks somewhere, solder it. If the fan does not work completely, it is better to replace it with a new one with the same parameters and dimensions.
So that you understand the importance of good fan operation, we will now briefly describe its operating principle. When the heating element heats up to a certain temperature, the fan starts spinning and blows hot air towards the food. If the fan does not work properly, a situation may arise when the air fryer does not bake well or does not fully cook the food from below.
Air fryer: functions and principle of operation
A little about the functions of a smart car
Depending on the manufacturer and model, the air fryer can have from 6 to 12 programs. The most popular, according to reviews from those already using them: grilling, baking, roasting, drying, self-cleaning, defrosting.
Additional options include the functions of smoking, double boiler (according to reviews, it does not work completely), stirring (excellent in terms of safety, you don’t have to manually mix hot foods), sterilize dishes, heat food, cook first courses, jam.
You can delay cooking using the delayed start function.
Principle of operation
Convection is the principle on which the operation of the device is based. An electric heater located on the lid and located inside the flask heats the air to the required value. A fan, also located at the top, sets in motion a hot air mass that circulates inside the flask: from top to bottom and back to the fan. Products undergo heat treatment under the influence of uniform heating.
The temperature and flow intensity can be changed by selecting a specific mode. The built-in thermostat monitors the temperature, which can rise up to 260°. The controller turns the heating element off and on.
Advantages and disadvantages of an air fryer
Why the air fryer is designed this way is a big question. Judge for yourself:
Inside there is a quartz lamp, separated from the working compartment by a grille. The steel is specially equipped with thick overlaps so that half of the radiation is left by the grating. Where does the rest go? Warms the table, floor, cooks, ceiling!
It's not rational. It is known that the efficiency of a halogen lamp is 98%, if the light heats the room, it is not good for cooking. The air fryer bowl is made of glass and stops ultraviolet radiation, not infrared. It's definitely useful for a cook. Infrared radiation is used for treatment, prevention, and relief of post-syndromes in diseases of the nasopharynx. You will feel the warmth of the air fryer lamp when you raise your hand. Not convective heating! When the lamp turns off, the hand stops feeling warm. The only big drawback of the air fryer.
The appliance does not operate automatically when cooking other dishes. Some will object: the multicooker is not omnipotent. However, the main recipes are automated. You will have to work hard on the side effects. In the air fryer, we consider the dominant advantage to be the advantage of obtaining fries without oil. The main dish cannot be prepared automatically. The cook must monitor the actions of the air fryer and turn the meat on the grill at the right moment. The recipe book misses the point, the chicken won't cook if it's lying on one side. The roast is baked on top, but receives little heat from below.
Main conclusions
You should repair the convection oven yourself if you have experience in radio engineering work or if the breakdown is minor and uncomplicated. The most common causes of malfunctions are:
- Working indication when the device is not functioning.
- No response to enable.
- Slight heating.
- Loss of blower power.
- Limit switch failure.
Some types of repairs can be done with your own hands, strictly following the proposed instructions, others are best entrusted to a specialist, and in the most difficult situations, replace the failed component, or buy a new convection oven.
Source
Causes of malfunctions and preparation for air fryer repair
The design of this device has already been discussed above. It is not complicated, which allows you to quickly repair the air fryer yourself. Usually one of three main components breaks:
- thermal fuse;
- a heating element;
- Control block.
The third option is the most serious problem, because repairing the device in this case is quite difficult and expensive. In addition, only specialists should carry out restoration, but even they cannot guarantee a 100% result.
Breakdowns of the thermal fuse and heating element can be easily eliminated, and you can do everything yourself with minimal knowledge and tools. A multimeter is suitable for this, which “rings” all the elements.
Advice: