They contain switching protective devices that perform all the functions listed above. Device for monitoring electricity consumption.
Attach the housing to the wall. It is important to use specific recommendations and follow certain rules.
Installing an electrical panel is a complex procedure that is performed in strict sequence. ⚡⛔ ASSEMBLY of the distribution board in the apartment. How to assemble a budget electrical panel with your own hands
However, all complex concepts and processes can be presented in the form of simple recommendations.
It has several functions: It must receive energy from an external source. Next come single-pole group circuit breakers.
The neutral working conductors of the remaining groups, which are protected by conventional circuit breakers, are connected to the input common zero bus. In accordance with this project, the purchase and subsequent installation of an electrical distribution panel is carried out.
Schematic electrical diagrams of distribution and lighting boards with comments Scheme 1 Schematic electrical diagram of a lighting board for 12 circuit breakers, OSHV
The number of modules in distribution boards varies depending on the manufacturer. Electrical panel in the apartment. Switchboard
How to choose an electrical panel?
When repairing or replacing electrical wiring, the question of selecting this device arises. To select the correct electrical panel, the following criteria must be taken into account:
- Type of wiring used
. If it is open, hinged panels are better suited. If the wiring is hidden, then built-in probes are used. If the house is wooden, it is preferable to install a hinged panel. In this case it is safer. - The material from which the shield is made
(metal or plastic). A plastic body is lighter in weight and looks more modern, but is less durable than a metal one. Plastic will look better in residential areas. - The number of modules that will be installed inside the switchboard
. It depends on the sources of consumption inside the powered object. Based on the number of modules, select a shield of the required dimensions. It is better to take the electrical panel for the machines with a reserve in case of subsequent modernization. - Manufacturer of electrical panel
. The main selection criterion here is the ratio of price and quality of products.
https://youtube.com/watch?v=N2lE-7hvYBs%250D
Purchase of components
When installing distribution boards and power cabinets, the same set of components is required. We are talking about automation, terminal bars, insulated pin bushings, cable ties (they are plastic clamps).
Experts strongly recommend purchasing the entire set of components only in a specialized store that has certificates for all products sold. When purchasing automation and terminal bars, you should not take them with a reserve. As for the purchase of lugs and cable ties, it is worth taking a little more of them. It is impossible to completely eliminate errors during work, so you may have to redo something.
The modern market offers a wide selection of components, as a result of which many consumers are lost. Professionals recommend considering automation from brands such as Legrand, Siemens, ABB. Their products are distinguished by high quality characteristics. More affordable, but slightly inferior in quality are IEK (InterElectroKomplekt).
The best switchboard manufacturers
Floor distribution board Elektromol
On the domestic market there are electrical panels of Russian and foreign assembly. Among the worthy manufacturers producing quality goods are:
- Electromol. Moscow brand specializing in electrical panel equipment. They manufacture ASUs, apartment and floor switchboards.
- 1Electrical equipment. Russian company producing floor, input and distribution devices, as well as lighting control boxes.
- QMS. Novosibirsk brand, whose assortment includes ShchO panels, substations, floor boxes.
- Makel. It produces external and internal devices with transparent and opaque doors and IP40 protection. The brand does not use halogen.
- I.E.K. 98% of products are assembled in the Russian Federation, 2% in Italy, Bulgaria, and Poland. Boxes are designed for 2-96 modules. The range includes mounted, built-in, distribution and accounting devices.
- Fotka. The Greek manufacturer produces built-in steel devices with decorative front panels and doors. They have 13-80 modules, suitable for small apartments and production. The DIN rail is adjustable horizontally and vertically.
- ABC. It produces several series of switch cabinets - without frames and doors or with them. Switchboards have a row spacing of 125-150 mm, steel frames and doors, and are equipped with holders on which electrical wiring is attached.
The products of the presented brands comply with GOST standards and are distinguished by their quality and reliability.
How to check the correct functioning of the control panel
The correct functioning of the distribution board implies the massive (sequential) inclusion of each of the consumers. Next, the site is walked around and the functionality of each outlet is checked using a working device (for mobile convenience). If the automation does not deactivate, the installation work was completed correctly.
It is important to check the correctness when the control panel is loaded at full capacity. It is unacceptable if the equipment sparks, there is smoke, or a burning smell appears. All these factors indicate that one of the contacts is not made reliably, and therefore overheating occurs or the automation device is faulty. If the above points are missing, then the main components are checked using a special tester.
is ready to offer its professional services for the installation of turnkey switchboards. Our specialists are competent to: manufacture panels according to a personal project, complete them according to customer requirements, install and carry out commissioning work. All products and work are guaranteed.
Installation and connection of elements
All modern automatic devices and RCDs have a unified mounting for a standard mounting rail (DIN rail). On the back they have a plastic stop that snaps onto the bar. Place the device on the rail, hooking it with the recess on the back wall, and press the lower part with your finger. Once clicked, the item is installed. All that remains is to connect it. They do it according to the scheme. The corresponding wires are inserted into the terminals and the contact is pressed with a screwdriver, tightening the screw. There is no need to tighten it too much - you can squeeze the wire.
They operate with the power off, all switches are turned to the “off” position. Try not to handle wires with both hands. Having connected several elements, turn on the power (input switch), then turn on the installed elements one by one, checking them for the absence of a short circuit (short circuit).
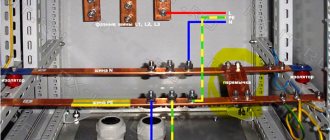
Connecting the input machine and RCD
The phase from the input is supplied to the input circuit breaker, from its output it goes to the corresponding input of the RCD (place a jumper with a copper wire of the selected cross-section). In some circuits, the neutral wire from the water is supplied directly to the corresponding input of the RCD, and from its output it goes to the bus. The phase wire from the output of the protective device is connected to the connecting comb of the machines.
In modern circuits, the input circuit breaker is installed with two poles: it must simultaneously disconnect both wires (phase and neutral) in order to completely de-energize the network in the event of a malfunction: this is safer and these are the latest electrical safety requirements. Then the circuit diagram for switching on the RCD looks like in the photo below.
When using a two-pole input circuit breaker
To learn how to install an RCD on a DIN rail, watch the video.
In any circuit, the protective grounding wire is connected to its own bus, where similar conductors from electrical appliances are connected
Grounding is a sign of a secure network and doing so is vital. Literally
To learn how to properly connect an RCD, watch the video tutorial.
When assembling the panel yourself, please note that the input machine and the meter will be sealed by the energy supply organization. If the meter has a special screw onto which a seal is attached, then the input machine does not have such devices. If it is not possible to seal it, you will either be denied entry or the entire panel will be sealed. Therefore, inside the common panel, a box is placed in one or two places (depending on the size and type of machine), and the input machine is mounted in it. This box is sealed upon acceptance.
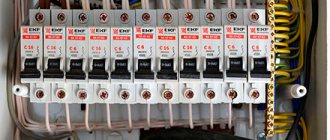
Individual automatic machines are installed on the rails exactly like an RCD: they are pressed against the rail until it clicks. Depending on the type of machine (one or two poles - wires), the corresponding wires are connected to them. What types of circuit breakers are there, and how devices differ for single- and three-phase networks, see the video; the choice of circuit breaker rating is described here.
After the required number of devices are installed on the mounting rail, their inputs are connected. As they said earlier, this can be done with wire jumpers or a special connecting comb. See the photo for what the wire connections look like.
The machines in one group are connected by jumpers: the common phase arrives
There are two ways to make jumpers:
- Cut the conductors into the required sections, expose their edges and bend them in an arc. Insert two conductors into one terminal, then tighten.
- Take a long enough conductor and strip off 1-1.5 cm of insulation every 4-5 cm. Take pliers and bend the exposed conductors so that you get interconnected arcs. Insert these exposed areas into the appropriate sockets and tighten.
They do this, but electricians say the quality of the connection is poor. It is safer to use special tires. Under them on the case there are special connectors (narrow slots, closer to the front edge), into which bus contacts are inserted. These tires are sold by the meter and cut into pieces of the required length using ordinary wire cutters. Having inserted it and installed the supply conductor in the first of the machines, tighten the contacts on all connected devices. Watch the video on how to connect machines in a panel using a bus.
A phase wire is connected to the output of the machines, which goes to the load: to household appliances, to sockets, switches, etc. Actually, the assembly of the shield is completed.
Types and sizes of electrical panels
There are two types of distribution boards, depending on the location of their installation:
- External.
- Internal.
An electrical panel is a metal or plastic box of a certain size (depending on the power, the number of circuit breakers, the purpose of the equipment), containing DIN rails for fastening the machines, an outlet and a place for laying wires. Most often, ready-made boxes made of metal coated with polymer powder or plastic of certain sizes are available for sale.
TIP: When assembling the equipment yourself for the first time, you should choose a box that is larger than required. More space will greatly facilitate the assembly and installation of the electrical panel.
When installing a distribution board outside the room, you should decide on the type of installation:
- Mounted.
- Built into a wall or niche.
The peculiarity of a separate wall-mounted box is that its appearance, as a rule, is more presentable. The box is made neatly and has a lockable lid. This will provide protection against unauthorized access to the switches. For an existing niche, you can select equipment of a certain geometry, size and thickness.
External devices protrude an average of 20 cm when installed on a wall made of non-combustible materials. Otherwise, you should take care of safety by placing insulating material attached to the surface over the entire area of the box under the base of the shield.
Particular attention should be paid to the mounting height. Metal boxes have sharp corners, which significantly increases the likelihood of injury. It is best to mount equipment no shorter than the tallest person in the family.
You can also place the box closer to a corner or just behind the door so that the equipment does not interfere with free movement in the room. With hidden installation, the box is walled up, leaving only the door at the level of the wall surface. Even if it protrudes a few millimeters, this does not spoil the appearance if placed correctly.
The distribution panel without “filling” consists of the following elements:
- Grounds.
- Protective cover.
- Din-rack.
- Latches for fixing DIN rails with the possibility of retrofitting with new circuit breakers as needed.
- Doors.
The base provides space for:
- Mounting of the device itself.
- Terminal block fastenings.
- Laying of wires.
- Mounting holes.
The protective cover is located under the door and allows you to protect the internal wiring from contact, leaving only the switches accessible.
IMPORTANT: When purchasing a distribution panel, it is necessary to provide free space for additional switches. It is possible that this may be needed in the future. Approximately 1/5 of the space should be left empty.
Automatic machines come in single- and double-pole types. Their thickness is 1.2 and 2.4 cm, respectively. The number of sockets, lighting fixtures, and electrical equipment in the apartment determines the required number of switches. From these calculations, the optimal size of the box is selected, taking into account the square and rectangular shape.
Switchboard ShchR - what is it?
As you climb up the landing, the first thing that catches your eye is the new switchboard, which was installed only recently. Gray, shiny, what hides behind it?
The ShchR distribution board is a metal structure divided by a partition into three compartments: metering, distribution and low-current compartments. Meters, circuit breakers and shutdown protection devices are installed in each panel compartment accordingly.
ShchR distribution boards are actively produced and sold by our company. The produced ShchR are designed for receiving and distributing electrical energy in three-phase four-wire and five-wire networks with a voltage of 380/220 V and a frequency of 50 Hz with a grounded neutral. ShchR distribution boards protect group circuit lines from overloads and short circuits. You can see all the technical characteristics of ShchR on the same page above.
ShchR distribution boards are installed not only in lighting, but also in power plants of residential buildings, public and industrial buildings, as well as administrative and other similar structures. Light and electricity in apartments is not possible without ShchR distribution boards. They are used not only to power them, but also to install devices for television, telephone and radio broadcast networks.
ShchR distribution boards are made of high-strength steel, they are convenient and reliable. For more durable use, the following requirements must be met: altitude above sea level no more than 2000 meters, ambient temperature from +5 to +40 degrees and humidity no more than 60%. The optimal environment for the operation of switchboards is one that does not contain aggressive vapors and gases, is not explosive and is not saturated with conductive dust. When installing shields, you should avoid places with high humidity, direct exposure to radiation and sudden shocks and shocks. The ShchR should be installed strictly vertically.
And again returning to the landing, you see the already familiar distribution meter with a window for taking readings. Now he no longer seems so mysterious and incomprehensible.
With MEC ELECTRICA, many things become simpler, clearer and more profitable.
Types of ShchR
ShchR come in several varieties. They differ:
- purpose;
- installation method;
- material used in the manufacture of the case;
- degree of dust and moisture protection;
- dimensions;
- the number and type of electrical equipment that can be installed in them.
According to their purpose, ShchR are:
- the main ones. Their task is to provide electricity to the entire facility or a significant part of it;
- AVR. They are an automatic switch to a backup line in the event that the power supply is interrupted;
- SCHO (lighting boards). With their help, lines for lighting are connected;
- ShchS (power shields). Supply power consumers with electricity;
- ShchE (floor panels). First, the distribution board is installed , then they are installed;
- ShchK (apartment shields). The connection is made to the power distribution board.
Separately, it is worth noting equipment that not only distributes electrical energy and protects electrical circuits, but also takes into account the consumed energy (a meter is installed for this purpose).
Principles of distribution of electricity by groups
Distribution boards, in which several machines are used for the entire apartment, are a thing of the past. The need for a large number of modular devices is explained by convenience and increased safety. If an outlet breaks down in one of the rooms, you can turn off one circuit breaker, and the rest of the network will continue to operate as normal. The basic rules for assigning groups are described below.
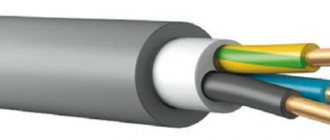
- Powerful consumers. All devices with a power of more than 2 kW are connected separately or combined into small groups. For each of them, a separate line is drawn with an individual circuit breaker. As a rule, the cable cross-section and machine rating are chosen with a small margin. For most cases, a copper cable VVGng or NYM with a cross-section of 2.5 mm2, as well as a 16A automatic, is suitable.
- Heavy-duty devices require separate lines. Such devices may include instantaneous water heaters from 5.5 kW and hobs, the power of which starts from 6.5 to 9.5 kW. To connect them, use a cable with a cross-section of 4 or 6 mm2, as well as 25A and 32A circuit breakers.
- Outlet groups are combined by room, and several groups are also created for one large room. The common line runs from the panel to the junction box, where the cable branches. A VVGng or NYM cable with a cross section of 2.5 mm2 and a 16A circuit breaker are sufficient.
- Lighting is distributed throughout the rooms. For example, different groups for the bathroom, bedroom, balcony. Lines with a 1.5 mm2 wire are protected by 10A circuit breakers.
Technical task
An electrical panel project, like any project, begins with the formulation of technical specifications .
First of all, it is necessary to collect a large array of initial data .
Basic data for the project:
— Input type;
— Dedicated power;
— List of consumers by room (so-called electrical points);
— Backup power from the generator;
— Voltage stabilizer, UPS, etc.;
— Undisconnected lines;
— Availability of automation, etc.
After the requested initial data has been received, it is necessary to analyze, process it and agree with the customer on points that require clarification.
Often you have to meticulously clarify some points and details; this process can be significantly extended over time.
⚠️The result, the outcome of the first stage, is a clear TECHNICAL TASK agreed with the customer for the implementation of the electrical panel design project.
Emergency input of backup power (ABP)
This electrical panel is capable of providing emergency power in the event of a main system failure. This type of device can be considered the most common, and it is used in almost every electrical network. If electricity suddenly stops flowing into the system, then the AVR will automatically switch it to the emergency power source.
AVR
Most often, two subtypes of AVR shields can be used:
- Priority shield. There is only one power channel here.
- Non-priority shield. Any power source can be the main one.
You need to choose a specific product depending on personal preferences, as well as the characteristics of the electrical network.
Regulatory documents and rules
Requirements for installing an electrical panel are specified in GOST 51321.1-2007
The panel is a switchgear operating under voltage up to 1 kW. Its features are discussed in Chap. 4.1. 7th edition of the PUE. The requirements for the ASU in a residential multi-storey building are specified in GOST 51732-2001, and for switchboards - in GOST R 51628-2000. Since the apartment electrical panel is a low-voltage switchgear and control device, you need to refer to GOST 51321.1-2007.
Basic requirements and installation rules
GOSTs and PUE indicate the correct way to connect the panel.
The standards note several points:
the presence of a complete circuit with the rating of the circuit breaker, the type and cross-section of the cable, installed and one-time power, protection parameters of the housing shell; installation of modules equipped with a nameplate inside or outside is permitted; mandatory affixing of the “Caution Voltage” sign in the form regulated by GOST R 12.4.026; selection of cable cross-section for laying inside according to the rating of the circuit breakers;
selection of wire insulation capable of withstanding an alternating current voltage of at least 660 V; protection of bolted connections from vibrations and short circuits with disc springs, controllers, spring washers, tips; assembly of neutral conductors on N and RE buses; connecting the REN wire to the RE panel; use of terminals to protect input and output wires; performing work using screwdrivers with slots for screw slots, tools with insulated handles; cable marking with colored PVC tubes - blue/light blue (working zero), yellow-green (protection zero), red/brown (phase); marking of N and RE bus contacts according to the serial numbers of protective circuit breakers; connection of one conductor per bus terminal N or RE; designation of outgoing cables with round (line voltage from 1000 V), square (voltage up to 1000 V), triangular (control) tags.
Which case is more reliable - metal or plastic?
Metal distribution panel in a wooden house
The apartment panel is available in metal and plastic casings. The choice of material depends on the project, design specifications and financial capabilities of the user.
The metal electrical panel has a number of features:
- reliable landing on protective zero;
- high anti-vandal characteristics;
- good fire resistance;
- installed on the street or in the entrance;
- moisture resistance class IP31 – IP54.
The disadvantage of a metal case is the need for grounding. The third wire will need to be brought out from the main power supply panel of the apartment.
Plastic electrical panel near the door in the hallway
The plastic case has the following characteristics:
- suitable for interior design;
- can be built into a special niche;
- resistance to wet environments;
- beautiful transparent or tinted door;
- excellent dust resistance.
If the insulation is poor, there is a risk that the plastic will ignite and cause a fire. In this case, it is better to purchase a box made of textolite.
Required Tools
To install distribution panels yourself, you will need a whole set of tools. To properly connect all components and connect consumers, you cannot do without:
- an insulation stripper, through which the wiring is effectively and safely exposed;
- a manual clamp, through which crimping of the tips will be performed;
- wire cutters (modern). Required to make a perfectly flat cut of PV3 stranded copper wires.
Having prepared insulated screwdrivers, it is also worth taking care of the availability of cordless screwdrivers, which will allow you to speed up the process of tightening screws as much as possible. Some modifications to the control panel will require a set with open-end/socket wrenches.
Scheme of a panel with an RCD for individual groups
Electrical panel diagram with RCD for individual groups
The RCD device operates at a load from 1 A to 80 mA, which prevents electric shock and death in cases of leakage. The device is suitable for residential premises where the electrical wiring has a total length of 400 m.
You can disable the apartment as follows:
- Installation of the device at the input. An RCD with a response limit of up to 30 mA is suitable for an apartment with a single-phase load of 11 kW.
- Protection against current leakage is also installed on the outlet lines and the split system group.
- One device is located on an integrated system, where each group has a circuit breaker.
- Installation of a standard circuit breaker with metal housings for lighting fixtures.
Advice from professionals
Now it would be useful to seek advice from professional electricians who will help you more competently connect the electrical panel and simplify its operation.
When installing a distribution board in an apartment or house, it is advisable to create a diagram of all connections with clear symbols. It can be drawn or printed on paper and glued to the inside of the panel housing door. This will allow, in the event of an emergency and the owner’s absence, almost anyone to quickly turn off or turn on the power.
For ease of maintenance and repair work, all wiring groups inside the distribution board are grouped according to the purpose of the lines. Grouping can be done using insulating tape or plastic clamps. Tags with appropriate inscriptions are attached to each group. When repairing wiring, you won’t have to rack your brains about which wire is responsible for what and avoid unpleasant mistakes.
Once again we remind you of the importance of correct connection of circuit breakers - the input conductors are inserted from the top. For reliability, inspect the markings on the devices; most manufacturers place on them a diagram of the correct connection and the question of how to connect the machine in the panel disappears by itself. Model panelSource static.wixstatic.com
Model shieldSource static.wixstatic.com
After a test run, the switchboard has been assembled or repaired, it is left open for several hours. In this case, it is desirable to increase the load on the network to the maximum. After a couple of hours, you can check whether the components of the shield are heating up.
With proper assembly and calculations, there should not be an increased temperature. Otherwise, you need to turn off the shield and look for the source of the problem. If this is not done, a short circuit is inevitable.
Approximately once every six months it is necessary to tighten all the screws inside the distribution board
This is especially important when using aluminum wires in the network. Professionals recommend not sparing three places for installing a modular socket in the panel
This will allow you to connect various tools and lighting to the panel, completely de-energizing all lines.
Professionals recommend not sparing three places for installing a modular socket in the panel. This will allow you to connect various tools and lighting to the panel, completely de-energizing all lines.
To create a high-tech distribution panel, it is recommended to install a voltage relay in it. This device will monitor network performance and, in the event of a critical surge or drop in voltage, will automatically turn off the load. After restoring the nominal parameters, it will turn on. In this way, you can reliably protect electrical appliances that have increased requirements for network voltage.
Outdated machines - “traffic jams” Source homemasters.ru
Once again, pay attention to the dimensions of the case; as mentioned above, it should be “expandable”, providing the possibility of expanding the system. A more spacious housing reduces mutual overheating of elements and increases their service life.
Pulling the contact fastenings can be combined with cleaning the inside of the switchboard housing. Dirt causes the shield elements to heat up more, and dust and cobwebs can become sources of short circuits.
Another example of shield assembly in the video:
Commissioning works
After completing all the manipulations for assembling and installing the electrical panel, you should put the switches in the “Off” mode and proceed to the final stage - commissioning.
Instructions for testing and debugging:
- The check is carried out after complete installation of lamps, switches, sockets and other electrical installation devices, connections on all dedicated load lines in sockets.
- Voltage is applied to the input of the electrical probe, the presence and value are checked with a multimeter, the correspondence of zero and phase.
- All differential circuit breakers and RCDs are connected in series, with the functionality checked by clicking on “Test”, after which they are turned on again.
- All terminals of automatic switches are checked with a multimeter to determine the presence of voltage at the input.
- The circuit breakers are switched on in series and the output terminals are checked for voltage;
- When electrical appliances are switched on sequentially, the operation of the switchboard is monitored for each consumer line, and the absence of smoke, heating of modules, and sparking is recorded. Otherwise, the problem is found and eliminated.
- Each outlet line is checked for the size and presence of voltage.
- The performance of lighting lines is tested.
- Leave the shield open for several hours and check its functioning.
If the test is successful, all internal parts of the electrical panel should be closed. Colored stickers with markings and identification of each switch should be placed on the surface of the cover or plastron.
To protect the inscriptions, it is sealed with transparent film or tape. In the case of an opaque door, the device diagram should be placed inside it, pasted on tape or placed in special clips (provided in some models).
How to insert cables correctly
An electrical panel with a removable cover will help you insert the wires inside correctly and conveniently. Conventional enclosures have holes for cables that are slightly cut or pressed out. They are located at the top or bottom of the body. They may also be in its back wall.
In electrical panels of low quality, there may not even be a hint of any holes. Then you will have to mark and drill them yourself; not everyone has the patience for this. Therefore, it is better to buy a housing that is more expensive and will take less time to install.
The first step is to start the input core. It should be located near the input machine. There are comb-type fastenings on the shield; the lead-in conductor should be attached to it. A plastic clamp is used as a tie. Its excess ends are cut off.
The cable is marked with markings, which are indicated on the diagram. This is done with all veins. After their installation, a removable cover is applied and marks are made on it. Cutouts are made along them, and the lid falls into place.
Hardware Specification
The circuit and layout of the electrical panel have been developed!
In order to carry out the subsequent assembly of the electrical panel, it is necessary to order all the necessary equipment, materials and the housing of the future electrical panel.
⚠️Therefore, at this stage, using the current catalog of the selected manufacturer of electrical products, a detailed specification of the entire filling of the electrical panel is prepared. For each element, article numbers and catalog numbers and their quantity are indicated on the diagram.
ShchRN and ShchRV shields
The most popular electrical panel is a ShchRN or ShchRV shield. These products are modular. They contain a DIN rail
on which any modern devices for protection, metering and distribution of electricity can be easily attached. Now you can simply buy an electrical panel and fill it yourself with the devices you need.
The combination of devices with a universal mount is limited only by your needs and finances. Shields of the ShchRN brand can be used for two types of wiring (open and hidden), but ShchRV products have a special collar along the edge and are used only for hidden wiring.
Installing an electrical panel is absolutely not difficult, since both models are produced in two versions: with a metal body or impact-resistant, non-flammable plastic. Both options can be easily mounted in a niche or on a wall and have an aesthetic appearance.
Photo tips for assembling the shield
1+
Read here! Heat shrink for wires: all types and characteristics. Detailed description of how to choose and use heat shrink
Create a schema
An electrical panel in a private house or apartment begins with design work, namely the creation of a wiring diagram. In this case, it is advisable to adhere to a rational approach to the distribution of future elements. This will not only make the device more compact, but also save on wiring. At this stage, the location for installation of the finished equipment is finally determined.
How to calculate the number of places in an electrical panel
A rational approach to the design of a switchboard, first of all, implies a competent calculation of the number of meters for the installed equipment. In practice, there is nothing difficult about this, since all modern components of electrical panels have strictly standardized dimensions.
One module is considered as a unit of measurement here. This area is equal to the space occupied by a single-pole circuit breaker. Its width is 17 and a half centimeters. This standard is international and is suitable for any modern electrical components.
To make your calculations easier, we offer you a table with the main components that may be required in a switchboard.
Module size table:
Example of a simple calculation for a distribution board
For a practical understanding of how such calculations are carried out, we will give a small example for a simple distribution panel in an apartment or private house.
The figure shows a diagram that includes an electrical energy meter. According to the conditions of our task, the main line was entered using a VVGng cable with a cross-section of 3 * 6 square millimeters. Now let’s count the modules installed in the panel and the space they occupy:
- input circuit breaker with two poles = 2 modules;
- then an electricity meter is installed = 6 modules;
- after the meter two RCDs = 4 modules;
- six single-pole circuit breakers = 6;
- zero buses intended for two RCDs = 2.
Let's sum up the results by summing up all the modules and get - 20 places and this is for the simplest distribution board. Since all experts recommend including a certain reserve in the calculations in case of installing additional components, we understand that the housing for the shield must be purchased for at least 24 places. It is advisable to increase this value to 40, so as not to subsequently encounter the problem of lack of space.
Diagram of a small distribution boardSource avatars.mds.yandex.net
A few words about RCD
When designing and installing, it is important to remember one more point - the inclusion of an RCD in the circuit. This abbreviation stands for - residual current device
Like an automatic circuit breaker, an RCD is a protection device, but much more sensitive.
Circuit breakers are designed to operate with short circuits in the network. The current at such loads can reach hundreds of amperes. However, even a couple of tens of milliamps can have a detrimental effect on human health. RCDs protect against precisely such troubles.
For example, a child puts a foreign object into the socket, and the current will be instantly turned off. Plus, you need to add a type of grounding in the apartment. A system with three phases and zero (international standard TN-C) is already widely used. The RCD in such a system is the only and reliable protection against overloads.
Features of choosing locations for installation of distribution switchboards
In order to determine the area where the control panel will be installed, it is worth proceeding from two basic principles. Firstly, the place must comply with the PUE and PB. Based on them, it is unacceptable to carry out installation if gas communications, appliances, and powerful heat sources are located nearby. Experts also strongly recommend screening out places where the humidity level is high or where there is water supply (especially if the design is not waterproof).
Secondly, you should be guided by the convenience of placement. If the equipment is planned to be used in a small apartment or private house, then it is advisable to install the control panel closer to the entrance. If installation is planned in a narrow place, you should give preference to built-in solutions. With this approach, when using, the consumer can be sure that the control panel will not be damaged, for example, when moving interior items, a refrigerator, etc., and there will be no problems with quick access.
If the areas are spacious and have a large number of separate rooms, then other schemes can be considered. As an example, we can give the following: accounting cabinets should be located at the entrance, and accounting cabinets in the central zones. This solution helps to save cable and wire products and radial connection scheme for electricity consumers.
Simplified diagram of an apartment panel
Scheme No. 1
This scheme is suitable for small one or two room apartments. Where the total length of all wires and cables does not exceed 300-400m.
There is a load switch at the input, not a circuit breaker. If you already have protection installed on the floor switchboard, after or before the meter (check this before assembling this circuit), then it is not necessary to install a machine at the input. The better the load switch from the machine can be found in the article Modular load switch or incoming machine.
The rated current of the input device for apartments with electric stoves and single-phase load should be from 40A and above. Below are group cables feeding certain groups, indicating the cable brand and its cross-section depending on the load. Outgoing lighting circuits made with a 1.5mm2 cable are protected by a 10A circuit breaker, socket groups with a cross section of 2.5mm2 are protected by 16A.
The bathroom is connected to the differential machine, i.e. sockets, lighting and all consumers in the bathroom are combined into one group. Moreover, the leakage current on the diff is selected to be 10 mA.
Some electricians set it to 30mA, citing possible false alarms. There is no specific prohibition in the rules; it stipulates that this protection should not exceed 30 mA. Why it is still better to set it to 10mA can be understood by familiarizing yourself with how a current of a certain magnitude affects your body:
True, in order to purchase 10mA differential automatics in stores, you will most likely have to place an order. Basically, devices with a leakage current of 30 mA predominate on the free market.
The hob and oven are powered in separate groups, implying that these are two different consumers. If you have an electric stove, that is, when the hob and oven are combined, you need to change the power cable and circuit breaker:
Scheme No. 2
If you are concerned about power outages and want to protect your equipment from power surges, then you can slightly increase the cost of the circuit by adding a voltage relay to the input. Here is a schematic representation of a relay of the UZM-51M brand, as the easiest to connect (input-phase + zero and output-phase + zero).
Scheme No. 3
The advantages of these schemes:
- inexpensive
- the best option for small apartments
- easy to install and connect
The big disadvantage of the circuit is that if there is a current leak in lines other than the bathroom, the protection will not work.
This circuit can be improved by placing an RCD at the input. Before doing this, make sure that a circuit breaker is installed in the floor panel where your meter is located, since it is prohibited to install an RCD without a circuit breaker. If there is already an RCD or automatic circuit breaker there, then it makes no sense to duplicate the protection. The circuit with the RCD at the input will be like this:
Scheme No. 4
One caveat - if your total cable consumption in the wiring of an apartment is 400 m or more, then false alarms of the input RCD are possible due to total current leaks. Here it is already advisable to apply the RCD to separate groups, removing the introductory one from the apartment panel diagram.
Electrical panel placement
That, in principle, is all that should be inside the electrical panel. Now let's talk about where it should be located
. There is no need to say that a shield may appear in an apartment in the event of a major overhaul or rather serious cosmetic renovation. In other cases, start with gating, plastering, etc. hardly worth it.
External and hidden installation
Installing an electrical panel begins with determining its type
: for external or hidden installation. The first option is most often used when it is impossible to make a niche in the wall for hidden installation, which looks more aesthetically pleasing. A minimally protruding electrical panel from the wall not only looks beautiful, but also does not bother anyone.
Choose a place for the shield
should take into account the furniture that will be in the hallway (most often there is the entry of the electrical cable into the apartment from the staircase).
It is necessary to ensure that the furniture does not cover the shield. There must be constant access to it for emergency shutdown
in the event of an accident. Installation of the electrical panel in a niche is carried out on alabaster or plaster, while the outdoor panel is mounted on dowels with self-tapping screws.
What is an electrical panel
An electrical panel is a power transmission and distribution unit, which includes protection devices, metering devices and other switching and measuring devices. Each electrical panel contains one or more incoming lines and many outgoing lines.
Input electrical distribution board
In industrial and household electrics, electrical panels of 2 types are common:
- Power shield (PS). Designed to power powerful consumers in enterprises and ordinary electrical appliances plugged into an outlet at home.
- Lighting board (SHB). Used to connect lighting networks.
Electrical panel assembly
When the panel diagram has been created and the electrical wires have been laid around the apartment, we proceed to assembling the panel. If desired, you can order a prepared shield, which all that remains is to install and connect the input cable.
Marking and installing DIN rails
First, markings are made of where the modules will be located and how long the slats are needed. During the fitting process, they also take into account the distance between the rows, if there are several of them, as well as the distance between the zero and ground buses. When the marking is ready, the slats are installed in the required places.
Installation and switching of modular devices
At the stage of installation of modular devices, automatic machines and additional devices are installed on a DIN rail. They are also connected to each other. First of all, they install an input circuit breaker, then voltage relays, RCDs and differential circuit breakers, which are located in front of conventional switches.
Organization of cable entry into the electrical panel
At the stage of cable entry, it is necessary to make holes in the shield. As a rule, all insertion points are provided by the manufacturer, so it is enough to squeeze out the plastic. On one side, a general network cable is installed, which is connected to the input circuit breaker, and on the other, internal network wires.
Choosing an installation location
In most apartments, the shield is installed closer to the front door. This is not a mandatory requirement, the main thing is to follow a number of recommendations:
- quick access to turn the voltage on or off;
- remoteness from flammable and fire hazardous materials;
- natural lighting of the room where the shield is installed is an advantage during repair work.
Cable cutting
To cut the cable, use a special tool designed for stripping insulation. Typically, professional electricians use claws or a heel knife. The equipment increases the speed of cable handling. When cutting, remove the outer sheath, and then the required amount of insulation from each of the cores.
Connecting consumer groups
During installation, modules are grouped depending on various factors. For example, by purpose or premises. Automatic devices for apartment lighting are installed one at a time, after which protective devices are installed for the kitchen, bathroom and other rooms.
Pre-assembly of the electrical panel on the frame
To facilitate the installation and assembly work of electrical panels, you need to purchase more expensive, high-quality, functional models. It is not easy for even an experienced electrician to cope with the painstaking work, and cheap boxes complicate the process several times. It is important to ensure that the modules are installed cleanly and that all equipment is protected from contamination or moisture.
You will need the following tool:
- Dielectric screwdrivers in the set, so that among them there is a model with PZ, PH and straight slot.
- Stripper for removing insulation.
- Pliers, round nose pliers of different sizes.
- Nippers (side cutters).
- Hacksaw for cutting metal.
- Tester, or maybe a multitester.
- Construction knife with removable blades.
- A screwdriver with a set of bits or a set of screwdrivers.
Apartment board (SchK)
Such designs can most often be used in apartments. They allow you to replace floor panels. Its purpose is practically no different from floor panels, but there are a couple of exceptions.
ShchK
With the help of an apartment switchboard, you can turn off the power in your apartment at almost any time. Also, with its help, in the future you will be able to turn off the electricity in any room of your house. Secondly, power meters are rarely installed in such structures. Sometimes such a problem can cause a lot of litigation between you and the company that services your home.
Shields IP31 and IP54
These are the same shields, but with some protection from external factors, most often water and dust. They look exactly the same as regular ones, but are more expensive due to additional sealing in the form of anthers, etc. Most often you come across IP31 and IP54 versions, but there are also IP30, IP41, IP65 enclosures. A visual sign that explains the specific values of the IP protection degree is available on StabExpert.ru.
An example of a distribution wall panel from Schneider Electric ShchRN-P-4 with a degree of protection IP65.
Wiring diagram
Experienced electricians can assemble a panel without a diagram, since they remember it by heart. Those who decide to do this for the first time need to study in detail all the connections and elements. Each module has its own designation, rating and protection class.
If you plan to connect an electrical panel in old houses without grounding, then you should note that the PE bus will not be shown in the diagram.
Due to voltage surges, insulation breakdown may occur. To prevent household appliances from being damaged, the circuit should be broken in time. This is done using a voltage control relay. It is also indicated on the diagram.
Double-pole RCDs help avoid electric shock from voltage leaks, even if there is no grounding. This is especially true for rooms with high humidity.
Panels for apartment buildings have a more complex design. Each apartment has not only single-phase, but also three-phase appliances.
Thanks to the diagram, assembling the shield becomes easier and faster. In some cases, they provide a transcript and explanations of its elements. It is glued to the inside of the housing cover. And if the diagram is not useful, then in the future it will help another master service the shield.
What is required to assemble an electrical panel in an apartment?
To assemble a complete electrical panel in an apartment, you will need:
- Electrical wiring project.
- Suitable place to attach the shield.
- Assembly diagram of an electrical panel in an apartment.
- Selecting a suitable housing.
- Selection of optimal components.
- Correct installation.
- Proper connection to the electrical network.
In order for the equipment to operate safely, deviations from the electrical panel diagram in the apartment and installation errors are unacceptable. Otherwise, all household appliances, and even the home itself, will be at risk.